Top quality exact replica watches with free shipping worldwide and world class customer service.


I. Moving Monsters

Monsters And Walls

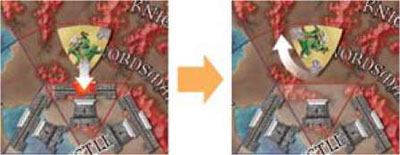
  • When a Monster moves from the Swordsman ring and a Wall is present between the Swordsman ring and the Castle ring, the Monster attacks that Wall.

    The Wall is then removed from the board, and the Monster that attacked the Wall takes 1 point of damage. If the Monster still has points remaining, that Monster stays in the Swordsman ring until the next Move Monsters phase, as shown below.


  • If two or more Monsters move from the Swordsman ring to attack a Wall at the same time, the Wall is removed and 1 Monster (players' choice) takes 1 point of damage. The others are unharmed. All remaining Monsters stay in the Swordsman ring until the next Move Monsters phase. …


La Granja may be played solitaire, especially to learn key mechanics. All rules are in effect with the following exceptions.


Setup

  1. The components of one player plus the player markers of a second color are required (to be used for the "neutral player").

  2. Use 5 dice.

  3. Use turn order markers 2 and 3. Shuffle them (hidden) and draw one marker; place a player marker on the space in the center of the market that corresponds to the number drawn. The player marker of the neutral player is put on the other hexagonal space in the center of the market. …


The Events in Detail:


3x Pilgrimage

When the "Pilgrimage" event is drawn, you may not recruit Monks this round. Pilgrimage is the only event that is not triggered in Phase 6: "Event", but in Phase 5: "Actions".


3x Income

You receive a number of coins equal to your Development Status.


3x Harvest

You must pay 1 food item (grain, cheese, or wine). Return the paid food item to the Goods Market. If you cannot pay the food, pay 5 coins instead. If you cannot do this either, you must undergo torture (see below). …


Once players are comfortable with the rules of the game, they should use the complete setup rules. To do so, proceed through the following steps in order:

  1. Define Play Area & Setup Area: Clear a 3' x 6' play area. Then, establish a 3' x 4' setup area by using the length of the range ruler to place the setup area markers 1' from the short edges of the play area. The players sit across from each other on the 6' edges of the play area. …


When a player stops his Ship on a Harbor on the map he takes the Harbor marker if there is any.

All the Harbor marker the player owns are put beside the player himself. Only the last marker taken is the active one, the others are placed face down. A marker stays active until a new marker is taken or the player's Ship stops at an empty Harbor (so the player has no active markers at all).

There are 6 kind of Harbor markers. …


Toyotomi Hideyori


Toyotomi Hideyori was the son of Toyotomi Hideyoshi, the warlord whose death led to the Sekigahara campaign. He was 7 years old when the war took place.

The Toyotomi Hideyori disk is placed at Osaka castle. If it is destroyed, the regent is captured and the game ends in a Tokugawa victory. As such, it is the last unit lost in any siege of Osaka castle.


Sanada Masayuki


Sanada Masayuki defended Ueda castle with tenacity and creativity, delaying a force of 38,000 under Tokugawa Hidetada (Ieyasu's son). As a result of the prolonged siege, the younger Tokugawa missed the climactic battle of Sekigahara by several days. …


The School of Architects: Introductory Level

The rules for two players are identical to those used for solitaire play, with the following exceptions:


Setup

Place the Champion of the Oniverse card nearby.


Game Play

Each player builds her own castle.

You may not directly place a drawn Defender tile into your partner's castle. You may, however, donate a drawn Defender tile to your partner.

To do so, you must destroy a tile in your own castle (you may not destroy a tile that has other tiles above it, nor may you destroy a tile that would split your castle into two separate structures). …


Age III

In the full game, Age III is a full age like Ages I and II. After resolving the end of Age II, shuffle the Age III civil and military decks and place them on the current age board as the new current age decks. The game continues for another age.

Age IV is the game-ending age. This works like the game-ending age in your first game:

  • When the Age III civil deck runs out, Age II cards in hand are discarded, Age II leaders, unfinished wonders, and pacts are removed from play. Each player loses 2 yellow tokens. Age IV begins. It has no current age decks.
  • If Age IV begins during the first player's turn, it is the last round. Otherwise, the following round is the last round.

Age III Wonders

Age III wonders have a one-time effect that is resolved as soon as they are completed. You score a certain number of culture points based on your other cards and workers in play. …


These are a couple of variants that we have thought of which you can try in your games.


All-in Variant

Instead of the normal setup, take all the Location Cards (both basic and special) and shuffle them together. This will be the Location Deck from which you will draw.

Take the bottom 20 cards from that Deck (without looking at them) and set them aside. These will play the role of the unused Special Locations.

This speeds up the setup process, but it makes the game less predictable since nobody will know how many copies of each Basic Location Card will appear. …


Before The First Game

Gently remove the cardboard tiles from their sheets. Attach the 'child' stickers on the underside of each villager figure.

  • Place the game board in the center of the table.

  • Sort out the building tiles according to the number on the back of each tile.

    The building tiles with a '1' should be sorted according to building type and placed face up next to the game board.

    The tiles with '2' on the back should be placed face down and mixed, and then placed as a stack face down near the game board. Mix and stack the tiles with a '3' on the back in the same way. …