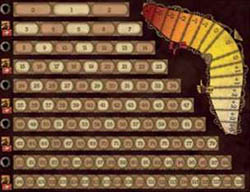
Map Tiles
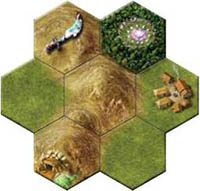
Map tiles represent the land that the Heroes are exploring.
Each tile consists of seven hexagonal spaces. Before the game, the Map tiles should be separated by their reverse sides:
Starting Tile (two-sided)
The starting tile is two sided. Each side displays a magic portal and a coastline - the coastline is different on each side, and defines the shape of the map for a given game.
The spaces which represent the sea cannot be occupied by Heroes. For the first scenario, we will need the side marked by a small "A" in the lower corner.
Countryside Tiles (green Back)
There are 11 tiles representing the less developed countryside of the land. For the first scenario, they are not revealed randomly. Sort them by the number in the lower corner and create a face down pile with number 1 on the top.
- When playing with two players, remove the three tiles that are at the bottom of the pile and return them to the box.
- When playing with three players, remove two tiles from the bottom of the pile.
- When playing with four players, do not remove any tiles.
Core Tiles (brown Back)
These 8 tiles represent the most developed part of the land, with big cities and advanced challenges. Four of them contain a city in their center, four of them are non-city tiles, but they all have the same reverse side.
To prepare this scenario, separate non-city and city Core tiles into two piles, and shuffle each of them. Randomly take one city and two non-city tiles, and shuffle these three together. Put the Countryside (green) pile on top of this pile.
Thus, you have one pile of tiles, and the city you are looking for will be somewhere in the last three on the bottom of the pile.
Initial Position
Reveal the first two tiles 1 and 2 and add them to the starting tile A according to the diagram.
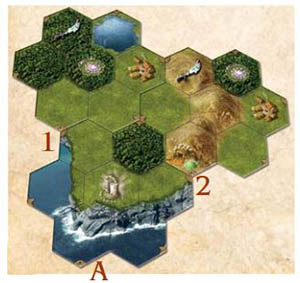
Note: Tiles have symbols in six of their corners. If a tile is placed correctly, these symbols connect with like symbols on neighboring
All tiles should be oriented in a way so that their number is in the same direction as the letter A on the starting tile.
These three tiles form the starting area of the map - the magic portal, some villages, a mine, etc. During the game, players will reveal other parts of the map, adding more tiles.
Note that there is a coastline on the starting tile. Imagine this coastline extends indefinitely along both sides, forming the border of the map. No tiles may be placed behind this coastline. Thus, during the game, the map will look like the diagram to the right.
Take into account the expanding size of the game map when placing the first tiles to allow for enough free space on the table in the directions the map will be expanded.

Enemy and Ruin Tokens
There are tokens representing various things on the map: round tokens for enemies and monsters and hexagonal tokens representing the content of ancient ruins. At the start of the game, sort them into seven face down piles and randomize them.
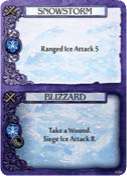
First Rampaging Enemies
With the initial setup of the map, there are two "Orc Khan" symbols. Draw two tokens from the pile with the same symbol on the reverse and put them, face up, on the marked spaces.
Enemies rampaging the land - Marauding Orcs and Draconum:

Monsters living in dungeons and other dark places:

Units garrisoned in keeps, mage towers and cities.
Tokens representing what is hidden in the ruins:

Deed Cards
The term "Deed cards" refers to the different types of cards that can become part of a player's decks during the game. All Deed cards have identical card backs, so that they will be indistinguishable when shuffled together.
At the start of the game, different types of Deed cards are in different piles, so they need to be sorted by their front side. We
strongly recommend players place these piles exactly as shown in the Setup diagram. Once you get used to this layout, you will have no problem locating any required pile, even though they have identical card backs.
The types of Deed cards are as follows:
Basic Action Cards

Each Hero has his own starting deck of 16 Basic Action cards. They are marked with his Shield symbol in the upper right corner.
Each player's set of Basic Action cards is the same, except one card has been replaced by a unique card in each deck.
The art for this card shows a portrait of the Hero that the deck belongs to. For all purposes, this card is treated like any other Basic Action.
Advanced Action Cards
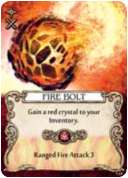
There are 28 Advanced Action cards. They are stronger than the Basic Action cards. Over the course of the game, these Advanced Action cards are gained and added to a player's deck.
You can distinguish Advanced Actions from Basic Actions by the golden frame around the text and the lack of any icon in the upper right corner.
Please note that some Advanced Actions will not be used in the first scenario. You should only use cards numbered 1 through 16 for this first game; cards 17 through 28 should be removed from the deck and returned to the box.
Shuffle the cards you are using and create a face down pile. In other scenarios you will be using all of the Advanced Action cards.
Spell Cards
Spell cards represent powerful Spells a player can learn during the game.
They have a violet frame and are separated into top and bottom parts, each with different names. The lower part represents the ultimate version of the spell that can only be cast during Night Rounds.

Artifact Cards
Artifacts are the most powerful items a player can gain during a scenario.
have a gold frame and text box, and two different effects. The effect written on the darker portion of the text box represents an ultimate one-time power that destroys the Artifact after use.
Wound Cards
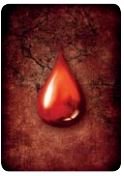
Wound cards are used to mark Wounded Units and also go into a player's hand when his Hero is Wounded.
Wound cards count towards a player's maximum Hand limit, so taking too many Wounds will clog up your hand and make it harder to take an effective turn. All Wounds have an identical dark red front side, so you can place them as a face up pile on the table.
Terminology Note:
Whenever any text refers to an "Action" card, it is referring to both Basic and Advanced Action cards.
Whenever any text refers to "any" or "a" card, it is referring to Action, Spell or Artifact cards, but never a Wound card unless stated explicitly. Thus, the term "discard a card" means discard any Deed card except for a Wound card.
Other Cards
Other card types can be clearly distinguished by their reverse side:
Regular And Elite Unit Cards
There are two decks of Unit cards, Regular Units (with silver card backs), and Elite Units (with gold card backs).
In the first scenario, we will only need the regular (silver) ones. Shuffle them and place the pile face down on the designated spot. Leave the Elite Units in the box.
To create the Unit offer, reveal as many Regular Unit cards as there are players, then add 2 more (e.g. for a 4 player game, reveal 6 Regular Units), as depicted in the Game Setup diagram.
Note: For the first game, there should be at least one Unit in the offer with the village icon  on the left side of the card. If not, shuffle the cards and deal them until this is true.
Tactic Cards
There are two decks of Tactic cards: Day Tactics and Night Tactics.
Sort them by their card backs. Put the Night Tactic cards in a face down pile next to the Day/Night board, and the Day Tactics in the center of the table.
You do not need to shuffle them.
Site Description Cards
There are seven two-sided Site Description cards. They depict all the map locations, and briefly describes all the rules related to that site.
As soon as a new site is revealed for the first time, fi nd the corresponding card and read what that site means and the options it offers to the players. The Site Description card remains on the table, so every time a player considers visiting the site, it is available for easy reference.
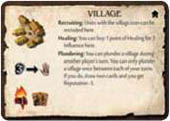
At the start of the game, find the cards for the sites that are in the starting area of the map: Village, Magical Glade/Crystal Mines (on the same card) and Marauding Orcs. They will help you when explaining these locations.
City Cards
There are four City cards, one for each city. You do not need them for the first game - return them to the box.
Achievement Scoring Card

This summarizes the end game scoring rules. You do not need to show it to the players now, it is better to explain once they have played at least one Round of the game.
Magical Glade
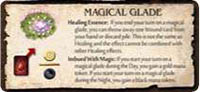
The Magical Glade has two effects:
-
Healing Essence
If you end your turn here, you can throw away one Wound card from your hand or from your discard pile. Note that this is not regular healing - you cannot use it to heal Units. However, it does allow you to search your discard pile for a Wound card - which is not possible with regular healing.
-
Imbued With Magic
If you start your turn here, you get a gold mana token. Take a token from the bank. You have to use it before the end of the turn, or it disappears.
At Night, you take a black mana token instead. You will learn what they are for when the first Night comes.
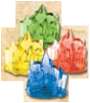
Crystal Mines
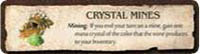
Mines are easy to use - if you end your turn on a mine, you get a crystal of the corresponding color (green in the case of mine that is revealed now). Put it in your Inventory. Note that this happens after you announce the end of your turn, so you can't use the crystal this turn.
You can get more crystals if you stay on a mine for consecutive turns.
Note: you can't have more than 3 crystals of the same color in your Inventory at a time.
Also note that if you announce the end of Round, you do not play your turn, and you get nothing from the mine, neither can you throw away a Wound on a Magical Glade.
Players
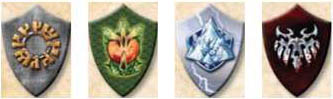
There are four Heroes in the game. Each of them has his own Shield symbol; all the components for that Hero are marked with this symbol.
For your first game, a player may take whichever Hero he likes, or just distribute them randomly. He takes all the components relating to his Hero.
We recommend storing all components belonging to one Hero, including his deck of Basic Action cards, in one plastic bag. If playing with less than four players, return the unused components back into the box.
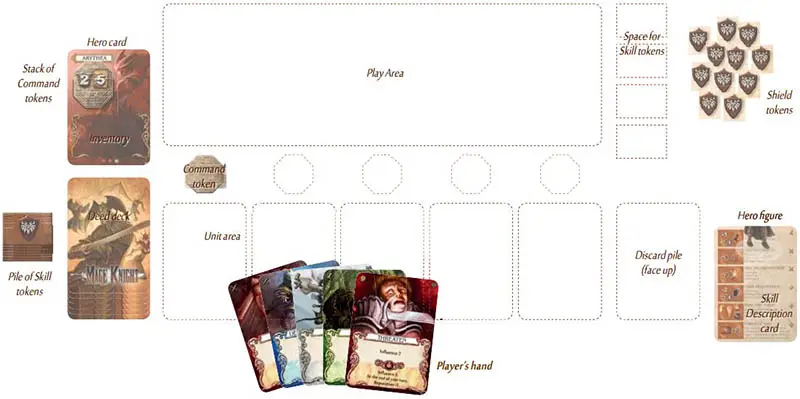
Hero Card
The card with the Hero portrait lays in front of the player for the entire game to help identify who controls which Hero.
It also works as that player's Inventory - during the game, a player stores his Level tokens and any crystals he gains here. See the Mana section for more details.
Figure
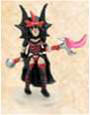
The game figure represents your Hero in play. At the start of the game, it is in front of you on the table - the Hero has not entered the map yet. On your first turn, place it on the portal space and you can start to explore the map.
Round Order Token

Each Hero has a Round Order token. These tokens show the order in which players take turns during the Round. For now, randomize them and place them in a column to the left of the Day/Night board.
Level Tokens

Each Hero has six octagonal Level tokens, marked with his symbol on the reverse side. Five of them have a small pair of numbers, 1-2, 3-4, 5-6, 7-8, 9-10, on the bottom.
Sort them by these numbers in a face up pile, so the token marked 9-10 is on the bottom, and the token marked 1-2 is visible on the top of the pile. Place the pile on the marked area on your Hero card. The sixth Level token has an empty front side. Put it in your Units area with the symbol side up. This will be your first Command token.
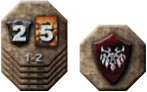
A Level token with the symbol side up is called a Command token, and it represents your Command limit - at the start of the game, you only have one Command token, so you can only control one Unit.
The top token of the Level pile shows your Hero stats - Armor of 2 and Hand limit of 5. These are your stats for Fame levels 1 and 2 (as indicated by the "1-2" on the bottom of the token).
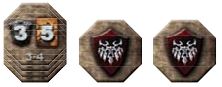
When you gather enough Fame to progress to level 3, you remove the top token from the Level pile, flip it over to the symbol side, and put it next to your first Command token. Your Command limit increases to two (you have two Command tokens now, so you can command up to two Units), and also your Hero stats change (you revealed the tile marked "3-4", which indicates a higher Armor).
Shield Tokens

Place your Shield tokens in a pile. During the game, two of them will be used to show your position on the Fame and Reputations tracks, and the rest will be used to mark your successes on the map - fortified sites you have conquered, adventures you have completed, and in later scenarios, your participation in conquering a city.
Skill Tokens
Each Hero has his own set of 10 Skill tokens. These represent the natural directions his talent may develop. Randomize them and place them in a face down pile.
Skills Description Card
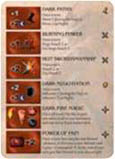
The two-sided Skills description card depicts all the Skill tokens of a Hero, and describes how to use them. Keep it somewhere close, you will need it once you advance to the second level and gain your first Skill.
Deed Deck
As described in the Deed Cards section, each player has his own deck of 16 cards. Shuffle them and place them on a face down pile - they form your Deed deck.
Then, draw five cards from your Deed deck. This is your starting hand. Note the number of cards in your hand is one of the Hero characteristics that is depicted on your top Level token. Once you advance to level 5, your Hand limit increases to 6.
Player Area
The following diagram shows how the player area should look before the game begins.
Note: The Deed deck is the face down pile to the left, with space for a discard pile far to the right (to prevent mixing these two piles together). Between them is the Units area, the space for recruited Units (the number of Unit slots is determined by the number of Command tokens you have).
The Play area is where the player plays his cards and effects during his turn. The Skill pile on the left side contains Skills not in the game yet - once the player gains them, he puts them to the right.
Fame and Reputation Board
Fame Track
The larger track shows a players' current Fame. Each row represents one Fame level.
At the start of the game, all players have 0 Fame - they put one of their Shield tokens on the 0 space of the Fame track. They are on the first row, so they are of the first Fame level.
Whenever a player gains Fame during the game, he moves his Shield token along this track by the given number of spaces. If the token moves to the next row, the player's Fame level increases. (To progress to Fame level 2, a player needs to gain at least 3 Fame; to progress to Fame level 3, a player needs a total of 8 Fame, etc).
At the start of each row, there is either a Skill token or a Level token depicted. When a player progresses to a row marked with a Skill token, he is rewarded with one Skill token and one Advanced Action card (additional explanation later). If his token progresses to a line marked with a Level token, he flips his top octagonal Level token into a new Command token, increasing his Command limit and Hero stats.
The Skill token and Level token lines alternate, so on every even numbered Fame level the player gains a new Skill and Advanced Action, and on every odd numbered level his Command limit and Hero stats increase.
Reputation Track
The smaller track, in the right upper corner of this board, is the Reputation track. While your Fame rises all the time, your Reputation can both rise and fall - it depends on whether you gain your Fame through noble deeds, or by conquering and pillaging.
At the start of the game, all players put one of their Shield tokens on the central space of the Reputation track - local people have no opinion of them. When doing noble deeds (such as killing Orc Marauders and Draconum that terrorize the land), a player's token progresses towards the brighter area. When acting violently, the token progresses toward the red area.
Your reputation affects the influence you have with local people.
Day/Night Board
The two-sided Day/Night board shows whether it is Day or Night. For this scenario, it starts with the Day side up and remains like this for the entire first Round. Then, when the Round ends, it flips over to the Night side.
The empty area on the right side of the board is called the Source. We will talk about it later when discussing mana.
Night / Day Rules
There are two changes in the Move costs of terrain: At Night, it is more difficult to travel through forests. So beware, it is not good to be surrounded by deep forests when a Night Round starts.
On the other hand, it is easier to travel through deserts at Night. If you want to cross large deserts, it may be advantageous to position yourself to do so at Night.
Visibility
During the Day, you were able to see what is at a ruins location anywhere on the map, and also what enemies defend keeps and mage towers if someone was close enough (see the corresponding chapters above).
Ruins tokens are placed face down at Night, and stay face down until someone moves onto its space (or when the next Day Round begins). You can still decide whether to enter them or not after the ruins token is revealed.
However, you do not know who or what defends a keep or mage tower until you assault it. Sometimes it may be better to wait until Day, when you will have more information. (This does not apply to cities. They never sleep and are revealed when adjacent, even at Night. But we do not care about cities for now, since we are only concerned with finding them, not conquering them).
You also still see rampaging enemies. In fact, you do not need to see them - you can just listen to what horrified villagers say about their malicious attacks.
Magic
During Night, gold mana cannot be used, even if it is produced by some means other than the Source. Gold dice in the Source are depleted.
On the other hand, black mana can be used to power the stronger effect of Spell cards. See Revealing a Mage Tower - Casting Spells on page 14. At night, black mana does not work as a wild card like gold mana during the day.
Mana
There are four basic colors of mana in the game, each related to one element.
 Red is the energy of fire, its domain is flames, destruction and rage.
 Blue is the energy of water, its domain is frost, magic and crystals.
 Green is the energy of earth, its domain is nature, protection and healing.
 White is the energy of wind, its domain is spirit, speed and mind.
Mana of basic colors can exist in its unstable pure form, or it can be crystallized to a more stable form and stored as crystals.
Special Mana Colors
There are also two special colors of magic. These exists only in an unstable pure form, they can be never crystallized and stored.
 Gold is the energy of sun. It can only be used during Day, but it can be used as mana of any basic color (thus it can be thought of as a mana "wildcard").
 Black is the energy of darkness. It can only be used during Night, and it has no power by itself - instead, it amplifies the power of basic mana colors, allowing the most powerful spells to be cast.
Gold mana makes it easier to cast spells during the Day, while black mana allows for the most powerful spells to be cast at Night.
Mana Tokens And Crystals
Take all the mana tokens and create a bank of them, in an accessible place on the table. There are 12 tokens in each of the four basic colors (red, blue, green and white) and 3 in each of the special colors (gold and black).
Mana tokens represent pure mana unless the token is in a player's inventory where they represent crystals instead.
Whenever a card or other effect tells a player to gain a mana token, this is placed in front of a player in his Play area. It can be used at any time during his turn, but if he does not use it, the mana disappears at the end of the turn.
If a card or other effect says to gain a crystal, then a mana token is taken from the bank and placed in the player's Inventory on his hero card. Crystals in a player's Inventory can be turned into mana of the corresponding color at any time during his turn - the player just removes one from his Inventory and then he can use it as a mana token. A player may not turn mana tokens into crystals unless a card or effect specifically allows him to do so.
Note: This is the reason why there are only a few gold and black tokens - while the tokens of basic colors may be stored in a player's Inventory for several turns or even Rounds, gold and black mana exist only during a player's turn. At the end of his turn, the player returns them to the bank, making them available for other players.
Three crystals per color: High concentrations of crystals become unstable, so a player is not allowed to have more than three crystals of the same color in his Inventory at a time.
If you are about to gain a crystal of a color that you already have three of in your Inventory, you gain a mana token to your Play area instead. Thus, your Inventory can never contain more than 12 total crystals - up to three of each basic color.
Mana Dice

There are seven mana dice included in the game. Each mana die has six sides, each showing one of the six colors of mana. Play with as many dice as there are players, plus 2 (e.g. use 6 dice in a 4 player game etc)., roll them, and put them in the open area on the Day/Night board. This area and the dice in it are called the Source.
At the start of each Round you reroll the dice into the Source. At least half of them should show a basic color (red, blue, green or white). If they don't, keep rerolling all the black and gold dice (together) until this condition is met.
Keep any unused dice next to the mana token bank, they will be used whenever a card tells you to roll a die.
The dice in the Source represent a common pool of mana, omnipresent in the world and available to all Heroes. Each turn, a player may use one mana die from the Source as a mana of the corresponding color. If he does, he rerolls that die and returns it to the Source at the end of his turn, to be available for other players. Unless a card or effect says otherwise, players are not allowed to use more than one die from the Source each turn.
Thus the colors of mana in the Source change over the course of a Round. Black mana cannot be used during the Day; If a mana die is rolled back into the Source and it comes up black, no one can use it, and it is not rerolled. This is referred to as a depleted mana die - to make this clear, place it in the darker part of the Source area.
Note that there may be some black (depleted) mana dice at the start of the Round. Whenever a player rolls black, another die is depleted. As the Day Round comes to an end, it may happen there are very few or even no mana dice available in the Source (the Night is coming).
When the Day Round is over, Night begins - all dice are rerolled, forming a completely new Source for the Round. Since it is Night, gold mana cannot be used and thus gold dice are set aside as depleted.
Continue Reading