For all their ferocity, zombies are dumb as dirt. You pretty much know what they're gonna do. Unless there's a necromancer around, of course. That's when you've gotta be smarter. A determined group, even a small one, can hold the stupid hordes at bay. Just keep careful, keep quiet, and strike without mercy, cause you sure won't get any from them.
Once the players have activated all their Survivors, the Zombies play. Nobody takes their role; they do it themselves, performing the following steps in order:
Step 1 - Activation
Each Zombie activates and spends its Action on either an Attack or a Move, depending on its situation. Resolve all the Attacks first, then all the Moves. Each Zombie performs either an Attack OR a Move with a single Action.
Attack
Each Zombie in the same Zone as Survivors performs an Attack. A Zombie's Attack is always successful, does not require any dice rolls, and inflicts one Wound. Survivors in the Zone share the Wounds in any way the players prefer, even if it means inflicting them all on a single Survivor.
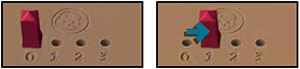
After any applicable Armor roll, the Wound Bar's tracker is moved one point higher per Wound received. A Survivor is eliminated as soon as his Wound Bar reaches 3. Remove his miniature and discard his Equipment.
Feeding Frenzy! Zombies fight in groups. All Zombies activated in the same Zone as a Survivor joins the Attack, even if there are so many that it would be overkill.
EXAMPLE: A group of seven Walkers is in the same Zone as two Survivors. Six of them would be enough to kill both Survivors, but the players decide to allocate all Wounds on the same Survivor. Your name will be remembered, pal!
Armor Rolls
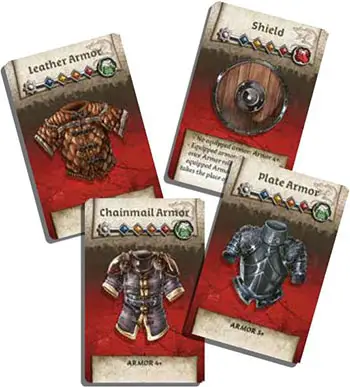
Armor: Survivors wearing an armor Equipment card on the Body slot can execute Armor rolls to avoid Wounds. Roll as many dice as the number of Wounds the Survivor is about to receive. Each die result that equals or exceeds the Armor number of the armor card negates a Wound. A lucky Survivor could even choose to endure all Wounds for his team and get out without a scratch!
Shield: A Hand-held Shield allows Armor rolls if the Survivor isn't wearing actual armor. If he is wearing armor, the Shield allows re-rolling its Armor rolls once. Re-roll all the dice, and the new result takes the place of the previous one. In some cases (with a 5+ Leather Armor, for example), the Shield could offer a better Armor value than the armor itself: the Survivor may choose to use the Shield's Armor value instead, but then he won't be allowed a re-roll.
Wounds inflicted by Abominations, as well as being eliminated by a Dragon Fire, can't be prevented by Armor rolls.
Move
The Zombies that have not attacked use their Action to Move one Zone toward Survivors:
-
Zombies select their destination Zone.
First is the Zone with Survivors in Line Of Sight that has the most Noise tokens. Remember, each Survivor counts as a Noise token.
If no Survivor is visible, they move toward the noisiest Zone.
In both cases, distance doesn't matter. A Zombie always goes for the noisiest meal he can see or hear.
-
Zombies move 1 Zone toward their destination Zone by taking the shortest available path.
In case there are no open paths to the noisiest Zone, Zombies move toward it as if all doors were open, though locked doors still stop them.

EXAMPLE: A group of four Walkers, one Fatty, and three Runners move toward a group of Survivors. The Zombies can take two routes of the same length, so they split into two groups.
Two Walkers go one way, the other two take the other route.
The Fatty joins one group of Walkers, and a second Fatty is added to the other group.
The three Runners also split, two joining the first group, and the other joining the second group. Another Runner is added to the latter group so that the groups remain even.
Things just got a lot harder for the Survivors.
IMPORTANT: Necromancers use their own Movement rules. They always Move toward the nearest non-Necromancer Spawn Zone.
Playing Runners
The ones we call "runners" use their predatory instinct and unnatural speed to compensate for their lack of judgment. They can tear a man to shreds in seconds, so act accordingly. Keep your trusty crossbow ready, and don't let any of them get close to you.
Runners have two Actions per Activation. After all Zombies (including the Runners) have gone through the Activation step and resolved their first Action, the Runners go through the Activation step again, using their second Action to Attack a Survivor in their Zone or Move if there is nobody to attack.
EXAMPLE 1: At the beginning of the Zombies' Phase, a group of three Runners and a Fatty is one Zone away from a Survivor. For their first Action, since they have nobody they can Attack in their Zone, the Zombies Move into the Zone with the Survivor. The Runners then perform their second Action. Since they now occupy the same Zone as a Survivor, they Attack. Each of the Runners inflicts one Wound, killing the Survivor.
EXAMPLE 2: A Runner is in the same Zone as a Survivor, and a Walker is in the adjacent Zone. The Runner Attacks the Survivor with its first Action, inflicting a Wound, and the Walker Moves into the Zone, since he sees the Survivor. Then the Runner performs its second Action. It Attacks the Survivor again, inflicting a second Wound.
EXAMPLE 3: A Survivor stands in the same Zone as three Walkers, two Fatties, and two Runners. All the Zombies Attack and inflict seven Wounds (three Wounds are enough to kill the Survivor). None of the Zombies Move, as they all Attacked. Then the Runners resolve their second Action. They have no one to Attack, so they Move one Zone toward their next meal.
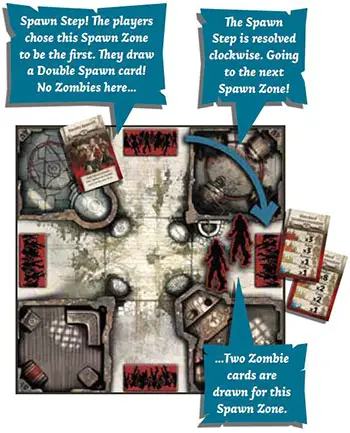
Step 2 - Spawn
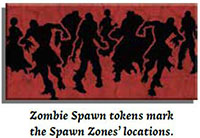
The Quest maps show where Zombies appear at the end of each Zombies' Phase. These are the Spawn Zones.
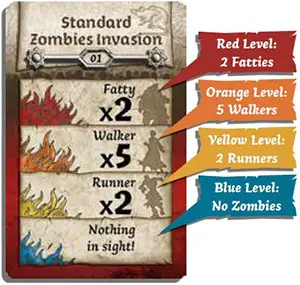
Indicate a Spawn Zone and draw a Zombie card. Read the line on the card that corresponds to the color of the Danger Level of the most experienced Survivor still in the game (Blue, Yellow, Orange, or Red). Place the number and type of Zombies shown.
Repeat this for each Spawn Zone. Always begin with the same Spawn Zone and continue clockwise. When the Zombie deck runs out, reshuffle all the discarded Zombie cards to make a new deck.
EXAMPLE: Ann has 5 experience points, placing her in the Blue Danger Level. Clovis has 12, which puts him in the Yellow. In order to determine how many Zombies spawn, read the Yellow line, which correspond to Clovis, the most experienced Survivor.
Colored Spawn Zones
Some Quests feature blue and/or green colored Spawn Zone tokens. Unless otherwise stated, their Zone doesn't spawn Zombies until a specific event (like taking an Objective of the matching color) happens and activates them.
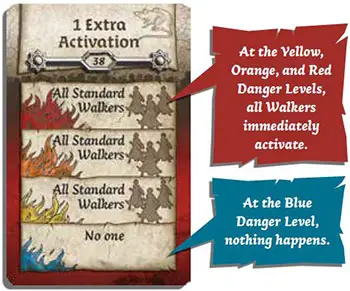
Extra Activations Cards
When you reveal an Extra Activation card, no Zombies appear in the designated Zone. Instead, all Zombies of the indicated type immediately get an extra Activation (see Activation step, page 23). Notice that these cards have no effect at the Blue Danger Level!
Double Spawn Cards
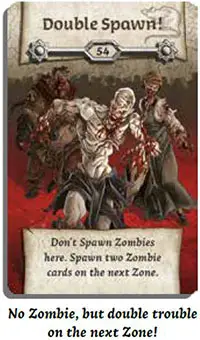
When you draw a Double Spawn card, no Zombies appear in the designated Zone. The next Zombie Spawn is resolved by drawing two Zombie cards instead of one for the next Spawn Zone (if drawn during Spawn Step) or building Zone (if drawn when spawning in a building).
These Zombie cards are drawn together and resolved in drawing order. If one of them is another Double Spawn card, resolve the standard Spawn card first, then the Double Spawn card.
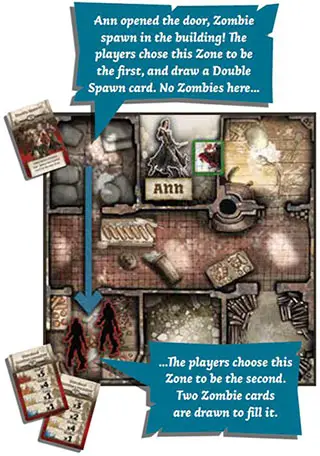
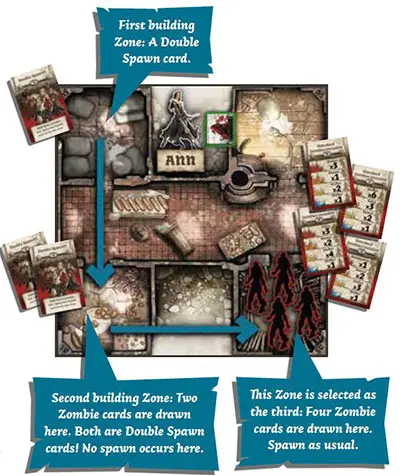
If another Double Spawn card is then drawn, apply it to the following Spawn Zone or building Zone.
If you draw two Double Spawn cards on the same Zone, the next Zone receives four cards' worth of Zombies!
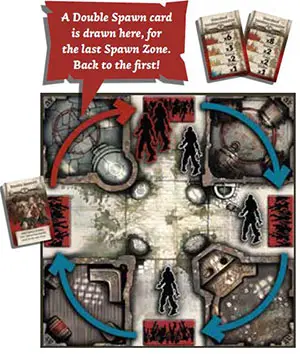
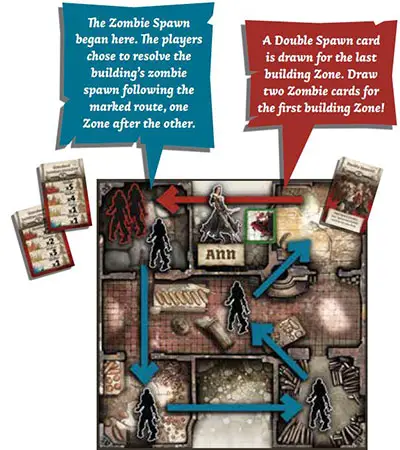
If the Double Spawn card is drawn for the last Spawn Zone or building Zone, use it for an extra double Spawn on the first Spawn Zone or first building Zone (even if you previously spawned Zombies in it!).
If, during this extra double Spawn, you draw a new Double Spawn card, continue on to the next Spawn Zone or building Zone, until you stop drawing Double Spawn cards.
Running Out Of Miniatures
The Zombicide: Black Plague box contains enough Zombies to invade a village. However, players may still run out of miniatures of the indicated type when required to place a Zombie on the board through spawning or populating a building. In this case, the remaining Zombie miniatures are placed (if there are any), and then all Zombies of the indicated type immediately resolve an extra Activation.
Multiple Activations may occur in a row. ^is rule is . especially important to Abominations and Necromancers, as there is a single miniature of each in the Zombicide: Black Plague core box. Under some circumstances, an Abomination or Necromancer may get several extra Activations in a single Game Round.
Several Abominations and Necromancers can roam the board if you own miniatures of them.
Always keep a wary eye on the Zombie population on the board or risk an unexpected Zombie riot!
Necromancers
Being the most evil of all opponents, Necromancers do their best to spread havoc and seize power. They don't have time to battle Survivors on their own, and try to flee as soon as they are discovered. Necromancers follow these special rules:
-
A Necromancer is a Zombie for game purposes.
-
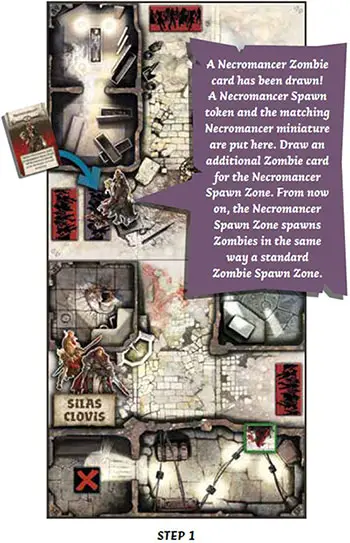
A Necromancer comes with his own infected army. When a Necromancer appears, put an additional Zombie Spawn token (on its "Necromancer" side) on his entry Zone. Then, immediately resolve a regular Zombie Spawn for it. From now on, the Necromancer Spawn Zone is active: it spawns Zombies in the same way a standard Spawn Zone would. Each subsequent drawing of additional Necromancer Zombie cards, no matter the type, gives an Extra Activation to every Necromancer on the board until they flee or die.
The game is immediately lost if a Necromancer manages to escape once there's a total of 6 Zombie Spawn tokens on the board (including the Necromancer Zombie Spawn tokens).
-
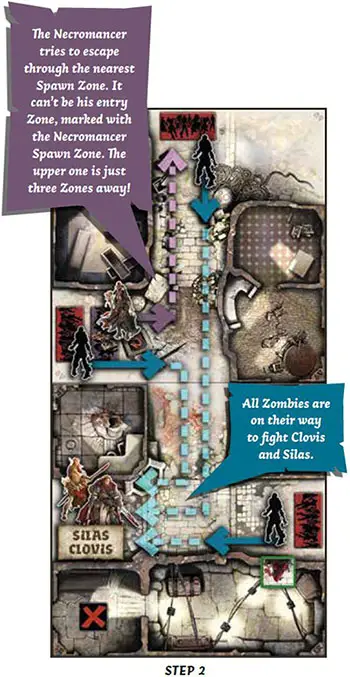
A Necromancer tries to flee the board. If there are no Survivors in his Zone for him to Attack during his Activation (see Zombies' Phase, page 23), he Moves 1 Zone toward the nearest Spawn Zone (NOT his entry Zone), ignoring any Survivors he might see. If several escape Spawn Zones are at the same distance, choose one.
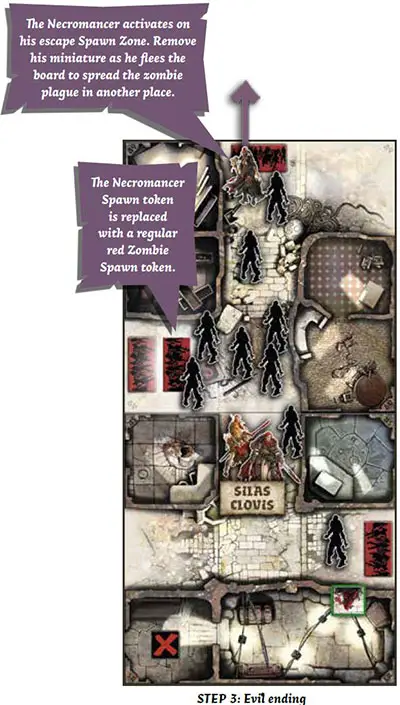
A Necromancer escapes the board as soon as he activates on his escape Spawn Zone. Replace the Necromancer Spawn token it introduced on the board with a standard Zombie Spawn token.
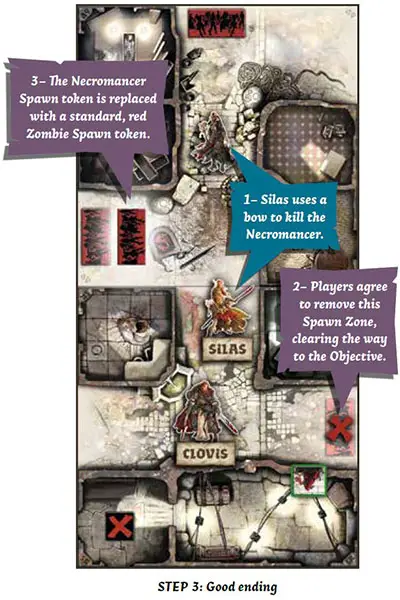
Killing a Necromancer slows the invasion. If you manage to kill it, choose a Spawn Zone (including its own Necromancer Spawn Zone) and remove it from the board. If the Necromancer Spawn token is still on the board after this removal, replace it with a standard one.
In special circumstances, all Spawn Zone tokens may end in the same Zone. In that case, a Necromancer still comes with an additional Necromancer Spawn token, but flees as soon as he activates.
Continue Reading