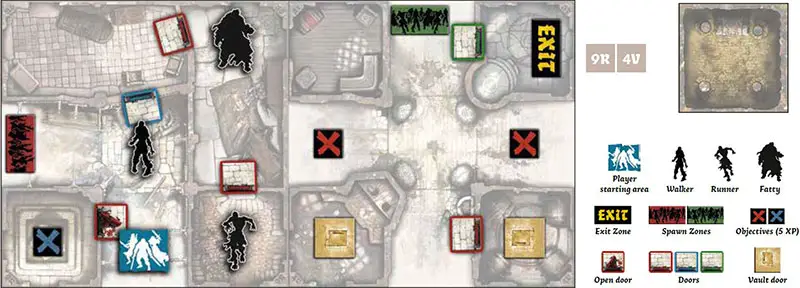
Quest 0: Tutorial: Danse Macabre
Easy / 4+ Survivors / 45 Minutes
War is nothing new for us. Our counts and dukes are always fighting amongst themselves. For the peasantry, it usually just involves a change in taxes and rents, assuming you survive. But this time, the duke and his army went off and were never seen again.
Well, not until the hordes emerged. Pretty sure a lot of the tougher ones came from his troops. Now everything's a brutal mess. Now we're all equals, facing the danse macabre together. There's no time for social snobbery when the hordes are at your door. We stand together, and throw death back in their teeth.
The magician among us is a case-in-point. He used to be the richest of the rich, powerful and influential. Now, he's one of us, holding to life with his fingernails. He's got a magic circle that can spirit us away. Better to escape and counterattack than stand here and get overwhelmed. But, there might be a few souls left to save, and we could all use a better weapon or two. He'll hold it until the last second. Good man that, without his nose in the air.
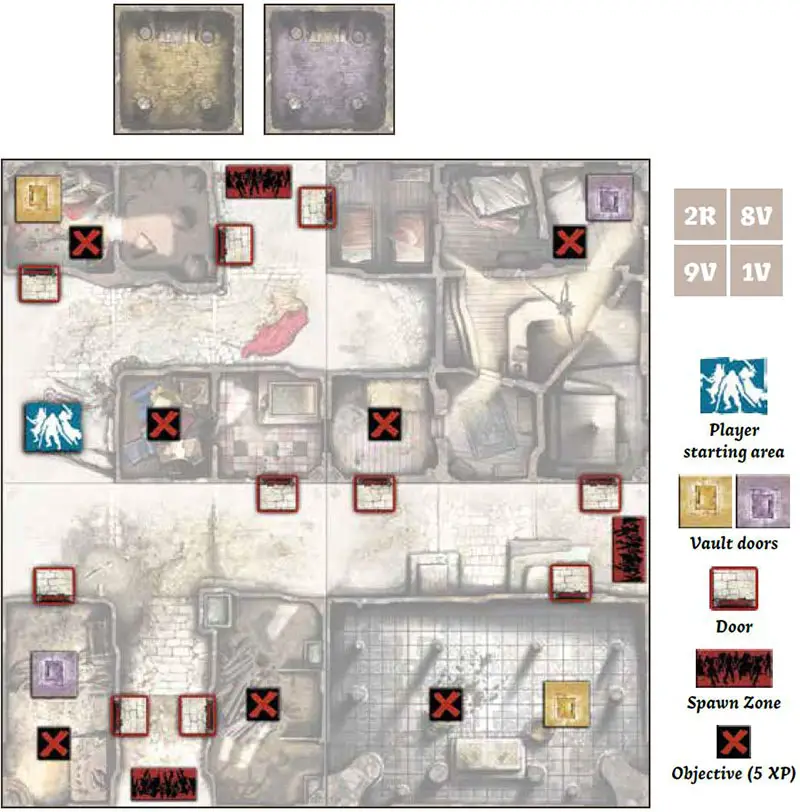
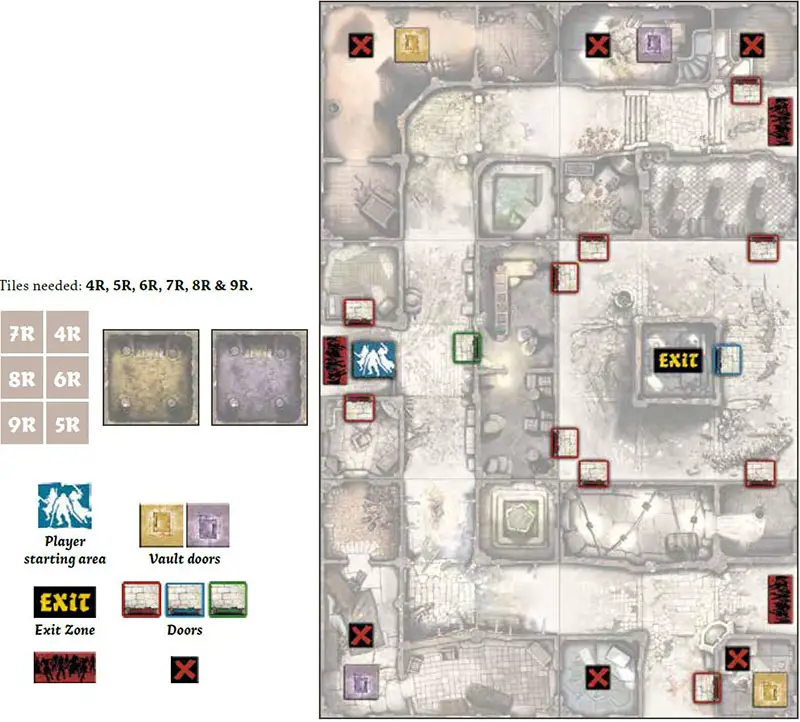
Tiles needed: 4V & 9R.
Objectives
Use the magic circle to teleport to safety. Reach the Exit Zone with all Survivors. Any Survivor may escape through this Zone at the end of his turn, as long as there are no Zombies in it.
Special Rules
-
Setup:
- Put aside the Necromancer Zombie cards.
- Put the green Objective randomly among the red Objectives, face down.
- Put a Walker, a Fatty and a Runner in the marked Zones.
-
I don't think so. Abominations are considered as Fatties when reading Zombie cards.
-
What's this? Each Objective gives 5 experience points to the Survivor who takes it.
-
Doors and keys. The blue door cannot be opened until the blue Objective has been taken. The green door cannot be opened until the green Objective has been taken.
-
We shall pass. The green Spawn Zone is inactive until the green Objective is taken.
Quest 1: Big Game Hunting
Easy / 6+ Survivors / 60 Minutes
We quickly discovered the starting point of the zombie invasion. Other survivors spotted a huge zombie wandering the streets, and some kind of sick wizard directing the horde to engulf us.
It took us two days to pinpoint the Necromancer's location, and understand the Abomination can't be killed by any weapon at our disposal. Let's raid the Necromancer's laboratory and take them both out with a secret brew of our own: Dragon Fire.
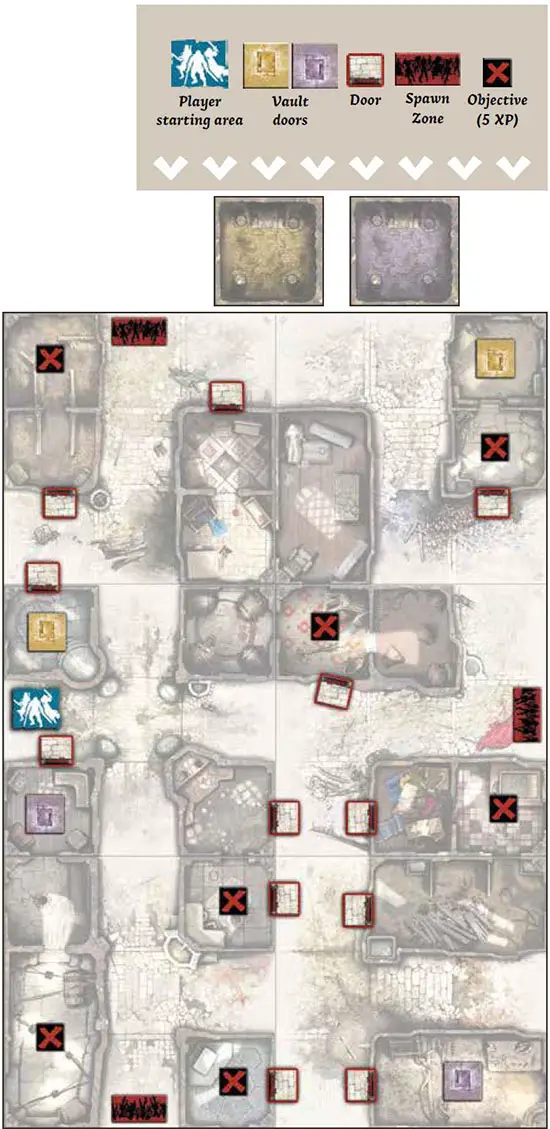
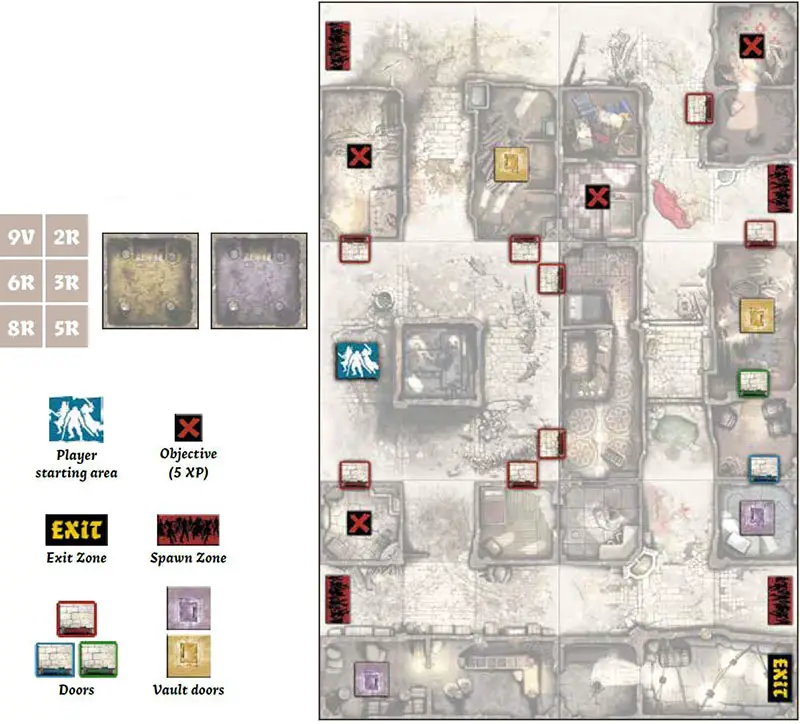
Tiles needed: 1V, 2R, 8V & 9V.
Objectives
Reach these objectives in any order to win the game:
Slay the beast and its master. Kill at least one Abomination and one Necromancer.
Raid the laboratory. Take all Objectives.
Special Rules
-
Setup:
- Put the blue Objective randomly among the red Objectives, face down.
- Put a Vault artifact randomly in each Vault.
Let the hunt begin!
-
Looking for the laboratory. Each Objective gives 5 experience points to the Survivor who takes it.
-
Torch'em! Finding the blue Objective marks the laboratory's location! Immediately spawn a Necromancer in the Zone. If a Necromancer is already on the board, spawn an Abomination instead. If both are already on the board, nothing happens (but you still get the experience).
Quest 2: The Black Book
Easy / 6+ Survivors / 60 Minutes
Now we know. It's not just our village. The zombie plague has spread across the land. What's going on? The Necromancer we killed held notes in his laboratory, most of them referring to a mysterious Black Book and other items of power.
Exploring the surroundings could prove useful to get a better grasp about the threat we're facing. Of course, there are zombies on the way, familiar faces turned to monsters...
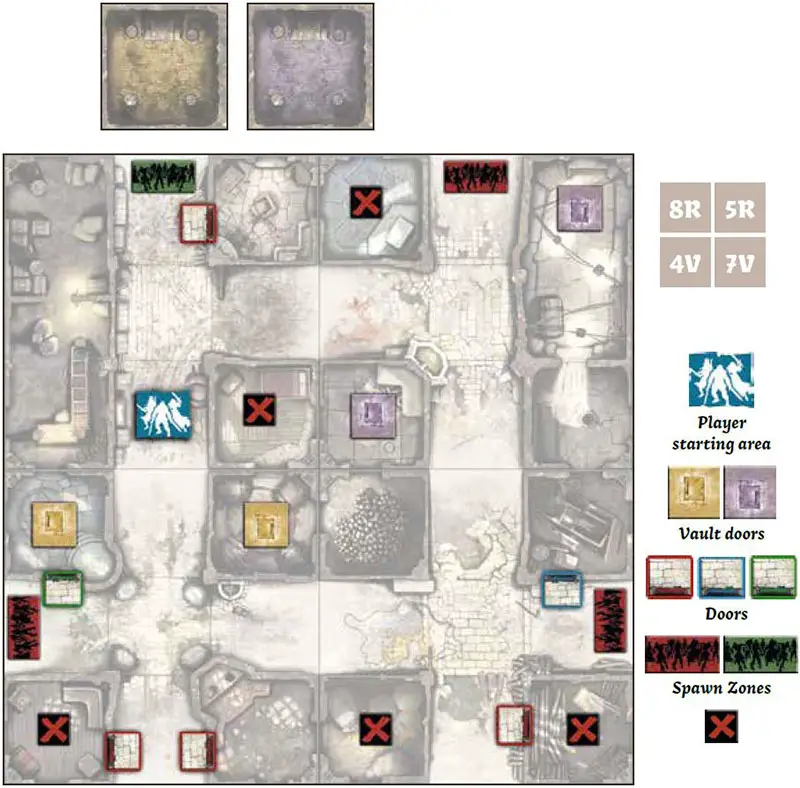
Tiles needed: 4V, 5R, 7V & 8R.
Objectives
Reach these objectives in any order to win the game:
Steal the Black Book. Take the Objective in the central building (tile 8R).
Claim the artifacts. Take both Vault artifacts.
Feel the power. Get to the Red Danger Level with at least a Survivor.
Special Rules
-
Setup:
-
Put the blue and the green Objectives randomly among the red Objectives, face down.
Put a Vault artifact randomly in each Vault.
-
Lost keys opening forbidden doors. Each Objective gives 5 experience points to the Survivor who takes it.
-
What the...? Magic trap! The green Spawn Zone is inactive until the green Objective is taken.
-
Doors and keys. The blue door cannot be opened until the blue Objective has been taken. The green door cannot be opened until the green Objective has been taken.
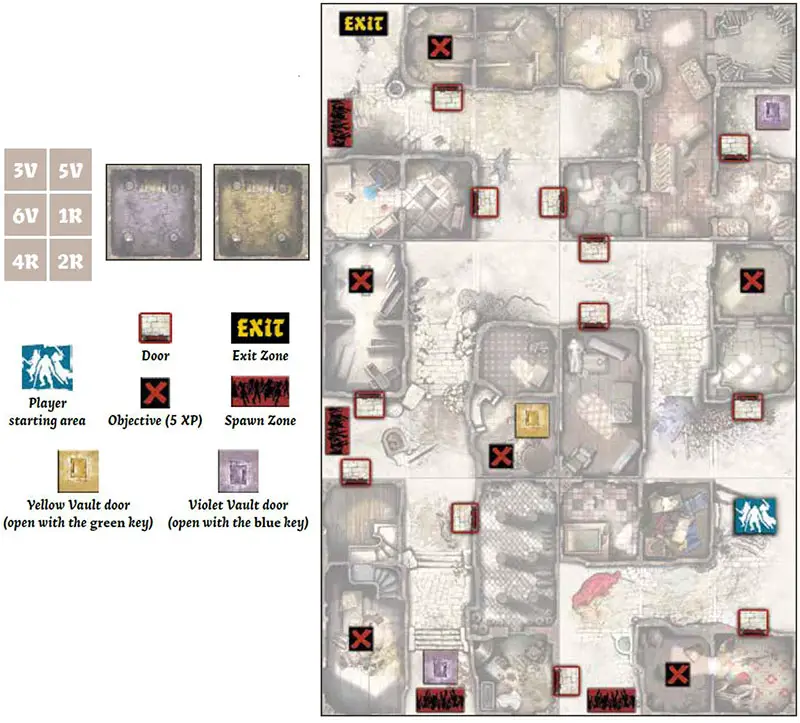
Quest 3: The Shepherds
Medium / 6+ Survivors / 90 Minutes
Necromancers are everywhere. They're spreading chaos and seizing power in the whole kingdom! Against a menace this big, there is almost nothing we could do. Almost.
We know we're good at survival as long as we stand together. Our plan is to reach out and find other survivors to create an army of our own. Four days we've spent,
Spawn Objective traveling to the next village, which is currently under attack, but not completely overrun. Let's get in the fray and help these people!
Tiles needed: 1R, 2R, 3V, 4V, 5R & 9V.
Objectives
Rescue the townsfolks. Keep an eye on them, some may be infected. You win the game when all Objectives are taken.
Special Rules
-
Setup:
- Put the blue and the green Objectives randomly among the red Objectives, face down.
- Put a Vault artifact randomly in each Vault.
-
Hidden folks. Each Objective gives 5 experience points to the Survivor who takes it.
-
These are infected! The blue and the green Objectives mark infected people turning zombies! Earn the experience, then resolve immediately a Zombie spawn in the Objective's Zone.
Quest 4: Famine
Medium / 6 Survivors / Variable
A few days have passed. These zombies are, for the most part, stupid as hell. But they never tire, or need food, or even sleep. Alas, we're all too human. We need food and a secure shelter.
There are many vaults beneath this town. Clever survivors could hole up and rest for a while. But, we still need to gather supplies to last a couple of days while we plan our next move. This war may last far longer than anyone - even the Necromancers - expected.
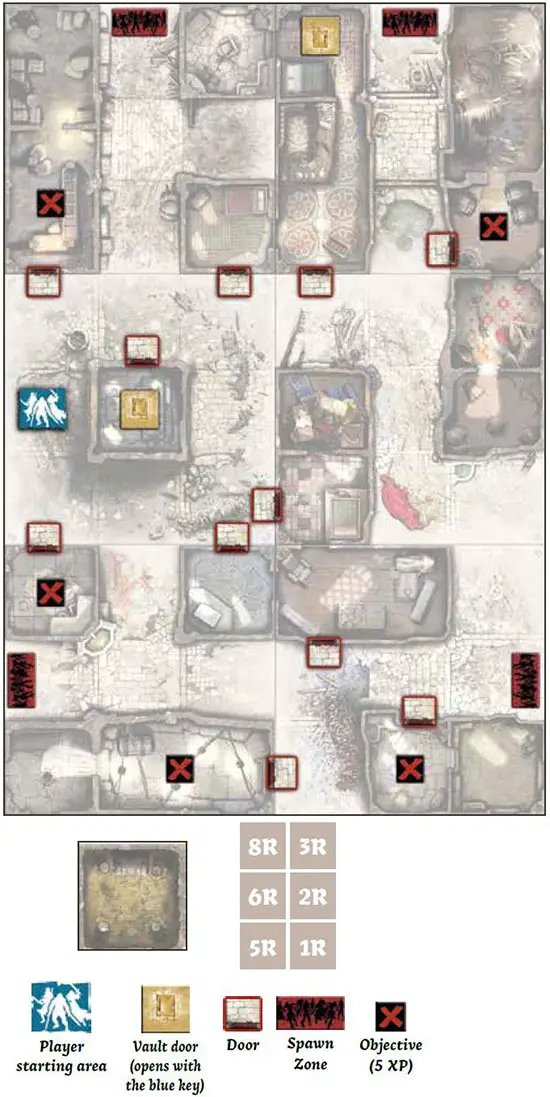
Tiles needed: 1R, 2R, 3R, 5R, 6R & 8R.
Objectives
Reach the objectives in this order to win the game:
-
Find enough food. Gather the following 6 food cards in your team's inventories:
- Apples x2
- Salted Meat x2
- Water x2
-
Lock yourself in the Vault. You win the game when all starting Survivors are in the yellow Vault during an End Phase, without any Zombies with them.
This Quest is played with 6 Survivors. Considering the objectives, the duration can vary.
Special Rules
-
Setup:
- Put the blue Objective randomly among the red Objectives, face down.
- Put a random Vault artifact in the Vault.
-
Candles, clothes, iron tools... Each Objective gives 5 experience points to the Survivor who takes it.
-
keys! Both yellow Vault doors cannot be opened until the blue Objective has been taken.
Quest 5: The Commandry
Medium / 6+ Survivors / 120 Minutes
This capital has been taken. People died by the thousands, but some areas are still unharmed. The Necromancers seem content to battle the nobility in the castle, and leave the commoners corralled for when their zombie hordes need ready reinforcements.
We need a way in, to establish communications with the people still alive. It's also been suggested we learn more about the infection. The Black Book says little on it. If we can learn more, we can plan a bold move to end this.
First we need a way past the city walls. Some survivors we rescued speak of a secret passage beneath the commandry nearby. However, it's guarded. Clearly the Necromancers are aware of it. If we can dispatch the guardians, we can get inside, and get our plan in motion.
Tiles needed: 4R, 5R, 6R, 7R, 8R & 9R.
Objectives
Use the underpass to escape. Reach the Exit Zone with all Survivors. Any Survivor may escape through this Zone at the end of his turn, as long as there are no Zombies in it.
Sepecial Rules
-
Setup:
- Put the blue and the green Objectives randomly among the red Objectives, face down.
- Put a Vault artifact randomly in each Vault.
-
Hidden clues. Each Objective gives 5 experience points to the Survivor who takes it.
-
Reinforced doors. The blue door cannot be opened until the blue Objective has been taken. The green door cannot be opened until the green Objective has been taken.
Quest 6: In Caligine Abditus
Medium / 6+ Survivors / 120 Minutes
W're now in the city, but not as close to the Necromancers as we would like. The area is eerily quiet, and there's desolation as far as we can see. That won't last. As soon as they hear us, they'll be rushing to kill us. We must proceed as stealthily as possible.
Clovis and Baldric both noticed strange Latin writings on some walls. It seems someone here used a network of underground passages to get around town.
And Clovis is right when he says that not everybody knows Latin... Only the highly educated know this language on sight, not to mention being able to write it. It's probably a Necromancer!
Tiles needed: 2R, 3R, 5R, 6R, 8R & 9V.
Objectives
It means "hidden in the darkness". Reach the Exit Zone with all Survivors. Any Survivor may escape through this Zone at the end of his turn, as long as there are no Zombies in it.
speCial rules
-
Necromancers set the scene. What a promise!
- Put the blue and the green Objectives randomly among the red Objectives, face down.
- Put two random Vault artifacts in the yellow Vault.
-
Latin writings. Each Objective gives 5 experience points to the Survivor who takes it.
-
Doors to darkness and death. The blue door cannot be opened until the blue Objective has been taken. The green door cannot be opened until the green Objective has been taken.
Quest 7: Dead Trail
Medium / 6+ Survivors / 150 Minutes
There is no way we can get any further unnoticed. That's good, for my fingers are itching for some zombie bashing, and I was getting tired of walking on tiptoe.
There are dark signs and symbols on the walls here. The necromancers are hanging around. We don't know what kind of ritual they are performing, but we must try to make it fail. Let's see what happens if we destroy these wicked scriptures...
Fortunately, this is the foundry district. These Orc weaponsmiths seem to know their job pretty well. New toys!
Tiles needed: 1R, 2R, 3V, 4R, 5V & 6V.
Objectives
-
Heavy doors. Both violet Vault doors cannot be opened until the blue Objective has been taken. The single yellow Vault door cannot be opened until the green Objective has been taken.
-
Hinder the ritual. Here is the plan. You can achieve the first two objectives in any order.
-
Ruin the ritual. Destroy the impious scriptures by taking all Objectives.
-
Get the artifacts. Get both Vault artifacts. Then, Reach the Exit Zone with all Survivors. Any Survivor may escape through this Zone at the end of his turn, as long as there are no Zombies in it.
Special Rules
-
Setup:
- Put the blue and the green Objectives randomly among the red Objectives, face down.
- Put a Vault artifact randomly in each Vault.
-
Wicked writings. Each Objective gives 5 experience points to the Survivor who takes it.
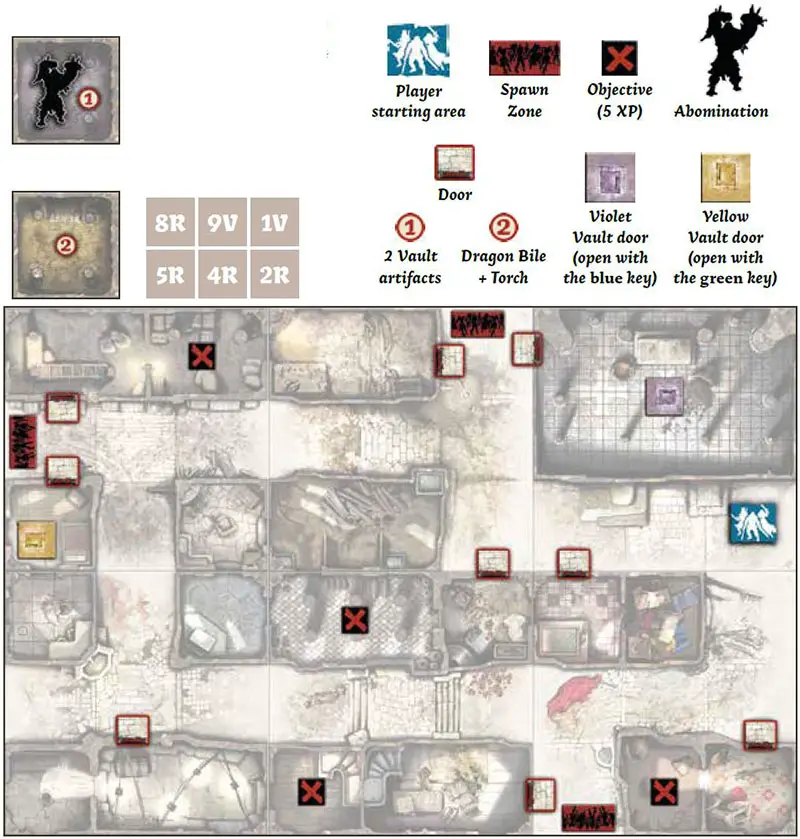
Quest 8: The Evil Temple
Hard / 6+ Survivors / 120 Minutes
This is the center of necromantic power. Cursed idols are everywhere, and a huge Abomination is locked up in the temple. Plus, it seems the Necromancers have figured out how we're dealing with their biggest beasts. Dragon Bile is scarce, and our supplies gone. But, there are vaults here. All the old parts of town had them.
Killing that beast could draw the Necromancers to us. There may be thousands of zombies, but there can't be too many more Necromancers. - Right?
Tiles needed: 1V, 2R, 4R, 5R, 8R & 9V.
Objectives
Exorcism, survivors' style: Zombicide! Take both Vault weapons and kill the Abomination to win the game.
Special Rules
-
Setup:
- Put the blue and the green Objectives randomly among the red Objectives, face down.
- Put aside the Dragon Bile and Torch cards. Set one Dragon Bile card and one Torch card in the yellow Vault.
- Put two random Vault artifacts in the violet Vault.
-
Destroying the cursed idols. Each Objective gives 5 experience points to the Survivor who takes it.
-
Caches. The violet Vault door cannot be opened until the blue Objective has been taken. The yellow Vault door cannot be opened until the green Objective has been taken.
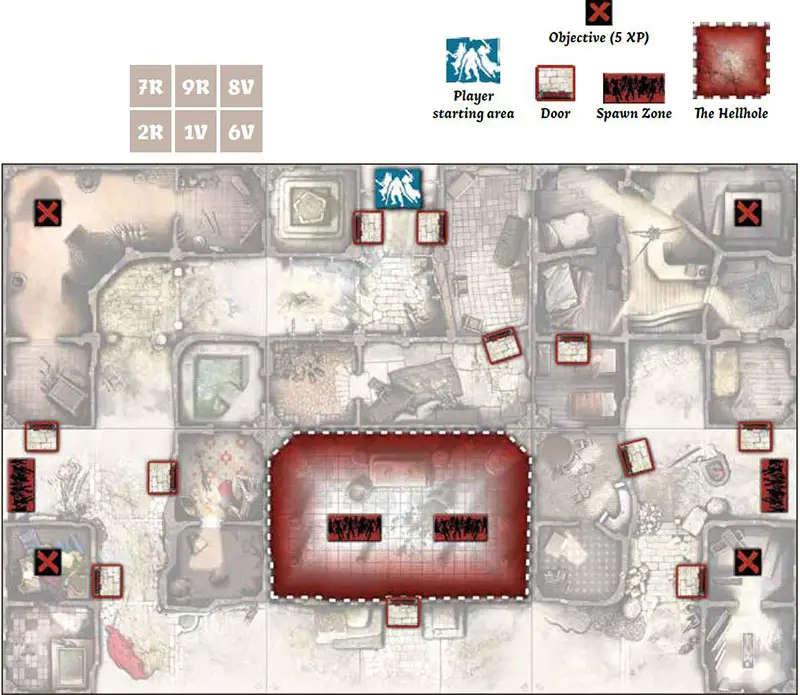
Quest 9: The Hellhole
Hard / 6+ Survivors / 150 Minutes
I think we stumbled upon the place our Duke made his last stand before the town fell. All who sought his protection gathered in the temple, under the protection of the gods, the remaining soldiers and the Duke himself.
It wasn't enough, unfortunately. After a huge fight, the zombies killed everyone. And now, this is a hellhole vomiting zombies. We have no choice but to fight them and destroy this forsaken place once and for all.
Hey, do I see the Duke? Nothing personal, Your Grace!
Tiles needed: 1V, 2R, 6V, 7R, 8V & 9R.
Objectives
Reach the objectives in this order to win the game:
Gather them all in one place... Get all Spawn Zones on the board in the Hellhole, the marked Zone of tile 1V. Check the Necromancer rules.
and call upon a dragon. Create a Dragon Fire in the Hellhole.
Special Rules
That's the way we do alchemy. Each Objective gives 5 experience points to the Survivor who takes it. It also allows the player to look for a Dragon Bile card in the Equipment deck and give it to the Survivor for free.
If there are no Dragon Bile cards in the Equipment deck, look in the discard pile. Shuffle the Equipment deck afterward.
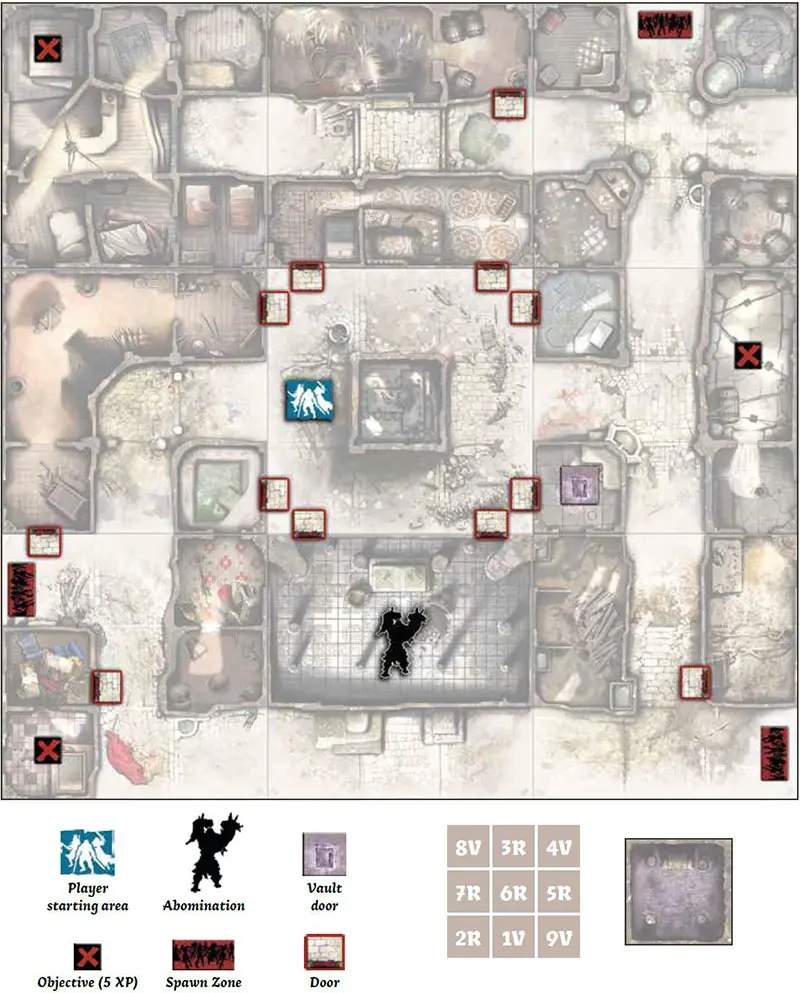
Quest 10: Trial By Fire
Hard / 6+ Survivors / 180 Minutes
We're in the heart of the city, the place where all zombies converged. It seems we're not the first ones to get here. Heroes or mercenaries of some sort tried to clean the place before us, and failed.
However, they locked the most impressive Abomination we've seen so far in a nearby magic school. The beast is trapped and is waiting for someone - or something - to break its bonds. Its roaring / lures every zombie around like a beacon.
And the Necromancers are still nowhere to be seen.
Tiles needed: 1V, 2R, 3R, 4V, 5R, 6R, 7R, 8V & 9V.
Objectives
Slay the monster. Kill the Abomination set on tile 1V.
Special Rules
-
Setup:
-
Put the blue Objective randomly among the red Objectives, face down.
Put aside all Dragon Bile cards. Set them in the violet Vault.
Set an Abomination in the marked Zone.
The north-eastern building Zone has no door on purpose.
-
Three seals. Each Objective gives 5 experience points to the Survivor who takes it.
-
A hero died here. The blue Objective gives a random Vault artifact to the Survivor who takes it.
-
Sealed gate. The violet Vault door cannot be opened until all Objectives have been taken.
Continue Reading
-
-