Players represent alien civilizations that are trading resources and inventing shared technology. Each new technology increases the abilities of all the players, but grants the inventor many victory points.
Players can also invest in colonies to improve their economy or use social converters to turn resources directly into victory points. The objective is to acquire the most points in six turns.
Converters produce resources, ships, and points. The resources are traded with other players to acquire the best possible mix for the next turn, and then are spent to run converters and invent technologies.
Ships are bid on colonies to improve one's income, and to gather research teams. Once a player gives a research team enough resources of a single color, they are funded and invent their technology.
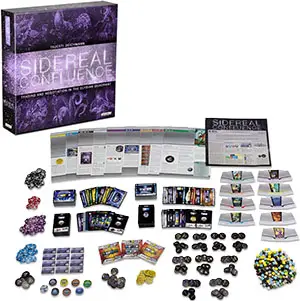
Components
- 390 Cards
- 292 Wood pieces
- Dozens of tokens
- 9 Player sheets
- 9 Race sheets
- Rulebook
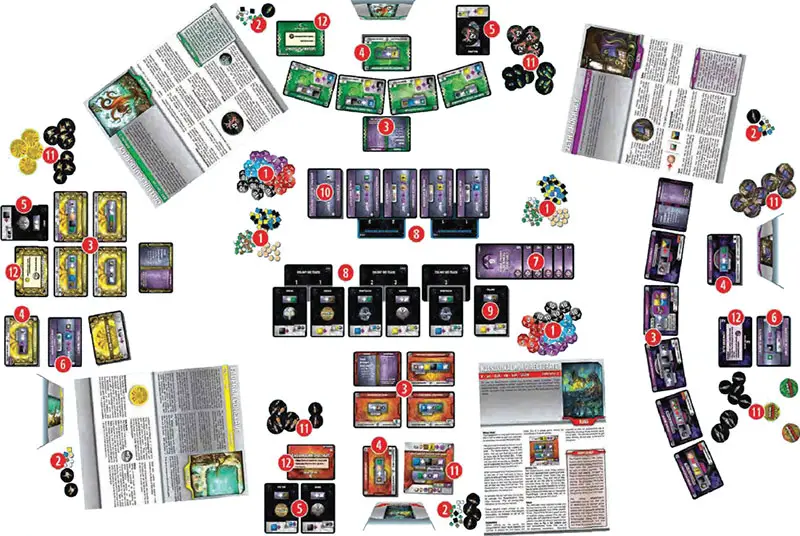
Setup
Put piles of points and resources within reach of all the players.
Select Species
Starting with the least experienced player, each player chooses a species whose play style is the most enjoyable for them. The Kt'Zr'Kt'Rtl, Caylion, Kjasjavikalimm, and Faderan are all good choices for new players.
When a species is taken, take its fact sheet, all starting cards/tiles with its unique background, and its ship tokens.
Player Setup
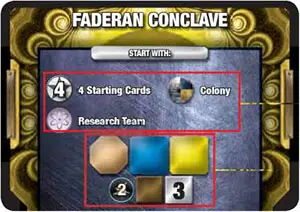
Example of a Faderan starting card:
The Faderan start with one colony, one research team, and four starting cards in play.
The Faderan also begins with one Ultratech resource, one Biotech resource, one Power resource, three Culture resources , one Industry resource, and two Faderan ships.
Each player collects the starting resources and number of ships printed on their species card. 2
The cards with a star on them start in play in front of the player 3. The remaining cards should be kept in a stack for easy access 4. The stack is not shuffled; it is a library of cards that can be looked through at any time.
Shuffle the deck of colonies without looking at them, front side up. Deal one colony to players with the  symbol in their "starting resources" box t. The Kjasjavikalimm will start with two colonies.

Shuffle the era I technologies without looking, research team side up. Deal one to each player with a  symbol in their "starting resources"
 6.

Track Setup
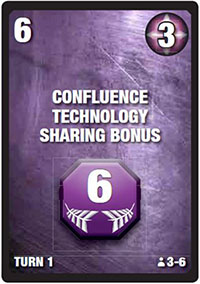
Find the Confluence Technology Sharing Bonus 7, Research Team Bid Track, and Colony Bid Track cards 8 that match the number of players in your game. The number of players the card is meant for is printed next to the  icon.
icon.
Put any remaining cards back into the box. You should have six confluence cards, and as many spots in each Bid Track as the number of players. Note: the Kjasjavikalimm count as two players for the Colony Bid Track.

Deal colonies from the top of the deck to the Colony Bid Track, starting with the lowest minimum bid and working up 9. Put the remaining colony deck near the Colony Bid Track.
Shuffle each era of technology separately. Put the era II below the era I, the IIIs below that, and the IVs at the bottom. As with the Colony Bid Track, deal cards from the technology deck to the Research Team Bid Track starting with the lowest minimum bid and working up 10. Put the remaining technology cards near their track.
Final Setup
Several species have unique components, and all have their ships. Place these within easy reach of their player. 11
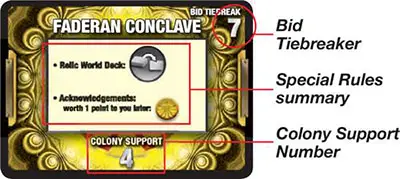
Finally, every player flips their species card so their Bid Tiebreaker and Colony Support is visible 1@. The game is ready to start the first Trade Phase.
Game Play
Sidereal Confluence is a simultaneous game; during each phase, every player acts at once. In order, the phases of a turn are:
- Trade: also, upgrade cards and invent technologies
- Economy
- Confluence: share technologies, bid on colonies, then research teams
Trade Phase
During the Trade Phase, players freely exchange resources, ships, cards, and promises. All agreements are binding: both players must agree as to what is being traded before it happens, and neither can cheat the other by withholding what has been agreed upon.
Trades which involve action later in the turn or on future turns are still binding.
Players can make three-way (or more) binding trades. Everyone involved must agree to everything that is being traded before it happens. This resolves situations where three players each want what the next one has, or where a player only wants to make one trade contingent on another trade going through.
In the rare case that it comes time to fulfill a promise and a player finds that they cannot, that player may instead give compensation to the wronged player(s) that everyone involved agrees to.
If they do not agree to the compensation, the offending player must complete as much of the original agreement as possible, then that player loses points based on what they failed to uphold. For each card, octagon, or point that they could not give, they lose 2 points. For every cube resource or ship they could not give, they lose 1 point. These losses may cause player's score to go negative.

If a player trades away a card with their background on it, it must be returned at the end of the turn. Cards without player backgrounds, such as colonies and research teams, are traded away permanently.
The Trade Phase continues until all but one player is done trading, at which point play should continue to the Economy Phase. Players may immediately invent technologies or use other Trade Phase abilities before running their Economy.
Players may only trade during the Trade Phase. Players should avoid talking about potential future trades except during the Trade Phase.
 Players may invent technologies during the Trade Phase. Those technologies will later be shared with everyone during the Confluence Phase.

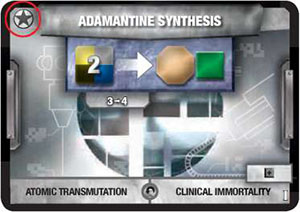
A Player invents a technology by running the violet converter on a research team they control.
To do this, spend one of the two (or three) sets of resources printed to the left of the violet arrow. This produces the printed points, as well as inventing the technology. Don't take the additional points for the Sharing Bonus yet.
Flip the research team over, then find the matching card in your deck of out-of-play cards and put it into play.
Players may run violet arrow converters during the Trade Phase. These converters always involve card manipulation. Usually, they let a player play or upgrade (flip) a card.

Running a violet arrow converter next to this symbol will make the card enter play. This is the only case where a player can run a converter on a card that is not in play.

There are two ways to upgrade (flip) most cards, one on each side of this symbol. If either is used, the card is upgraded. If one way is a violet arrow converter, running it flips the card.
Alternatively, if the name of a different card is printed here, that card can be "spent" to upgrade the first card. Both cards must be in play and in the possession of their owner (not loaned to another player for the turn). To upgrade the first card, flip it over and put the second card underneath it. Each card can only be "spent" to upgrade one card.
 Examples of upgrading cards |
If both Nanotechnology and Genetic Engineering were invented, a player could upgrade Genetic Engineering: they would put their Nanotechnology card underneath the Genetic Engineering card and flip the Genetic Engineering card over to reveal its upgraded version.
If Clinical Immortality had also been invented, they could choose to put it underneath Genetic Engineering instead. The other side of Genetic Engineering is an improved industry called "Genetic Resynthesis".
It isn't Genetic Engineering any more, and can't be used to upgrade a card that could use Genetic Engineering to upgrade, like Nanotechnology does.

Deep Hunting can be upgraded by running the converter on the left, which outputs a point in addition to flipping the card, or by spending Genetic Engineering.
Economy Phase
Colony support is checked at the beginning of the Economy Phase. Any excess colonies are put under the colony deck.

Players may run their economic converters during the Economy Phase. Economic converters have white arrows and are found in the middle of their cards. Each converter can be run at most once per turn.
Players may always choose not to run a converter. Converters with nothing to the left of the arrow can be run without input resources. Colonies Be a common example of this. Negotiation is prohibited during the Economy Phase; players should not speak to each other until everyone is done running their converters.
Economic converters are run simultaneously. As such, the output of one converter cannot be used as the input for another. It is recommended that players first put all resources they intend to spend on the inputs of converters, then take resources from the common pool and put them on the outputs. Finally, return all spent resources to the pool. Handling production this way helps avoid mistakes.
The value of the input and output of economic converters is printed below the converter . That value is measured in small cubes . This is to help players judge a fair trade that involves exchanging cards.

Converters sometimes output "donation" resources, ships, or points, indicated with an outstretched hand and violet outline.
These goods are put in the player's donation area on their summary card. During the next Trade Phase, players must trade away all donation goods. If they do not, they must give them away at the end of the Trade Phase.
Players cannot refuse a gift. Until the items are traded or gifted, they must stay in the donation area, in order to make their nature clear to Che other players.

Donation victory points break the normal rule that points cannot be traded.

Some species have converters that accept or produce wild resources. Those species have specific rules governing what can be c:onsumed or produced. In all cases, small wild resources can only accept or produce small cubes, and large-wild resources do the same with large cubes.
For the Unity and Zeth, wild resources do not have to be the same color. For the Eni Et, all wild resources on a card must match.

Some converters consume colonies with the correct climate icon. Those colonies are discarded front-side- up under the colony deck. The colony deck is not shuffled - it will go through the discarded colonies in the order they were discarded.
If players run out of resource pieces or ships, they can use x5 tokens to consolidate large piles. Player may also produce ships from a different species' pool, if necessary.
Confluence Phase
First, players share all technologies they invented during the previous Trade Phase, and earn points for sharing those technologies.

Each player announces every technology they invented and places them face down in the middle of the play area, splaying them so that their names can be read easily.
For each technology invented, the inventor receives points equal to the current Sharing Bonus printed on the upper-left of a Confluence card. The Yengii instead receive the Yengii Sharing Bonus, printed at the upper-right.
Each player then looks through their deck of out-of-play cards, finds the ones that match the newly invented technologies, and puts them into play. Era IV technologies are unique: they are not shared after they are invented.
Bidding
Once all technologies are shared, the players will bid ships for colonies and new research teams. These are two simultaneous hidden bids to determine the order in which the players can select cards from the two bid tracks. Colonies are resolved first, then research teams.
Before bidding begins, each player announces the number of ships they have, so the other players can consider it while planning. Then, behind their screens, each player secretly divides their ships into three piles: one for the colony bid, one for the research bid, and one of any ships they don't want to spend on bidding this turn.
Any pile can be empty. When each player has decided how to divide their ships, they hide each of the two bids in one of their hands. The third pile is kept hidden behind the player's screen until the bidding is over.
Players indicate that their bids are prepared by putting forth their closed fists - one bid in each of them. Once all players are ready, they simultaneously reveal their colony bid. In order from highest bid to lowest, each player has the opportunity to buy a colony or pass.
If a player chooses to buy a colony, they spend all the ships that they bid, and select a colony. They may not select a colony if its minimum bid is higher than their bid. If there are no colonies a player can buy, that player must pass. Players who pass keep all the ships that they bid for colonies.
Remember that Colony Support is only checked at the beginning of the Economy Phase: players can take colonies even if it would put them over this limit at this time.
Once each player has bought a colony or passed, all players simultaneously reveal their research team bids. Players now get an opportunity to buy research teams or pass, again going from highest bid to lowest. This follows the same rules as the colony bid.
In both bidding rounds, two or more players might tie by bidding the same number of ships. In that case, the player with fewer of the type of card being bid on (colonies or research teams) gets to choose first. If players are still tied, the player with the highest tie-breaker number on their species tile chooses first.
Players may briefly negotiate during the bid phase, although only regarding what is being bid upon. For example, a player may try to convince another player not to take a card they want, in exchange for promises in the future. Nothing can be traded until the next Trade Phase, although all deals are still binding.
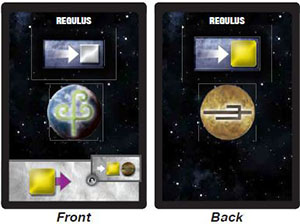
At the end of the bid phase, take all remaining cards with a minimum bid of 1 and put them under their respective decks, front-side face up. Then, slide all cards in the tracks all the way to the left and fill the empty spaces to the right from the top of the research team or colony deck, as appropriate.
Do not flip cards as you draw them: keep them front-side face up.
Ending the Turn
At the end of each turn, players return any cards that have another species' background. The current Confluence Technology Sharing Bonus card is flipped upside down and added to the splay of shared technologies.
The back of that card lists what phases remain in the game so players can plan accordingly. Then, if there are any Confluence cards left, go on to the next Trade Phase.
End of the Game
If there are no Confluence cards left, it is the last turn of the game. During the last turn's Economy Phase, donation points, resources, and ships are kept by the player who generated them.
At the end of the game, resources and ships are worth points. Since only the size of a resource matters for its point value, during the last Economy Phase players generally should not bother producing the exact colors their converters state, only the correct size.
Each octagon, every 2 large cubes, and every 3 small cubes and/or ships are worth 1/2 point. This is half their nominal value, as seen on page 1. Score is tracked down to 1/2 point. There is no tie-breaker.
Players reveal their hidden points. The player with the most victory points wins, having influenced the resulting multi-species society to hold most to their own ideals..

Optional Rules
Timed Trading
With some groups, the Trade Phase can continue on beyond the point where there are any profitable trades, dragging the game out a little.
If this is a problem for your group, you can implement timed Trade Phases: 10 minutes is recommended. Of course, if all but one player feel that they are done trading, the Trade Phase ends sooner.
Handicapping
If a group wants to adjust the strength of a species or a specific player, the easiest way to do this is to add or remove a single small cube from that player's starting resources.
Precise Resource Scoring
At the end of the game, instead of adding up half points, you can treat octagons as 6/12 point, large cubes as 4/12, and small cubes as 3/12. This gives a much more precise score, but takes longer to calculate.
Continue Reading
