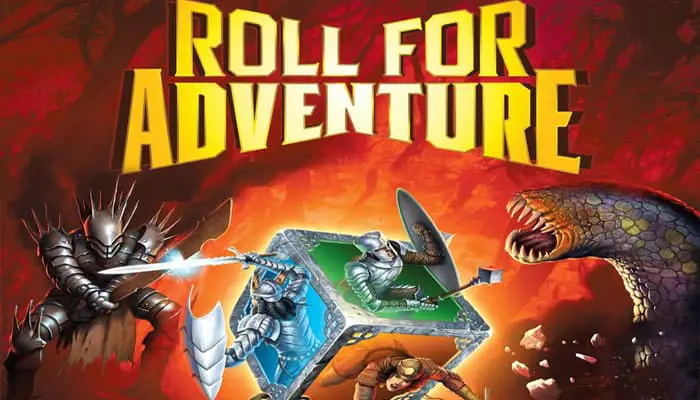
Game Materials
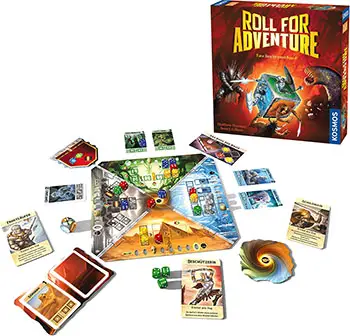
- 4 Game board pieces (double-sided)
- 54 Cards
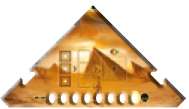
- 1 Vortex of Resurrection
- 20 Hero dice
- 4 Bonus dice
- 8 Power stones
- 6 Barrier tiles
- 4 Skulls
- 1 Territory die
- 4 End-of-game markers
- 10 Hero boards
- 1 Boundary tile
- 4 Adventure boards
- 5 Chain tiles
- 1 Storage chest
- 4 Game board connectors
- 1 Card holder board
Setup
All parts must be carefully removed from their frames before the first game.
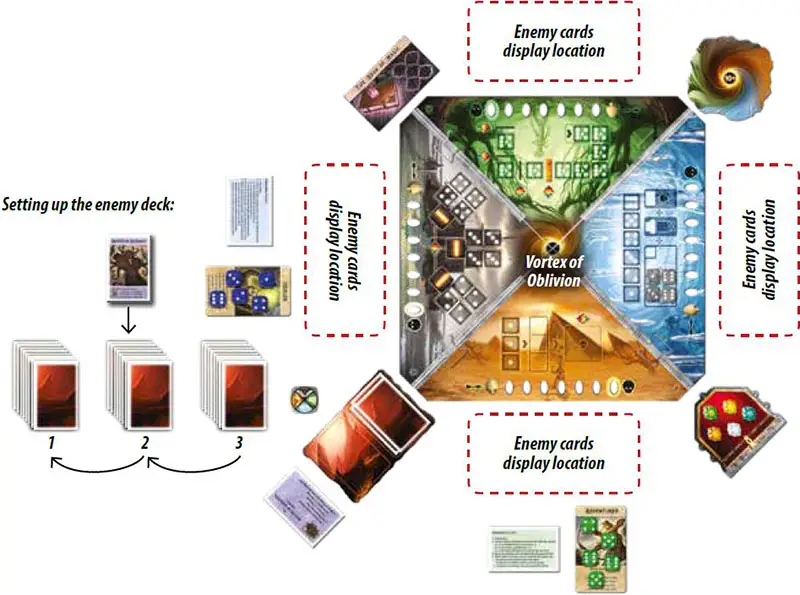
Put the four game board pieces (territories) together in the middle of the table to form the game board and place the matching-color connector pieces between the boards to prevent them from shifting, making sure all territories are on their A-sides (letters in lower right) for your first game.
You will be able to lay out your own territory configurations or play with all of the B-sides facing up in later games; for now use all A-sides.
At each of the four corners of the game board, place the storage chest, the card holder board, the Vortex of Resurrection, and one of the adventure boards.
If this is your first time playing a cooperative game, then you should use the "The Book of Magic" adventure board, with which you will only need five power stones to win. If you have played cooperative games before, use "The Sword of Saints" board, with which you need to gather six power stones to win.
Each section of the game board (territory) has a damage track along the bottom edge. Place one skull in the starting hole of each track. These are the holes on the left side of each territory, indicated by an arrow.
On the fortress territory, place a barrier tile on each of the blank squares below each of the dice spaces.
Note: The other three barrier tiles will not be needed for the A-side territories. These barrier tiles, the five chain markers, and the four end-of-game markers will also not be needed during this first game.
Four-player Game Setup
The boundary tile must be placed on the forest territory on the first boundary line located between the sixth and seventh dice space.
Fill the storage chest with as many power stones as specified by your selected adventure board; i.e., five or six power stones for the first game. You may select any of the colors you wish. It will make no difference in the game.
Take these heroes for your first game, from the ten hero boards available: Adventurer, Fighter, Healer, Warrior
Shuffle these four hero boards face down and give each player a hero or heroine, which will then be placed face up in front of them. If there are less than four players, put the remaining hero boards back in the box.
Note: In later games you can shuffle all ten hero boards and simply draw from them or you can select specific heroes.
Each player receives five hero dice, all of the same color. If there are less than four players, then each player additionally receives the dice of one unused hero color as ally dice: in a game with three players, each player receives one ally die; in a game with two players, each player receives two ally dice.
Any leftover dice go back in the box. Place all of your dice on your hero board. In addition, each player receives a turn overview card in his or her own color for reference during the game. The overview card for "The Master of Shadows Appears" should be placed next to the card holder board.
Place the four gray bonus dice on the large space located on the ice cave territory. Place the large territory die next to the card holder board.
Sort out the special enemy cards from the rest of the enemy deck. There will be: six dragon cards, six phantom cards, six giant cards, and six blank cards. These cards are not needed in the first game and should be returned to the box.
Search for the "Master of Shadows" card from the remaining 25 cards and place it initially off to one side. Thoroughly mix the remaining 24 enemy cards face down and count out three equal stacks; each stack will have eight cards.
Place one stack directly on the card holder board within the designated space.
Shuffle the "Master of Shadows" card face down into the second stack and place this stack on top of the first. And then the third stack is placed on top of the second stack. This completed deck forms the draw deck, subsequently referred to as the enemy deck.
Note: You can add some of the special enemies to this enemy deck in later games.
The player who is determined to be the most heroic is the starting player.
Game Play
1. Roll and place available dice
The active player's turn consists of several dice rolls. At the beginning, the active player rolls all of the dice on his or her hero board. Then the player places at least one or more dice of the same number on any one territory, active enemy, or on the Vortex of Resurrection.
If the active player still has dice available, he or she must roll them again and use them as described above. The player can select the same territory or a different one from before. The player continues this process until he or she has no dice left to place.
Important: The player may not end his or her turn early.
If there are no more spaces available in a territory for a specific die number, then no more dice with this number can be placed there.
You cannot take back any dice that you have previously placed. You only get them back when you complete a subtask or task, defeat an enemy, or free the dice from the Vortex of Oblivion (located in the center of the game board).
Important: If you get dice back during the course of a turn, place them on your hero board and only roll them again at the beginning of your next turn.
Note: Sometimes a player manages to complete a subtask or task alone. But most of the time you should try to work together with the other players over several turns.
Important: You may discuss your actions at any time. If you cannot reach an agreement, then the decision falls to the active player.
2. Revealing the top most enemy card and executing the enemy attack
At the end of his or her turn, the active player reveals the top card from the enemy deck causing a new enemy to emerge and attack immediately.
Important: If a player has no dice at the beginning of his or her turn because the dice have been placed or have been lost to the Vortex of Oblivion, the player still has to reveal the topmost card of the enemy deck.
Play then proceeds clockwise to the next player, who is now the active player.
The Heroes
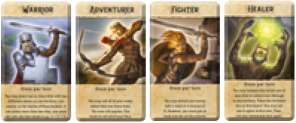
Every player has a hero or heroine card with special abilities. During each turn, the active player may take advantage of his or her hero's ability.
Receiving Power Stones

You can collect power stones by placing the required dice in three territories: desert, fortress, and forest.
Important: If any ally dice are retrieved from a task (in games with two and three players), they are all returned to the active player - regardless of who placed them.
When all the spaces on the adventure board have been filled with power stones, you have all won the game. Congratulations!
The Territories (A-sides)
The Desert
There are three sections in the desert.
As soon as you have filled in the first section with three dice each displaying a one, you have completed a subtask. Then, place one die chosen from those placed on the next section. The other dice are returned to their respective owners.
in the first section there are once again three spaces ready to be filled.
Once you have placed the required dice on the first section three times, there will be three dice in the second section. Choose one die out of these three in the second section and move it to the third section returning the other two dice to their respective owners.
You have now fulfilled the desert task and receive one power stone. You can now begin once more to place dice on the first section and tackle the desert task again.
Important: The die that is placed on the third section will be devoured by the desert and remains on the skull space of the desert territory for the rest of the game.
Example: Player Red has rolled her five dice. She places two dice with a value of one on spaces in the first section. Since there is already one die from /player Blue here, the subtask is fulfilled.
Player Red then moves one of her dice to a space in the second section and returns the remaining placed red die to her hero board and the blue die to player Blue, who places it on his hero board. Then Red rolls her remaining three dice again.
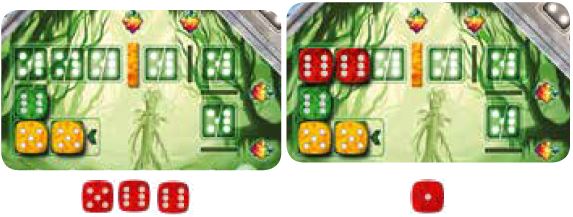
The Fortress
In order to win a power stone at the fortress, you must complete three subtasks. To do this, you must place dice with the values of two, three, and four on the three sections of the fortress and overcome the barriers.
Every subtask is comprised of four spaces that must be completely filled with dice that match the numbers represented in each of the spaces.
When all four spaces of a subtask have been filled, remove the barrier tile below (place it in the storage chest) and return the dice to their respective owners. Only when the barrier tiles have been removed from all three subtasks have you completed the fortress task and can retrieve the power stone.
After you've completed the three subtasks, the barriers will be magically reconstructed: Place the barrier tiles back on the appropriate spaces. You can tackle the fortress task several times in the same game.
If you have placed enough dice in a territory in order to complete a task, then you will receive a power stone. Take one power stone of any color from the storage chest and place it on an empty space of the adventure board. Then return any dice which were used to complete the task in that territory to the appropriate player.
Example: Player Blue has rolled four 3's and one 4. Since there is already one red die on the fortress section showing a three, player Blue adds three of his 3's to it.
This subtask is now complete. The barrier tile is removed. Player Blue and player Red now retrieve their dice and place them back on their hero boards. Player Blue then rolls his remaining dice again.
He is not allowed to use the 4 die on the fortress in addition to the 3 die from the same roll, since only one number represented on the dice during each roll is playable.
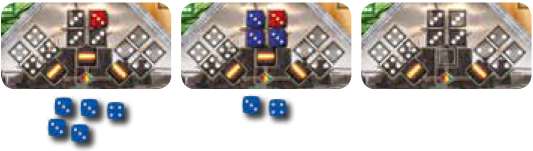
Important: Once a barrier tile has been removed from a fortress section, no dice can be placed there again until all three barrier tiles have been removed.
The Forest
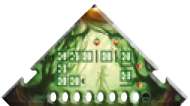
The path leads deeper and deeper into the forest. Every space along this path requires a die with a value of five or six. Starting from the first space (arrow), you will need to place dice all along the path. You can place a five or a six in any order along the path.
When you have placed the dice required to reach the boundary tile, you have completed the first forest task and receive one power stone.
Return the placed dice to their respective owners' hero boards and then move the boundary tile one space deeper into the forest.
To obtain the first power stone in the forest you will need six dice; for the second task, seven; then eight; and finally nine dice are needed to complete the task.
Example: Player Red still has three dice on her hero board. She rolls them and gets two 6's and a 5. Since there are already three dice on the forest path, there are only three more dice needed.
However Player Red may only place dice that have the same value during each roll. She places her two 6's and rolls the remaining die again: it's a 1. She places this die on the desert since it cannot be placed here.
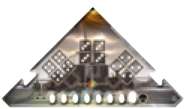
The Ice Cave

You do not receive any power stones in the ice cave. Instead, here you can summon the spirits of your ancestors and receive bonus dice and other benefits from them.
On the ice cave territory there is a row of dice represented in the spaces. Each die is a different number. You can place the dice in any order, on the matching space.
Important: You may only place one die per roll on any open space of the ice cave.
As soon as you are able to position four dice, you must then decide whether you want to receive a reward or continue until you can occupy five or even all six spaces and receive multiple rewards.
Note: The four dice do not all have to be placed together. There can be open spaces left between them.
The Rewards in the Ice Cave:

Four dice: bonus dice
Each player who has placed at least one die of his or her own color on a space in the ice cave will receive a bonus die.
If only one player has placed dice in his or her color, then only that player receives a bonus die, and they only receive one bonus die.
If there are not enough bonus dice left in the ice cave to satisfy the number of participating players, then the active player decides who does not receive a die.
The bonus die is rolled by the active player at the beginning of his or her turn with his or her other dice. You can only use a bonus die once. If you get a bonus die back, it is returned to the ice cave.
Important: If you have used bonus dice in order to complete the task, you may not take those bonus dice back. They are returned to the ice cave.

Five dice: Bonus dice + Defeat one enemy.
In addition to the bonus dice, you may immediately defeat an active enemy.

Six dice: Bonus dice + Defeat one enemy + Reset damage.
In addition to bonus dice and defeating an active enemy, you can immediately remove any damage from any territory and place the skull back in the starting hole of the selected damage track.
The Enemies
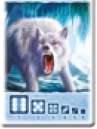
The enemies of the ancient kingdom attack in certain territories depending on what kind of enemy they are.
When the active player has finished his or her turn, he or she then reveals the top card of the enemy deck, leaving the card face up on the deck.
The enemy attack consists of two stages:
-
First, compare the rank (number in the top right corner) of the new enemy card with the ranks of all the other enemies that are face up in all territories. The higher-ranking enemy commands all the enemies of a lower number (i.e., lower rank) to immediately attack their territory again.
Note: This is omitted with the first enemy as no additional enemy is in play.
-
The newly revealed enemy then also attacks. Place it on the matching colored territory. Each enemy of each territory has its own type of attack.
Important: The enemy remains laying there after the attack.
If an attack results in dice having to be removed from a territory, then these dice are placed in the middle of the game board, on the Vortex of Oblivion. These dice are no longer available to the players and can only be freed again later with the help of the Vortex of Resurrection or by specific heroes.
If during an enemy attack, the required number of dice cannot be removed from a territory, then the affected territory is damaged. To record the damage done by the enemy attack, the skull on the damage track in this territory is moved one hole to the right.
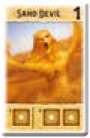
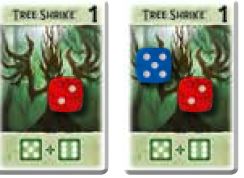
Example: During the enemy attack, a Crypt Spirit is revealed (Rank 2). Therefore, the already active enemies (Sand Devil and the two Tree Shrikes, all Rank 1) attack their territories again.
The Cave Troll (Rank 2) and Black Knight (Rank 3) do not attack because they have the same rank as, or a higher rank than, the Crypt Spirit.
The Enemy's Attacks
After a newly revealed, higher-ranking enemy has commanded all of the active lower-ranking enemies to attack again, the newly revealed enemy also attacks:
Desert Enemy
If a desert enemy attacks, then you must remove one die from the first desert section and place it on the Vortex of Oblivion. Dice on the second or third section are not affected. Only if you cannot remove any dice will the desert receive one damage.
Note: Up to two dice are removed from the B-side of the desert.
Fortress Enemy
If a fortress enemy attacks, then you must remove one die from every fortress section as long as this is possible (therefore, one 2 and one 3 and one 4).
Only if you cannot remove any dice will the fortress receive one damage.
Note: It is sufficient to remove one die from only one section of the fortress in order to avoid damage if there are no dice in the other sections.

Forest Enemy
If a forest enemy attacks, then you must remove one die of your choice with a value of five and one die with a value of six from the forest path as long as this is possible.
If gaps occur, then the dice will be pushed together on the path. Only if you cannot remove any dice will the forest receive one damage.
Note: It is sufficient to only remove one of the dice with a value of five or a value of six from the path in order to avoid the damage.
Ice Cave Enemy
If an ice cave enemy attacks, then you must remove the dice with the highest number from the dice row. If a dice with a 6 is placed here, then it must be removed.
If there is no 6 present, then the 5 is removed and so on. If there are no dice at all on the dice row, then the ice cave receives one damage.
Defeating Enemies
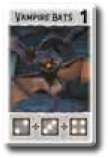
Instead of using dice after a roll in one territory, the active player can use dice of one number to defeat one face up enemy. The player must place dice that have a total value of six or more on it; e.g., a single 6, or two 4's. An enemy can be defeated in a single roll or in multiple rolls - as well as by different players.
Example: Player Red places a 2 on a Tree Shrike during her turn. This is not enough to defeat the enemy. Player Blue places a 5 on the same enemy in a later turn. As there are now dice with a total value of seven, which is greater than the required six, the players have defeated the Tree Shrike.
If an enemy is defeated, then its card is placed face up on the card holder in a discard pile next to the enemy draw deck. This enemy is now out of the game. Return all of the placed dice to their respective owners, who place them on their own hero boards.
Important: As long as an enemy has not been defeated, it can attack again and again. This also applies when there are dice on it as long as its total value is less than six.
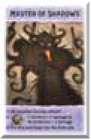
The Master of Shadows Appears
The Master of Shadows was shuffled into the middle part of the enemy deck at the beginning of the game.
If the top card of the enemy deck is revealed to be the Master of Shadows, leave it face up on the enemy deck.
His attack consists of three stages:
-
All enemies already revealed and placed on territories immediately attack their territory again, regardless of their rank.
-
The Master of Shadows then attacks. Roll the large territory die to determine the results:
One Territory: If one of the four territories is rolled, then the Master of Shadows inflicts two damage on that territory.
All territories: The Master of Shadows inflicts one damage on every territory.
No territory: You were lucky! The Master of Shadows does not inflict any damage on the territories.
Important: The territory die only inflicts damage on the territories. Dice that are currently placed on the territories are never removed.
-
Once you have dealt with all of the attacks, shuffle the Master of Shadows card face down into the enemy deck again. The Master of Shadows can never truly be defeated and will always reappear.
Important: Once all the enemy cards have been revealed, the Master of Shadows remains, continuing to attack with all active enemies and inflicting damage to the territories himself, after every player's turn.
Damage
If damage is inflicted on a territory, then you move the skull on the damage track of that territory one hole to the right towards the skull symbol.
If you must put a skull in the last hole of the damage track, then the territory falls to the Master of Shadows. You immediately lose the game (refer to "End of Game").
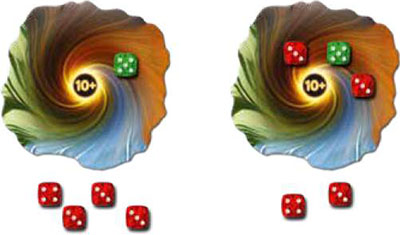
Vortex of Resurrection
Any dice that you must remove from the territories due to enemy attacks end up on the Vortex of Oblivion in the middle of the game board. You can free them from the Vortex of Oblivion with the help of the counter vortex, the Vortex of Resurrection.
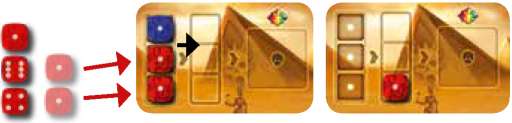
To summon the counter vortex, you must place dice that have a total value of ten or higher on the Vortex of Resurrection.
After rolling, the active player can place any number of dice of the same value on the Vortex of Resurrection.
Important: Placing dice on the Vortex of Resurrection ends a player's turn. Even if he or she still has more dice to use, he or she may not roll or place them in this turn.
If the total value of ten or higher is reached on the Vortex of Resurrection, then all dice are immediately freed from the Vortex of Oblivion in the middle of the game board. Their owners receive their dice back, as well as the dice which were placed on the Vortex of Resurrection.
Bonus dice are returned to the ice cave. Any ally dice go to the active player.
Example: A die with a value of five has already been placed on the Vortex of Resurrection. Player Red rolls three dice with a value of three and one die with a value of four. She positions two of her 3's on the Vortex of Resurrection.
As the sum of 11 has been reached, the players get all of their dice back from both vortexes and lay them on their hero boards.
Since player Red has placed dice on the Vortex of Resurrection, her turn is over. The two dice she has not placed cannot be rolled or placed again.
End of the Game
The Master of Shadows is Defeated
If you have received enough power stones to fill all of the spaces on your initially selected adventure board, then you have defeated the Master of Shadows and you have all won the game.
The Master of Shadows Triumphs
If a skull reaches the last hole of the damage track in any of the four territories, then the Master of Shadows has covered this territory in darkness and you have all lost the game.
You also lose the game if - at the beginning of a player's turn - no player has any dice left at his or her disposal because they are all on territories, enemies, the Vortex of Oblivion, or the Vortex of Resurrection.
Continue Reading
