
When you have played the game a few times and survived a few adventures, you can then choose to play some or all of the B-side territories in the game.
The Desert

When you play with the B-side of the desert, you must try to defeat the giant desert worm.

To set up this territory, you must place the five chain tiles on the corresponding illustrations at the top of the dice spaces.
The active player may place one or more dice with a value of one on any free dice space.
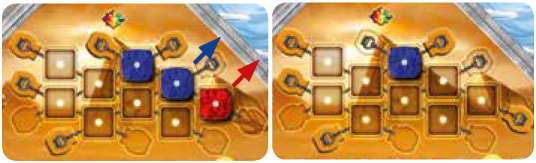
As soon as two, three, or four dice form a continuous connected chain (connecting a chain tile above with an empty chain tile space below), then a subtask is completed. The chain tile shifts from the upper end to the space at the opposite lower end of the connection to complete the task and the chain.
After that, you have to decide if you want to take back some or all of the dice you just used and give them to their owners. If you leave dice, it's easier to make more connections. But you risk losing your dice.
Important: Only the dice in a straight closed connection may be taken back. This is not possible later on.
Example: Player Blue has closed the connection with three dice. He leaves one die, which is part of a not-yet-closed connection. The other two dice are returned to players Blue and Red.
When you have closed all five connections, you have completed the desert task and receive one power stone. Return all the dice from the desert spaces and give them to their owners. Put the five chain tiles back on the illustrations above the desert spaces, you can now attempt this task again during the same game.
Important: If a desert enemy attacks, then you must remove two dice of your choice, if possible, from the desert spaces when using the B-side. Only if you cannot remove at least one die will the desert receive one damage.
The Fortress


When you play with the B-side of the fortress, then you will need to use all six barrier tiles on the yellow framed dice spaces.
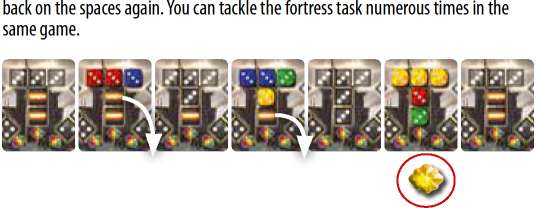
The B-side of the fortress is made up of three sections. As on the A-side, you must place dice with values of two, three, and four to complete the subtasks.
You can receive one power stone in every section. To do this, you will have to overcome the barriers of each section by completing three subtasks.
You must initially place three dice of the same value. As soon as this has been done, remove the first barrier tile (place it on the storage chest) and return the placed dice to their respective owners.
The next subtask of this section requires that you place four dice of the same value. Once completed, the next barrier tile will then be removed and the placed dice are again returned to their owners.
In order to finally receive the one power stone, you must then place five dice of the same value on this section. If you have achieved this, then you will receive one power stone.
Once completed, the barriers will be magically reconstructed: Place the barrier tiles
Important: You can work on more than one section simultaneously, though you risk losing more than one die then.
The Forest
When you play with the B-side of the forest, you will have to place dice with values of five and six like on the A-side.
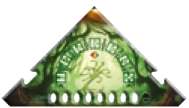
However, you will now place dice starting at both ends of the curved path.

Place the boundary tile below the arch during game setup.
When you start on the right-most space, you must place a die with a value of five. All dice continuing the path from the right must have a value of five. When you start on the left-most space, you must place a die with a value of six.
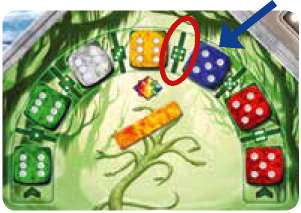
All dice continuing the path from the left must have a value of six. You start paths from both sides and they meet somewhere in the middle. When all of the spaces in the arch are filled, you have to then place the boundary tile on the boundary area located between the two dice values that completed the path.
To do this, you must sacrifice a rolled die that has a value matching what is shown on the boundary area by placing it on the Vortex of Oblivion. Then you may place the boundary tile and receive one power stone.
Following completion of the forest task, return all of the placed dice to their respective owners and put the boundary tile back below the arch. You can tackle the forest task numerous times.
Example: Player Blue has closed the curved path. However a die with a value of four is still needed. This must be placed on the Vortex of Oblivion in order to set the boundary tile between the blue and yellow dice and fulfill the forest task.
The Ice Cave
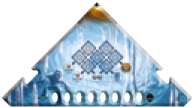
As on the A-side, you do not receive any power stones on the B-side of the ice cave. Here, you summon the spirits of your ancestors to receive various benefits.

The four bonus dice are placed on the storage chest before the game.
The active player may place one die of any value on any available dice space during a roll.
Important: If a die is placed either horizontally or vertically adjacent to an already placed die, then the new die must show a different value.
No dice of the same value may be adjacent to each other; however, this is allowed diagonally.
Following the placement of a die, if there is now a continuous line of two or three dice, you must decide whether you want to receive the corresponding reward and withdraw the dice.
Or you may leave the dice as they are placed in order to complete more tasks and receive multiple rewards at once. By leaving the dice placed in position, it will be easier to complete more continuous lines, as one dice can count for two lines. However you also risk losing those dice.
Note: As on the A-side, an enemy attack will remove the dice with the highest value. If there are multiple dice with this value, then you may select the one you need to place on the Vortex of Oblivion.
The rewards in the ice cave:

The active player receives two bonus dice from the storage chest, if there are any present.

You may immediately defeat any enemy in play.

The active player may free any one die from the Vortex of Oblivion and return it to its owner.

You may reset a skull by one and/or two holes in any territory.
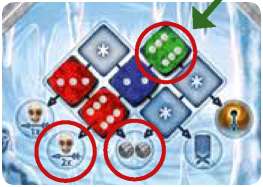
Example: Player Green places a die completing a second line. She then decides to receive the rewards from both lines.
This gives player Green two bonus dice and the ability to move the skull back two holes on any one territory.
Continue Reading
