Components
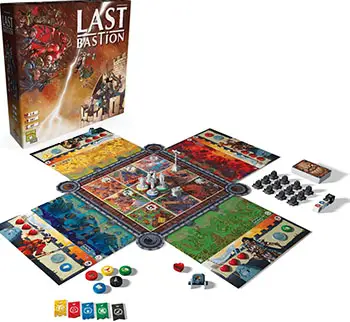
- 8 Hero figures
- 4 bases
- 8 Hero boards
- 64 cards
- 4 monster boards
- 9 bastion tiles
- 4 enclosure tiles
- 15 figures
- 47 tokens
- 5 dice
- 1 scoresheet
- 1 power description booklet
- Rulebook
Object of the Game
The players take the roles of heroes who are defending an ancestral Bastion against the Monstrous hordes of the Baleful Queen. To claim victory, the heroes must vanquish the Warlord leading this army.
Setup
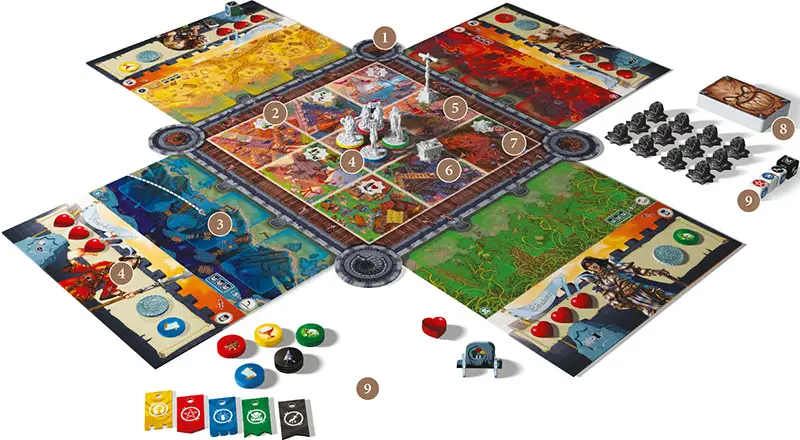
Difficulty level: Normal (suggested for your 1st game), 4-player game
1 Form the Bastion with the 4 Enclosure tiles.
2 The 9 Bastion tiles are randomly placed in order to form a 3 by 3 square inside the enclosure.
3 The 4 Horde boards are placed, one on each side of the enclosure.
4 Preparation of the hero elements:
Each player chooses a Hero and places the corresponding Hero board in front of themselves, under the Horde board in front of them.
Each player gets the figure matching their Hero board as well as the color base corresponding to the Horde board in front of them. Fit the Hero figures into the appropriate bases and place them on the central Bastion tile.
Each player places in front of themselves:
- 3 Life tokens;
- 1 Equipment token of the color of their hero;
- 1 Call to Arms token.
5 The Standard figure is placed on the corresponding symbol on the Standard Bastion tile.
6 The Trap figure is placed on the corresponding symbol of the Dwarven Quarry Bastion tile.
7 The Net figure is placed on the corresponding symbol of the Trebuchet Bastion tile.
8 Prepare the deck for 4 players: Shuffle the 50 Monster cards and set 8 aside. Shuffle the 10 Warlord cards and draw 1 without looking at it. Place the chosen Warlord card on the 8 Monster cards that were set aside.
Place the remaining Monster cards on top. The deck is thus composed of, from top to bottom:

- 42 Monster cards
- 1 Warlord card
- 8 Monster cards
Place the deck near the central board.
Clarification: The preparation of the deck varies depending on the number of players and the chosen difficulty.
9 Form the reserve near the game board by placing in it:
- The undistributed tokens (Equipment and Life)
- The 5 Standard tokens
- The Grasp of Evil figures
- The Combat dice and the Corruption die
The remaining material is returned to the box and will not be used for this game.
Game Play
The last player to have defended a person or an honorable cause starts the game. The players will play in turn, going clockwise. A game turn consists of 2 phases: Horde phase and Hero phase
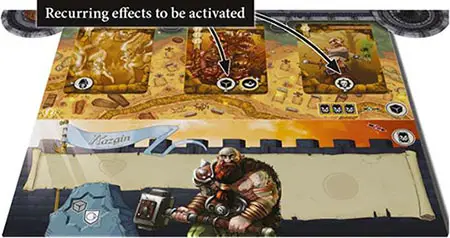
Horde Phase
1. Action of the Horde Cards
At the beginning of their turn, the active player must apply the recurring effects (located in the central zone of the Horde cards) of the Horde cards present on their Horde board.
If there are no Horde cards on the board, there are no effects to be activated. This mainly happens during the first few turns of the game.
When multiple effects must be applied in a given phase, the active player chooses in which order they are applied.
2. Action of the Horde board
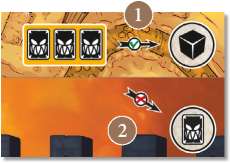
Then, the active player must apply the power of their Horde board. Two situations are possible:
-
If all 3 spaces of their board are occupied by Horde cards, the player applies the board's effect.
1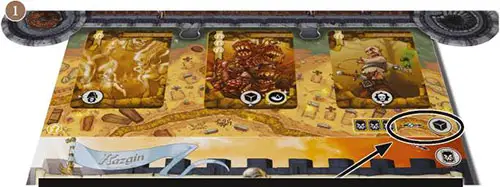
-
Otherwise, the player takes the first Horde card from the deck and places it into play according to the placement rules
2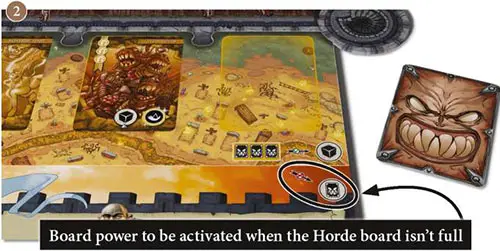
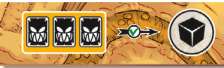
The following indication, divided onto the Horde and Hero boards, is a reminder of this rule when they are linked.
Specifics for the Horde
Effects of the Horde Cards
The Horde cards represent various Monsters and Warlords. They assault the Bastion from the dedicated spaces on the Horde boards.
-
 Entrance Effects
These are located in the lower left section of Horde cards. These effects are applied, only once by the active player, as soon as the card is placed onto a Horde board.
-
 Ongoing Effects
These are located in the lower central part of Horde cards AND are marked by an Infinity icon. These effects are applied, in an ongoing way by all players, as soon as the Horde card enters play and until its elimination.
-
 Recurring Effects
These are located in the lower central part of Horde carts. These effects are applied during each Horde Phase of the player linked to the Horde board where the card is located.
-
 Exit Effects
These are located in the lower right part of Horde cards. These effects are applied, only once by the active player, as soon as they eliminate the Monster in combat. The effects may be positive or negative.
Placement rules for Horde Cards
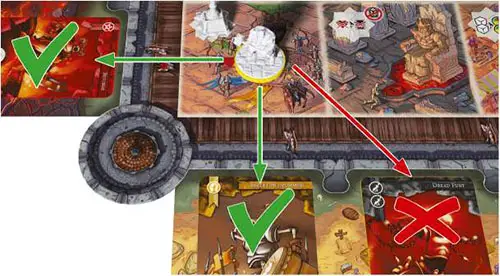
A red, green, blue, or yellow Horde card must be placed on a free space of the player's choice on the Horde board of the corresponding color.
A black Horde card must be placed on the Horde board of the active player.
If all 3 spaces of the concerned Horde board are already occupied, the active player chooses another free space of their choice.
If all spaces of all Horde boards are already occupied by cards and a player must put a card into play, that card isn't put into play - it instead remains on the deck, and the player loses a Life token.
When a Horde card is put in play with an entrance effect, the active player must immediately suffer that effect, no matter what color appears on the Horde board on which the card is played.
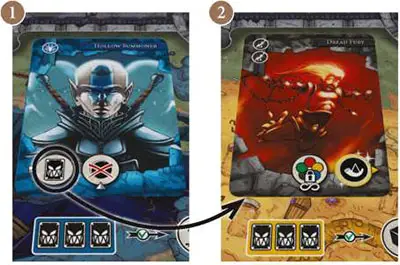
Example: Gary plays the yellow hero, he draws the "Hollow Summoner" Horde card.
1As that Monster is blue, he must place it on the blue board.Then, he must apply the entrance effect (located at the bottom left) of that Monster, in this case, he must put another Horde card in play. He draws a black Monster.
2He must therefore place it on his own Horde board, the yellow.
Warlord Cards
The Warlords are special Horde cards. They are not affected by the Tomb of the Ancient Kings, Trebuchet, or Dwarven Quarry Bastion tiles. As a reminder, the icon  is present on these 3 Bastion tiles.
They can, however, be affected by the other Bastion tiles, such as the Strategist's Tower, the Divine Fountain, or the Standard.
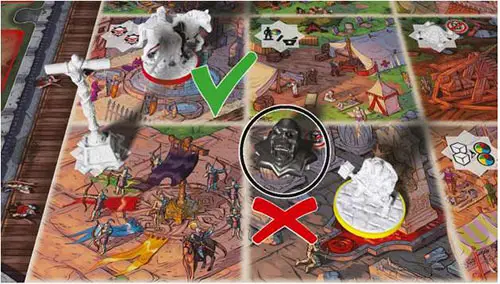
Grasp of Evil
When a Grasp of Evil figure is placed on a Bastion tile or a Hero board, the figure is placed on the Icon zone.
The players may no longer activate that tile, or use that power. If the Icon zone contains an element (Net, Standard, Enchant- ment,..)., that element is placed in the reserve. It will be returned to the corresponding icon zone as soon as the Grasp of Evil figure is removed.
Clarification: An element already placed on a card or Horde board remains active and is only placed in the reserve at the end of its use.
Neutral Board
A neutral board is a Horde board to which no hero is linked. This can happen in the following 2 situations:
When a player's hero is taken out, their Horde board becomes a neutral board.
In a game with fewer than 4 players, each Horde board not linked to a player is a neutral board.
The Horde phase of a neutral board must be resolved the same way as a normal Horde phase, with the exception that no card is drawn and put into play when the Horde board isn't full.
The following indication on a Horde board unlinked from a Hero board is a reminder of this rule.
As there are no active players during the game turn of a neutral board, all of the effects which may occur must be suffered, each separately, by one of the players able to be affected.
Example: Gary just ended his turn and it's a neutral board which is to his left. On that red board is a "Butcher" Horde card with the recurring effect
. During the Horde phase of that board, a player must suffer the effect.
As only Paul and Amy have at least one round token, one of the two must suffer the effect. Gary, not having any round tokens, cannot suffer the effect for them.
Hero Phase
During their Hero phase, the active player can act AND move, in the order of their choice:
Act
The hero can perform only ONE of the following 2 actions:
-

Activate a Bastion tile
The Hero can use the action of the Bastion tile on which their figure is located.
Be careful: A Bastion tile on which a Grasp of Evil figure is located cannot be activated.
Example: The red hero can activate the Bastion tile on which they are located, but not the yellow hero as a Grasp of Evil figure is on it.
-

Combat
The hero can enter combat against one or more Monsters located on spaces adjacent to the Bastion tile on which their Hero figure is located, following the combat rules.
Clarifications:
No combat is possible from the central Bastion tile (except by Twindalli).
A hero can simultaneously enter combat against 2 monsters if the hero is located on a corner Bastion tile.
Move 
The player can move their Hero figure from the Bastion tile where it is located to an adjacent Bastion tile. Moving diagonally is allowed. More than one hero can be on the same Bastion tile.

Call to Arms 
The Heroes have a special ace up their sleeve, the Call to Arms. Using a Call to Arms token allows the active player to use the action of any Bastion tile without having to be located on it, even if that tile is in the Grasp of Evil.
The use of a Call to Arms token is a special extra action. When a player uses a Call to Arms token, they put that token in the reserve.
The Call to Arms can be used at any point during the Hero phase (before or after the hero's movement, etc). but not during an action. Ihe active player can use multiple Call to Arms tokens in a given game turn. It's also possible to use a Call to Arms token in the turn in which it was earned.
Example: Gary is facing the "Nefarious Cannon" Monster (Black, Resistance 3). Before entering combat with it, he'd like to get some Equipment tokens to have a better chance of success.
To do so, he discards his Call to Arms token and activates the Market tile: he rolls 2 Combat dice and takes from the reserve the 2 matching Equipment tokens. Gary is now ready to face the Monster.
Specifics for Heroes
Combat
To combat a Monster, the active player rolls the 3 white Combat dice and must roll a number of faces matching the color of the targeted Monster equal to or higher than its resistance.
The white faces of the dice are jokers and may each take a color of the player's choice.
If the player doesn't roll the required faces, they can, if they have Equipment tokens of the right color, spend them to complete the result of these Combat dice.
Note: the active player can also use the Equipment tokens of one or more heroes located on the same Bastion tile as them. However, the players may not trade or give to each other any Equipment tokens.
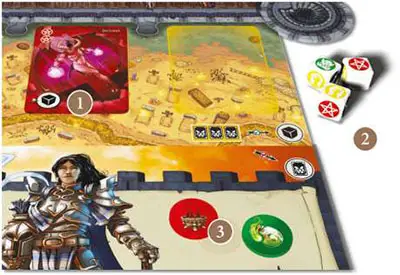
Example: Gary is faced by a Monster "Incubus" (Red, resistance 2)
1. To vanquish it, he must get at least two red (or white) faces with the Combat dice.Gary rolls the Combat dice and only gets one red face
2. As he has a red Equipment token3, he can choose to spend it to vanquish the Monster.
Clarification: A Monster can see its resistance diminish due to some effects (Standard Bastion tile and Mylfaar's hero power). A Monster can only be vanquished by performing the Combat action, even if its resistance is currently at 0.
Two combat results are possible:
If the monster is vanquished: the active player resolves any exit effects of the Monster. The Horde card is placed in the discard (create a discard pile near the game board) and any elements placed on it are returned to their initial position (Reserve, Bastion tile, or Hero board).
If the combat failed: the Monster remains in place and nothing happens.
Combat two Monsters Simultaneously
A hero located on one of the 4 Bastion corner tiles is adjacent to two spaces, they can thus potentially vanquish two Monsters. The player must get the total resistance of both with the Combat dice and any spent Equipment tokens.
If the dice and / or Equipment tokens allow them to vanquish one or the other Monster, but not both, they can choose which one is vanquished.
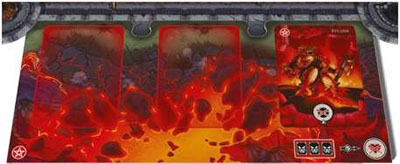
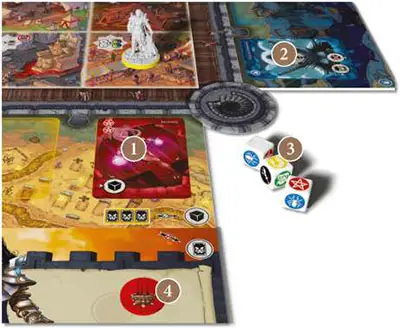
Example: Gary is now on a corner tile. The two adjacent spaces are occupied by Monsters: a "Incubus" (Red, resistance 2)
1and a Hollow Summoner (Blue, Resistance 1)2. He rolls the 3 Combatdice and gets a red face, a white face, and a yellow face
3. The yellow face is of no use to him. He spends a red Equipment token4which is added to the red face to vanquish the "Incubus" and he uses the white face to vanquish the Hollow Summoner.
Inventory and Reserve
Each player may have multiple Equipment, Life, and Call to Arms tokens on their Hero board.
All of these tokens are available in limited quantities, howe- ver. If a player would gain a type of token which is not avai- lable in the reserve, that gain is lost.
Inversely, if a player would lose a round token and they have none, they lose nothing and the effect is ignored.
Wounded Hero, Dead Hero
A Hero who loses their last Life token is taken out. All of their tokens (Equipment, Call to Arms) are lost and placed in the reserve. Their figure is placed on their Hero board and that board is unlinked from the Horde board. All of the elements on their Horde board remain in place.
Note: When a hero is taken out, their Horde board becomes a neutral board (until the hero is healed).
Clarification: A player whose hero is taken out still takes part in the group's planning. They can return to play when another hero activates the Dispensary Bastion tile.
If a hero is healed, they flip their Hero board to the wounded side and link it back to their Horde board. They lose the use of their power for the remainder of the game. Their figure returns to play on the Dispensary Bastion tile and the player recovers 3 Life tokens and as a Call to Arms token.
If a hero loses all of their Life tokens a second time, they are dead and the game is over for them.

End of the Game
The game is won when the players win the combat against the Warlord.
Three situations bring about defeat:
- All of the heroes are taken out.
- A third Bastion tile falls under the Grasp of Evil.
- A Horde card must be drawn while the deck is empty.
Note: Even when the Warlord is vanquished, the players must apply any possible exit effects it may have. They actually only win if the application of its effects doesn't cause them to lose.
Defeat Upon Defeat?!
If your first games end up in defeat, don't worry; try your hand at the Novice level. Last Bastion requires a learning curve and many games in order to triumph over the difficulty levels offered.
Even for experienced players, the "Heroic" level offers a tight challenge, but still remains winnable. Make sure to apply all of the rules, to properly use the powers and the Call to Arms in your possession, and especially to cooperate in order to claim victory.
When one of these three situations occur, the players lose. The heroes have failed, the Bastion falls into the hands of the Baleful Queen and the civilized world takes its last breath...
Score
In order to evaluate your performance and help you progress, you'll find in the box a pad of scoresheets to keep track of your games.
To tally your score, use the values below:
- 5 points for a victory in Novice mode
- 10 points for a victory in Normal mode
- 15 points for a victory in Difficult mode
- 20 points for a victory in Heroic mode
- + 1 point per Life token in your possession
- + 2 points per Call to Arms token in your possession
- - 3 points per dead Hero
- - 4 points per Bastion tile in the Grasp of Evil
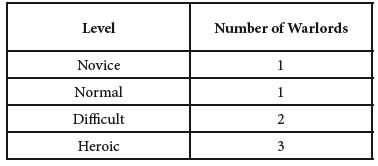
Difficulty Levels
Last Bastion offers 4 difficulty levels. The preparation of the game varies depending on the chosen difficulty level, as explained by the table below:
For the Novice level, 2 additional adjustments are also required:
- remove 4 additional Monster cards at the beginning of the game.
- each player begins with a black Equipment token in addi- tion to the Equipment token of their color.
For the Difficult and Heroic levels, when you prepare the deck, alternate 8 Monster cards with 1 Warlord card.
The game is only won when all Warlords have been vanquished.
Continue Reading
