Howdy pardner! The name's Buster. Stick with me and I'll take you from an unsalted greenhorn to a sourdough miner, lickety-split!
Components
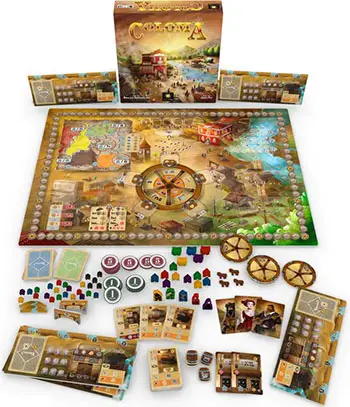
- 1 Main Board
- Barker Tile
- Bust tile
- 20 Horses
- 1st Player Marker
- 24 Barrels
- 18 Bridge Tiles
- 5 Selector Dials
- 5 Pioneers
- 40 Tents
- 5 Wagons
- 40 Coins
- 1 Round Marker
- 5 Score Markers
- 5 Player Boards
- 10 Hotels
- 5 Buster Cards
- Buster Pioneer
- Instructions
Setup
Now that you've shucked off the lid, let's rake and scrape these cowchips to set the table, real purdy-like.
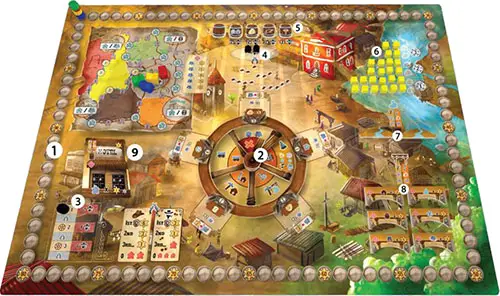
Prepare Game Board
-
Place the game board in the center of the table.
-
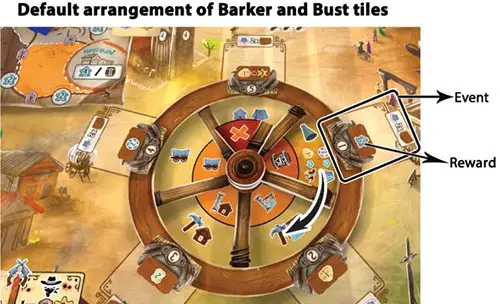
Attach the two movable tiles to the board's wheel with the smaller tile on top. Rotate them so that the larger Barker tile is fully covering Site 1 and the smaller Bust tile is covering the Signpost arm of the Barker tile.
Note: A "Site", is a wedge section of the board's wheel area. The Sites printed on the board are numbered 1-5. The rotating Sites are called by their functional names such as the Barker, the Bust, and the Signpost.
They replace or disable the actions of the Sites beneath them.
-
Place the round counter on the round 1 space of the round track.
-
Place two Outlaws on the Shootout space, marked with the Outlaw icon. The number of Outlaws placed at the start of each round is indicated on the round track.
-
Randomly place four Barrels face-up on their marked spaces (use five Barrels in a 5-player game).
-
Place the Gold Nuggets on the gold icons on the upper right portion of the board, adjusting for the player count as indicated above the Gold Supply. This is the available gold supply.
-
Place a supply of River tiles on the indicated spaces on the board. To keep the board neat, you may keep excess River tiles near the board within easy reach.
-
Sort and place the Bridge tiles on indicated spaces on the board, in six stacks, one for each type for 2 player games. In 3-4 player games use two copies of each type. In a 5-player game use all three copies. Return any excess River tiles to the box; you will not need them in the game.
-
Place the Hotels face-up on the indicated space on the mainboard, adjusting for player count: two Hotels per player.
Additional Setup for 2 Players
Place the Buster deck and Buster Pioneer near the board. Place 3 gunmen at the Shootout from a player color you are not using. They stay there for the rest of the game and are taken into account when the Shootout is resolved.
Prepare The General Supply
Place all Bucks, Horses, Outlaws, River tiles, and the rest of the Barrels (face-down) near the board. They will form the general supply.
Prepare Players
Each player:
-
Takes one player board.
-
Chooses a player color.
-
Takes all the Town Building cards and, wooden components of that color, and then places:
- Their scoring marker on the "0/100" Victory Point (VP) space of the scoring track.
- Their Town Building card deck on the indicated space on their player board.
- Their Pioneer and their selection dial next to their player board.
- 1 Camp and 4 Dudes in the Lodge on their player board.
- Their Wagon on the Frontier Map section of the main board in the city of Coloma.
- The rest of their wooden components in their playing area within easy reach. This is their personal reserve.
- Takes 2 Bucks and 1 Horse from the general supply and 1 Gold Nugget from the gold supply, and places them in their player board's Lodge.

-
Takes 1 selection dial.
-
Draws 6 cards from their deck and keep 4. Returns the rest on top or bottom of the deck.
Game Play
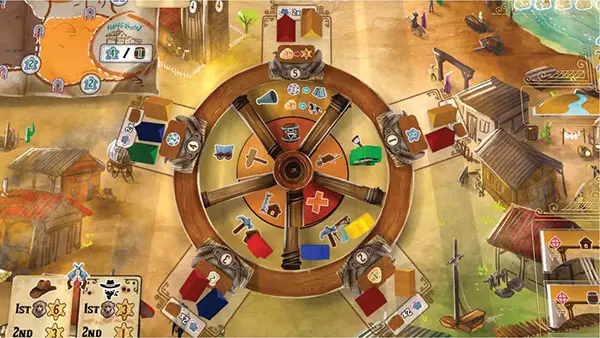
A game of Coloma consists of three Rounds. Each Round in Coloma is divided into five Chapters and each Chapter consists of multiple actions that players can take on their turns.
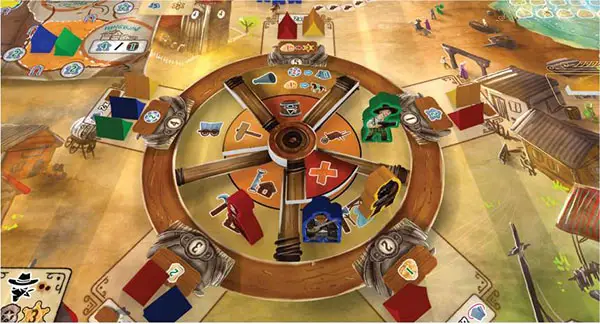
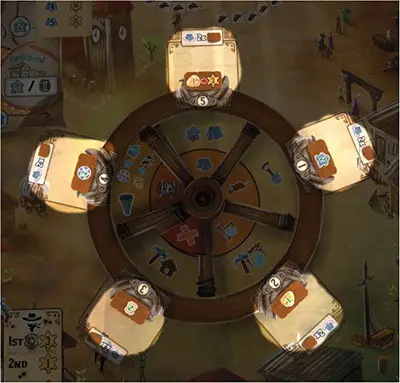
During a Chapter each player will secretly select a Site on the board, with the intention of performing that Site's listed actions.
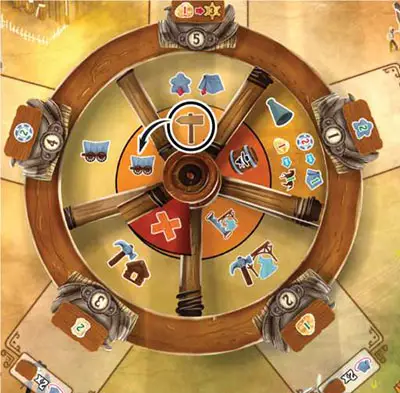
However, if too many players choose the same Site, they will "Bust" and perform fewer Site actions! Once all actions have been resolved, the Barker tile is rotated clockwise, changing the available actions for the next chapter. Then the players repeat the Site selection and resolution process.
1. Reset and rotate the barker and bust tiles
At the beginning of each Chapter, return the tiles on the wheel to their default arrangement, with the Bust tile covering the Signpost. Then rotate both tiles clockwise to the next Site. Skip this step on the first chapter of the first round.
2. Resolve the site - Specific Event
Each time the Barker is rotated to the next Site, it triggers that Site's Event, causing all players to immediately gain the indicated reward. See Events.
3. Simultaneously Select Sites
All players secretly choose a Site number with their dials.
4. Place pioneers on the selected sites
After all players have secretly selected a Site, they simultaneously reveal their dials and place their Pioneers on the corresponding Sites.
Example: If you selected Site 3 with your dial, place your Pioneer on Site 3. If the Barker is covering that Site, place your Pioneer on the Barker.
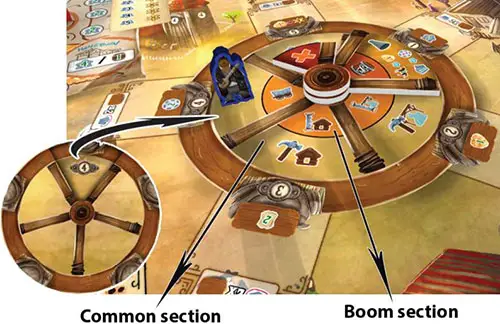
Each Site has two sections containing action icons, an outer Common section, and an inner Boom section. The players resolve one or two actions on the Site where they placed their Pioneers, based on if they had a Boom or a Bust.
5. Resolve Turns
After players have placed their Pioneers, they take turns resolving the Sites, starting with Site 1 and continuing clockwise in numerical order. Note: If a Site contains no Pioneers, it is skipped.
When the Site containing your Pioneer is being resolved, you will take your turn (minding player order if the site contains other player's Pioneers). The player who has the Sheriff Badge is the first player, and player order continues clockwise around the table from them.
On your turn, you may take the Site's Common and Boom actions (if available), in either order you choose. Note: You may choose not to take an action.
6. Remove Pioneers
After all, turns have been completed, players remove their Pioneers from the board and return them to their play areas.
Note on the game flow: In many cases, players can perform their actions simultaneously-granted their actions do not affect each other.
Sites
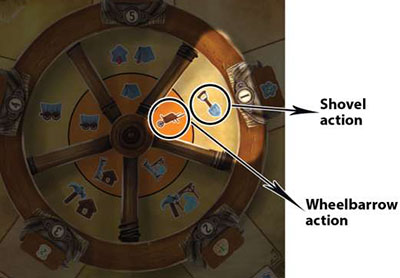
Site 1: Workday
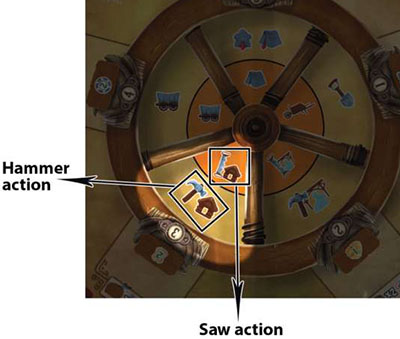
Common, Shovel action: You may use the ability on Sutter's Mill on your player board and all Shovel abilities in your Town Building tableau.
Boom, Wheelbarrow action: You may use the ability on Sutter's Mill and all Wheelbarrow abilities in your Town Building tableau.
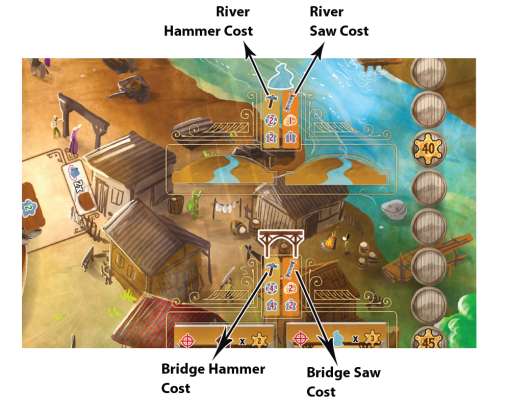
Site 2: Survey the River and Build a Bridge
Common, Hammer action: Survey a River or build a Bridge.
To survey a River or build a Bridge you must pay the Common (Hammer) cost indicated on the main board by returning the required amount of Bucks and Gold to the general supply while Dudes are returned to your personal reserve.
Note: Spent Gold is not returned to the gold supply on the board! Instead, it is kept near the general supply of Bucks.
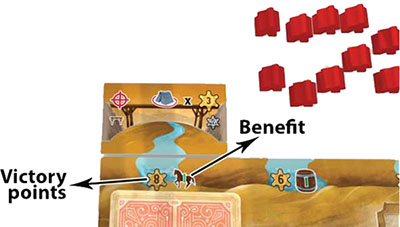
When survey a River, take a River tile from the supply on the mainboard and place it face-up above your player board on a vacant River column of your choice.
Then immediately score the Victory Points and gain the benefit indicated below the newly built River tile on your player board. Note: If the main board's supply of River tiles becomes low, simply refill it from the general supply. River tiles are not limited.
When you build a Bridge, take a Bridge tile from the supply on the mainboard and place it face-up above a vacant River tile of your choice. You can only place a Bridge tile above a River tile without a Bridge tile over it.
A Bridge cannot be built unless you have a River tile below it. Note: If the Bridges run out, there are no more: first come, first serve.
Note: You cannot survey more than four Rivers or build more than four Bridges per game, and you cannot build two identical Bridges!
Bridges do not score Victory Points or give you any other benefits during the game; however, they can score you Victory Points at the end of the game if you meet their requirements.
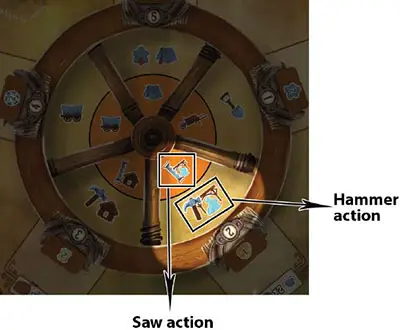
Site 3: Build Town Buildings and Hotels
-
Common, Hammer action: Build a Town Building or a Hotel Building.
To build a Town Building you must pay the Common (Hammer) cost indicated on the card by returning the required amount of Bucks and Gold to the general supply while Dudes are returned to your personal reserve. Then immediately score the Victory Points printed on the card.
Note: Gold that is spent is not returned to the gold supply on the board! Instead, it is kept near the general supply of Bucks.
When you build a Town Building, choose a card from your hand and place it face-up in front of you next to Sutter's Mill on your player board. This card is now considered part of your Town Building tableau.
To build a Hotel Building you follow the same rules as building a Town Building, but with two main differences: you must take it from the Hotel supply deck on the mainboard, and place it on top of a Town Building.
The Hotel card covers the Town Building entirely, disabling its effects for the rest of the game.
Note: When you spend Horses they are returned to the general supply.
-
Boom, Saw action: You may build a Town Building or Hotel Building following the same rules as above, but you must pay the Boom (Saw) cost indicated on the card instead of the Common (Hammer) cost.
Note: When you build a Town Building or Hotel Building, you immediately score the Victory Points indicated in the upper-right portion of the card.
A. Town Buildings
All Town Buildings have abilities that you can use once it's been built into your Town Building tableau.
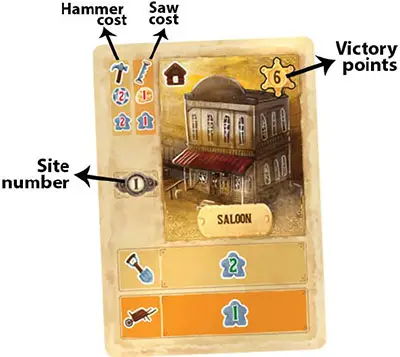
You may only activate the Town Building abilities on your turn if you place your Pioneer onto a specific Site.
Each Town Building has a number matching the Site where it can be activated by having your Pioneer there. Town Building abilities have icons that show which actions must be available on the Site to enable them.
Some abilities require you to Bust on a certain Site in order to be activate them.
During your turn you can take the actions on the Site and use abilities on your Town Buildings in any order you choose.
Note: You can also choose to forfeit the action on the Site and just use the matching abilities on your Town Buildings.
Some Town Buildings (The Foundry) have abilities that allow you to activate abilities of other Town Buildings in your tableau.
Important: You cannot activate a Town Building in the same turn you built them.
Deck
Milling Victory Points: If you have need to draw cards from your deck but cannot, instead gain 1 Victory Point for each card you were owed.
Discarding: There is no discard pile. Discarded cards are placed face-down onto the top or bottom of your deck, your choice.
B. Hotels
Hotels in your Town Building tableau can score extra Victory Points at the end of the game. Each Hotel gains you 1 Victory Point per Dude remaining in your Lodge.
You can gain maximum of 6 extra Victory Points per Hotel. Note: Each Hotel counts all Dudes in your Lodge separately. For example, if you have two Hotels and four Dudes in your Lodge, you score 4 extra Victory Points per Hotel (8 total).
Site 4: Explore The Frontier
-
Common, Wagon: Move your Wagon on the Frontier Map.

When you use a Wagon action you may move your Wagon on the Frontier Map, one vacant space per Horse you have.
Note: you do not "spend" the Horses to move-you simply count how many Horses you have and can move up to that number of spaces with each Wagon action you take.
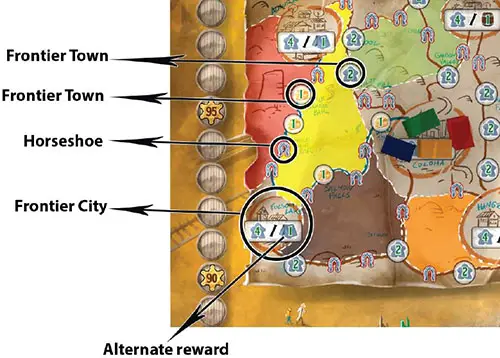
Each space on a route is represented by a Horseshoe, Frontier Town, or Frontier City.
When your Wagon moves over or stops on vacant Frontier Towns or Cities, you gain the indicated rewards. Horseshoe spaces do not give rewards, but they still count against your movement limit.
Horseshoe and Frontier Town spaces can only hold one Wagon at a time. If you need to pass or stop on an occupied space, skip it. Note: this does not count against your movement limit or grant any of the indicated rewards. In contrast, Frontier City spaces can hold any number of Wagons, and are never skipped.
If your Wagon ends its movement on a Frontier City, you may choose between the Dudes and the alternate reward indicated on that space. Note: If your Wagon does not end its movement on a Frontier City, and passes over it instead, you do not get a choice and must gain the Dudes.
You may not backtrack on your route in the same turn! But you may choose to move fewer spaces than your maximum to end your movement on a Frontier City, etc.
-
Boom, Wagon: Move your Wagon following the same rules as above. Note: Each Wagon action is considered a complete movement. For example, you can end your movement with one Wagon action on a Frontier City, stop and gain the alternate reward, then use your second Wagon action to move elsewhere, collecting rewards as normal.
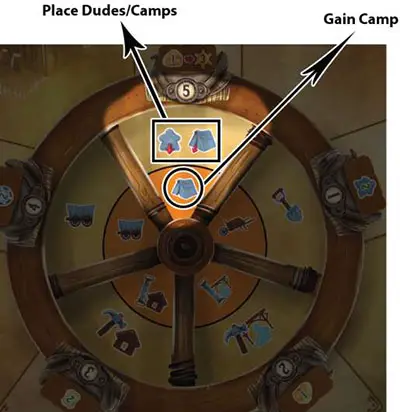
Site 5: Settle the Frontier and Defend Coloma
-
Common, Place Dudes/Camps: Place Dudes as Gunmen at the Shootout and/or place Camps on Events and/or Frontier Lands.
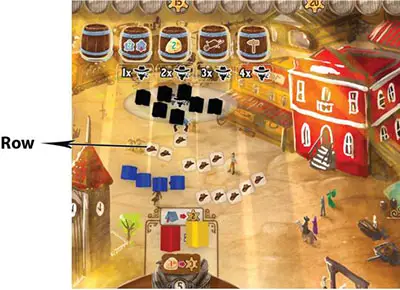
When you place Dudes at the Shootout you must fill one entire row-no more, no less. Note: You cannot fill more than one row per turn, but you may fill additional rows on future turns, following the same rules.
You can place Camps at any Event where you do not already have one.
If you have a Camp on the Event that is resolved by the Barker during Chapter step 2: Resolve Site-Specific Event you receive double the indicated reward.
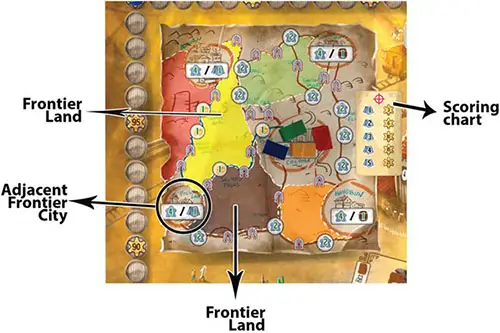
To place a Camp on the on Frontier Lands your Wagon must be in an adjacent Frontier City.
Note: Each color area represents a different Frontier Land. The Frontier City of Coloma is not considered adjacent to any Frontier Lands. You can only place Camps from Hangtown, Georgetown, Folsom, and Auburn.
You can place Camps at any Frontier Land where you do not already have one.
Camps on Frontier Land do not score Victory Points or give you any other benefits during the game; however, they score you Victory Points at the end of the game. The more Camps you have on the Frontier Map in different Frontier Lands, the more Victory Points you will score. The scoring chart is printed the Frontier Map.
Players' Camps can share Events and Frontier Lands.
-
Boom: Gain a Camp.
The Barker
-
Common: Buy Camps and Horses by paying the indicated costs. You may buy as many Camps and/or Horses as you are able to afford while taking this action.

-
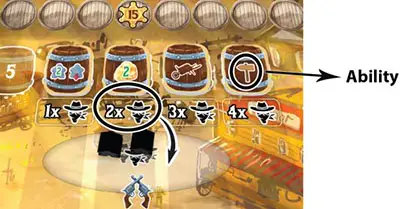
Boom: Gain a Barrel from the Outlaw's Hideout.
Take any face-up Barrel from the Outlaw's Hideout. Then place Outlaws on the Shootout as indicated below the Barrel space.
When you take a Barrel, you may immediately use it's ability(s), or save it to use on one of your future turns. After use, keep the Barrel face-down in your play area.
Note: Face-down Barrels are used when activating some Town Building abilities, Bridge scoring, etc.
If an action or ability requires you to discard a Barrel, remove a Barrel from your play area and return it to the game box.
The Bust
After the players reveal their dials and place their Pioneers, the Site with most Pioneers on it will Busts! When that happens, the Bust tile is moved to cover the Boom section of the affected Site, making it unavailable for the players on their turns.
Note: The Common section of the Site is never affected by the Bust and is always available.
Example: If Site 1 has two Pioneers on it, while the rest of the Sites have one or no Pioneers on them, Site 1 has the most and Busts.
Note: In the case when the Signpost is adjacent to the Bust (pointing at it) both Sites' Boom sections Bust.
Resolving Bust Ties
When two or more Sites are tied for most Pioneers on them, the Bust tile stays covering the Signpost.
The Signpost
The Signpost allows you to use the Boom action of the Site adjacent to(counterclockwise) the one your Pioneer is on. It acts as if your Pioneer is on two Sites: half and half.
Events
When the Barker is rotated to the next Site in order, it activates that Site's Event. All players gain the indicated reward. Events are always resolved immediately after the Barker is rotated during Chapter step 2: Resolve Site- Specific Event. Note: Players with Camps at Events gain twice the indicated rewards.
The rewards given at each Event are:
- Site 1: Gain 2 Dudes (4 Dudes if you have placed a Camp on the Event)
- Site 2: Gain 1 Gold Nugget (2 Gold if you have placed a Camp on the Event)
- Site 3: Draw 2 Cards (4 Cards if you have placed a Camp on the Event)
- Site 4: Gain 2 Bucks (4 Bucks if you have placed a Camp on the Event)
- Site 5: Trade 1 Gold Nugget for 3 Victory Points (You may trade 2 Gold Nuggets for 6 Victory Points if you have placed a Camp on the Event)
Round End
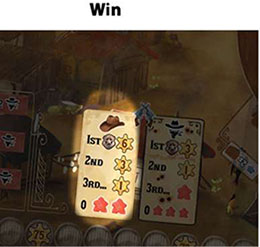
When the players have completed all five Chapters, the Round ends with a Shootout!

Shootout
After each round is completed a Shootout takes place. The Shootout is resolved by comparing the total number of Gunmen to the total number of Outlaws at the Shootout.
If the number of Gunmen is greater than number of Outlaws, the players win the Shootout and should then refer to the left hand chart for rewards and penalties.
If the number of Outlaws is equal to, or greater than the number of Gunmen, the players lose the Shootout, and refer to the right-hand chart for rewards and penalties.
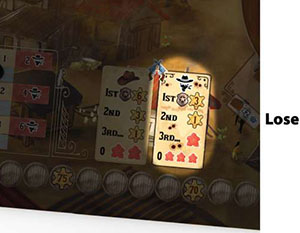
Rewards are tiered, meaning that the player with the most Gunmen at the Shootout claims the best reward and the player with the second most Gunmen claims the second-best reward.
Then each other player with at least one Gunman claims the third reward/penalty. Break ties in favor of the player who has Gunmen placed in the row nearest to the Outlaws.
Players without Gunmen at the Shootout take a penalty. When you take a penalty, place the number of Dudes indicated on the chart into your Graveyard.
Dudes placed are taken from your personal reserve (or Lodge if there are none in your reserve), and fill up your Graveyard beginning with the bottom row, and moving up a row when the current row is filled. Dudes in your Graveyard are considered dead, and therefore cannot be used again for the rest of the game.
Dead Dudes are scored at the end of the game.
After the Shootout is resolved, players return their Gunmen to their personal reserves and Outlaws to the general supply.
Clean Up
Remove any remaining Barrels from the Outlaw's Hideout and refill it with new Barrels from the supply.
Refill the board's gold supply with the Gold Nuggets in the general supply, starting with the empty Gold Spaces in the lowest pool.
Advance the round marker to the next round and place a number of Outlaws at the Shootout as indicated on the round tracker.
Reset the rotating tiles to their original starting positions, with the Barker covering Site 1 and the Bust covering the Signpost.
Additional Rules For 2 Players
Before players select the Site with their dials, draw 2 cards from the top of the Buster deck and place them face up near the board. These cards indicate the Sites where Buster won't go in this Chapter.
After players choose their Sites and place their Pioneers, reveal the next card from the top of the deck and place Buster on the Site indicated on the card. Resolve the Bust like in a normal 3 player game and continue taking your turns.
When both players' turns have been resolved, remove Buster from the board and shuffle the face-up cards back in the Buster deck. Repeat this for every Chapter.
Gold Nuggets
Gold can be spent instead of Bucks at any point in the game.
The gold supply is divided into three gold pools valued at 1, 2 or 3 Bucks. The current value of Gold Nuggets is always equal to the value of the lowest gold pool with an empty gold space.
Example: If there are one or more Gold Nuggets missing from the second gold pool, all Gold Nuggets in play are worth 2 Bucks each. If the second gold pool is full, but the first gold pool is empty, Gold Nuggets are still worth 3 Bucks each.
Important: When paying a cost with Gold Nuggets you will not receive change if you overpaid. Though Gold can be substituted for Bucks, Bucks can never be substituted for Gold.
Example: If you build a Bridge that costs 4 Bucks with two Gold Nuggets valued at 3 Bucks each, you would not get 2 Bucks back from the general supply.
Reminder spent Gold Nuggets are returned to the general supply to be restocked at the end of the round - they are not returned to the gold supply.
When you gain a Gold Nugget, take it from the gold supply on the board, not the general supply. Gold Nuggets are always taken from the top gold pool first. When the pool is exhausted, you then take Gold Nuggets from the next pool, and so on.
Gold Nuggets can never be worth less than 1 Buck-even if there are no Gold Nuggets left in the gold supply. Note: If there are no Gold Nuggets left in the gold supply, players who need to take a Gold Nugget should instead gain 1 Buck per Gold Nugget owed.

Dudes, Horses and Camps
There are a limited number of Dudes, Horses and Camps. If an action instructs you to gain Dudes, Horses, or Camps from your personal reserve but there are none left, the remainder is lost.
End of the Game
The game ends after the third Shootout.
Award end-game Victory Points for:
-
Camps on Settlement areas
Count the number of Camps you have on Frontier Lands and score the Victory Points according to the chart on the Frontier Map.
Example: If you have 3 Camps you score 10 Victory Points.
-
Bridges
Score Victory Points for each Bridge you have Built according to its requirements. Consult the Bridges section on page 26 for every Bridge.
-
Hotels
Count the number Dudes you have in your Lodge and multiply it by the number of Hotels you have in your tableau.
Example: If you have 5 Dudes in your Lodge and 3 Hotels in your tableau you will score 15 Victory Points.
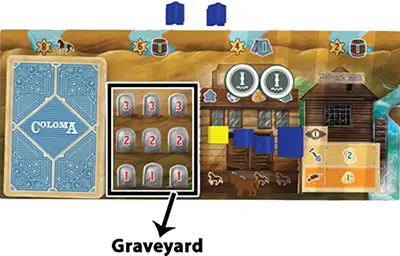
Subtract Victory Points for Dead Dudes in your Graveyard.
Each Dead Dude in your Graveyard brings you negative Victory Points according to the number printed on the Grave underneath him. Subtract these Victory Points from your final score.
The player with the most Victory Points is declared the winner!
Ties are broken in favor of the player with the most Gold Nuggets. If still tied, the player with the most Town Buildings and Hotels wins.
Continue Reading
