Once the players have activated all their Survivors, the Zombies play. Nobody takes their role; they do it themselves, performing the following steps in order:
Step 1 - Activation
Each Zombie activates and spends its Action on either an Attack or a Move, depending on its situation. First resolve all the Attacks, then all the Moves, but each Zombie only performs one or the other with a single Action.
Attack
Each Zombie in the same Zone as a Survivor performs an Attack. A Zombie's Attack is always successful and does not require any dice rolls.
It snatches, if possible, an Equipment card the Survivor is carrying. The player who controls that Survivor chooses an Equipment and discards its card. The Survivor receives a Wounded card, which replaces the lost Equipment.
When he reorganizes his Survivor's inventory, the player may move this Wounded card just like an Equipment card, but he cannot discard or trade it, and it reduces the amount of Equipment the Survivor can carry.
A Survivor with two Wounded cards is eliminated and his Equipment discarded. If different Survivors are in the same Zone, the players share the Wounded cards in any way they prefer. Cooperation also means sharing the pain and suffering!
Example: A Walker in a Zone with two Survivors inflicts one wound during its activation. The players choose which Survivor receives the Wounded card and loses Equipment.
They can decide, for example, to give it to a Survivor who is holding no equipment. They can also decide to give it to a Survivor who's already wounded and put him out of his misery!
Feeding frenzy! Zombies fight in groups. All Zombies activated in the same Zone as a Survivor join the Attack, even if there are so many that it would be overkill.
Example: A group of seven Walkers is in the same Zone as two Survivors. The first four Walkers are enough to kill the hapless victims, but all seven spend their Action attacking. Chow time!
Move
The Zombies that have not attacked use their Action to move one Zone toward their target, according to the following parameters:
If they can see a Survivor, they move toward him.
If they can see Survivors in different Zones, they move toward the noisiest group, regardless of the distance (REMEMBER: Each Survivor counts as a Noise token).
If they can't see anybody, they move toward the Zone that contains the most Noise tokens.
If they can't see anybody and there are no open paths to the Survivors, they move toward the noisiest Zone as if all doors were open, though locked doors still stop them.
Zombies always take the shortest possible route to their target Zone. If there is more than one route of the same length, the Zombies split into groups of equal numbers to follow all possible routes.
They also split up if different target Zones contain the same number of Noise tokens. If necessary, add Zombies so that all new groups resulting from a splitting group contain the same number of each Zombie type!
Splitting Special Cases:
The Abomination never splits; the players decide which direction it goes.
If there aren't enough Zombies for a split, each Zombie of the designated type immediately gains an extra activation.
Fatties don't get extra Walker escort when splitting.
Example: A group of four Walkers, one Fatty, and three Runners move toward a group of Survivors. The Zombies can take two routes of the same length, so they split into two groups.
Two Walkers go one way, the other two take the other route. The Fatty joins one group of Walkers, and a second Fatty is added to the other group (this new Fatty does not come with extra Walkers)! The three Runners also split, two joining the first group, and the other joining the second group.
Another Runner is added to the latter group so that the groups remain identical. Things just got a lot harder for the Survivors...
Runners
Runners are an exception in that they have two Actions per turn. After all Zombies (including the Runners) have gone through the Activation step and resolved their first Action, the Runners go through the Activation step again, using their second Action to Attack a Survivor in their Zone or Move if there is nobody to attack.
Example 1: At the beginning of the Zombies' Phase, a group of three Runners and a Fatty is one Zone away from a Survivor. For their first Action, since they have nobody they can Attack in their Zone, the Zombies Move into the Zone with the Survivor.
The Runners then perform their second Action. Since they now occupy the same Zone as a Survivor, they Attack. Each of the Runners inflicts one Wound, killing the Survivor.
Example 2: A Runner is in the same Zone as a Survivor, and a Walker is in the adjacent Zone. The Runner Attacks the Survivor with its first Action, inflicting a Wound, and the Walker Moves into their Zone, since he sees the Survivor. Then the Runner performs its second Action. It attacks the Survivor again, killing him.
Example 3: A Survivor stands in the same Zone as three Walkers, two Fatties, and two Runners. All the Zombies attack and inflict seven Wounds (two Wounds are enough to kill the Survivor; the five remaining Wounds are still applied but without further consequence).
None of the Zombies Move, as they all Attacked. Then, the Runners resolve their second Action. They have no one to Attack, so they Move one Zone toward the noisiest Zone.
Step 2 - Spawn
The Mission maps show where Zombies appear at the end of each turn. These are the Spawn Zones. Point to a Spawn Zone, and draw a Zombie card.
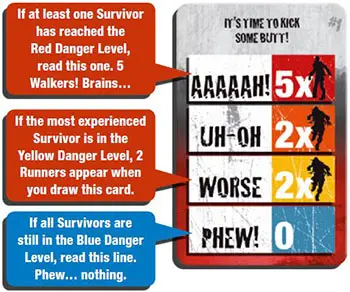
Read the line on the card that corresponds to the color of the Danger Level of the most experienced Survivor still in the game (Blue, Yellow, Orange, or Red). Place the number and type of Zombies shown.
Repeat this for each Spawn Zone. Always begin with the same Spawn Zone and continue clockwise.
Attention: Each Fatty has two Walkers as escorts when it spawns but not when you add one to balance a group of Zombies that splits.
When the Zombie deck runs out, reshuffle all the discarded cards to make a new deck.
Example: Wanda has 5 experience points, placing her in the Blue Danger Level. Doug has 12, which puts him in the Yellow. In order to determine how many Zombies spawn each turn, read the Yellow line, which corresponds to Doug, the most experienced Survivor.
There are two special cases: the Extra Activation card and the Manhole card. In both cases, no Zombies appear in the designated Zone.
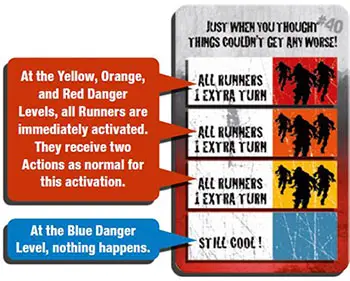
When you reveal an Extra Activation card, no Zombies appear in the designated Zone. Instead, all Zombies of the indicated type get another turn (see Activation step in the previous page). Notice that these cards have no effect at the Blue Danger Level!
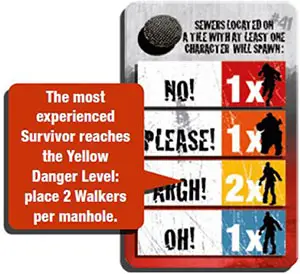
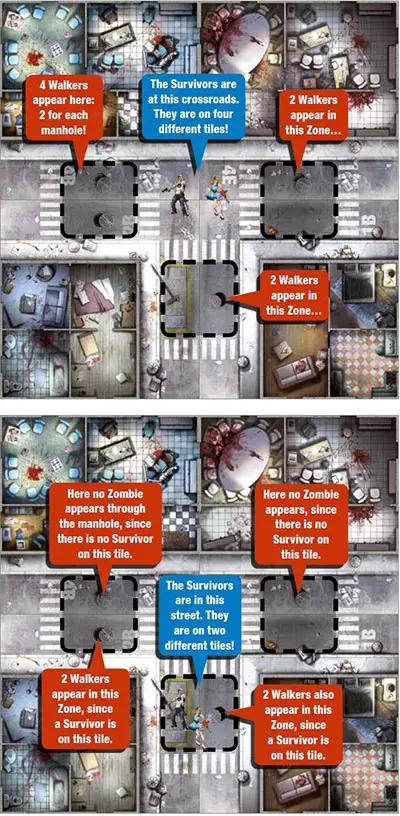
When you draw a Manhole card, no Zombie appears on the designated Zone. Instead, place the indicated number and type of Zombies in every Zone where the map shows a manhole, on every tile where at least one Survivor stands. Manhole invasions never happen on tiles devoid of Survivors.
Attention: The Danger Level used for spawning Zombies is set by the Survivor with the highest Danger Level still in the game. If this Survivor is eliminated, the Danger Level drops to that of the next most experienced Survivor.
The Survivors are in this street. They are on two different tiles!
Running Out of Miniatures
The Zombicide box contains enough Zombies to invade a city. However, players may still run out of miniatures of the indicated type when required to place a Zombie on the board (when spawning, populating a building, or due to splitting).
In this case, the remaining Zombies are placed (if there are any), and then all Zombies of the requested type immediately gain an extra activation.
Continue Reading