Trismegistus: The Ultimate Formula is played over three rounds during each of which you will draft exactly three dice.
The potency of your drafted die will allow you to transmute precious materials, collect alchemical essences, acquire and activate artifacts, and perform experiments that will progress you along four mastery tracks.
You will also build a secret hand of publication cards which - together with the value of your Experiments, the completed formulas of your Philosopher's Stone and your collected gold - will determine your final score in Victory Points and, perhaps, make you the greatest alchemist, able to rival Hermes Trismegistus himself!
Components
- 1 Main Game board
- 5 double-layered Laboratory boards
- 108 cards
- 48 Artifact tiles
- 40 wooden Formula tiles
- Dominant Essence tokens
- Ethereal die tokens
- Reactions tokens
- Chameleon tokens
- Essence tokens
- Bonus tokens
- 20 small wooden discs
- 16 custom dice
- 12 large wooden discs
- 80 acrylic material cubes
- Components for solitaire play
- Rulebook
Setup
The rules of the setup are a bit complicated. To set up a game of Trismegistus, follow the steps here.
Game Play
During a round each player will perform a number of actions and react to actions performed by their opponents. After a player performs an action (and allows opponents time to resolve reactions), play passes to the next player.
Player Turn
Each player's turn consists of four phases: draft, action, opponent reactions, and lab cleanup. These steps are always resolved in this exact order.
Draft
If your Potency track is empty (you have no die there), you must draft a die. Choose any of the dice on the main game board and resolve the following steps:
-
Count the number of dice in the bowl you have drafted from, including the die you have just taken, and place it on the corresponding position of your Potency track.

-
Optionally spend one Ethereal Die token to move the drafted die one space left on the Potency track. Note that you may not exceed the maximum Potency value of 5.
Important:
While drafting a die is mandatory when your Potency track is empty, this step will usually be skipped if you have a die on your Potency track (as you usually want to use all Potency of a die you drafted).
However, you are allowed to draft a new die and retire a die from the Potency track to the used dice area of your Laboratory board (effectively wasting any of its remaining Potency), if you want to.
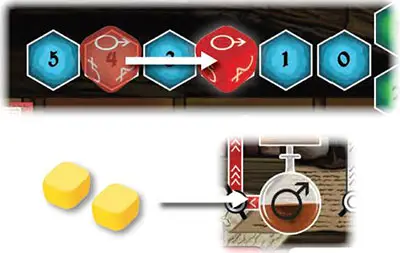
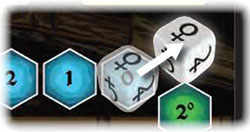
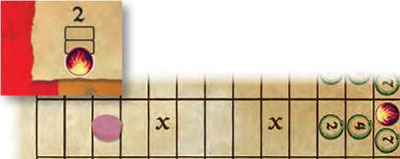
Example: Anna drafts a die from the Mercury
bowl of the main game board. The bowl contains 3 dice (including the die Anna drafts), so she places the drafted die in position 3 of the Potency track.
Also, she immediately spends 1 Ethereal Die token. This allows her to move the die from position 3 to position 4. Anna still has 1 more Ethereal Die token but she may not spend it now, as only one Ethereal Die can be spent per dice drafted.

Drafting 
After you draft a , immediately turn it into a different symbol. You still use the number of dice in the@ 88.jpg bowl to determine your potency, but for all action and reaction purposes your die will be treated as the symbol you changed it to.
Mercury And Gold
Two materials have special properties.
Mercury is both a material and an essence. When you receive it as an essence, treat it the same way as if you received it as a raw material, and you may spend it as either material or essence. See the rules governing Transmutations on page 15 for further consequences of this rule.
Gold  is a wildcard. It can be spent as any other material, for every purpose. That includes spending it as an essence, substituting a . For other special properties of Gold.
Actions
Spend Potency of your die (by moving it closer to 0 on your Potency track) to perform exactly one of the following actions:
-
Spend 1 or more Potency to harvest materials.
For every 1 Potency spent, gain 1 material from the supply and add it to the raw material holding space on your Laboratory board corresponding to the symbol on your die.
-
Spend 1 or more Potency to acquire alchemical essences.
For every 1 Potency spent, gain 1 essence from the supply and add it to your supply. The type of essence you would gain is shown next to the bowl corresponding to the symbol on your die.
Note: if you use a
 to take this action, you may choose any essence, but if you acquire multiple essences as one action (by spending more than 1 Potency) all acquired essences must be of the same type.
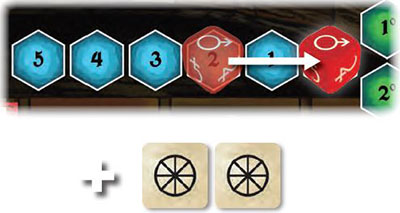
-
Spend 1 or more Potency to perform transmutations.
For every 1 Potency spent, you may transmute 1 raw or refined material along 1 transmutation arrow matching the color of the die. All transmutations performed as part of a single action must be resolved along the same transmutation arrow on your Laboratory board.
Please refer to the Transmutation and Artifact Activation section of the rules for the additional cost of this action and more details.
-
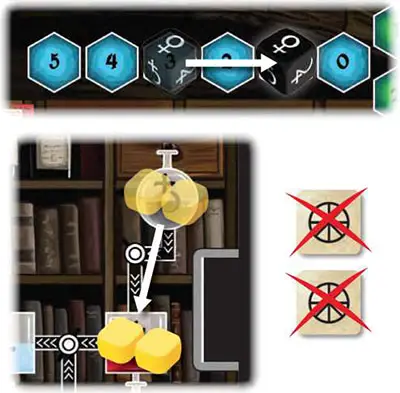
Spend exactly 3 Potency to acquire an Artifact from the Artifact Market.
You may choose any 1 of the 2 Artifacts displayed in the spaces corresponding to the color of your die.
Place the acquired Artifact in any Artifact slot on your Laboratory board (if it is occupied, remove the old Artifact from the game), and resolve its ability immediately (the Artifact does not exhaust). Refill the empty space of the Artifact Market by drawing from the current Artifact stack.

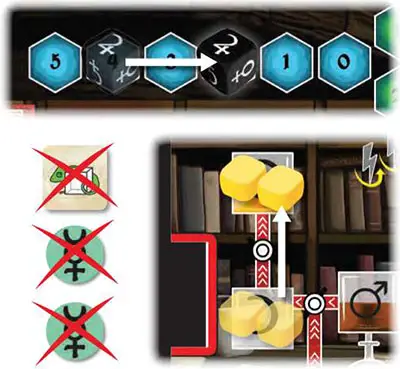
-
Spend exactly 1 Potency to recharge any one of your Artifacts (by flipping it face up).
You may not recharge other players' Artifacts.
-
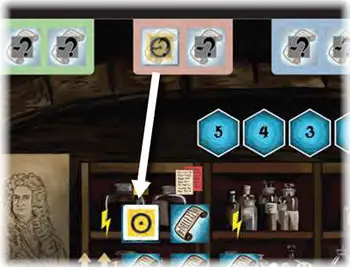
Spend exactly 1 Potency to acquire an Experiment card from the main game board section corresponding to the symbol on your die.
You Place the acquired Experiment next to your Laboratory board face up. If you already have 2 Experiments (not including your Masterpiece), you may not perform this action.
If the Experiment purchased came from the current Experiment deck, replenish it immediately. Otherwise, do not replenish the Experiment card on the main game board.
Chameleon Tokens
Certain effects in the game (Formulas, Bonus tokens) will grant you a chameleon token.
You may discard a chameleon token immediately before your action to resolve your action as if you had a different die: you may change both the icon and the color of the die for that single action (which can involve spending multiple potencies as explained above).
Do not change the die itself, as the chameleon token does not affect future actions of the same die or the reactions of other players (all players will thus react using the symbol and/or color of the die you drafted, ignoring the Chameleon token)
For example, discarding a Chameleon token would allow you to transmute over a red arrow using potency from a black die, including multiple times during the same action.
Free Actions
As part of your turn you are also allowed to perform any of these free actions (in any order and as many times as you wish, immediately before or after your main action, but not interrupting it):
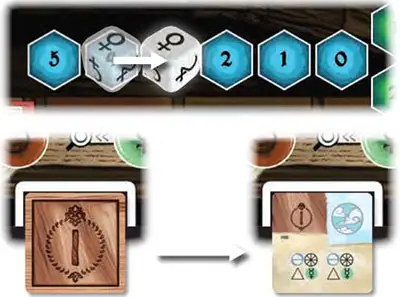
-
Purchase a Formula from your Laboratory board and place it in your Vault. Please refer to the Philosopher's Stone section of the rules for more details.
-
Sample a face up Formula in your Vault (by flipping it face down) in order to use its special ability.

-
Perform an Experiment placed next to your Laboratory board or your Masterpiece Experiment by paying its material cost. Please refer to the Performing Experiments section of the rules for more details.
Opponent Reactions
After you have performed your Action (and any desired Free Actions), each other player may flip one of their face up Reaction tokens in order to perform exactly 1 of the following reactions:
Gain 1 material from the supply and add it to the raw material holding space on their Laboratory board corresponding to the symbol on your die.
Gain 1 essence from the supply and add it to their supply. The type of essence they would gain is shown next to the bowl corresponding to the symbol on your die.
Transmute 1 raw or refined material using a Transmutation arrow of the color corresponding to the color of your die (spending essence as normal).
Recharge any single exhausted Artifact on their Laboratory board.
Note: the reacting player's dice has no bearing on reactions, and it does not cost them potency to perform these reactions.
Important:
Reactions are designed to mostly remain contained within players' Laboratory boards without influencing the state of the main game board. This means that reactions can be performed simultaneously by all reacting players.
However, a player may request these be performed in order. In such a case, players should resolve reactions starting from the player sitting on active player's immediate left and continuing clockwise until each player had a chance to react or pass on the reaction.
Lab Cleanup
After you have performed your action and allowed your opponents to react:
-
Check the position of the die on your Potency track. If it is on 0, move it to the used dice box on your Laboratory Board.
-
If your used dice box now contains 3 dice, move your Turn Order marker to the first open position on the New Round Order track.
You do not draft any more dice or take your turns this round, but you are allowed to react to opponent actions normally (using face-up Reaction tokens as usual, if you have any left). Note that since you will not take more turns this round, you may not perform any more free actions until the next round.
-
If any player markers are now on or above Bonus tokens on any Mastery tracks, remove those Bonus tokens - they will not be available any more.
Important:
All players that reach a Bonus token on the same player turn (via reactions) are allowed to benefit from its ability. Only when the turn is over will used Bonus tokens be removed from the Mastery tracks.
After performing this step, play passes to the player whose Turn Order marker is next on the Current Round Order track. If no such player remains, the round ends.
End of the Round
Once the round has ended, perform the following steps in order to set up the next round of play.
-
All players flip all their Artifacts and Reaction tokens face-up.
-
If this was the third round, skip the remainder of this section and proceed to End Game Scoring immediately.
-
Remove all the face-up Artifacts from the Artifact Market (but not from the Laboratory boards).
-
Replace the current Artifact stack with a stack of Artifacts of level equal to the number of the next round.
-
Draw 6 new Artifacts from the current Artifact stack to fill the market.
-
Remove all face-up Experiments of level one lower than the number of the current round from the main game board (but do not remove any finished or unfinished Experiments belonging to players).
This means, that at the end of round 1 you do not remove any Experiments and at the end of round 2 you remove all level 1 Experiments, if there are still any on the main game board.
Example: at the end of round 2 remove all level 1 Experiments from main game board.
-
Replace the current Experiment deck with the experiment deck of level equal to the number of the next round.
-
Add 1 new Experiment drawn from the current Experiment deck to each Experiment space on the main game board.

Example: at the end of round 2 add one new level 3 Experiment to each Experiment space.
-
Without changing their order, slide all Turn Order markers on the Next Round Order track to the same spots on the Current Round Order track.

-
Collect all the dice in play (from all bowls and Laboratories) and roll them following the procedure described in the Rolling Dice and Filling Bowls section, which you will find in the Game Setup section of these rules.
Further Game Rules
The following section provides details on some of the most important concepts of Trismegistus: Transmutations, Experiments and the proper use of the Philosopher's Stone.
Raw and Refined Materials
Any material in the round material space is a raw material. Raw materials are marked in the game as circles:

 is a symbol for any raw material.
Any material in the square material space is a refined material. Refined materials are marked in the game as squares:

 is a symbol for any refined material.
Lead  is always a raw material.
Silver  and Gold @g are always refined materials. An ability allowing you to gain any raw material does NOT allow you to gain silver or gold.
Gold is a wild material and can stand in for any material in the game for any reason.
A refined material can always be used in place of its raw counterpart, but not vice versa.
Transmutations and Artifact Activation
A Transmutation is the act of moving a material from one of the spaces on a Laboratory board along a Transmutation arrow to another space, thus changing one material into another and upgrading it from a raw state to a refined state.
When performing a Transmutation as an action, each individual Transmutation costs 1 Potency. Transmutations performed as actions (via potency) or reactions (via flipping a Reaction token) are limited by the color of the die used to perform them.
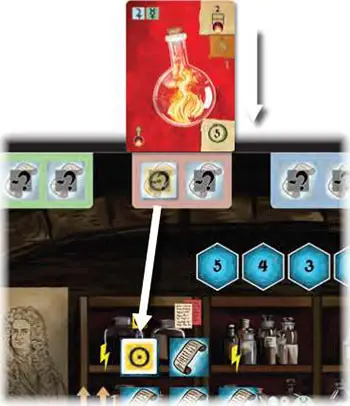
However, certain Experiments, Artifacts, Formulas may grant wild Transmutations  , which do not cost Potency, but still include all of the following steps:
-
Choose 1 raw or refined material on your Laboratory board (with the exception of
) -
Pay 1 Essence token or 1
(Mercury), by returning it to the stock. -
Move the material cube along the Transmutation arrow (clockwise) to the next material refined space (lead becomes copper, copper becomes tin, tin becomes mercury, etc.).
-
The color of the Transmutation arrow must match the color of the die on your Potency track (if you are transmuting as an Action) or the color of die on the active player's Potency track (if you are transmuting as a Reaction). If performing a wild Transmutation, skip this check.
-
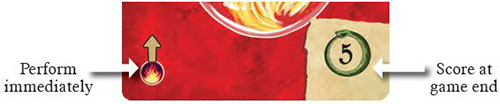
Move your player marker up 1 space on the Mastery track marked with the same Essence symbol. Note: If this Mastery track is already at the top and you should move your marker, receive 1 Victory Point instead (only 1 Victory Point, regardless of the number of spaces the marker would have moved).
-
If your marker enters a space with a Bonus Token, perform its effect immediately, by either moving 1 space up on any Mastery Track (for the bonus token), or by taking a Chameleon token or an Ethereal die (as shown on the Bonus
 Token).
 -
If the Transmutation arrow you used passes over an active (face-up) Artifact, you may use the Artifact's ability now. If you do, flip the Artifact face down.
Important Transmutation Rules To Remember
You may Transmute both raw and refined materials.
If you cannot pay an essence or
You may perform multiple Transmutations as part of a single Action (by paying 1 Potency for each), but they must all be performed along the exact same Transmutation arrow (but can come from raw and refined spaces of the transmuted material type - in any combination - and may use different Essences).
Transmutations are performed along transmutation arrows only. You may not simply upgrade a raw material into its refined version.
When you perform a Transmutation as a reaction, you use the color of the die on the active player's Potency track, and not on your Potency track.
If a special ability grants you multiple wild Transmutations, they do not have to be performed along the exact same Transmutation arrow.
Performing Experiments
As a Free Action during your turn you may perform an Experiment placed next to your board, or the Masterpiece Experiment kept in your hand. To perform an Experiment:
-
Check the Experiment's Mastery track requirement. If the position of your player marker on the track indicated is equal to or higher, you may perform the Experiment.
-
Pay the Experiment's material cost by discarding the proper materials from your Laboratory board. Remember that you can always use
as any material. -
Receive any bonuses printed on the Experiment in any order. All immediate effects (like wild Transmutations or track movements) must be either used immediately or ignored. Some of these effects score you victory points based on certain conditions: score these immediately. Do not score the victory points shown in the bottom-right corner, as they will be counted at the end of the game.
-
Slide the Experiment card into the proper completed Experiment column. If this is the first Experiment in the column, receive 1 Formula tile from that column, and place it in your Vault.
Mastery Discounts
There are two discounts you may receive every time you perform an Experiment:
-
You may lower an Experiment's Mastery track requirement by spending
(Silver): for each you spend you may lower the Mastery track requirement by 1.Note: this does not increase your actual position on the Mastery track.
-
Ignore any one material cost of the experiment OR lower the mastery track requirement by one, for each Formula unlocked in the corresponding elemental column.
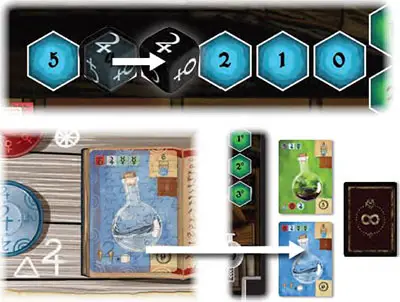
The Philosopher's Stone
The grid in the middle of each Laboratory board is the Vault, where the players build their Philosopher's Stone. Each alchemist in the game comes with their own Vault and a set of their own Formulas.
Each of those Formulas is socketed in one of the 8 Formula spaces on the top of Laboratory board at setup. They cannot be used until they are unlocked:
You unlock 1 of the Formulas available in an Experiment column after you complete its first Experiment.
On your turn, as a Free Action, you may unlock 1 or more Formulas by paying a number of
, as explained below.
Unlocking Formulas With Gold
Depending on how many Formulas you have unlocked with Gold, you pay:
- 1 for the first Formula,
- 2 for the second Formula,
- 3 for the third Formula,
- 4 for the fourth Formula.
Whenever you unlock a Formula with gold. place 1 material cube next to the vacated Formula space (avoid covering the discount icon), to mark that it has been bought with gold, and not released by performing an Experiment. The material cubes also track the price you have to pay for unlocking the next Formula with gold.
Important: You may unlock at most 1 Formula from each column using any of the above methods. You may never pay to unlock a Formula from a column if one of its Formula sockets is marked with a material cube
Performing further Experiments (after the first) will never unlock a second Formula from the same column. It can only be bought with
Placing Formulas In The Vault
Once unlocked, a Formula must be placed immediately in an empty space of the player's Vault, where it will contribute towards completing the Philosopher's Stone. After placing, check for completed rows and/or columns (thematically: parts of the Stone):
If you completed a row, immediately receive all the bonuses from the left and right side of the row.
If you completed a column, immediately receive all the bonuses from the top and bottom of the column.
If you completed both a row and a column with one Formula, resolve both of the above.
Important: All bonuses are resolved immediately upon completing a row and/or column. If you are unable to make use of some or all of them, you will not be able to use them later.
However, a Formula bonus (the one printed on the tile itself) can be used at a later time. You do not have to expend them immediately upon placing the formula tile.
Publication Card Hand
Publications are a special kind of card acquired during the game, held secret in hand and played from hand in order to score at the end of the game (see the End Game Scoring section for more details). Whenever any game ability allows you to draw publications (via this symbol):

Draw 2 Publication cards and add them to your hand.
Return any 1 publication card from your hand to the bottom of the Publications Deck.
If there is just 1 Publication in the deck, simply add it to your hand without returning any cards.
In the unlikely event of the Publication deck being empty, simply ignore this ability for the rest of the game.
Important: Publications are never removed from the game, and there is no limit on how many publications you are allowed to have in your hand at any time.
Timing Rules
Many effects in Trismegistus may happen at seemingly the same time. Below follows a short list of resolving some timing conflicts in the game:
-
No effects can be used between moving a material cube along a Transmutation arrow and activating the Artifact.
Even if you receive a Bonus Token's effect due to performing Mastery track movement, you are only allowed to use it after the Transmutation is completed, and an Artifact's ability is completely resolved.
-
When performing multiple Transmutations as part of a single Action you are allowed to use any gains from any of those Transmutations in subsequent Transmutations. If the first Transmutation generates Essence tokens, they can be used for subsequent Transmutations resolved as part of the same Action.
-
No effects gained from Bonus Tokens and Formulas can ever interrupt a single Transmutation procedure.
-
Formulas and Chameleon tokens can only be used, and Experiments can only be performed during your own turn. However Artifacts can be triggered during other players' turn if using a reaction to perform a Transmutation.
End of the Game
Once the third round has concluded, the game ends. Any points scored now are added to the Victory Points accrued during the game. Mark the points by moving your Victory Point marker on the Victory Point track.
-
Experiments
Add all the Victory Points printed on the bottom- right corner of your completed Experiments. Experiments reserved and placed next to your Laboratory board, or an incomplete Masterpiece Experiment score you no points.
-
Publications
Each player should now reveal their hand of Publication cards. In order to score a publication, it first needs to be completed with elemental symbols from the Laboratory board.

An elemental printed on an Artifact or a completed Experiment can be used only towards the completion of one Publication. (But an Artifact with two elementals printed on it can contribute one each to 2 Publications, or both towards 1).
Additionally, if a player reached the top (step 12) of one or more Mastery track, they also consider having one extra elemental of the shown type.
Once each player has completed some (or possibly all) of their Publications, they receive Victory Points only from the cards they completed. Publications completed by other players will not score points for you.
-
Philosopher's Stone
The Formulas locked in your Vault contribute towards the completion of your Philosopher's stone.
Depending on the number of these Formulas, you receive a number of points:
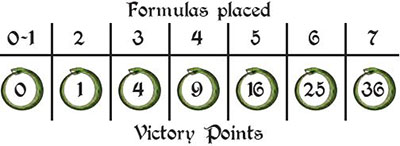
-
Scoring Materials and Essences
Each Gold o and each Ethereal Die token O[ remaining on your Laboratory board is worth 1 Victory Point. Any other materials, Artifacts, Essences and Chameleon Tokens are not worth any Victory Points.
-
Mastery Tracks
Players on the top 3 rows of each Mastery track (level 10, 11, and 12) receive 2/4/7 Victory Points, respectively.
The player with the most Victory Points is the best Alchemist and the winner of the game.
In the case of a tie, the tied player with the most completed Experiments is the winner. In case of a further tie, the tied players share the victory and publish a stunning tome together.
Continue Reading
