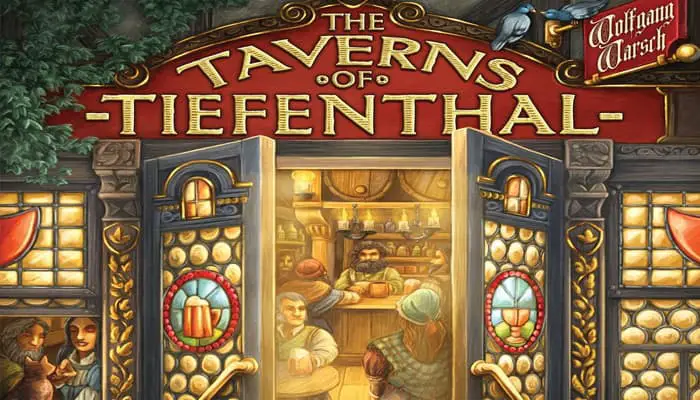
The small village of Tiefenthal is famous for its dimly lit taverns. When visiting the famed TAVERN OF THE DEEP VALLEY, you'll encounter the regulars, who are citizens of the area.
Each player assumes the role of a tavern host and tries to attract new, wealthy guests. Only by doing this will you earn enough money to afford expansions to the tavern, which will, in turn, attract well-respected noblemen to visit.
But which expansion is the right one to invest in? An additional table never hurts, and a larger beer warehouse is also a good idea.
With the proper focus on your spending, you'll ensure that the beer flows freely!
The challenge of the Tavern of the Deep Valley is to make skillful dice choices and to develop your personal deck of cards as profitably as possible.
Components
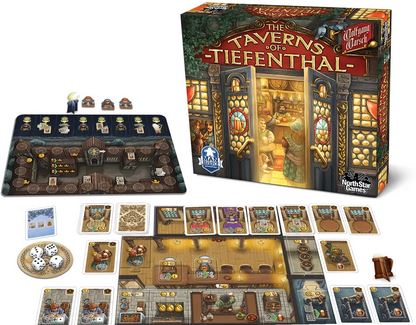
- 1 Monastery Board
- 240 Cards
- 4 Taverns
- 16 White Dice
- 12 Colored Cubes
- 4 Beer Coasters
- 12 Counter Guest Markers
- 4 Beer Markers
- 4 Safe Markers
- 4 Monastery Markers
- 4 Reputation Markers
- 1 First Player Marker
- 1 Turn Marker
- 20 Schnapps Tokens
- 12 Entertainer Tiles
- 4 Guest Books
- 40 Signature Tiles
- Instructions
Setup
-
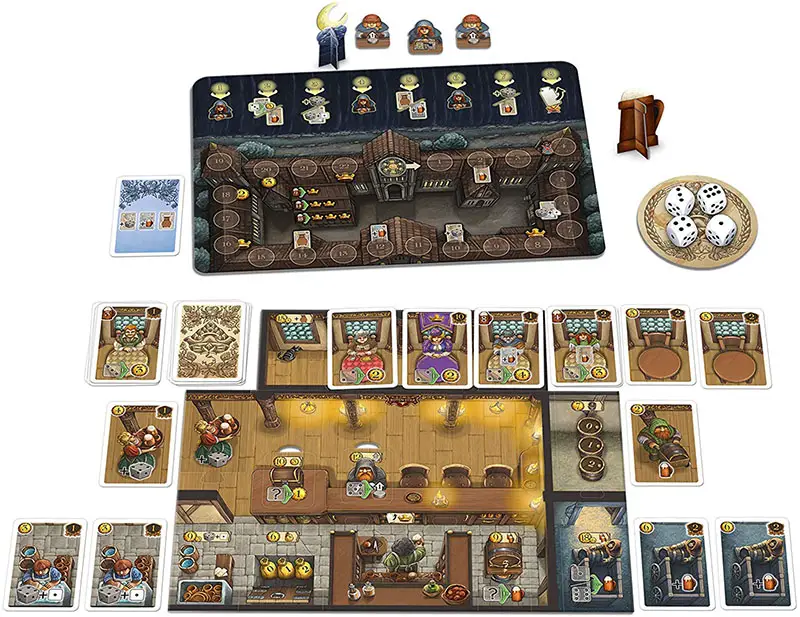
Lay out the Monastery Board with the summer side (without snow) upwards. Place the Schnapps Tiles in the 3 recesses in the Monastery Board so that the schnapps are not visible.
During the game you will be passing the Dice Coasters from player to player. Leave enough room in the middle of the table so as to make this easy.
-
Assemble the Round Marker (Moon) and place it above the first box of the round track at the top of the Monastery Board. Place 3 Counter Guests per player next to the Monastery. Any remaining Counter Guests can be returned to the box.
-
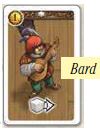
From the Tavern Cards first return all Bards to the box; they are needed only when using Module 3 onwards.
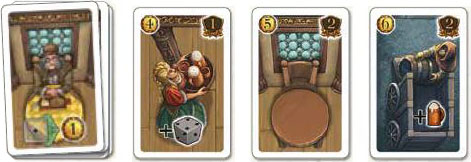
Sort the remaining Tavern Cards (Beer Merchants, Dishwashers, Waitresses, Tables and Beer Suppliers) according to their type and place them as shown in order of ascending cost as an open display, so that each player can reach them easily.
The cost in Doubloons for each Tavern Card is shown in its top left corner.
-
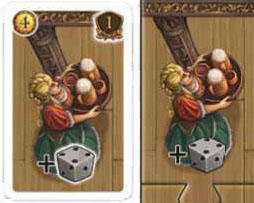
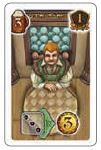
The Guest Cards are sorted next. In the top left corner of the Guest Cards, the cost of purchasing the card in Beer is shown. Find the 8 guests with a cost of 3 Beers. They are placed as a face up stack.

Next, remove the 10 Guest Cards with a white die showing at the top of the card. These cards are only needed when using Module 3 onwards; return them to the box.
Shuffle the rest of the Guest Cards and place them as a face down draw pile to the left of the guests that cost 3 Beers. Now draw 4 cards from the Guest Card draw pile one at a time and lay them face up to the right of the guests that cost 3 Beers.
-
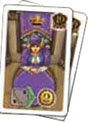
The Nobles Cards are a special type of. guest. Place these cards as a face up stack to the right of the rest of the Guest Cards.
-
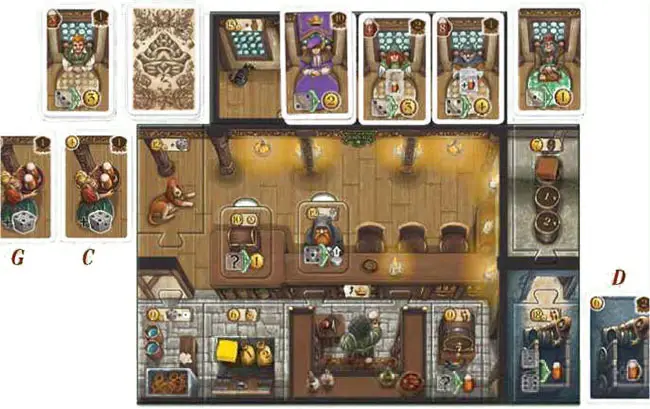
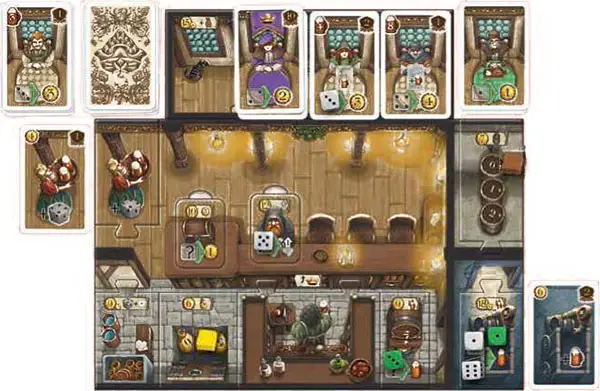
Each player takes a Tavern Board and a set of 10 Equipment Tiles (Tables, Waitress, Cashbox, Monk, Dishwasher, Safe, Host, Barrel, Beer Supplier and Beer Storage) and places each of them in the appropriate areas of his Tavern Board.
The tiles are aligned so that the Doubloon symbol is visible in the top left corner. Align the Host so that the Victory Points are not visible at the counter.
-
Each player takes a yellow Safe Marker and places it on the "0" space of the Safe, as well as a brown Beer Storage Marker, which he places on the "0" space of the Beer Storage.
-
Each player takes a Dice Coaster, and places it in front of himself. Then each player takes 4 White Dice.
The Dice in the players' colors are placed on the table as a general supply.
-
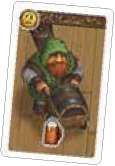
Each player next takes the 7 Regular Customer Cards ("Regulars") in his color (recognizable by the color of the tablecloth) and adds to them 1 Waitress, 1 Table and 1 Beer Supplier from the general supply of Tavern Cards.
These 10 cards form the starting deck of each player. The starting deck is shuffled and placed face down to the left of the Tables on the player's Tavern Board. This forms the player's deck.
-
Each player takes the Monastery Marker in their color and places it on the "0" space of the track on the Monastery Board.
-
Assemble the Beer Mug. The player who was last in a tavern places the beer mug in front of him as a Start Player marker.
-
All remaining components can be returned to the box. They are not needed for the introductory game (Module 1).
The Modules
The Tavern of the Deep Valley is a game that can be played with several successive modules. In the basic game (Module 1) your goal is to attract as many Nobles as possible.
In Module 2, you can receive bonus actions using Schnapps. Module 3 introduces the reputation bar, which offers players another way to get Beer and Nobles.
In Module 4, players select a starting card that determines their starting Equipment. Finally, in Module 5, you can add entries to your guestbook in order to unlock additional bonuses.
Each Module builds upon the previous ones. So if you want to play Module 4, you must also use Modules 1,2 and 3. For inexperienced players, we recommend starting with only Module 1. Experienced gamers may start with Modules 2 and 3 as well.
Within these rules, we will explain the rules for the basic game (Module 1). The rules for the other Modules can be found in the Supplement.
Components: Module 1
- 1 Monastery Board
- 1 Round Marker (Moon)
- 12 Counter Guests
- 4 Tavern Boards, including 4 sets of Equipment: Tables, Waitress), Cashbox, Monk, Dishwasher, Safe, Host, Barrel, Beer Supplier and Beer Storage.
- 16 White Dice
- 12 Colored Dice (3 each in the player colors)
- 4 Dice Coasters
- 4 Beer Storage Markers
- 4 Safe Markers
- 4 Monastery Markers
- 1 Beer Mug (Starting Player Marker)
- 207 Cards
Game Overview: Module 1
Each player seeks to expand his tavern. In the course of the game, guests will visit your tavern, paying you for serving their needs.
With the money earned you can recruit new temporary or permanent employees or expand your tavern with more tables or a larger capacity in your beer storage.
Object of the Game
After 8 rounds, the player who has the most lucrative tavern, thus scoring the most victory points, is the winner.
Game Play
The game is played over 8 Rounds. The Round Marker (Moon) tracks the current Round on the Round Track, found along the top of the Monastery Board.
Each Round is divided into 7 Phases, which are played in this order:
AA New Evening in the Tavern: Start PlayerBThe Tavern Fills Up: all players simultaneouslyCHere Comes the Waitress: all players simultaneouslyDHow Can I Serve You?: in turn orderEPlanning your Actions: all players simultaneouslyFTime to Serve the Guests!: in turn orderGClosing Time!: all players simultaneously
The five Phases A, B, C, E and G are played simultaneously by all players, and Phases D and F are played in turn order, beginning with the Starting Player and proceeding clockwise from there.
Phase A: A New Evening in the Tavern
(Start Player)
The Start Player moves the Round Marker (Moon) to the next space on the Round Track. (In the first Round it is placed onto the first space of the track).
Whenever the Round Marker moves onto a symbol (or past a Schnapps symbol, in Module 2), all players receive the corresponding bonus.
Phase B: The Tavern Fills Up
(all players simultaneously)
In this Phase, Guests will enter your Tavern. To do this, reveal the top card of your deck and place it face up in the appropriate spot in your Tavern. Depending on what card you have drawn, you will have to place it in its appropriate spot.
You then draw another Guest Card from your deck and place it in its appropriate spot. Continue to repeat this until all of your Tables (existing Tables and those that were possibly drawn in this Phase) are occupied.
Phase B now ends for you, and you stop drawing cards. It is common that not all players finish this Phase at the same time.
Important: Nobles are very sociable and like to sit together at a table. The first Noble you draw in a round is placed at a free table, as usual.
Every subsequent Noble you draw will be put at the same table with the other previously drawn Nobles. (Place the new Noble on top of the existing Nobles).
In the Closing Time! Phase G, all cards you've drawn and placed in your Tavern this Round will be placed in your discard pile.
If at any time you need to draw a card from your deck and it is empty, you must shuffle your discard pile to create a new face-down draw deck.
As soon as the Tables of all players are lled, this phase ends.
Example: Wolfgang's first drawn card is a Noble A so he places him at a free Table. Then he draws a Table B, a Waitress C and a Beer Supplier D one after the other and places them in the appropriate places on his Tavern Board.
The next two cards drawn are two Guests E, which are placed at the second and third free Tables. The next card Wolfgang draws another Noble F which is placed on top of the previously drawn Noble.
He then draws a second Waitress G and places her next to the other previously drawn Waitress. Finally, he draws a "Regular" Guest H and places him at the previously drawn Table. Since all Tables are now occupied, Wolfgang does not draw any more cards.
Phase C: Here Comes the Waitress
(all players simultaneously)
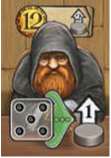
For each Waitress you drew in Phase B you may take 1 Die in your player color from the general supply, roll it and then place it below your Tavern Board. These dice will be used in phase for actions in Phase F.
If you hired a permanent Waitress on an earlier turn (turning the Dog side of the tile over to the Waitress side), you will also receive 1 Die in your player color from that Waitress,.
At any given time you can have a maximum of 3 Dice in your player color. Any additional Waitresses you may have in excess of 3 do not give you any more Dice.
Example: Wolfgang has previously drawn 1 Waitress, and has also hired a permanent Waitress.
He may, therefore, take 2 Dice in his player color and roll them immediately.
Phase D: How Can I Serve you
(in turn order)
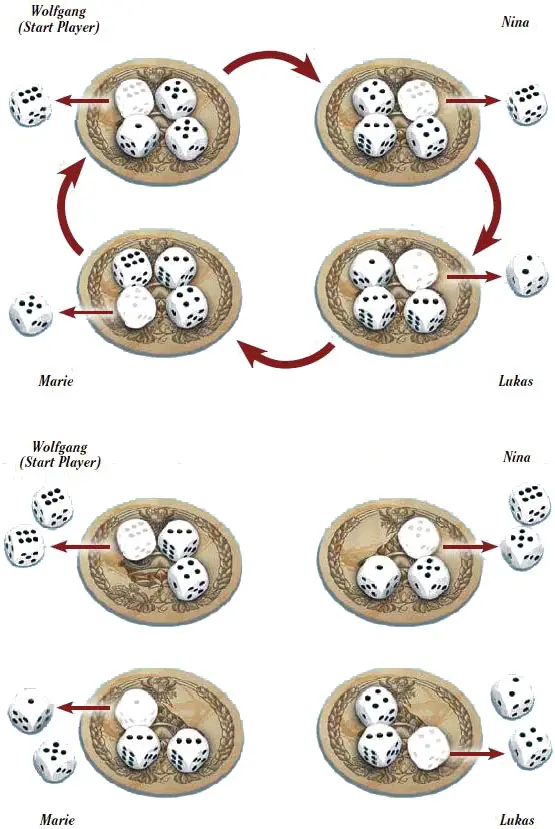
First, each player rolls the 4 White Dice on their Dice Coasters at the same time, and returns them to the Coaster, with the rolled numbers facing up.
Then, beginning with the Starting Player and continuing in turn order, each player selects 1 of the White Dice on his Coaster and places it below his Tavern Board.
After all players have chosen 1 White Die, everyone passes their Dice Coaster (which now has 3 White Dice on it) to the player on his left.
Players repeat the action of selecting a White Die and passing their Coaster to the left 3 more times until all Coasters are empty and each player has 4 White Dice below his Tavern Board. These Dice will be used to take actions in Phase F.
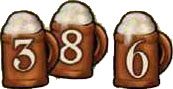
Example: Wolfgang, the Start Player, takes a "6" Die from his Dice Coaster. Nina also takes "6" from her Coaster. Luke takes a "2" and Marie takes a "5". The Coasters are then all passed to the left.
Wolfgang again takes a "6" from Coaster passed to him by Marie. Nina takes a "5", Luke takes a "4" and Marie takes a "1 ". The Coasters are passed to the left two more times, until all players have 4 White Dice.
Phase E: Planning your Actions
(all players simultaneously)
Before performing actions in Phase F, you must first plan them. To do this place all of the Dice which are below your Tavern Board (both White Dice and
Dice in your player color earned via Waitresses) onto any appropriate action spaces. This planning phase is mainly for your reference and may be freely changed later in the Round.

On an action space showing a "?", you may place a Die of any value.

On an action space showing a specific number of pips, the Die placed must be of that value (exception: using a Dishwasher).

On an action space showing a green arrow with a "lx", only 1 Die may be placed there.

On an action space showing a green arrow with a any number of Dice may be placed there.
Important: Even if you have placed several Nobles at the same Table, you may still only place 1 Die on the topmost Noble card action space.
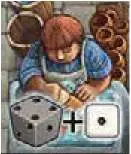
For each Dishwasher in your Tavern, you may place 1 Die on any action space and treat it as if it were 1 value higher. The Die is not rotated, but placed on the space with the actual value rolled.
That way you can reference later how many Dishwashers you have used. Die values do not wrap around; thus a Die of value "6" can never be made into a "1" by using a Dishwasher!
You may use several Dishwashers on the same Die to increase its value by more than 1.
Example: Wolfgang has a total of 6 Dice this Round with values of 1,1,3,3, 5 and 6. he places 2 "1 "s and the "6" on the Beer Supplier, the "5" on the Monk, a "3" on 1 of his Guests and the other "3" on the Barrel.
As soon as all players have placed their Dice, Phase F begins; beginning with the Start Player, players perform their planned actions in turn order.
Phase F: Time to Serve the Guests
(in turn order)
The Start Player takes all of his actions on his turn. After that, the next player in turn order takes all of his actions, and so on, until all players have taken their actions.
On your turn, remove your placed Dice one at a time to keep track of the actions you take. You receive "virtual" Doubloons to spend (or save) by serving Guests, and "virtual" Beer to spend (or store) when you use Beer Merchants.
(Doubloons and Beer are not represented by actual game components). When you remove a Die from a Monk, you move forward on the Monastery Track. Doubloons and Beer can be used to perform the actions described on the following pages (see "Doubloons Actions" and "Beer Actions".
Important: Dice are immediately removed from your Tavern as you use them.
This will help you keep track of which Dice you have already used and which ones you have not.
This is very helpful, especially in later Rounds. Used White Dice are returned to your Dice Coaster and the Dice of your color are returned to the general supply.
If you have not removed a Die from its space yet, you can move it to another, previously unused space during this Phase, if you should happen to change your mind about which actions you'd like to take.
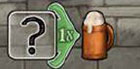
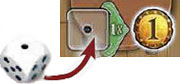
When a Die is removed from this space, the player receives 1 Beer.
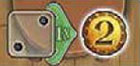
When a "2 " Die is removed from this space, the player receives 2 Doubloons.
The actions in this phase are dynamic and can be performed in nearly any order. For example, a player could first perform an action that costs 5 Doubloons by removing Dice worth 5 Doubloons from their Tavern.
Afterwards he can remove Dice worth 4 Beer and take an appropriate action. After that he could (if he still has enough Dice left) perform another action costing 2 Doubloons by removing the appropriate number of Dice.
You can always combine several Dice to pay for an action. If you remove Dice in excess of the required amount, you may spend any excess Doubloons and/or Beer (e.g. remove a 4-Doubloon Die and perform an action that costs only 3 Doubloons) during later actions or save it in your Safe/ store it in your Beer Storage at the end of the action Phase.
Doubloons and Beer which are not used, saved or stored at the end of this phase are lost.
The Action Spaces Explained
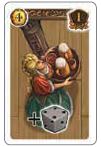
1. Serve a Guest
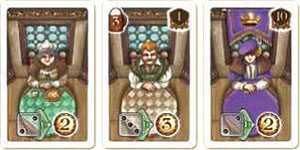
When removing a Die from a "Regular", a Guest or a Noble, receive the number of Doubloons as indicated on the bottom right of the space/card.
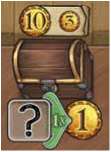
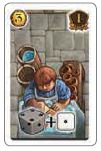
2. Withdrawal From the Cashbox
When removing a Die from the Cashbox, receive 1 Doubloon, regardless of the value of the Die placed there.
If you have upgraded your Cashbox, receive 3 Doubloons instead.
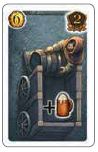
3. Deliver Beer
Dice of value "1" and/or "6" may be placed on the Beer Supplier space. For each Die you remove from this space, you receive 1 Beer, plus 1 additional Beer for each Beer Supplier card next to the printed Beer Supplier space.
If you have upgraded your Beer Supplier space, you will receive 2 Beers for each Die you remove from the space.
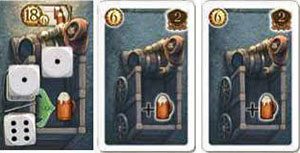
Example: Wolfgang places 2 "1" Dice and 1 "6" Die on his Beer Supplier (which has not yet been upgraded).
Since he has 2 Beer Supplier cards next to the space, he receive 3 Beers for each pf the Dice, for a total of 9 Beers.
4. The Beer Merchant Visits
For each Beer Merchant you placed in Phase B, you receive exactly 1 Beer.
The Beer Merchant does not increase the number of Beers you receive per Die with your Beer Supplier!
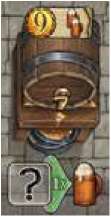
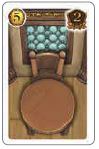
5. The "house Brew" Barrel
The Barrel represents the House Brew of your Tavern. When removing a Die from it, you receive exactly 1 Beer, regardless of the value of the Die.
If you have upgraded your Barrel, you will receive 2 Beers instead.
6. The Monk
For each "5" Die you remove from the Monk space, you may move your Monastery Marker 1 space on the Monastery Track. If your Marker passes or ends its movement on a space showing a bonus, you receive that bonus immediately.
If you have upgraded your Monk, you may move your Marker ahead by 2 spaces.
If your Marker moves beyond the "22" space on the Monastery Track, place your Marker back on the starting space of the Track and continue its movement from there.
Which actions can be performed by acquiring doubloons and beer?
Note: There is no fixed order in which actions must be performed on a turn, or how and when Doubloons and/or Beer must be earned.
You do not have to perform all Doubloon Actions first, before performing all Beer Actions.
Often, a mixed approach will be more advantageous, i.e, first use some of your earned Doubloons to pay for an upgrade, which will in turn earn you more Beer, etc.
Important: Whenever you purchase or earn new cards, place them face down on the top of your draw deck. In this way, they are immediately available to you in the next Round!
Doubloon Actions
Purchase Tavern Cards
Take 1 or more Tavern Cards (Beer Merchant, Dishwasher, Waitress, Table or Beer Supplier) from the general display and place them face down on top of your draw deck. The cost of each Tavern Card in Doubloons is displayed in the top left corner of the card.
Important: In a given Round, you may buy a maximum of 1 Tavern Card of each type (as listed above).
Upgrade your Tavern or Hire Staff
Each area (Equipment/Furnishing/Staff)of your Tavern, with the exception of the Host Counter, can be permanently upgraded by paying earned Doubloons. (The Host Counter is flipped over when using Module 3).
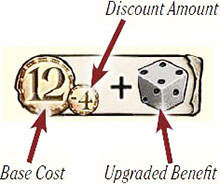
The base cost of an upgrade is the number in the large Doubloon symbol, shown in a banner in the upper left corner of the area to be upgraded. To the right of the base cost is shown the benefit of the upgraded area.
To upgrade an area, flip its tile to the opposite side. From now on, the upgraded benefit is in effect. Unless otherwise stated, the upgraded benefit may be used immediately. If there were any Dice on the upgraded tile, return them to the tile after flipping the tile over.
Important: Whenever you upgrade a tile, you immediately receive 1 Noble from the general supply; place it face down on the top of your draw deck.
Tip: This important reward is often forgotten, especially when playing the game for the first time. The symbol above the Host Counter helps you to remember to take a Noble when upgrading.
Special Offer!
The cost of an upgrade can be reduced by returning 1 or more Tavern Cards from the area being upgraded to the general supply.
Use of the Special Offer is only possible if a Tavern Card was drawn in Phase B and placed in the area being upgraded (for example, a Dishwasher being drawn and placed next to the Dish Washing Area).
For each Tavern Card returned in this way, the price of the upgrade will be reduced by the amount shown in the small Doubloon symbol, to the immediate right of the base cost.
You can never earn Doubloons in this way however; the price of an upgrade can never be reduced to less than 0.
-
If you want to upgrade the Dish Washing Area, you can return as many Dishwasher cards as you like.
The cost for upgrading the Dish Washing Area is reduced by 3 Doubloons for each Dishwasher card returned to the general supply.
-
If you want to hire a permanent Waitress, you can return as many Waitress cards as you like.
The cost for hiring the permanent Waitress is reduced by 4 Doubloons for each Waitress card returned to the general supply.
-
If you want to add another permanent Table to your tavern, you can return as many Table cards as you like. Any Guest cards that were placed on returned table cards will remain in your Tavern for the rest of the current Round.
The cost for adding a new Table is reduced by 5 Doubloons for each table card returned to the general supply.
-
If you want to upgrade the Beer Supplier, you can return as many Beer Supplier cards as you like.
The cost for upgrading the Beer Supplier is reduced by 6 Doubloons for each Beer Supplier card returned to the general supply.
Beer Actions
Recruit a Guest
By offering Beer to the local villagers, you can win them over as new Guests for your tavern.
Take 1 of the Guest Cards from the general display and place it face down on top of your draw deck. The cost of the Guest is displayed in Beer, in the top left corner of the Guest Card.
Important: In a given Round, you may recruit a maximum of 1 Guest Card.
When a Guest Card is taken from the general display, you immediately draw the top card from the face down Guest Card deck to refill the empty spot in the open display. In the rare event that the final "3 Beer" Guest card is taken from its stack, a fifth card from the face down deck is drawn and placed in the empty spot.
Some Guest Cards show an immediate bonus, displayed on the table in the center of the card. This bonus is earned only once, at the moment the Guest is recruited. It is not activated again when the Guest card is placed at a Table on a later turn.
Recruit Nobles
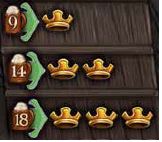
You may recruit Nobles at any time during your turn.
By paying 9,14 or 18 Beers, you may take 1,2 or 3 Nobles and place them face down on the top of your draw deck.
End of your Action Phase
As soon as you cannot or wish not to take any more actions, your action phase ends. If you have any Doubloons or Beer left over, you can save/store up to 2 of them in your Safe or Beer Storage. Any remaining Doubloons or Beer will be forfeited. If you have upgraded your Safe or Beer Storage, you can save/store up to 5 Doubloons or Beer there.

If you have any Dice left over that you could not or wished not to use, return any White Dice to the Dice Coaster and any Dice in your color to the general supply.
The next player in clockwise order now performs all of his actions. Once all players have completed their Phase F actions, the phase ends.
Phase G: Closing Time
(all players simultaneously)
Each player now picks up all the cards placed in or next to his Tavern in Phase B and discards them face up in a discard pile to the left of his draw deck.
If the Round Marker(Moon) is in the last field of the Round Track, the game ends. Otherwise, the Start Player Marker (Beer Mug) is passed to the next player in clockwise order and a new Round begins with Phase A.
End of the Game
The game ends after the 8th Round. Each player now counts the Victory Points on all of his cards (in both the draw and discard stacks).
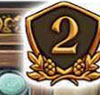
Victory Points are shown in the upper right corner of the cards.
The player with the most Victory Points wins the game!
In case of a tie, the tied player who has stored more Doubloons and Beer (in total) is the winner. If there is still a tie, the tied players share the victory.
Often Forgotten Rules
When upgrading your Tavern/hiring staff, you may return corresponding cards to the general supply to reduce the upgrade/hiring cost.
When upgrading your Tavern/hiring staff, you receive 1 Noble card, which is placed face down at the top of your draw deck.
All Noble cards drawn in a Round are placed in a stack at the same Table.
Beer Merchants are not placed next to the Beer Supplier, but instead are placed next to the Beer Storage, earning exactly 1 Beer.
All cards played in a Round (not only the Guests) are cleared and placed in the discard stack at the end of a Round.
You may Recruit Nobles at any time during your turn by paying with Beer (see the reminder on the Monastery Track).
All cards you purchase or earn through bonuses are always placed face down at the top of your draw deck.
Any Bonuses shown on newly obtained Guest cards are earned immediately upon taking the card.
Only by removing Dice from action spaces do you earn Doubloons or Beer.
You may recruit a maximum of 1 Guest per turn, and a maximum of 1 Tavern Card per type may be purchased per turn.
Continue Reading

