Augusta Treverorum rose to be the biggest Roman city north of the Alps in the late Roman Empire. Founded in the times of Augustus, this town at the river Moselle was built up by generations of Roman architects to be the Emperor's residence and a world-renowned city in the early 4th century.
The remains of its most impressive structures can still be visited in modern-day Trier, foremost among which is the massive Porta Nigra - the "black gate".
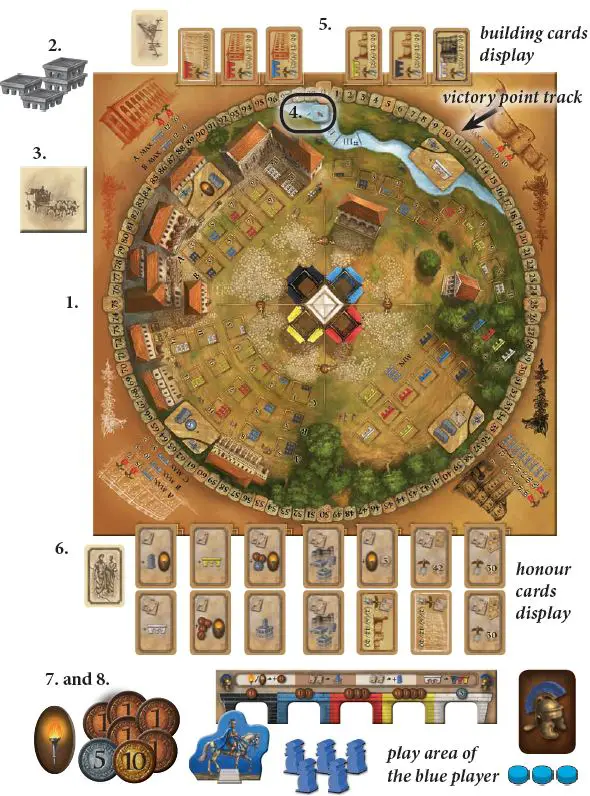
Components
- 1 game board
- 4 Player Boards
- 4 master-builder stands
- 4 Victory Point Markers
- 18 torch tokens
- 60 Romans
- 12 Action Markers
- 1 round marker
- 28 honor cards
- 10 supply cards
- 90 Bricks
- 32 Action Cards
- 16 influence tokens
- 51 Coins
- 20 Building Cards
- 4 victory points markers
- Instructions
Object of the Game
In Porta Nigra, you supervise the construction of the magnificent buildings of ancient Augusta Treverorum.
On your turn, you play one action card from your hand of 2 cards to determine which actions you may carry out. You must collect bricks and place them according to their color on the 4 construction sites of the game board.
Timing is important, as to collect the right bricks you must move your master builder from quarter to quarter of the city, at a cost of 1 coin per quarter border crossed. With the right timing, you can also collect a variety of building cards as rewards for advancing some important building sections.
At the end of your turn, you draw 1 action card from your action card deck. Once every player's action card deck is empty, the round ends and you receive a mix of coins and victory points for every brick you have built.
After 2 rounds (or 3 in a 2-player game), the game ends and you receive victory points mainly for majorities in the construction sites and for the sets of building cards you have collected.
The player with the most victory points is considered to be the greatest Roman architect north of the Alps and wins the game.
Setup
-
Place the game board in the center of the table.
-
Place the bricks, the coins (sesterces), the "+100/+200" victory points markers, the torch tokens and influence tokens next to the game board as a reserve. The reserve of coins is considered to be the bank.
-
Shuffle the 10 supply cards and place them as a face-down draw pile next to the game board.
-
Place the round marker on the first space of the round track.
-
Shuffle and place the building cards face down as a draw pile next to the game board. Draw 6 building cards from the draw pile and place them face up in the 6 spaces of the building cards display.
-
Shuffle the honor cards and place them face down next to the game board. Reveal 14 honor cards and place them face up in the honor cards display. The honor cards display has 7 card spaces. Place the honor cards in two rows.
-
Every player takes 20 sesterces and 1 torch token from the reserve and places them in her play area.
-
Every player chooses a player color and does the following:
-
Take all of the following components in your player color: the player board, the victory point marker, the master-builder stand, 3 action markers and 5 Romans. Place your victory point marker on space 0 of the victory point track.
Place the master builder, the 3 action markers and the 5 Romans next to your player board (i.e. your play area). The remaining Romans of your color are placed in a common reserve next to the game board.
-
Take the action card deck of your color. If you are playing with 4 players, remove the action card with the "2 or 3 players only" sign from your action card deck and return it to the box.
Shuffle your deck and place it face-down next to your player board. Draw 2 cards from your action card deck and put them in your hand. Keep the cards in your hands hidden from the other players.
Finally, return all unused components to the box.
-
Game Play
If you are playing with 2 players, the game is played over 3 rounds. If you are playing with 3 or 4 players, the game is played over 2 rounds. Determine a starting player at random using your favored house rule.
She will begin the game by taking the first turn. Play then continues in clockwise order, with each player taking a turn until each player has played all her action cards.
After the first round (and also after the second round of a 2-player game), there is an intermediate scoring round. After the last round, the final scoring sequence takes place.
Quarters
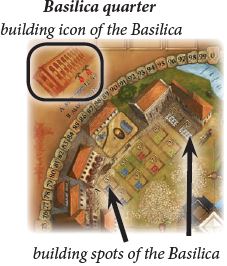
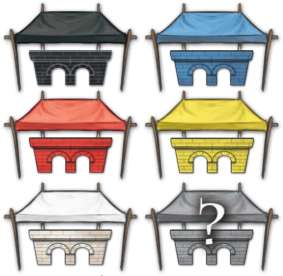
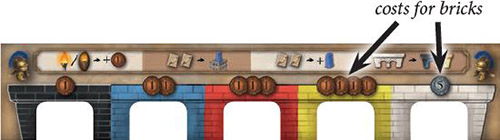
Each sector of the game board is called a quarter and each quarter contains one of the 4 buildings and its building spots: Amphitheatre, Basilica, City Wall and Porta Nigra.
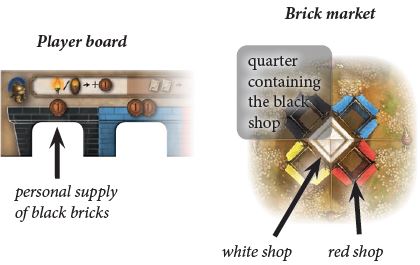
Each quarter also contains one shop of the brick market.
Bricks and Colors
As all the bricks are in fact grey, they only adopt a color by being placed in certain locations. Once a brick has been placed in any location, it has the color of that location and keeps it until the end of the game.
There are three locations a brick can be placed on a shop in the brick market, a player's personal supply on the player board and a building spot of one of the 4 buildings.
Player turn
Every turn is split into 2 phases:
-
Refill Phase:
- Check the number of bricks in the brick market.
- Check the number of building cards in the building cards display.
- Check the number of honor cards in the honor cards display.
-
Action Phase
Choose 1 action card and resolve it entirely. Use influence tokens. Place the resolved action card in your discard pile and draw 1 action card.
1. Refill Phase
-
Bricks
At the start of your turn, check the number of bricks in the brick market. If there are fewer than 7 bricks in total, you must refill the brick market.
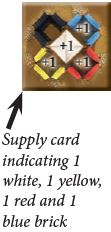
To refill the brick market, draw a card from the supply cards pile and place 1 brick in every shop indicated by a "+1" on the card. If there are already bricks in a particular shop, place a new brick on top of the others.
Repeat this process until there are at least 14 bricks in the brick market. Place used supply cards in the discard pile. If the draw pile of supply cards runs out, shuffle the discard pile and form a new face-down draw pile with it.
On the first turn of the game, you must fill the brick market up for the first time. In the manner described above, draw supply cards and place bricks until there are at least 14 bricks in total in the brick market.
-
Building Cards
Check whether there are 6 building cards in the building cards display. If there are fewer than 6, refill the display by drawing cards from the building cards pile and adding them face up. If the draw pile of building cards runs out, there will be no new building cards for the rest of the game.
-
Honor Cards
Check whether there are 14 honor cards in the honor cards display. If there are fewer than 14, refill the display by drawing cards from the hon- our card pile and adding them face up. If the draw pile of honor cards runs out, there will be no new honor cards for the rest of the game.
Example: At the beginning of her turn, Nicole checks the brick market and finds that there are only 5 bricks left. She starts refilling the market by drawing a supply card from the draw pile.
The card indicates that she must place 1 yellow, 1 red, 1 blue and 1 white brick on their respective shops in the brick market.
By placing these 4 bricks, the new total is 9 bricks in the brick market. Thus, Nicole draws another supply card which tells her to add 3 new bricks.
As the new total of 12 bricks is still not enough, she draws another card which tells her to place another 4 bricks. This brings the total to 16 bricks and thus no more supply cards are drawn.
After refilling the brick market, Nicole takes a look at the building cards display and sees that 2 cards are missing, so she draws 2 cards from the building cards draw pile and places them face up in the building cards display.
Then going on to the honor cards display, she draws 1 card as there are only 13 there.
Nicole is now ready to go on with her turn, carrying out her action phase.
2. Action Phase
At the beginning of your first turn of the game, place your master builder in any quarter of the game board.
Play 1 action card from your hand.
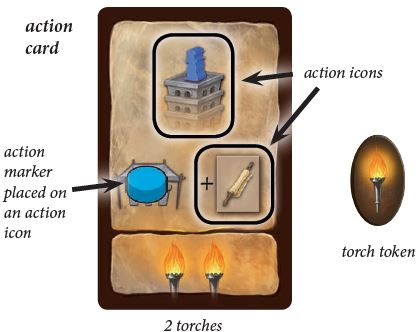
The number of torches at the bottom of the card you play indicates how many actions you may perform (2 or 3 actions). However, you may only perform actions whose action icons are on the card. Each action may only be carried out once. After you use an action, place one of your action markers on that action icon. You may carry out the actions on the card in any order you like.
You may also use a torch token from your play area to carry out an additional action. Place the torch token on a free action icon on the card you played and resolve the chosen action. You may use as many torch tokens during your turn as you want, provided there are free action icons remaining.
At any point during your turn, you may perform influence actions by returning influence tokens to the reserve. There is no limit to the number of influence tokens you may spend on influence actions. However, you can only buy up to 1 honor card per turn.
At the end of your turn, return all used action markers to your play area and return all used torch tokens to the reserve. Then place the action card you played this turn in a discard pile next to your player board. Next, draw one card from your action card pile, if possible.
If you cannot draw a new card because your draw pile is empty, you will only have a hand of 1 card for your next turn. On your last turn of around, you have to play your last action card from your hand.
Example: This action card allows Courtney to carry out 2 actions, as the card shows 2 torches on the bottom. She chooses 1 of the action icons, resolves its action and covers the icon with an action marker.
Then she chooses one of the uncovered actions, resolves it and covers it with another action marker. There is one action icon left uncovered on the action card. If Courtney also wanted to resolve this last action, she would have to use a torch token.
Actions
Every action card has a different combination of action icons. There are 5 different actions.
- Buy 1 brick
- Place 1 building element
- Take 1 influence token
- Take 1 torch token
- Take coins
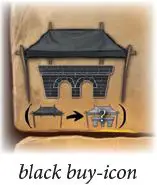
A. Buy 1 Brick
This action icon allows you to buy exactly 1 brick from a shop of the brick market. Most buy-icons show the color of the shop from which you must buy the brick.
Only the grey "any color"-icon (with a question mark) allows you to buy from any shop. Important: to buy a brick from a shop, your master builder must be in that shop's quarter!
To buy 1 brick, execute the following 2 steps:
If necessary, move your master builder to the quarter containing the shop and pay any costs for his movement.
Buy 1 brick from this shop of the brick market. Place the brick in your personal supply on your player board.
You cannot perform this action if you do not have enough sesterces to either pay the master builder's movement or to buy a brick of a certain color.
1. Move your Master Builder
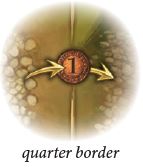
If necessary, move your master builder in a clockwise direction to the quarter containing the shop of the color you are allowed to buy from. Note: You are not allowed to move counter-clockwise.
You must pay 1 sesterce to the bank for every quarter border your master builder crosses.

The white shop is special, as it is the only shop that is part of all 4 quarters and thus accessible from any of the 4 quarters.
Example: The action card Thomas played shows a black buy-icon and the black shop has 1 brick in it. Thomas decides to use this action. Unfortunately, his master builder is in the quarter containing the red shop.
Thus Thomas has to move his master builder in a clockwise direction across two-quarter borders to reach the black shop: From the red shop quarter to the yellow shop quarter and from there to the black shop quarter.
To move his master builder to the black shop quarter, Thomas must pay 2 sesterces, because he crosses 2 quarter borders.
If it had been a white buy-icon, Thomas could have left his master builder in the initial quarter, as the white shop is accessible from any quarter.
2. Buy 1 Brick
Buy exactly 1 brick from its shop.
To buy a brick from the red, blue, yellow or black shop, you must use a buy-icon of that shop's color or the grey "any color"-icon. Your master builder must also be in that shop's quarter.
To buy a brick from the white shop, you must use a white buy-icon or the grey "any color"-icon, but your master builder may be in any quarter.
The cost of the brick depends on its color and must be paid to the bank:
A black brick costs 1 sesterce, a blue brick costs 2 sesterces, a red brick 3, a yellow brick 4 and a white brick costs 5 sesterces. (These costs are also indicated on your player board).
After paying its cost, take the brick from its shop and place it in your personal supply of that color on your player board. If you already have bricks of that color, place the new brick on top of them.
Important: If the shop of a colored buy-icon is empty, you cannot buy a brick of that color. However, this buy-icon then automatically acts just a grey "any color"-icon in every respect.
Example: Since the black shop is empty, Thomas can use the black buy-icon on his card to buy a brick of any other available color.
He still must be in the quarter of this other color's shop to buy from it.
Thomas uses the black buy-icon and is thus allowed to buy 1 black brick from the black shop.
His master builder is in the quarter with the black shop, so he pays 1 sesterce to the bank and takes 1 black brick from the black shop. He places this new brick in his personal supply of black bricks on his player board.
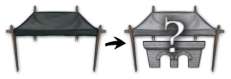
B. Place 1 Building Element
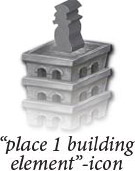
This action icon allows you to place exactly 1 building element on an empty building spot in the quarter where your master builder is located. A building element is a stack of 1 to 8 bricks of one color.
Each of the four buildings has several building spots and each building spot shows what is required to place a building element on it (defined by the color and number of brick icons).
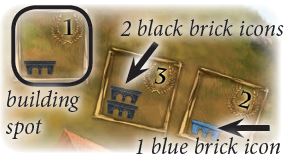
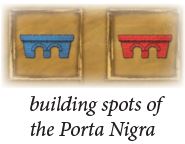
Building spots in the Porta Nigra always show only a single brick icon to indicate the color of the building element required. How many bricks of that color you use to assemble your build- ing element is up to you. However, the number of bricks must be at least 3 and at most 8.
Important: You must place 1 of your Romans on top of your building element. Therefore, you may only carry out this action if you have a Roman in your play area to place on it.
To use this action, execute these 3 steps:
-
Choose 1 empty building spot of a building for which you have the required bricks in your personal supply and if necessary move your master builder to the building's quarter, paying the associated costs.
-
Assemble a building element that matches the requirement of the chosen building spot and place one of your Romans on top.
-
Score the victory points of the chosen building spot and check for matching building cards. Place the building element along with your Roman on the chosen building spot and then check for master builder rewards.
1. Choose a building spot and move your master builder
Choose 1 empty building spot for which you have the required bricks in your personal supply.
If necessary, move your master builder in a clockwise direction to the quarter containing the chosen building spot. Note: You are not allowed to move counter-clockwise. You are only allowed to build in the quarter where your master builder is.
You must pay 1 sesterce to the bank for every quarter border your master builder crosses. You are not allowed to move if you cannot pay these costs.
2. Assemble the building element
From your personal supply, take a stack of bricks that matches the number and color required by your chosen building spot. These bricks form your building element. Then place 1 of your Romans on top of this building element, to indicate that it is yours.

White bricks are special as they can also be used as bricks of any other color.
When assembling a building element, you can always replace any brick of a required color with one of your white bricks.

Example: The Amphitheatre building has one building spot that requires 3 red bricks.
If you want to place a building element there, you have to assemble 3 red bricks from your personal supply and put 1 of your Romans on top. As an alternative, you could also use 1 or more white bricks.
3. Collect rewards and place the building element
Execute these 4 steps:
-
Victory points
Score the victory points that are indicated in the chosen building spot by moving your victory point marker on the victory point track the appropriate number of spaces forward.
Exception: In the Porta Nigra you score victory points according to the number and color of bricks that you have used to assemble your building element.
You score 1 victory point per black brick, 2 per blue brick, 3 per red brick, 4 per yellow brick and 5 per white brick
-
Building card reward
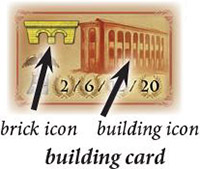
Check whether there is a building card in the building cards display that:
- shows the building icon of the building to which your chosen building spot belongs AND
- whose single brick icon matches the color of the brick icons of your chosen building spot.
If there is a matching building card, take this building card an place it in your play area. By collecting building cards, you score additional victory points at the end of the game.
-
Place the building element
Place the building element on the chosen building spot.
-
Master builder reward
After you have placed your building element, check whether (and how often) this triggers the master-builder reward of that building.

The unique master-builder reward of a building is triggered each time the total number of your bricks in that building reaches a new multiple of 3 (i.e. your overall 3rd brick, 6th brick, 9th brick, etc. placed in that building will each trigger this reward once).
Immediately collect the appropriate reward each time it is triggered.
C. Take 1 Influence Token

Take 1 influence token from the reserve and place it in your play area. Influence tokens are used to pay for influence actions.
Influence Actions
At any time during your turn, you may pay influence tokens to the reserve in order to carry out any of the following influence actions:
Once per turn, you may buy 1 honor card from the honor cards display. Pay the cost shown on the top of the honor card and resolve its effect immediately. Then return the honor card to the box.
 Cost |
-
Most cards only cost influence tokens (between 1 and 3), but some require you to discard additional cards from your play area. These cards are shown .on the upper right of the honor card.
-
Most honor cards are resolved immediately, except for those that are substitute building cards or final scoring cards. These cards are placed in your play area and take effect in the final scoring.
substitute building card (costs 2 influence tokens and has a building icon)
final scoring card (costs influence tokens and requires you to discard certain cards)
-
See the back of this rulebook for an overview and explanations of the honor cards.
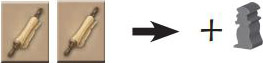
Pay 2 influence tokens and take 1 Roman of your color from the reserve and place it in your play area.

Pay 2 influence tokens and then use the "Place 1 building element" action.
D. Take 1 Torch Token
Take 1 torch token from the reserve and place it in your play area.
E. Take Coins
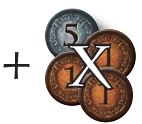
Take as many sesterces from the bank as the icon shows (3, 4 or 5) and place them in your play area.
Special Action: Torches to Coins
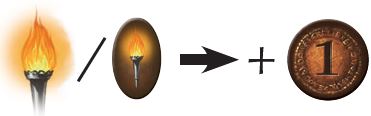
Your torches can also be used to take 1 sesterce per torch from the bank. This means you can either forfeit one of your allowed actions from your action card or return 1 torch token to the reserve to take 1 sesterce.
If you forfeit one of your actions from your action card, cover the torch icon on your card with one of your action markers to indicate that you have forfeited this action.
End of the Round
A round ends after the last player in turn order has played her last action card and resolved it. If this was the last round for your player count, the game ends (see the bottom of this page). Otherwise, there is an intermediate scoring round:
2-player Game
After the first and second round, each player - in turn order - carries out the following 2 steps:
-
Count the total number of bricks you have placed on the game board (in all 4 buildings combined).
-
Divide this number as you see fit between sesterces and victory points. Take the chosen amount of sesterces from the bank and score the chosen amount of victory points.
After every player has taken her sesterces and scored her victory points, a new round begins.

3 or 4-player Game
After the first round, each player - in turn order - carries out the following 2 steps:
-
Count the total number of bricks you have placed on the game board (in all 4 buildings combined) and double this number.
-
Divide this number as you see fit between sesterces and victory points. Take the chosen amount of sesterces from the bank and score the chosen amount of victory points.
After every player has taken her sesterces and scored her victory points, a new round begins.

A new round begins:
Begin a new round by executing these steps:
The player with the fewest victory points appoints the starting player for the next round (she may choose herself). In the case of a tie, the youngest tied player determines the starting player.
The starting player moves the round marker to the next space.
Each player shuffles her action card discard pile and places it as a new draw pile next to her player board.
Each player draws 2 action cards from her action card pile into her hand. Then the starting player takes her turn as usual.
End of the Game
The game ends at the end of the round in which the round marker reaches the last round indicated for your player count. In a game with 2 players, you play 3 complete rounds. In a game with 3 or 4 players, you play 2 complete rounds.
The game may end prematurely if at least 1 of these 2 conditions is met:
During any player's turn the brick reserve and the brick market are completely depleted.
A player places her 15th building element, thus having no Romans left in her play area or the reserve.
The player during whose turn one or more of these conditions are met scores 5 victory points immediately and then finishes resolving her current action card.
Then each other player continues to play one final turn.
General Notes:
The number of bricks is limited. If the reserve of bricks is empty, no new bricks enter the game any more.
The number of Romans per player color is limited to 15.
The reserve of coins, torch tokens or influence tokens is considered to be infinite. If you ever run out of one of these components use substitutes.
If your victory marker moves past space 99, place a "+100/+200"-victory point marker with the "+100"-side up in front you. If your victory marker should move past space 99 a second time, turn your "+100/+200"-victory point marker to the "+200"-side.
After the game has ended, carry out the final scoring sequence.
Final Scoring Sequence

After the game has ended, execute the following scoring sequence:
- Set collection scoring: score victory points for your collected building card sets.
- Final scoring cards: score victory points for your final scoring cards.
- Play area scoring: score victory points for Romans, sesterces, influence tokens, torch tokens and bricks in your play area.
- Majority scoring: score victory points for majorities in buildings.
-
Set Collection Scoring
Form sets of your collected building cards (including substitute building cards). Each set may include up to 4 cards and each card of that set must show a different building (a different color requirement is not enough).
Score victory points for each set as follows:

- A set of only one building card scores 2 victory points.
- A set of two different building cards scores 6 victory points.
- A set of three different building cards scores 12 victory points.
- A set of four different building cards scores 20 victory points.
-
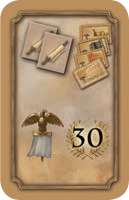
Final Scoring Cards
Score the victory points shown on any final scoring cards in your play area.
Note that you had to discard 4 building cards of 4 different buildings to receive the 30 victory points card in addition to paying 2 influence tokens. Thus you do not score these discarded building cards during the final scoring sequence.
When you bought the 42 victory point card, you discarded the 30 points card and to buy the 56 points card you had to discard a 42 victory points card. Discarded cards are out of the game.

final scoring cards
-
Play Area Scoring
Score the components left in your play area: You receive 1 victory point for each Roman, for every 3 sesterces, for each influence token, for each torch token, and for each brick on your player board.
-
Majority Scoring

Finally, in each of the 4 buildings victory points are awarded for brick majorities. Depending on the building, majorities may apply to the whole building or certain parts of that building.
In each scored part, the player with the most bricks and the player with the second most bricks receive victory points.
In the case of a tie, the tied player who has placed the most valued building element in the scored part of the building wins the tie. The most valued building element has the most and most valued bricks.
The value of a brick is equal to the cost of its color on your player board: White bricks are the most valuable, black bricks the least.
The Winner

The player who collected the most victory points wins the game. In the case of a tie, there are multiple winners.
Continue Reading