As the owner of a major fishing company in Nusfjord on the Lofoten archipelago, your goal is to develop and expand the harbor and the surrounding landscape.
Components
General Components:

- 1 Action board
- 1 Ships and Elders supply board
- 100 fish tokens
- 50 wood tokens
- 1 wooden First Player ship
- 1 Banquet Table
- 2 Building supply boards
- 1 Imitation tile
- 132 Building cards
- 18 Elder cards
- 15 First Player tiles
- 18 Ship tiles (6 sloops | 6 cutters | 6 schooners)
- 41 gold coins
- 9 multiplication tiles 3x "5 fish"
- 30 forests
In Each Of The Five Player Colors:
- 1 "Personal Supply" board
- 3 Worker disks
- 1 Elder Council
- 1 Harbor board
- 5 Share tiles
Setup
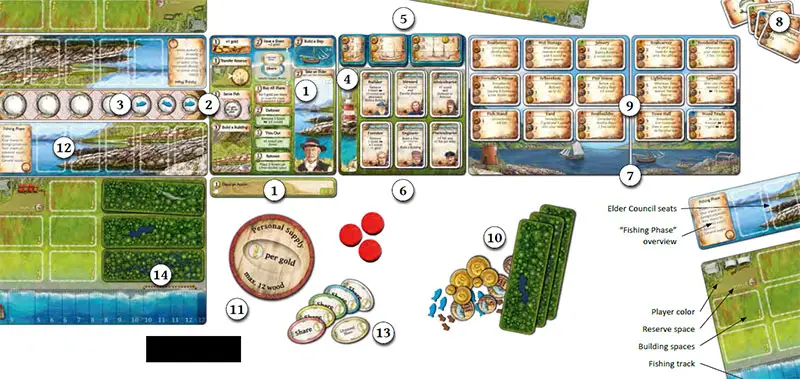
Central Display

1 Turn the Action board to the appropriate side, according to the number of players (as shown by a symbol, see illustration), and place it on the table. One side is for 1-2 players; the other side is for 3-5 players.

In 4- and 5-player games only: Turn the Imitation tile to the appropriate side, according to the number of players (as shown by a symbol, see illustration), and place it alongside the bottom edge of the Action board. The 4-player side shows one space; the 5-player side shows three spaces.
2 Place the Banquet Table to the left of the Action board so that it is right next to the "Serve Fish" action space (see illustration).
3 Fill a number of Banquet Table plates with 1 fish each, according to the following table (one less plate than the number of players). Fill the appropriate number of plates in increasing numerical order, starting with the smallest plate.
| # of players: | 2 | 3 | 4 | 5 |
|---|---|---|---|---|
| # of plates: | 1 | 2 | 3 | 4 |
Example: In a 4-player game, there are 3 fish on the Banquet Table at the start.
4 Place the Ships and Elders supply board to the right of the Action board.
5 Sort the Ship tiles by type and place a number of each type on the designated spaces of the supply board. The following table shows how many Ships of each type you are supposed to use (one more than the number of players).
| # of players: | 2 | 3 | 4 | 5 |
|---|---|---|---|---|
| # of Ships per type: | 3 | 4 | 5 | 6 |
Example: In a 4-player game, there are 5 sloops, 5 cutters, and 5 schooners.

6 Find the appropriate Elder cards, according to the number of players (as shown by a symbol, see illustration). Place these Elders face up on the designated spaces of the supply board. Each space will have up to two Elders: first place the Elders numbered 1-6 on the spaces. Then place the Elders with numbers 7-12 on top (if they are used), as shown on the spaces.
In 5-player games, note that there are six Elders that are not shown on the spaces (see box).
Example: On the top left space, place the Builder (#7) on top of the Contractor (#1).
In 5-player games only: Shuffle the remaining six Elders (#13-18) that are not shown on the spaces and place one face down at the bottom of each of the six Elder stacks.
7 Place the two Building supply boards next to the Ships and Elders supply board.
8 Choose one of the three Building decks (each showing a different fish on the back) and return the other two to the game box. Separate the chosen cards by letter in "A", "B", and "C" Buildings and shuffle each pile separately, placing them face down on the table.
Tip: For your first game, we recommend you use the Herring deck Buildings.
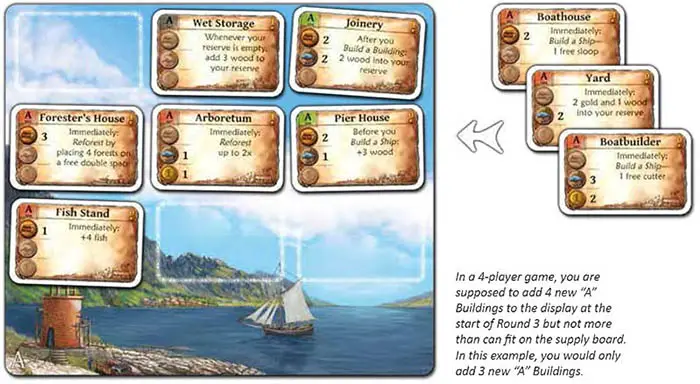
9 Turn 9 "A" Buildings and 6 "B" Buildings face up and place them on the Building supply boards of appropriate size. Set the remaining "A" and "B" as well as the "C" Buildings aside.
In 2-player games only: Only set the "C" Buildings aside. Return the remaining "A" and "B" Buildings to the game box-you will not need them.
10 Place the goods (wood, fish, and gold) and the Forests ready at hand in a general supply.
Personal Display
11 Choose a player color and take the Harbor board, the Elder Council, the three Workers, the five Shares, and the "Personal Supply" board in that color.
Personal Supply
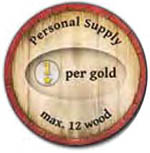
The round "Personal Supply" board constitutes your personal supply, i.e., this is where you keep the goods that you can use for actions. Whenever a good is said to move into your personal supply, place it on your "Personal Supply" board.
You can have as much fish and gold there as you wish but at most 12 wood. Whenever you get wood, return excess wood to the general supply immediately.
12 Place the Elder Council alongside the top edge of your Harbor board.
Tip: Two players can place their Harbor boards and Elder Councils alongside the Banquet Table to show that the Elders are seated at the Banquet Table.
13 Turn two Share tiles to the front side in your color (showing "Share") and the other three to the neutral back (showing "Unissued Share"), placing them next to your "Personal Supply" board. Even though Shares are placed next to your "Personal Supply" board, they are considered to be in your personal supply.
14 Cover the Building spaces on the right half of your Harbor board with four Forests, placing each of them horizontally on top of two adjacent Building spaces-so-called "double spaces". Note that the topmost double space is covered by two Forests stacked together.

15 Take the appropriate First Player tiles, according to the number of players (as shown by a symbol on the back and the tile shape, see illustration). Randomly determine a First Player who receives the tile showing Round space 1, placing the First Player ship on that space. The edges of their tile show which tiles the other players receive.
Game Play
Nusfjord is played over 7 Rounds. Each Round goes through the following 3 Phases in this exact order:
- Fishing Phase
- Work Phase
- Returning Home Phase
After the 7th Round is complete, you score your displays and determine the winner.
Phase I: Fishing Phase
In the Fishing Phase, you catch new fish that you must distribute according to certain rules.
This Phase is played simultaneously.
Determine your haul size from your Fishing track (see box) and take a corresponding number of fish tokens from the general supply into your hand. Distribute the fish in your hand according to the following five steps in this exact order (which is also shown on your Elder Council). You may not decline distributing your fish.
The Fishing Track
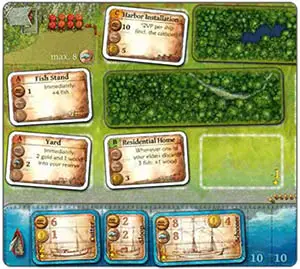
Your Fishing track is located at the bottom of your Harbor board. This is where your fishing fleet lies at anchor, which is comprised of the preprinted catboat at the start. As the game progresses, you will build Ships, placing them on your Fishing track.
This will increase your haul size, which is always the lowest visible number on your Fishing track. Thus, at the start of the game, your haul size is 3 fish.

Example: Here, your haul size is 10 fish.
1. Elders
Place 1 fish from your hand on each Elder seated in your Elder Council. Skip this step if you do not have any Elders.
Each time there are exactly 3 fish on an Elder, you must immediately remove the fish as follows:
- place 1 fish in your personal supply and
- return the remaining 2 fish to the general supply.
(Do not remove the Elder card).
Note: You start the game with no Elders. See page 13 on how to get Elders and what they are good for.
2. Your Shares in Foreign Possession
Place 1 fish from your hand on each Share in your color located on the Action board (on the "newly issued shares" space) or in another player's personal supply.
Resolve Shares on the Action board first, if available. Skip this step if all of your Shares are in your personal supply.
Note: At the start of the game, all Shares of your company are in your possession (some of which are unissued).
3. Your Shares in Personal Supply
Place 1 fish from your hand on each (issued) Share in your color located next to your "Personal Supply" board. Do not place fish on Unissued Shares.
Note: You start the game with two issued and three unissued Shares.
4. Reserve
Place the remaining fish in your hand on the Reserve space of your Harbor board. However, your Reserve is limited to 8 fish. Only place as much fish in there until you reach that limit. Skip this step if you already have 8 (or more) fish in your Reserve.
Note: You are not required to reduce your Reserve to 8 fish if it contains more than 8 fish (which is possible via certain Buildings).
Example: In Round 1, you catch 3 fish. Neither do you have Elders nor are any of your Shares in foreign possession. Therefore, yo/u place two fish on your issued Shares and the third fish in your Reserve.
5. General Supply
Return any remaining fish in your hand to the general supply (as excess).
The Fishing Phase ends after all players have distributed their fish. Then move all fish on Shares on the Action board to the general supply. Move all fish on Shares next to your "Personal Supply" board (regardless of color) into your personal supply.
Note: Players tend to forget this. If you do forget it, move the fish as soon as you notice.
Important!
In the Fishing Phase, you always distribute newly caught fish only. If you do not increase your haul size according to the demand, it may happen that you cannot place fish on every Elder or every Share in foreign possession. Even then, you need not and may not use fish from your personal supply. If you run out of fish during steps 1 or 2, you may choose on which Elders or foreign Shares you place fish (still resolving Shares on the Action board first in step 2).
Phase II: Work Phase
In the Work Phase, you send out your Workers to carry out actions that will help you with developing your fishing company. This Phase is played clockwise.
Beginning with the First Player, each player will take one turn at a time, for a total of three turns per player. On your turn, you may place exactly one Worker on an action space of your choice, on the Action board or on an Elder in your Elder Council.
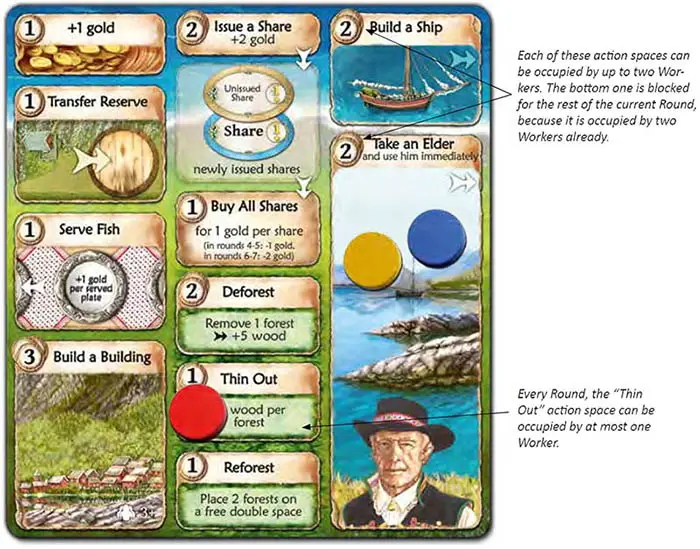
How many Workers can occupy an action space is shown in the top left corner of the space. Most action spaces show "1", i.e., they can hold at most one Worker. When they do, they are blocked for the rest of the Round. In 3-, 4-, and 5-player games, there are action spaces showing "2" and "3". These can be occupied by that many Workers (of the same player or of different players) before they are blocked.
You must immediately carry out the action of the chosen action space. Only the player who has just occupied the action space may carry out the action. You may not occupy an action space without taking the action.
Example: The "Thin Out" action space provides 1 wood for each Forest on your Harbor board. If you do not have any Forests left or if you already have 12 wood in your personal supply, you may not occupy the action space.
You may pass, i.e., not place a Worker on your turn. In the highly unlikely event that you cannot take any action, you must pass. If you pass one turn, you may place a Worker on your next turn.
Note: Remember you only get three turns total. Consequently, if you pass, you will not be able to place all of your three Workers that Round.
The Work Phase ends after each player has had a total of three turns.
Phase III: Returning Home
In the Returning Home Phase, you take back your Workers and move the First Player ship.
This Phase is played simultaneously.
All players must remove their Workers from the action spaces on the Action board and Elders. Then move the First Player ship to the next highest Round space (the ship moves counter-clockwise), making that player the First Player of the following Round.
Tip: The First Player will always be the player to the right of the current First Player. This player will take the last turn of the current Round and the first one of the following Round, i.e., they will effectively take two consecutive turns. Use this to your advantage!
Occasionally, you must add new Buildings from the piles that you have set aside during setup, if the new Round space tells you to do so. Whenever you move the First Player ship onto a Round space with instructions, you must carry them out immediately:
Round space 3: In 3-, 4-, and 5-player games only: Immediately add a number of new "A" Buildings to the respective supply board equal to the number of players (i.e., 3, 4, and 5 Buildings, respectively). Do not add more Buildings than there are empty spaces.
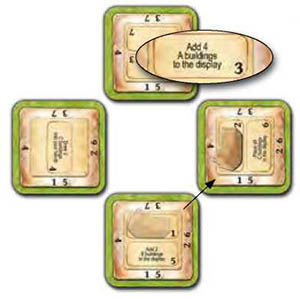
Example: Here, four new "A" Buildings have to be added.
Round space 4: Each player must draw a number of "C" Buildings into their hand. In 2-player games, draw 4 Buildings each; in 3-player games, draw 3 Buildings each; in 4- and 5-player games, draw 2 Buildings each. Keep your hand cards hidden from the other players.
Round space 5: In 3-, 4-, and 5-player games only: Immediately add 2 new "B" Buildings to the respective supply board. In 5-player games, add 3 new "B" Buildings (instead of 2). Do not add more Buildings than there are empty spaces.
Round space 6: Each player must place all "C" Buildings remaining in their hand face up next to the Building supply boards. (There is no supply board for "C" Buildings).
The Returning Home Phase ends after you have moved the First Player ship and carried out the instructions, if any. Proceed with the Fishing Phase of the next Round, or, at the end of Round 7, with scoring.
Actions
Here you find a detailed list of all the actions.
End of the Game
The game ends after 7 Rounds. Then total your scores. All Victory Points are printed on the components that score them. (In this game, you will not be surprised by any scoring categories at the end that have been explained to you at the start but which you have forgotten about).
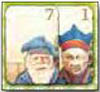
Total the Victory Point values of your Buildings and Ships.
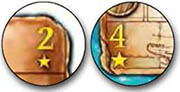
Example: In the example to the right, you would score 7 Victory Points from Ships and 4 Victory Points from Buildings with a fixed Victory Point value, for a total of 11 Victory Points.
Some Buildings show an asterisk (*) in place of a Victory Point value. This means the value depends on a condition as described on the Building card.
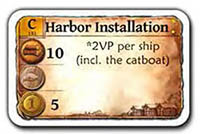
Example: The Harbor Installation scores 2 Victory Points for each Ship on your Fishing track. In the example to the right, you would score 8 Victory Points.
Add to your total 1 Victory Point per issued Share in your possession (regardless of color) and 1 Victory Point per gold in your personal supply.
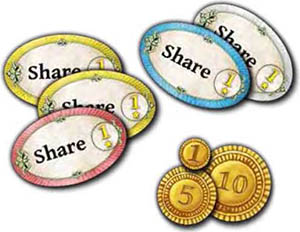
Example: In this example, you would score 21 Victory Points from Shares and gold.
From your subtotal, subtract 1 Victory Point per free Building space on your Harbor board and 1 Victory Point per Unissued Share in your possession.

Example: In this example, you would lose 5 Victory Points for having two Unissued Shares and three Building spaces left unused. Your overall score would be 11+8+21-5=35 Victory Points.
The player with the most Victory Points wins. In case of a tie, enjoy your shared victory.
Variants
Match and Rematch
Each of the three Building decks contains 18 "A" and 12 "B" Buildings, which is exactly the number of Buildings needed for two 2-player games, without using the same Building twice, so you can play two games, in which each of you is First Player in Round 1 once.
However, always use all "C" Buildings in every game, because-with enough experience-it is an integral part of the game to be able to guess in Rounds 4 and 5 which "C" Buildings the other player might have.
Mixing Decks
You may agree beforehand to use 3 "A" and 2 "B" Buildings from each of the three decks. However, all additional Buildings (via the First Player tiles) should be drawn from a single deck.
Continue Reading
