
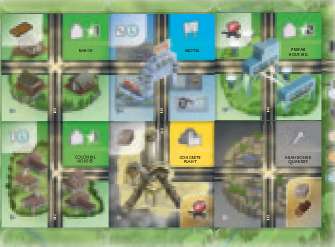
Components
- 150 Tiles
- 65 Coin Tokens
- 6 City Boards
- 30 Raw Good Tokens
- 40 Processed Good Tokens
- 15 Luxury Good Tokens
- Instructions
Object of the Game
In Neom, you are building a futuristic city over a period of three generations by placing tiles in your city grid. These tiles provide various goods and money that you will need to place other tiles as well as victory points.
Every city requires certain structures to be present or it will lose points during scoring. In the end, the player with the most victory points wins.
Setup
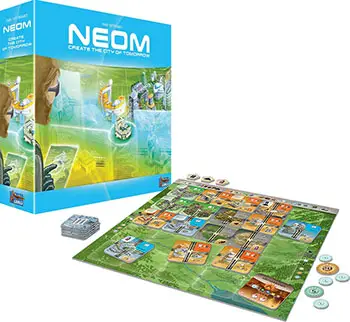
1 Take a random City board each and place it in front of you.
2 Take the Raw Good token corresponding to the Raw Good shown in your City Center and place it above your City board, in view of all players.
3 Take 6 L-Coins (£6) each and place the money next to your City board.
4 Place the remaining Good tokens and L-Coins in a general supply.
5 Separate the Cornerstone tiles from the Generation tiles, shuffle them, and place them nearby, face down.
6 Separate the Generation tiles into three decks by the numbers on the back side of the tiles (representing Generation).
From each deck, remove all tiles that are not used based on the number of players, as shown by the "1+", "4+", and "5+" icons in the bottom left corner of each tile.
Shuffle each deck separately and place it nearby, face down. Return the removed tiles to the game box-you will not need them.
Note: In the solo game, you can add the "4+" and even the "5+" Generation tiles, as though it were a 4- or 5-player game. (See page 7for details on the solo game).
Game Play
The game is played over three Generations (Rounds), preceded by a Preliminary Round, in which you will choose Cornerstone tiles for later use. Each Generation is comprised of seven turns, for a total of 21 turns over the course of the game.
In each turn, you will select a tile and take one of three actions with it. After 21 of these turns, you will score your Cities and determine the winner.
Note: This is true for any number of players. However, the way a turn is played with 3 to 5 players differs significantly from how it is played with lor2 players.
The following pages assume you play with 3to5 players. For details on the solo and 2-player game, see page 7.
Preliminary Round
Before the actual start of the game, deal each player a hand of 4 Cornerstone tiles and return the remaining Cornerstone tiles to the game box. Then all players must perform the following steps simultaneously until all players have chosen 3 Cornerstone tiles each:
-
Choose a Cornerstone tile from your hand and place it face down in front of you.
-
Pass the remaining Cornerstone tiles in your hand to the player to your left.
-
Pick up the Cornerstone tiles passed to you from the player to your right.
-
Repeat this process until there are 3 face- down Cornerstone tiles in front of you. Place the one remaining Cornerstone tile in your hand in a common discard pile.
-
Finally, reveal your chosen Cornerstones by turning them face up.
Choose your Cornerstone tiles carefully! They can provide a lot of Victory Points at the end of the game or give significant advantages throughout. They sort of hint at a basic strategy to pursue in this particular game.
Note: Your chosen Cornerstone tiles are not in play yet. You will get the chance to play them during the 21 turns that are about to happen.
Important! No actions are taken with the Cornerstone tiles during the Preliminary Round. You are just choosing tiles for later use.
Beginner's Variant
If you are playing for the first time, you may wish to skip the Preliminary Round and deal with each player one random Cornerstone tile.
If you do, the 1st Generation Contract Office (available with 4 or more players) lets you exchange your unplaced Cornerstone tile for a different random Cornerstone tile.
Playing a Generation
The Generations are played in order, beginning with the 1st Generation, followed by the 2nd and then 3rd Generation.
At the start of each Generation, take the corresponding Generation tiles and deal each player a hand of 8 tiles. (If you set up the game correctly no tiles should be left over after dealing the tiles for the current Generation).
With this hand, play 7 turns as follows:
- Select a Tile
- Take an Action
- Pick Up Tiles
The Generation ends after the 7th turn, in which you have a choice of 2 tiles in your hand. The remaining tile is returned to the game box, unused.
Then you receive income from the tiles in your City, before the next Generation is played in the same fashion. After receiving income at the end of the 3rd Generation, the game ends and scores are tallied.
A. Selecting a Tile
All players now simultaneously evaluate their hands of tiles, without showing them to the other players. Then select a tile from your hand and place it face down in front of you, setting the rest aside between you and the player to your left (unless it is only one tile). Do not proceed with the next step until all players have selected a tile.
Note: In this game, you always pass tiles to the left.
In the 7th turn of each Generation, your hand contains only 2 tiles. Do not pass the remaining tile to the player to your left after you select a tile for the turn. Instead, return the leftover tile to the game box, unused.
B. Taking an Action
Once all players have selected a tile from their hand, they reveal their selections and then take an action. You can play this step simultaneously (preferred) or sequentially. Regardless of how you choose to play, all selected tiles must be revealed before you proceed with this step.
Normally, you can take one of the following three actions:
- Place the Selected Tile
- Place a Cornerstone Tile
- Sell the Tile for Money
If you select a Disaster tile, you do not take an action this turn
Instead, at the end of the turn, you will impose the Disaster on the other players.
Note: In step A, you must always select a tile from your hand, even if you do not intend to use the selected tile, e.g., because you are going to place a Cornerstone Tile or take money.
Action: Placing the Selected Tile
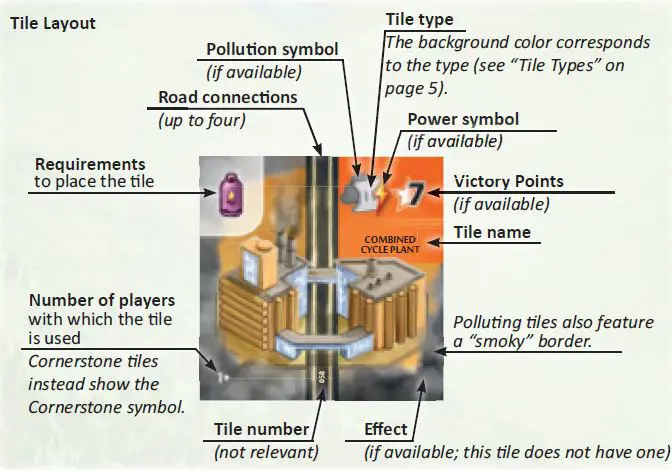
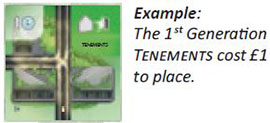
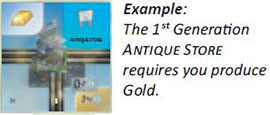
To place the selected Generation tile, you must meet the requirements shown in the top left corner of the tile (see "Tile Layout").
If no requirement is shown, you can place the tile right away (according to the placement rules, as detailed below). If you cannot meet the requirement, you must choose a different action.
A tile may require one or more of the following three things:
An L-Coin cost, which you must pay into the general supply. You receive change if you cannot pay the exact amount.
One or more Goods produced by your City, as shown by the corresponding Good tokens above your City board, or bought from another player (see "Buying Missing Goods").
Certain tiles in your City, which you must have placed on previous turns. (This kind of requirement is found only on a few 3rd Generation tiles).
Some tiles may require both Goods and money, and sometimes you are given a choice.
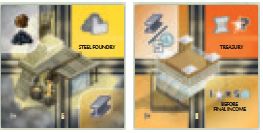
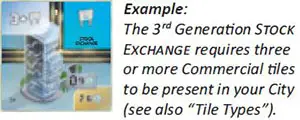
Examples:
The 2nd Generation Steel Foundry requires you to produce both Coal and Ore.
The 2nd Generation Treasury requires you to produce Steel. Alternatively, you can pay £5 to the general supply to place the Treasury.
If you meet the requirements of the selected tile (if any), you can place it in your City according to the following rules:
-
You must either place the tile on an empty space in your City grid or replace an existing tile.
-
The newly placed tile must be connected through Roads to the City Center (or the tile in its place, if you replaced your City Center).
Roads do not have to connect with other Roads necessarily, as long as there is at least one Road connection leading to the City Center.
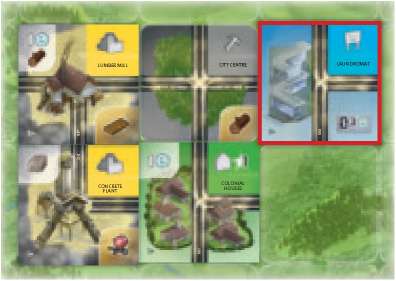
Example: The green tile is placed correctly, as it has a Road connection to the City Center (grey). It does not matter that the Road coming from the bottom left tile is not continued.
The blue tile, on the other hand, does not have any connection to the City Center and, thus, cannot be placed there.
-
You may not rotate (or flip) the tile. All tiles must be placed such that you can read their names upright.
Buying Missing Goods
If your City does not produce all the Goods required to place a tile, you must buy the missing Goods from one or more other players who produce them.
-
The base cost depends on the type of Good you are missing: Raw Goods cost £2, Processed Goods £4, and Luxury Goods £10 each. (This information s also printed at the top of your City boards).
-
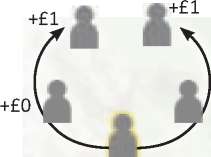
Transport Fee: The cost is increased by £1 for each player in-between you and the seller. You decide whether you count clockwise or anti-clockwise.
Example: If you buy from the players to your immediate left or right, you just pay them the base cost of the Good you need.
If you buy from a player across the table, you pay them an additional £1. For instance, a Processed Good would cost £5 if bought from a player across the table.
-
Trade Routes: The cost is decreased by £1 if you have established a Trade Route in the appropriate direction.
Having both Trade Routes does not decrease the cost further.

Example: You need a Processed Good. So far, you have established only the left Trade Route. In a 4-player game, the Good costs you...
£4-£l =£3 if bought from the player to your left;
£4+£l (Transport Fee) - £1 =£4 if bought from the player across the table;
£4 (base cost) if bought from the player to your right.
Pay the resulting cost to the seller. If need be, you can make change with the general supply. The seller may not refuse the payment, nor can they use the money this turn. (Keep payments separate from your money until the end of the turn).
Note: Good tokens are not removed when they are used or bought by another player. They simply indicate what a city produces.
Replacing an Existing Tile
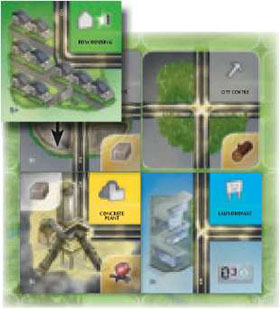
You are not required to place every tile in an empty space. Instead, you may choose to replace an existing tile. Tiles may only replace another tile if the existing tile is a Resource (grey) tile or if the new tile shares a type with the existing tile.
The City Center is considered a Resource tile and can, thus, be replaced with any tile. (See "Tile Types" for details on the different types of tiles).
When you replace a tile, remove it from your City board and return it to the game box. Place the replacement on the same space.
Removing Tiles From the City
When you remove a tile from your City you immediately lose all benefits from that tile (e.g., access to certain Goods). When you lose access to one or more Goods (by removing the last tile that provides it), immediately return the corresponding Good tokens to the general supply.
It is possible that, by removing a tile, you cut off one or more tiles from the City Center.
This does not have any consequences for you, except for the fact that newly placed tiles must still connect back to the City Center, so you might not be able to add new tiles to the cut-off parts. In particular, you do not lose the effects or Victory Points from cut-off tiles!
Trade Routes remain active as long as they are connected to a Road, even if that Road does not trace back to the City Center any longer.
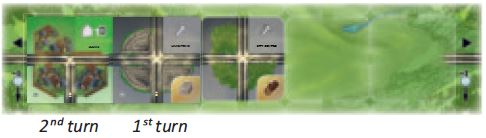
Establishing a Trade Route
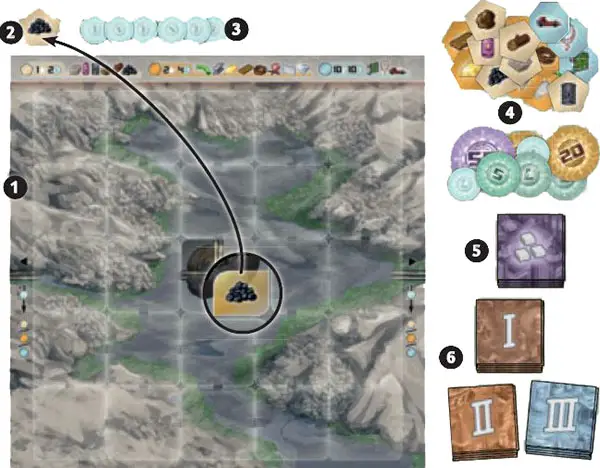
Your City board shows two Trade Routes that you can establish: one on the left and one on the right border. To establish one, simply connect a road to the corresponding Trade Route.
It does not matter over how many tiles the connection is established. The minimum number of tiles to establish a Trade Route is two, as there are two spaces between your City Center and the left or right border of your City board.
(Remember, newly placed tiles must always trace back to the City Center).
Example: You can establish a Trade Route as early as on your 2nd turn.
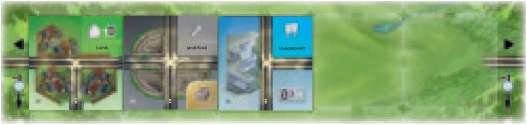
Once a Trade Route is established, it remains active as long as it stays connected to a Road immediately next to it, even if its connection to the City Center is lost. Y
ou lose the Trade Route only if you remove the tile immediately next to it (due to a Disaster) or replace it with another tile that does not have a Road connection towards the Trade Route.
Example: You replaced your City Center with a tile, losing the connection to the left Trade Route. The Trade Route remains active, because it is still connected to a Road.
A newly placed tile provides its effect right away. Some tiles trigger their effect whenever another tile is placed in your City.

Example: The Merchant Union Cornerstone tile provides £1 whenever you place a Commercial tile in your City.
The effects of a tile usually correlate to its type. There are 6 tile types:
Tile Types
-

Residential (green) tiles usually have a Victory Point value and no further effect. Your goal is to group as many of them together (via Road connections between them) to form so-called Neighborhoods.
The bigger a Neighborhood, the more Bonus Points you will get during scoring.
Cities with less than two Residential tiles are considered Ghost Towns and will be penalized during scoring. You will also lose points if your Residential tiles are nearby Polluting tiles.
-

Commercial (blue) tiles do not have a Victory Point value. Instead, they provide income at the end of each Generation and/or a one-time monetary boost when you place them.

Note: The 3rd Generation Condos & Restaurant and Apartments & Retail are both Residential and Commercial tiles.
-

Industrial (yellow) tiles do not have a Victory Point value. Instead, they produce Processed Goods and-in the 3rd Generation-Luxury Goods, indicated by Good tokens placed above your City board.
Industrial tiles are always Polluting, so avoid placing them nearby Residential tiles.
-

Public (orange) tiles usually have a significant number of Victory Points. Some have a variable number of Victory Points, depending on other tiles in your City.
Many Public tiles provide special advantages in the game, like Power, which your City will need to avoid a penalty during scoring.
Most Cornerstone tiles are Public tiles.
-

Resource (grey) tiles do not have a Victory Point value. Instead, they produce Raw Goods, indicated by Good tokens placed above your City board. Resource tiles can be replaced with any other tile (see "Replacing an Existing Tile").
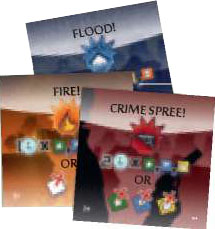
Disaster tiles are not placed in your City. When selected, the Disaster will affect all other players but you. Disasters cause the other players to lose money or tiles in their City. You cannot take an action if you select a Disaster. (See "Resolving a Disaster" for details).
Resource and Industrial tiles produce Goods in your City, which you will need not only to place certain tiles in your City but also during scoring for Victory Points.
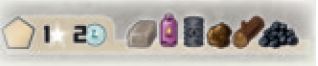
Good Tokens
Use the Good tokens to indicate which Goods your City produces:
- Raw Goods (pentagonal) are produced by Resource (grey) tiles.
- Processed Goods (hexagonal) are produced by Industrial (yellow) tiles.
- Luxury Goods (octagonal) are produced by 3rd Generation Industrial tiles.
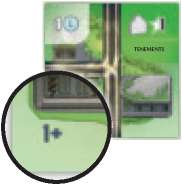
Whenever you add a tile producing one or more Goods that your City does not produce yet, take the corresponding Good tokens from the general supply and place them above your City board, in view of all players.
This way you can see at a quick glance which Goods are available from other players if you need to buy them. You can never have more than one token of each Good.
If you replace or lose a Good-producing tile, immediately return the corresponding Good token to the general supply, unless you have another tile in your City producing that Good.
Action: Placing a Cornerstone Tile
Cornerstone tiles are much like Generation tiles. To place a Cornerstone tile, you must return the selected Generation tile to the game box, unused.
Then choose one of your remaining Cornerstone tiles and place it in your City, as detailed in "Placing the Selected Tile". (The placement rules apply to both Generation and Cornerstone tiles).
Important! You cannot have more Cornerstone tiles in your City than the current Generation!
In other words, in the 1st Generation, you can have at most 1 Cornerstone tile in your City; in the 2nd Generation, you can have at most 2 Cornerstone tiles in your City; only in the 3rd Generation can you have all of your 3 Cornerstone tiles in your City.
You are not required to place one Cornerstone tile per Generation. For instance, if you did not place a Cornerstone tile in the 1st Generation, you can place up to 2 Cornerstone tiles in the 2nd Generation.
Reminder: You cannot discard a Disaster tile to place a Cornerstone tile! Remember that you do not take an action when you select a Disaster.
Action: Selling the Tile for Money
Instead of placing a Generation or Cornerstone tile, you can simply return the selected Generation tile to the game box, unused, and take 5 L-Coins from the general supply. (Usually, this is a desperation move if you are short on money).
Reminder: You cannot sell a Disaster tile! Remember that you do not take an action when you select a Disaster.
End of Turn: Resolving a Disaster
One tile in each Generation deck is different from all others, depicting one of three Disasters: Flood in the 1st Generation, Fire in the 2nd Generation, and Crime Spree in the 3rd Generation.
If a Disaster is selected by a player, it activates a negative effect for all other players at the end of the current turn (after all other players have taken their action), causing them to lose money or tiles in their City.
Selecting the Disaster protects you from its effect but you do not get to take an action that turn.
Note: If no player selects the Disaster in a given Generation, it will not happen.
All affected players must resolve the Disaster for their own City:
-
Flood

EITHER pay £1 for each Residential, Commercial, Industrial, and Public (but not Resource) tile in your City.
OR sacrifice 1 Residential, Commercial, Industrial, or Public (but not Resource) tile of your choice.
-
Fire

EITHER pay £1 for each unprotected Residential, Commercial, Industrial, and Public (but not Resource) tile in your City.
OR sacrifice 2 tiles of your choice (of any type).
-
Crime Spree

EITHER pay £2 for each unprotected Residential, Commercial, and Industrial tile in your City
OR sacrifice 1 Residential, 1 Commercial, and 1 Industrial tile of your choice.
Each player chooses individually whether they want to pay the penalty or sacrifice tiles in their City. You can choose to sacrifice tiles even if you have enough money to pay the penalty.
Even if you cannot remove all the required tiles, you can opt to sacrifice tiles instead of paying the penalty. (If you are missing a tile of the appropriate type to remove, you do not have to sacrifice a different tile in its place).
Example: You do not have any Commercial tiles in your City. During Crime Spree, you can choose to sacrifice a Residential and an Industrial tile, even if you are missing the Commercial tile. It does not matter whether or not you have enough money to pay the penalty.
If you choose to sacrifice tiles, remove them from your City board and return them to the game box. (See "Removing Tiles from the City" for details on the consequences).
Players can protect their tiles from the Fire and Crime Spree penalty by building certain Public tiles in their City. (There is no protection from Flood). Protected tiles are not counted when calculating how much money you must pay for the Disaster.
Tiles are never protected from removal, especially if you choose to sacrifice tiles instead of paying the penalty.
-

Fire Protection
Fire Departments are available in the 1st and 2nd Generation decks. They protect themselves and all nearby (i.e., the up to 8 surrounding tiles from Fire.
Note that Resource tiles are not affected by Fire anyway.
When calculating the Fire penalty, simply ignore any tile that is orthogonally or diagonally adjacent to a Fire Department (including the Fire Department itself).
Even if you have a Fire Department, you can still choose to sacrifice tiles (including the protected ones) instead of paying the (reduced) penalty.
-

Police Protection
Police Departments are available in the 2nd and 3rd Generation decks. They protect all nearby (i.e., the up to 8 surrounding tiles from Crime Spree. [n Note that Public and Resource tiles are not affected by Crime Spree anyway.
When calculating the Crime Spree penalty, simply ignore any tile that is orthogonally or diagonally adjacent to a Police Department.
Even if you have a Police Department, you can still choose to sacrifice tiles (including the protected ones) instead of paying the (reduced) penalty.
You can have more than one Fire and/or Police Department in your City to protect even more tiles.
C. Picking Up Tiles
Pick up the tiles passed to you, in step A, by the player to your right. This is your hand for the following turn. If there are no tiles to pick up, you have completed the current Generation. Proceed with collecting income as detailed in the next section.
End of Generation: Collecting Income

At the end of each Generation, after 7 turns have been played, players collect income from their Commercial (and other) tiles that show the income symbol.

Note: The 2nd Generation Postal Service Public tile and the Modular Factory Cornerstone Industrial tile also provide income.
If you do not have any income-generating tiles in your City, you do not get any money. (There is no unconditional basic income in this game).
After you collect your income, proceed with the next Generation, unless this was the 3rd Generation. In that case, proceed with scoring your Cities.
Important! Even though the game ends after three Generations, players do collect income even at the end of the 3rd Generation!
End of the Game
The game ends after you collect your final income at the end of the 3rd Generation. Take the scoring pad provided with this game to compute your scores.
Do not differentiate between Cornerstone and Generation tiles when tallying your scores. You score Victory Points (VP) in the following categories:
-

Tiles: Add up the Victory Point values on the (Residential and Public) tiles in your City, as printed in the top right corner of the tiles. For tiles with a variable number of VP, you must first determine their current value.
-
Neighborhoods: Residential tiles automatically form Neighborhoods by themselves or with other Residential tiles, if they are directly connected by Roads. T
he value of a Neighborhood depends on its size, i.e., the number of Residential tiles in the Neighborhood. (Do not add the face values of the Residential tiles involved, as you have already considered them under "Tiles")

Each tile beyond the 8th increases the value of its Neighborhood by a constant 4 VP.
-
Goods: As shown at the top of your City board, each Raw Good is worth 1 VP, each Processed Good 2 VP, and each Luxury Good 10 VP. Each Good is scored only once, regardless of how many tiles in your City show that Good. (In other words, only score the Good tokens above your City board).

-
Money: Score 1 VP for every £2 you have left, rounded down. (This is why you receive income at the end of the 3rd Generation).

-
Pollution: For each Residential tile in your City, check whether it is nearby one or more Polluting tiles.
You lose 2 VP for each orthogonally adjacent and 1 VP for each diagonally adjacent Polluting tile. (You can lose points for the same Polluting tile more than once, if it is nearby multiple Residential tiles).
Example: You have three Residential tiles nearby an Industrial tile. Two of them (top left and top right) are diagonally adjacent; the third (bottom left) is orthogonally adjacent. You lose l+l+2=4 VP from this.
-
Ghost Town: You lose 10 VP if you do not have any Residential tiles in your City. You lose 4 VP if you have only 1 Residential tile.
-
Power: You lose 5 VP if you do not have at least one Power-generating tile in your City (showing the Power symbol).
Total these values to determine your final score. The player with the most Victory Points wins.
In case of a tie, enjoy your shared victory!
Continue Reading
