Components

- 1 Gameboard
- 75 Secret Base Room cards
- 40 Henchman cards
- 97 Contract cards
- 8 Mercenary cards
- 14 Power cards
- 25 Scheme cards
- 5 Supervillain cards
- 7 Lackey cards
- 5 sets of wooden player tokens
- 28 Trait dice
- 10 Injury tokens
- 1 white Round marker
- 55 Money tokens
- 8 Finale cards
- 10 +1/+2 tokens
- 30 Hero cards
- 5 Player Aid cards
Object of the Game
Each player in MANIACAL takes on the role of a comic book Supervillain. Your goal is to earn the most Infamy points through 3 rounds of play. Infamy is primarily gained by completing contracts (such as, Steal a Nuclear Warhead) that appear on a world map.
To complete these contracts, you will need to recruit henchmen. There are 6 types of henchmen: Beasts, Criminals, Scientists, Mystics, Lackeys, and Mercenaries. Different types of henchmen will come work for you, if you build rooms in your secret base that attract them.
For example, if you build a Robotics Lab, Scientists will be attracted to your base. Room cards can also be activated by your henchmen for bonuses, making it easier for you to complete contracts and gain Infamy.
That's MANIACAL in a nutshell:
- Build your Secret Base,
- Attract Henchmen
- Complete Contracts.
Setup
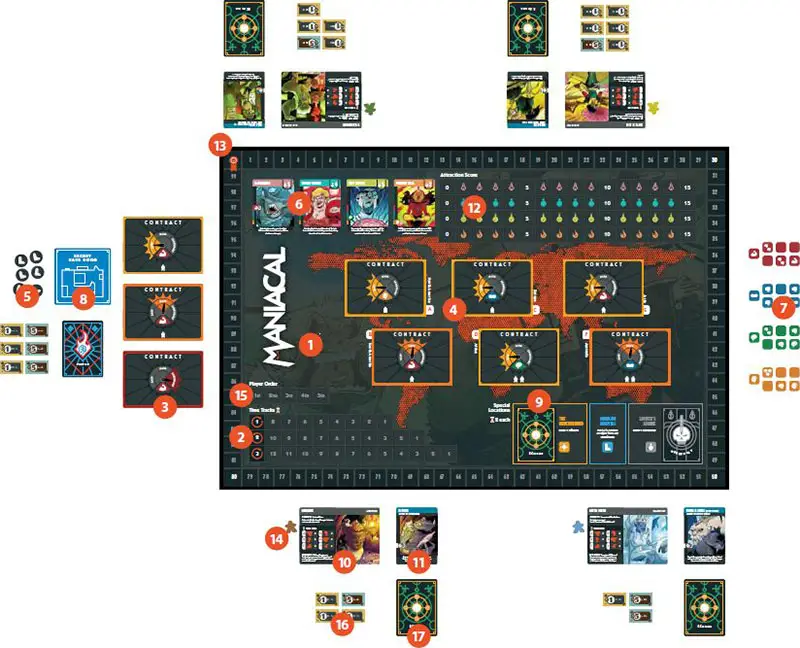
1 Lay the gameboard in the center of the play area.
2 Place the round marker on the "1" of the round track.
3 Separate all Contract cards by difficulty (Easy, Hard, Legendary), forming 3 decks. Shuffle each of the 3 decks and place them face-down near the gameboard.
4 Seed the world map with contracts. Draw 4 Easy and 2 Hard Contract cards, shuffle them together, and then randomly place them (face-down) on the continent locations of the world map.
5 Place the Injury tokens to the side of the gameboard.
6 Shuffle the 4 Henchmen decks and place them face-down on their matching locations on the gameboard. Then, flip over the top card of each deck.
7 Place the 4 pools of trait dice, separated by color, within reach of all players.
8 Shuffle the Secret Base Room deck and the Power deck, and place them to the side of the gameboard.
9 Shuffle the Scheme deck and place it, face down, within The Underground Special Location on the gameboard. Shuffle the Mercenary deck and place it, face down, within Lucifer's Lounge Special Location on the gameboard.
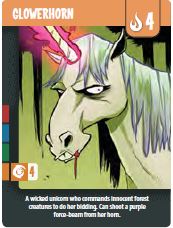
10 Each player picks a Supervillain card, randomly or otherwise. Each Supervillain card details a unqiue strength/weakness for that Supervillain (see Advanced Rules on page 15). If this is your first time playing MANIACAL, we recommend that you ignore these unique abilities, making the game a bit simpler.
11 Each player takes the Lackey card associated with their Supervillain.
12 Each player takes one set of colored wooden tokens. Place one wooden disc on the starting space of each of the 4 Attraction Score tracks on the gameboard (players will be stacking these on top of each other, and the order of stacking is irrelevant).
13 Each player places one of their cylinders, which will be used to track score, on the "0" space of the Infamy track.
14 Each player places their supervillain-shaped meeple on their Supervillain card in front of them.
15 Randomly choose a starting player. That player places their other cylinder on the "1st" space of the Player Order track. In clockwise order, each subsequent player around the table should place their token on the next available space ("2nd", then "3rd", etc)..
16 Give the starting player $8 in tokens. Each subsequent player (in clockwise order) should receive +$1 (so, the 2nd player should get $9, etc).. Place the remainder of the money tokens within reach of all players to serve as the "bank".
17 Each player draws 1 random Scheme card.
18 You are now ready to play!
Money

Each $1 token in MANIACAL actually represents $100,000. Because it's more fun that way.
Game Play
There are a total of 3 rounds in a game of MANIACAL. Each round is composed of the following phases:
- Base Building Phase
- Henchmen Phase
- Contract Phase
- Clean-Up Phase
I. Base Building Phase
The Base Building Phase is primarily composed of a draft for Secret Base Room cards. Deal 5 Room cards to each player. Simultaneously, each player should pick one of these cards to either Build or Sell.
They keep their decision secret until all players are ready to reveal their card and announce their decision. Once all players have revealed their card, Build and Sell actions can be resolved in any player order (all actions are considered to be simultaneous).
After every player has resolved their first Build or Sell action, the players should pass the remaining cards in their hand to their neighbor (the direction of the draft is indicated on the Turn Track, alternating from clockwise on Turn 1 to counter-clockwise on Turn 2, and then clockwise again on Turn 3).
At this point, players will have 4 cards in their hand to choose from. Again, they should simultaneously decide on and reveal a Build/Sell action. After this second action is resolved, a final pass occurs.
For the last choice, players will have 3 cards in their hand.Once this final Build/Sell action has been resolved, players should discard the remaining 2 Room cards leftover in their hand. The Base Building Phase is then over.
Building a Room
When building a room, you must first discard money equal to its cost. Place the Room card in front of you, near your Supervillain card. Room cards can be placed next to each other in any layout you wish; there is no "spatial" element to building your base.
Many rooms come with an activated effect that is described at the bottom of the card. This effect does not apply now. It only comes into play during the Contract Phase.
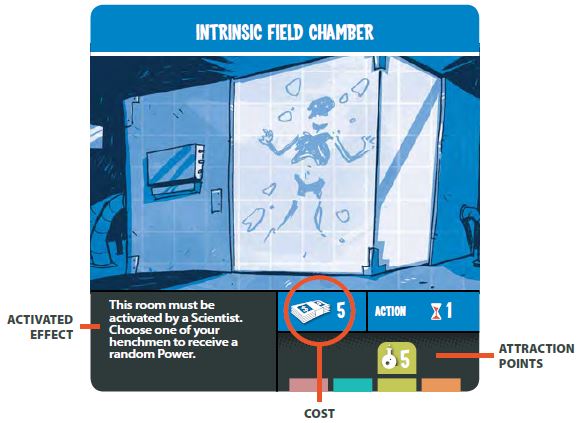
By building a new room, you make your secret base more attractive for particular types of henchmen. Along the bottom of the room card, you will the number of attraction points you gain in one of 4 are5 (from left to right): Beasts, Criminals, Scientists, and Mystics.
For example, the Intrinsic Field Chamber shown to the left is providing 5 attraction points for Scientists. As soon as you build a room, increase your respective Attraction Score. So, if you had built this room, you would track the increase thus:

It is quite possible that the Room you build will provide attraction points in m0e than one area - for instance, giving you +3 Beast attrac^n points and +3 Criminal attraction points. Players can be tied for attraction points; they should simply stack their tokens when this occurs.
Selling a Room

When selling a room, you discard the Room card and take money from the bank equal to the cost of the card. This is the quickest and simplest way to get money in MANIACAL
II. Henchmen Phase
During the Henchmen Phase, players will see how well their base attracts henchmen. This will be determined by using the Attraction Score tracks. Every turn, a maximum of 8 henchmen (2 Beasts, 2 Criminals, 2 Scientists, and 2 Mystics) will be recruited.
Henchmen are absolutely vital to your success in MANIACAL, since you need them to both complete contracts and activate rooms in your base.
Henchmen Cards and Traits
In the upper-right corner of a Henchman card is the henchman type icon and the Cost.
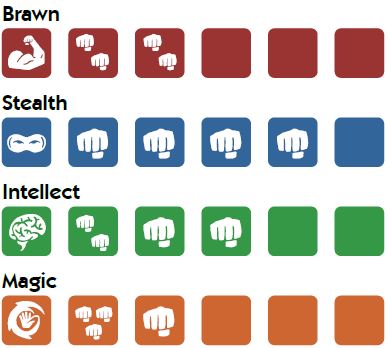
On the left side of the card are the trait values for the henchman. Henchman varies on 4 traits:
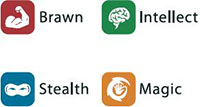
Each of these traits can vary between 1-5, and larger numbers are better.
This is the number of dice the henchman will add to your dice pool when resolving contracts.
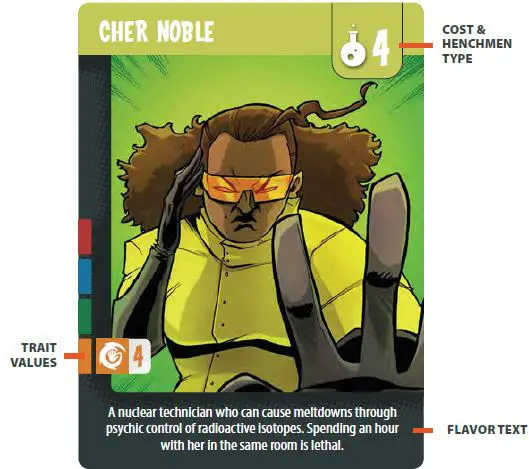
There are 6 types of henchmen in MANIACAL: Beasts, Criminals, Scientists, Mystics, Lackeys, and Mercenaries. Only Beasts, Criminals, Scientists, and Mystics are recruited to your base during the Henchmen Phase.
Every player begins the game with one Lackey, and you can never recruit another. Mercenaries are recruited by visiting the Lucifer's Lounge Special Location.
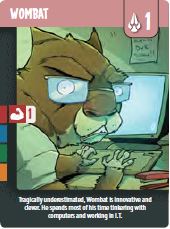

Beasts
Beasts are vicious hybrids of human and animal stock. They will have values in either Brawn or Stealth.
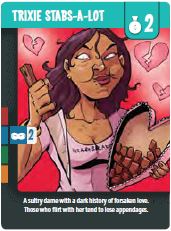

Criminals
Criminals are despicable thieves and cutthroats. They will have values in either Stealth or Intellect.
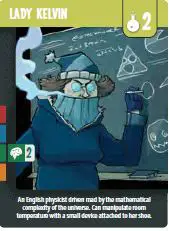

Scientists
Scientists are brilliant but deranged thinkers and inventors. They will have values in either Intellect or Magic.

Mystics
Mystics possess inexplicable powers and dabble in the occult. They will have values in either Magic or Brawn.
Attraction & Recruitment
Every turn, 2 Beasts, 2 Criminals, 2 Scientists, and 2 Mystics are available for recruitment. To conduct recruitment, players should refer to their respective Attraction Scores for each of the henchman types.
Start with the Attraction Score track for Beasts. The player who has the highest Attraction Score recruits the face-up Beast on top of the Beast Henchmen deck.
The player takes the henchmen card and adds it to their hand. That player must immediately reduce their beast Attraction Score by the cost of the henchman. Then, immediately reveal the next card of the Beast deck.
Again, the player with the highest Attraction Score in beasts recruits this henchman. It may be the same player who recruited the first Beast. Repeat this exact process for Criminals, Scientists, and Mystics, so that 2 of each type are recruited.
And after all the henchmen are recruited, make sure that the top card of each Henchmen deck is face-up, in preparation for the next turn.
Important: if a player cannot afford the henchman (i.e., they do not have enough attraction points to pay the cost), they cannot recruit that henchman! The henchman remains face-up and will be available next turn. Recruitment for this henchmen type immediately ends (even if it was the first henchman on offer).
Important: Any remaining points on the Attraction Score tracks rollover until the next turn; they are not reset to 0.
Tiebreaks and Player Order
When 2 or more players are tied for highest Attraction score, the player who is highest on the Player Order track wins the tie and recruits the available henchman.
Example: Recruitment Tiebreak
If Green and Blue were tied for highest Beast attraction score at the start of a Henchmen Phase, Green would win the tie and recruit the top Beast henchman.
After Green pays the cost for this henchman, Blue would have the most Beast attraction points and would therefore recruit the next Beast revealed.
 Player Order |
Example: Recruiting Henchmen
Let's say we have a 3-player game going. Hassan is playing yellow, Simon is playing brown, and Dave is playing green. Here are the Attraction Score tracks at the start of the Henchmen Phase on Round 1:
The currently showing henchmen are:
- Beasts: Royal Jelly (cost = 3)
- Criminals: Ms. Nomer (cost = 3)
- Scientists: Gray Matter (cost = 5)
- Mystics: Occulus (cost = 1)
We start with Beasts. Hassan (yellow) has the highest Attraction Score, and so recruits Royal Jelly. He immediately reduces his beast Attraction Score from 6 to 3.
The players reveal the next beast in the deck. It is Hammerhead (cost = 5). One of the best! Since Simon (brown) now ranks highest in beast attraction, he recruits Hammerhead (and fortunately has just enough attraction points to pay for him).
We then move to Criminals. Simon ranks highest here as well and recruits Ms. Nomer. He reduces his criminal Attraction Score from 3 to 0. The next criminal revealed is Magpie, with a cost of 2.
Unfortunately, even though Dave (green) ranks highest with an Attraction Score of 1, this is not enough to pay for Magpie. So Magpie remains un- recruited until next round.
Next up are Scientists. Dave really wanted Gray Matter since he's one of the most powerful scientists in the deck, and Dave easily wins with an Attraction Score of 8.
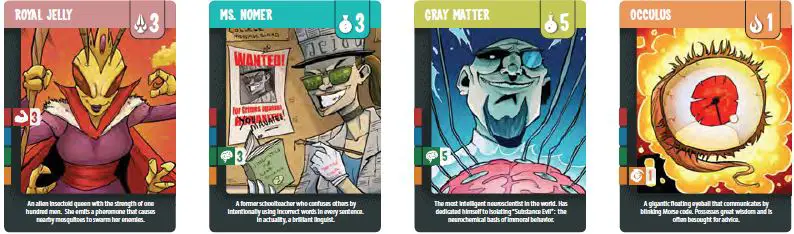
After recruiting Gray Matter, his Attraction Score is now 3 - tied with Simon! The next scientist revealed is Centrifuge (cost = 3). But who will recruit him? Simon started the game as 1st player on the Player Order track. He, therefore, wins the tie and recruits Centrifuge, paying the 3 attraction points.
Finally, we turn to Mystics. Hassan leads with an Attraction Score of 4. He successfully recruits Occulus, pays the 1 attraction point - and is still ranked highest! The next Mystic is revealed, and it is The Minister (cost = 3). He has just enough attraction points to recruit this henchman as well.
So, the final tally is:

III. Contract Phase
During the Contract Phase, players will attempt to complete nefarious mis S92 ns around the world, hopefully gaining additional wealth and infamy. You must carefully manage your henchmen and time to be successful.
Determining the Active Player
At the start of each Contract Phase, the players should transfer their Time tokens from the Player Order track to the Time track associated with the current round (1,2, or 3).
The players should stack their tokens on the left-most time space (e.g., the "8" if it is the first round). Tokens should be stacked in player order, such that the token of the 1 st player is on the top of the stack (2nd player next, etc)..
During the Contract Phase, player will alternate taking various actions. The player whose token is left-most on the Turn track becomes the active player.
When 2 or more tokens are on the same space, the player whose token is highest in the stack becomes active player. As you take actions during the Contract Phase, you will spend time and move your Time token to the right on the Turn track.
Once you have used all your available time, shift your Time token up to the Player Order track; your token should occupy the leftmost available space on the Player Order track.
Actions and Spending Time
When you are active player, you must take one action. Possible actions are:
| Action | Time Cost |
|---|---|
| Activate Action Room | 1 week |
| Attempt Contract | 3-5 weeks |
| Visit Special Location | 2 weeks |
| Pass | remaining time |
Every action costs a certain amount of time, and time is a limited resource. When you declare an action, you must spend the necessary time and track this by moving your Time token to the right on the Time track.
You may not take an action if you do not have the necessary time remaining. Once your action is complete, if your Time token is still the left-most token on the Time track, you immediately become active player again.
However, if another player's token is now left-most, they become active player. If, when you move your Time token, you land upon another player's token, simply stack yours on top.
If you end your turn with 0 Time, you must immediately move your Time token to the leftmost available space on the Player Order track.
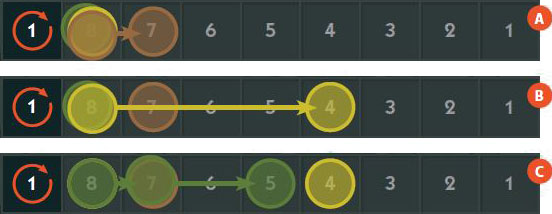
Example: Spending Time:
It is the start of the Contract Phase on Round 1. Simon (brown) is 1st player, Hassan (yellow) 2nd, and Dave (green) 3rd. They stack their Time tokens on the "8" of the Turn 1 Time track, with Simon's on top.
Simon becomes active player. As his first action, he activates an Action room in his base, spending 1 week A. Hassan now becomes active player. He goes on a contract, spending 4 weeks B. Dave then becomes active player.
He also uses an Action room in his base, spending 1 week C. Since his Time token is stacked on top of Simon's, he becomes active player again. He chooses to visit a Special Location, spending 2 weeks. Simon then is active player.
The phase continues until all 3 players have spent all their time.
Activating Action Rooms
Some of the rooms you build in your base are categorized as Action rooms. When you are active player, you may activate one of these rooms with an unexhausted Supervillain or henchman.
If you use your Supervillain, place your Supervillain meeple on the Room card; your Supervillain is now exhausted.
If you use a henchman, place the Henchman card on top of the Room card; this henchman is now exhausted (flip it face-down to indicate this status). Exhausted henchmen and Supervillains cannot be used for any further actions this turn. They will be refreshed during the Clean-up Phase.
Pay the Time cost for activating the room, which is almost always 1 week (indicated on the card). Immediately trigger the activated effect of the room. A given room may only be activated once per round.
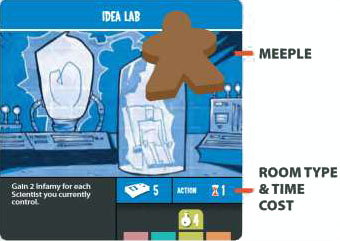
Example: Action Room
It is the start of Round 1, and Simon is the active player. He decides to activate his Id e9 Lab as his first action. He uses his Supervillain for this purpose, placing the meeple onto the room card.
This costs him 1 week. He moves his Time token to the right 1 space on the Time track, from "8" to "7". He then immediately triggers the effect of the room: gaining 2 Infamy for each Scientist henchman he currently controls.
His Supervillain is exhausted for the remainder of this round and may not be used for further actions.
Attempting Contracts
The most dramatic action you can take during the Contract Phase is to attempt a contract. There are always 6 face-down contract cards on the world map. Contract cards have information on both their front and back side. Players are not allowed to flip these over and read the front until they commit to one.
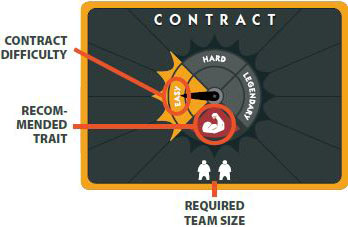
The back of a Contract card shows the contract difficulty (Easy, Hard, or Legendary), the required team size of henchmen that must be assigned to the contract (ranges between 1-4), and the recommended trait (Brawn, Stealth, Intellect, or Magic).
As active player, if you want to attempt a contract you must first declare which of your available henchmen you are assigning to the contract team. You must assign the exact number of henchmen to the contract as specified by the required team size.
At this point, your opponents have the opportunity to play one Scheme card against you.
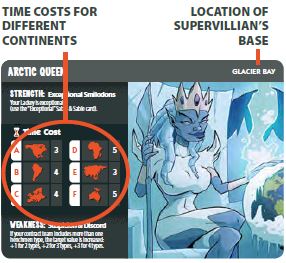
You must then pay the Time Cost on how far away the contract is from your Supervillain's base. On your Supervillain card, you will see the location of your base, as well as Time Costs for a7tempting contracts in 6 continents. Move your token on the Time track a number of spaces equal to the Time Cost you are paying.
Example: Contract Time Cost
Hassan is playing the Arctic Queen (shown above). It is Round 1, and for his first action, he declares that he is attempting a contract in Europe (continent "C" on the world map). He must, therefore, spend 4 weeks on the Time Track, moving from "8" to "4".

Resolving Contracts
After the Time Cost has been paid, the active player flips their chosen Contract card to read and resolve it.
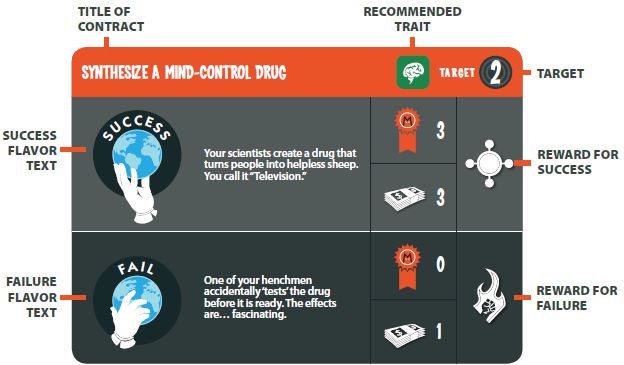
The most important number here is the Target value. This is the number of successes you must roll to succeed at the contract. The higher this number is, the more difficult the contract.
Easy contracts have target values that range between 1 -4, Hard contracts range from 3-9, and Legendary contracts range from 4-15. The other factor that influences the Target value is the required team size for that contract. Contracts that require bigger teams have higher Target values - but they also tend to pay out greater rewards!
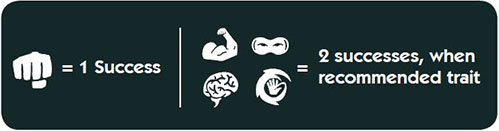
First, collect your trait dice. There are 4 types of dice in the game, and they match the henchmen traits: Brawn (red), Stealth (blue), Intellect (green), and Magic (orange). For every point of Brawn your henchmen have, take 1 Brawn die.
For every point of Stealth, take 1 Stealth die. Do this for Intellect and Magic, as well. Once you've collected all your trait dice, roll them! Total the number of successes. If you need to take more trait dice than are available, simply conduct two or more successive rolls and keep track of the number of successes between rolls.
Important: if you roll a trait icon that matches the recommended trait for this contract, that icon is worth 2 successes! Using henchmen with the recommended trait for a particular contract will drastically improve your odds of succeeding.
If you roll a number of successes equal to or greater than the Target value of the contract, you have succeeded. Read the "Success!" flavor text and take the rewards granted for success.
This will always be a certain number of Infamy points and a certain amount of money. Record your increase in Infamy on the Infamy Track. Take a number of money tokens equal to your money reward.
If you roll fewer than the required number of successes, you have failed the contract. Read the "Failure..". flavor text, and take the rewards granted for failure (significantly less, but it's something!).
Contract Results
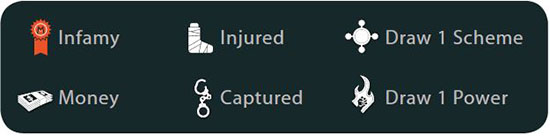
You may see an additional icon in the rewards area that applies to you. These effects include: Injured, Captured, drawing a Scheme card, and receiving a random Power.
Trait Dice Faces
Now that you are done resolving the contract, discard it. All henchmen that you assigned to this contract (and that weren't captured) are now exhausted. Flip these henchmen c ards over to indicate their exhausted status. Exhausted henchmen cannot be used for more actions this round.
Important: Immediately draw a new Contract card of the same difficulty and place it face-down on the available continent. Thus, there will always be 6 contracts for players to choose from.
Activating Contract Rooms
A second type of room in your base is the Contract room. These are rooms that you can activate while you are resolving a contract. Unless otherwise specified on the card, you may activate Contract rooms at any point during the contract resolution process.
To activate the room, you must exhaust an available henchman or your Supervillain. You cannot choose to exhaust a henchman who is assigned to the contract team. Immediately trigger the activated effect of the room.
Note that activating Contract rooms does not cost any time! You may activate as many Contract rooms as you wish during a contract resolution, as long as you have the available henchmen. As with Action rooms, each Contract room may only be activated once per round.
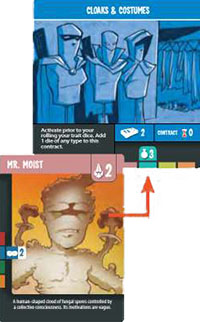
Example: Contract Room:
While resolving a contract, Hassan decides to use his Cloaks & Costumes room. He must activate this prior to rolling his dice.
He exhausts Mr. Moist (who is not assigned to the team) to activate the room. Hassan adds an additional die of his choosing to the dice pool.
There is no time cost for Contract room activation.
Special Effects
One of the results of succeeding or failing at a contract may be a Special Effect. There are 4 possible effects:
-

Captured
Choose one of the henchmen you assigned to the contract team. That henchman is removed from the game (return them to the box). They have been captured, killed or otherwise permanently disabled. Mock their ineptitude.
-

Injured
Choose one of the henchmen on the team. Place an Injury token on the henchman card. Injured henchmen cannot be assigned to contracts, although they can be used to activate rooms in your base. A henchman can acquire more than 1 Injury token.
-

Scheme Card
Draw the top card from the Scheme deck.
-

Power
Choose one of the henchmen assigned to the contract. That henchman receives a random Power. Draw the top card from the Power deck and attach it to the henchmen.
Lackeys
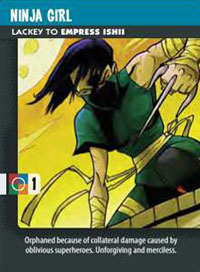
Lackeys are a special henchmen type. Every player starts the game with one.
Lackeys are much like regular henchmen in that they can be assigned to contracts, can be used to activate rooms, can be Injured or Captured, or even receive Powers!
After being used to complete an action, a Lackey becomes exhausted like any other henchman. But they differ from regular henchmen in 2 important ways:
-
Most Lackeys start the game with a "1" value in each trait (the exceptions come into play when using the optional Supervillain strengths and weaknesses).
However, they can only use one trait when assigned to a contract (and when activating a room). It is your choice which trait to utilize.
-
When assigned to a contract, Lackeys allow for a re-roll. After you roll all your trait dice, you may select any number of those dice to roll again (once). Lackeys, while weak, provide great flexibility on contracts.
Scheme Cards
Scheme cards give you opportunities to either help your own situation during the Contract Phase, or interfere with an opponent's plan. Each player begins the game with 1 Scheme card.
You can draw a Scheme card by visiting The Underground Special Location (see page 13). In addition, you may receive Scheme cards as rewards for succeeding at contracts or activating certain rooms.
Keep your Scheme cards hidden from your opponents. If you ever need to draw a Scheme card and there are none remaining, shuffle the discard pile to make a new draw pile.
You can use a Scheme card for one of two effects. These effects only apply during the Contract Phase. The top negative effect applies if you play it when an opponent is the active player.
You play the card after the active player has chosen to attempt a contract as their action and assigned a team, but before they flip the card. Only one negative effect may be played against an opponent on a single contract attempt. In clockwise order from the active player, each opponent decides whether they want to use one of their Scheme cards.
Once someone has played a negative Scheme effect, no other opponent may do so. You may still play a Scheme card against an opponent when yourTime token is on the Player Order track.
You may play Scheme cards for their bottom positive effects at any time when you are active player (e.g., before or after resolving a contract). You are allowed to play more than one. You are allowed to play a Scheme card that you just received as a reward for completing a contract. It does not count as an action or cost any time to play a Scheme card.
After you have played a Scheme card, discard it.
Possible Negative Effects

-
Increase the target value of a contract by +2.
-
Remove any 1 trait die from a player's dice pool before they roll the dice to resolve a contract. This can reduce them to 0 dice.
-
Force a player to pay 1 additional week to attempt a contract.
-
After a player has completed a contract, assign an Injury to one of the henchmen on the team. You may wait until after the active player has assigned any Special Effects.
-
If the player succeeds on this contract, steal $3 from them when they collect their reward.
In addition: every time you play a Scheme card for its negative effect, you immediately gain +2 Infamy.
Possible Positive Effects

-
Reroll up to 3 dice during a contract resolution. This may be used consecutively along with other reroll effects (from a Lackey or a Contract room).
-
Gain +2 weeks on the Time track. Move your Time token to the left 2 spaces. You cannot end up with more time than the maximum listed on that Time track.
-
Refresh one of your exhausted henchmen. This henchman may now be used for an additional action this round.
-
Nullify an Injured or Captured effect that has just occurred while you are active player.
-
Gain +2 Infamy & $2 after failing a contract.
Powers
Periodically, one of your henchman will be granted a random Power through the result of a contract or some other game effect. When this occurs, you must first declare which henchman is receiving the Power.
Then, draw the top card from the Power deck and attach it face-up to the chosen henchman. Powers increase one or more of your henchman's traits by a certain value.
-
You are allowed to give one henchman multiple Powers.
-
If a henchman with a Power is ever captured, immediately discard the attached card(s).
-
A henchman with a Power might have values in two or three different traits. For example, they might have started with a "4" in Brawn. Then, when they receive their Power, they gain "1" in Stealth and "1" in Magic.
If you then assign this henchman to a contract, they would contribute a total of 6 trait dice: 4 Brawn, 1 Stealth, and 1 Magic. Holy Mackerel!
-
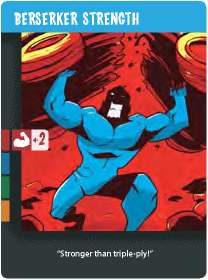
You are allowed to give Powers to your Lackey. However, be aware that your Lackey is still restricted by the rule that they can only ever use 1 trait at a time.
So, for example, if your Lackey received the Berserker Strength, they would have a Brawn of "3", Stealth of "1",Intellect of "1",and Magic of"1 ".When assigned to a contract, you could declare they are using their Brawn, allowing you to take 3 Brawn dice.
Or you could choose Stealth, Intellect, or Magic, each of which would allow you to take a single trait die of that type.
Visiting Special Locations
When you are active player, you may use your action to visit one of the 3 Special Locations printed on the world map. Visiting a Special Location always costs2 weeks in time - but you don't need to exhaust anyone. These locations are:
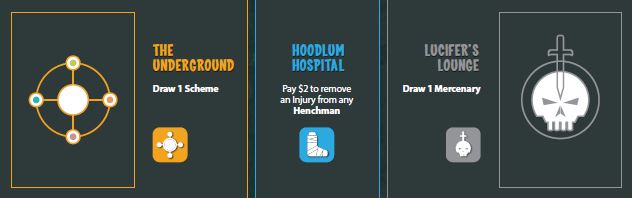
-

The Underground
Visit the criminal underground when you want a new Scheme card. Pay the time cost, and then draw one random Scheme card.
-

Hoodlum Hospital
Visit the hospital when you want to heal injuries. Pay the time cost. Then pay $2 (to the bank) for each Injury token that you wish to discard from any/all of your henchmen.
-

Lucifer's Lounge
Visit this (upscale!) hive of scum and villainy when you want to hire a merc. Pay the time cost, and then draw one random Mercenary card.
Mercenaries
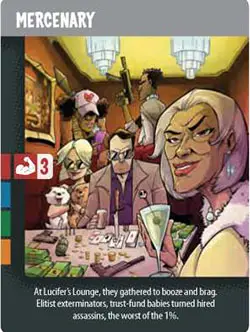
Mercenaries are henchmen for hire. You may draw a random Mercenary card when you visit the Lucifer's Lounge Special Location.
Mercenaries perform identically to other types of henchmen when assigned to contracts. They contribute trait dice to the pool.
They can be Injured or Captured (when Captured, they are immediately removed from the game).
They are exhausted after going on a contract. Mercenaries can also be used to activate rooms in your base and are exhausted after doing so.
Mercenaries have one special rule, associated with their "transitory" nature: they return to the bottom of the Mercenary deck during the Clean-up Phase, after all henchmen (including Mercenaries) have been paid their salary. Any Injury tokens or Powers they have acquired are discarded at that time.
Passing
When you are active player, you may decide to pass. Immediately spend the remainder of your time and move your Time token to the next available, leftmost spot on the Player Order track.
You must pass if you are not attempting a contract, activating a room in your base, or visiting a Special Location.

Example: Passing
"Itis towards the end of Round I.Hassan(yellow) and Dave (green) have already used all of their time, and moved their Time tokens to the "1st" and "2nd" spots, respectively, on the Player Order track.
Simon (brown) is now the active player. While he has 1 week left, he realizes that he cannot attempt any more contracts, activate any rooms in his base, or visit any Special Locations.
As such, he must pass. He immediately spends his 1 remaining week and moves his Time token to the "3rd" spot on the Player Order track.
IV. Clean-up Phase
Salaries: On every round, including the last, players must pay $1 to the bank for each of their henchmen (this is not optional, if you have the money available).
This includes Mercenaries, Lackeys, and Injured henchmen. Unless otherwise stated, you must pay Mercenaries before you pay any of your other henchmen. After being paid, Mercenaries immediately go back to the bottom of the Mercenary deck. Any henchman that is not paid immediately leaves the game.
Firing: After paying salaries, you may fire any one of your henchmen. Remove them from the game.
If it is Round 3, then the game is now over. Proceed to End of Game scoring.
If it is Round 1 or2...
-
Refresh all henchmen, flipping them face-up. They are no longer exhausted.
Refresh Supervillains by returning meeples to Supervillain cards.
-
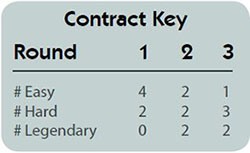
Reseed contracts. Discard all Contract cards from the world map. Draw 6 new Contract cards, based on the Contract Key. For example, if it is Round 2, draw 2 Easy, 2 Hard, and 2 Legendary Contract cards. Shuffle them and then randomly place the cards on the continent spaces, face-down.
-
Move the round marker. You are now ready to begin the next round.
End of the Game
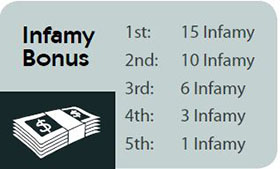
At the end of Round 3, the players should collect an Infamy bonus based on how much money they have relative to the other players. The player who has the most money gets the "1 st place" bonus, etc.
If there is a tie in rank between 2 or more players, they each get the full bonus for that rank.
The player with the highest total Infamy is then declared the winner.
If 2 or more players are tied for highest Infamy, then the player with the most henchmen (among those who are tied) wins. If there is still a tie, then the player with the most sinister laugh wins.
Bodyguard Variant
In 5-player games, henchmen are a tight resource. Some players may enjoy this additional challenge, while others may find it frustrating.
If you're in the latter camp, feel free to adopt this variant.
During Set-Up, simply give each player a random Mercenary card. This Mercenary will act as their Bodyguard.
The normal Mercenary rules do not apply for Bodyguards. Bodyguards act like regular henchmen in all ways (e.g., they do not leave you during the Clean-up Phase).
Thus, using this variant, each player will start the game with their Supervillain, a Lackey, and a Bodyguard.
Continue Reading