
Components
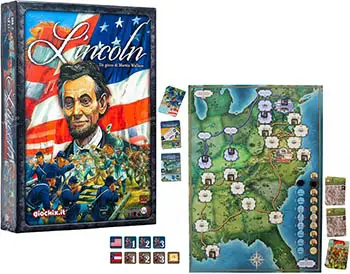
- Game Board
- 69 Union cards
- 50 Confederate cards
- 2 round wooden markers
- 18 control tiles,
- 45 unit tiles,
- 4 Fort tiles
- Rulebook
Setup
Players select which side they will play - Union or Confederate. Place the board so that players are closest to the side they have chosen.
Each player takes a set of cards and counters. Place the black markers on the start spaces of the Blockade and Eu- rope tracks (marked with an 'S').
Each player removes the cards numbered 'I' or 'II' from their deck. These cards are separated into two piles, one of 'Is' the other of 'IIs', and placed to one side. They will be added to your deck when you shuffle your discard pile, as explained later.
Players take the remainder of their decks and shuffle them. Place them face down to form a draw pile.
The Confederate player starts with a hand size of five cards from the draw pile, while the Union player has a hand size of six cards. Both sides draw cards up to their hand sizes.
Army counters are then deployed on the board:
The Union player starts with:
- One '3' strength army in Washington.
- One '2' strength army in each of Harper's Ferry, Kentucky, and Cairo.
The Confederate player starts with:
- One '3' strength army in Manassas.
- One '2' strength army in each of Front Royal, Savannah, and New Orleans.
- One '1' strength army in each of Nashville, Fort Henry & Donelson, and Fort Monroe.
The Union player is the game's first player.
Description of the Cards
Lincoln is a card game with a board, so it helps to understand how the cards work.
Each player has his own deck to draw from. When you exhaust your deck you shuffle to make a new deck, so the cards cycle. However, each time you shuffle you add in new cards to your deck. The Union deck gets stronger over time, while the Confederate deck becomes weaker.

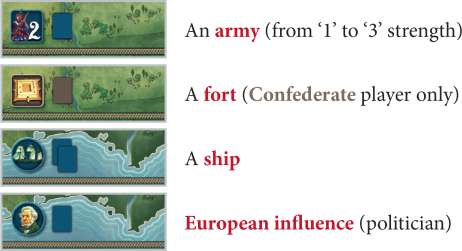
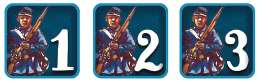
The area at the top of a card may contain an army ("1', '2' or '3' strength), a ship, a fort, or a politician. This card shows a '3' strength army.
Most cards may be used in more than one way. The majority of cards have a separate area at the top containing a symbol. This will either be an army ('1', '2' or '3' strength), a ship, a fort, or a politician (representing influence in Europe).
Next to this symbol is shown the number of cards you need to discard from your hand to deploy that unit. It is very important to remember that when you use a card to build the unit shown in the top area, it is then removed from the game.
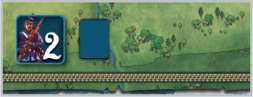
 A '1' strength army. |
'1' strength armies are deployed differently: you do not remove them from the game when you build the unit. Instead, discard the card after use (i.e. it is not permanently lost, as it will be reshuffled).
There are three symbols that may appear on the left-hand side of the card, which are:

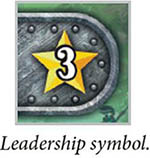
Leadership (shown in a yellow star). Leadership is used in combat and added to your army strength.

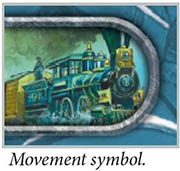
Movement (shown as a train). Movement is used to move units.

Naval movement (shown as a ship). Naval movement allows you to move units by sea (Union player only).
Finally, some cards have 'Action', 'Free action', or 'Benefit' marked on them. Action cards cost one of your actions to play. Free actions are played in addition to your usual two actions; there is no limit to the number of free actions you can perform in your turn.
Benefits modify an action, which in this game generally means modifying combat strengths; benefits do not cost one of your actions to play.
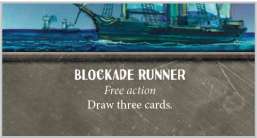
'Action', 'Free action', and 'Benefit' cards are explained at the bottom of the card. This example is a 'Free action' card.
A card can only ever be used for one purpose when played.
Game Play
Players take it in turns to perform actions. The active player performs two actions (plus any free actions).
After completing your actions you refill your hand to your hand size:
-
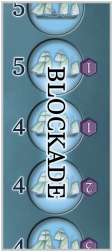
The Confederate hand size depends on the state of the Union blockade, as indicated by the number next to the space occupied by the black marker on the Blockade track.
The Blockade track, showing the Confederate hand size to the left and Union VPs to the right.
-
The Union hand size is always six cards.
If a player has exhausted his draw pile and needs to draw cards, he shuffles his discard pile to make a new deck. He also adds cards:
- On the first reshuffle, add the 'I' cards.
- On the second reshuffle, add the 'II' cards.
One of the end of game conditions is the Union player not being able to add any more cards (i.e., the Union player does not get a third reshuffle).
The Confederate player simply reshuffles his discard pile as many times as required, but will add no more cards after the second reshuffle.
When the Union player shuffles his cards, he checks his VP score:
- If his VPs are less than 2 VPs on his first reshuffle, the Confederate player wins immediately.
- If his VPs are less than 5 VPs on his second reshuffle, the Confederate player wins immediately.
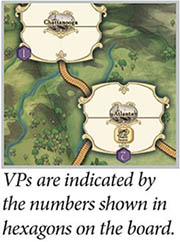
VPs are indicated by the numbers shown in hexagons on the board. Only the Union player counts VPs. They are gained for complete control of a location and by the position of the marker on the Blockade track.
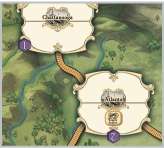
VPs are shown on locations; Chattanooga is worth 1 VP and Atlanta is worth 2 VP.
Taking Actions
When you are the active player, there are six actions available to you. These are:
- Deploy unit
- Move army
- Declare an attack in a contested location
- Discard cards
- Card actions
- Pass
Actions are independent of each other. You must complete one action before performing your second action. Thus, you cannot move units into a battle from two different directions in separate actions before fighting.
Action: Deploy Unit
Each card may have a separate section at the top, indicating either:
To gain the benefit indicated you must pay from your hand the number of cards shown. The cards that you pay with go to your discard pile. If the deployed card is a '1' strength army, it also goes to your discard pile (and is thus recycled). All other deployed cards are permanently removed from play.
To deploy this army, one card must be discarded from your hand; if the card symbol showed two cards, you would need to discard two cards from your hand. The card you are deploying is permanently removed unless it is a '1' strength army.
If you play an army/fort card, place a matching counter in a controlled location of your choice. Place the counter in either half of the location. There
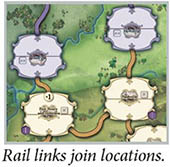
is no stacking limit, including forts. The location you place this in must connect to a supply source by a set of rail links (lines between locations on the board).
 A Union army counter.
 A Confederate fort counter.
You can connect through a contested location if the rail link goes through the half of the location that you occupy. For the Union the only supply source is Washington. The Confederates can trace supply from Richmond or Atlanta.
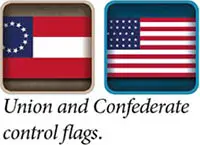
You control a location if it is your army's color and no enemy units are there. You also control a location if you have armies or one of your control flags in it, and the location is not contested.
You can deploy an army counter into a port you control by discarding a naval movement card in addition to any other cards paid.
If you play a ship card, you move the marker one space in your favor on the Blockade track (which will be away from you).
 Ship card symbol. |
If you play a European influence card, you move the marker one space in your favor on the Eu- rope track (which will be towards you).
 European influence symbol. |
You can never move a marker off the end of a track, so once it reaches one end or the other it cannot be moved further in that direction.
Action: Move Army
To move armies between locations you must discard one card with a Movement symbol on it.
The card you play is placed on your discard pile (i.e. eventually you will get it back when it has been reshuffled). You then move:
Some or all army counters in one location along one rail link into an adjacent location OR
One army counter to a location of your choice; you must be able to trace a set of rail links through friendly locations (these may be contested locations - if so, you must control the rail links running into and out of the location). You must cease movement if you enter an enemy occupied or enemy controlled location.
If you move to an enemy controlled location that does not contain any enemy counters then you take control of the location (which either means removing the opposing player's control counter or placing one of your own).
You may move into an enemy occupied location, which will lead to combat. As soon as you enter an enemy occupied location, combat is instigated.
The Confederate player can never move to the top three locations on the Union side.You cannot move a fort. For movement by sea, see the section 'Naval movement'.
Naval Movement

Only the Union player may perform naval movements. As a single action, the Union player can play one or more cards with a naval movement symbol to move one army counter for each such card played.
An army counter can move from a port location to any other port location. If the army moves to an occupied location, combat occurs. Savannah and New Orleans have a defense modifier of +1, while Fort Monroe has a defense modifier of +2.
Note that ship cards are discarded after use (i.e. they are not permanently lost, as they will be reshuffled).
Action: Declare an attack in a contested location
If you already have an army counter in a location that is contested (i.e. it contains enemy units as well as your own) and you wish to attack those units, you do not pay a card to move, you simply declare your intention to attack.
Action: Discard Cards
Place one or more cards on your discard pile.
Action: Card Actions
Carry out the action stated on the card. See the section 'Explanation of card actions' for more details. Discard the card after use (i.e. it is not permanently lost, as it will be reshuffled).
Action: Pass
If you choose this action, you do nothing.
Combat
Combat occurs either when a player moves units into an enemy occupied location or when he declares an attack in a location that is contested (i.e. units from both sides exist there). Combat is then resolved:
-
If the attacker moves by rail, his armies are placed in the half of the location entered by the rail link.
The defender moves all of his army counters to the half of the location under attack (thus where his army counters begin in the location is not important, they will always move to where the fight is).
Forts are stuck where they are, so can only take part in combat if their half of the location is attacked.
-
The attacker must now play one card face down. Some cards have a Leadership value, shown in a yellow star.
this card is revealed, any Leadership value shown is added to his army strength. When combat has ended, any cards played by either player are discarded (but not permanently removed).
-
The defender now has a choice: he may stand and fight or he may withdraw (see the section 'Withdrawal'). If he decides to stand and fight, he may play a Leadership card face down (it is not obligatory).
-
Each side now reveals any face down cards and sums its strength - this is the total army strength on counters plus the Leadership values from the cards.
In this example, the total army strength
adds up to 6 (1 + 2 + 3 = 6).
A fort has a value of '3' for the defender. If the attacker advanced by rail and there is a defense modifier on the link (e.g. Manassas gives +1 to the defender), this is added to the defender's total.
Note that an army cannot benefit from a defense modifier of the opponent's color (e.g. the Union player can never benefit from the defense modifier for Manassas). If the attack is happening within an already contested location, no defense modifiers apply.
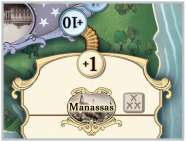
Some locations gain a defense modifier if the attacker advances by rail; for example, Manassas gives +1 to the defender.
-
The highest strength total wins. The defender wins ties.
-
Casualties are now calculated. The winner loses a number of counters equal to half the total number of counters he has in the battle, rounded down (e.g. if he has three counters he would lose one).
He chooses which counters will be removed. The loser loses a number of counters equal to half the number of counters he has in the battle, rounded up (e.g. if he had three counters he would lose two). He chooses which counters he will remove.
Forts can count as casualties. All eliminated counters are returned to the available stock. The winner cannot lose more counters than the loser - his losses will always be equal or fewer.
Note that casualties are based on the number of counters not overall strength, so having low value counters in an army is useful for taking losses.
-
Retreats are conducted. If the defender loses, he moves his remaining army counters back to the next connected location (he does not simply retreat to the other half of the location).
He may choose to split his forces and retreat to different locations, so long as they are friendly controlled or the half of the location moved into contains friendly units. If the attacker loses, he retreats to the location he attacked from.
If the attacker attacked from within the location, he must retreat to a connected friendly location. He may split his retreat if he wishes. If an army counter has no legal path of retreat, it is removed from play.
-
If a player is the sole occupant of what used to be an enemy controlled area, he now takes control of it. He places a control flag counter to show this. The control marker is only lost if the enemy gains control of the area (i.e. becomes the sole occupant).
-
The marker on the Europe track is moved a number of spaces according to the number of counters lost by the losing player. The marker is moved in favor of the winning player.
If the Confederate player captures and controls a blue location, he gains one additional point on the Europe track; this is lost if he subsequently loses the location.
Note that after combat the active player will draw cards to refill his hand, once he has finished his turn. The non-active player does not do so, so fighting a battle means the possibility of starting the next turn with a reduced number of cards in your hand.
Withdrawal
The defender may choose not to fight. He makes his decision after the attacker has played a card face down but before he reveals it (this card is then discarded).
If he originally controlled the whole location then he withdraws to the half of the location away from the direction of the attack. If he was already in one half of the location (i.e. it was already contested) then he must withdraw to a connected location.
He can only withdraw to locations he controls or half-locations that he has units in. He cannot withdraw via a half-location that has enemy units in it (so where the rail links feed into a location is important). He may split his forces when withdrawing and withdraw to different locations.
You cannot withdraw a fort, so it must remain in the half of the location it is placed. If you withdraw and leave one or more forts behind then combat occurs between the forts and the enemy.
The Union player may withdraw or retreat from a location reached by naval movement by playing a card with a naval movement symbol. Units are moved back to Washington. If the Union player cannot play the requisite card, the units cannot retreat or withdraw, which may mean they are eliminated.

End of the Game
The game ends when one of the following conditions is met:
-
The Union player fails to score 2VP before shuffling his cards for the first time, ending with a Confederate win.
-
The Union player fails to score 5VPs before shuffling his cards for the second time, ending with a Confederate win.
-
The Union player exhausts his deck for the third time (i.e. he has no more cards to add to his deck). In this case, the Union player adds up his VPs.
If he has 12 VPs or more he wins; otherwise, the Confederate player wins. VPs are indicated by the numbers shown in hexagons on the board.
The Blockade track awards VPs depending on where the marker is - the Union player will score the VPs shown at the position of the marker.
-
The Confederate player wins immediately if the marker on the Europe track reaches the Confederate end - it is assumed Europe enters the war (not something that would ever have happened historically, but it keeps the Union player honest).
-
The Confederate player automatically wins if he controls Washington at the end of the Union player's turn. The Union player automatically wins if he controls Vicksburg and Richmond at the end of the Confederate player's turn.
Continue Reading
