One player takes on the role of the Shark. The other players take on the roles of Quint, Chief Brody, and Hooper, who work together as a Crew to eliminate the Shark.
A full game is played over two Acts, in which success in Act 1 provides advantages going into Act 2. However, either Act may be played separately for a shorter game.
Act 1: Amity Island
Each round, the Shark secretly moves through the water surrounding the island, eating swimmers while trying to avoid detection. Meanwhile, the Crew rescues swimmers and tries to locate the Shark.
Act 2: The Orca
Act 2 occurs on Quint's boat, the Orca. Each round, the Crew Members select weapons and try to predict where the Shark is going to appear. Then the Shark resurfaces, attacking the boat and Crew before diving out of sight.
Components
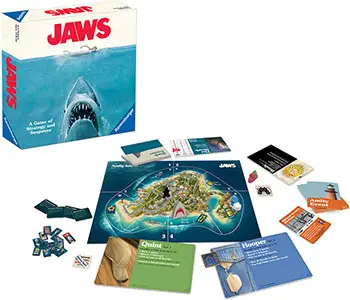
- 1 Double-Sided Game Board
- 1 Shark Mover
- 2 Boat Movers
- 3 Crew Movers
- 16 Shark Ability Cards
- 16 Resurface Cards
- 22 Gear Cards
- 16 Amity Event Cards
- 3 Dice
- 1 Shark Tracker Pad
- 4 Character Boards
- 4 Board Clips
- 8 Boat Tiles
- 40 Tokens
- Instructions
Object of the Game
The Crew wins the game if they eliminate the Shark. The Shark wins if it either eliminates all three Crew Members or destroys the Orca.
Act 1: Amity Island
Act 1: Setup
-
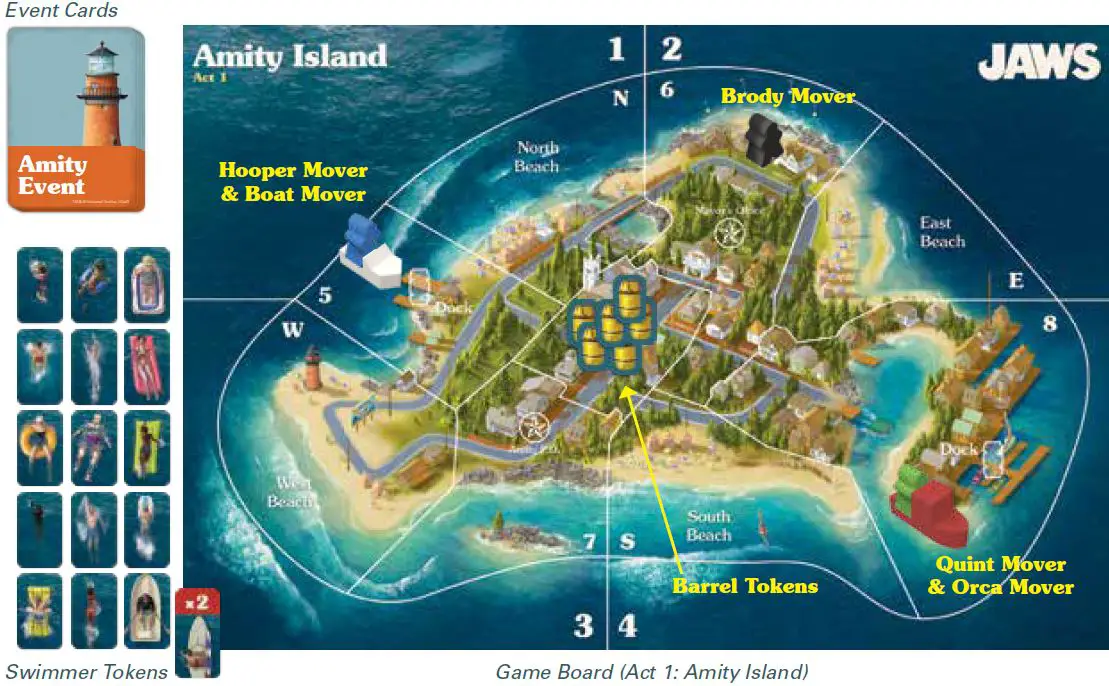
Unfold the game board and place it with the Amity Island: Act 1 side showing. The game board has spaces, separated by white lines.
-
Shuffle the Amity Event cards and place them face down in a deck near the game board.
-
Place the 16 Swimmer Tokens in a supply near the game board.
-
Decide who will be the Shark. The other players will be the Crew, and choose their Crew Member roles. All roles will carry over into Act 2.
Note: In a 4-player game, each Crew player controls a different Crew Member. In a 3-player game, the two Crew players each control one Crew Member and collectively control the third Crew Member. In a 2-player game, the Crew player controls all three Crew Members.
-
Give the players their corresponding Character Boards with the Act 1 side up, and complete the setup for each character.

Quint: Take two Barrel Tokens and place them next to your Character Board to indicate they are on the Orca. Place the remaining Barrel Tokens on the Shop (center space). Place the Quint Mover (green) in the Orca Mover (maroon) at the Dock on the eastern side of the island (space 8).
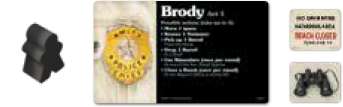
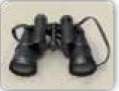
Brody: Take the Beach Closed Token and the Binoculars Token. Place the Brody Mover (black) at the Amity P.D. (space 6).
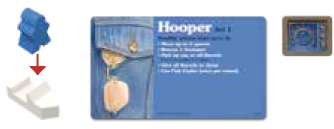
Hooper: Take the Fish Finder Token. Place the Hooper Mover (blue) in the Hooper's Boat Mover (white) at the Dock on the western side of the island (space 5).

Shark: Attach a clip to your Character Board and slide it over the 0 slot at the bottom of the Swimmer Track. Take the four Power Tokens and the Shark Mover. Do NOT place the Shark Mover on the game board. It is used only in specific situations, which will be explained later.
Note: If this is anyone's first time playing, show the Power Tokens to all players so they know what powers the Shark might use. During the game, the Power Tokens are kept secret from the Crew.
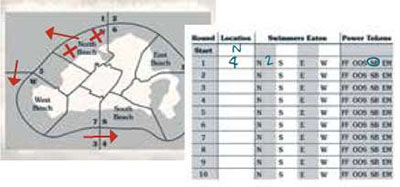
Take the Shark Tracker Pad and a pen or pencil. Choose a starting location. There are twelve spaces that contain water, each one designated by a different number or letter.
Pick a space and write the corresponding number or letter in the Location column next to "Start". Do NOT give the Crew your starting location. All of the Shark's movement is recorded in the Shark Tracker Pad and kept secret from the Crew.
Hint: Starting in one of the four Beach Spaces might give you easy access to Swimmers on the first turn.
-
Set aside all the other components-they will not be used in Act 1.
Act 1: Overview
Shark Goal: Eat as many Swimmers as possible while avoiding detection by the Crew.
Crew Goal: Locate the Shark and attach two Barrels to it, while protecting Swimmers from being eaten.
Act 1 is played in rounds, each of which consists of three phases, played in this order:
- Event Phase
- Shark Phase
- Crew Phase
Phase 1: Event Phase
Turn over the top card of the Amity Event deck and place Swimmers from the supply into the water of the Beach Spaces according to the letters shown next to the Swimmer icon.
Note: Michael (Brody's son) is a special Swimmer Token. When placing Swimmers, do NOT place Michael. Only place Michael if an Event card specifically states to do so.
Next, read the Event text aloud and follow the instructions given. Some Events will require immediate action, while others will affect phases later in the round.
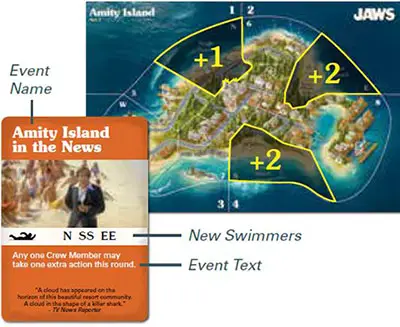
Event Phase Example: Place one Swimmer from the supply in the North Beach water, two Swimmers in the South Beach water, and two Swimmers in the East Beach water.
Phase 2: Shark Phase
During this phase, the Shark may take up to 3 actions and may choose to play one Power Token. Actions can be taken multiple times and in any order. The Shark's possible actions are:
Move
Move through water to an adjacent space. Diagonal spaces are not adjacent, and you cannot move across land.
Eat 1 Swimmer
Eat one Swimmer in your space. Do NOT show or tell your actions to the Crew. Keep your actions secret, planning them out privately.
After you've planned your entire turn, record it on your Shark Tracker Pad. Then announce that your turn is over and give the Crew the following information:
-
Swimmers Eaten
Tell the Crew how many Swimmers you ate and at what Beach.
Remove the corresponding Swimmers from the game board and return them to the supply, then slide the clip up the Swimmer Track on your Character Board one slot for each Swimmer you ate.
If your Swimmer Track reaches the 9 slot, Act 1 immediately ends.
-
Motion Sensors
You must inform the Crew of any Motion Sensors you triggered on floating Barrels during your turn.
-
Power Token
Let the Crew know if you played a Power Token. If you played one, do not show the Crew which one you played- that remains secret.
Motion Sensors
As the game progresses, there may be Barrels floating in the water. Each Barrel has a Motion Sensor attached to it.
At any point during your turn, if you are in a space with a floating Barrel, you trigger its Motion Sensor. At the end of your turn, you must inform the Crew of any Barrels whose Motion Sensors you triggered.
You do NOT have to say when you triggered them-whether it was before or after eating Swimmers-or in what order you triggered them if you triggered multiple Motion Sensors.
Power Tokens
Each Power Token gives you a special ability in the round it is played. Each one may be used only once per game. If you choose to play a Power Token, inform the Crew and place the token face down in front of you.
Do NOT tell the Crew which token you are playing-this remains secret. The Shark's Power Tokens are:
Feeding Frenzy
You may eat ALL Swimmers in your space as one action.
Evasive Moves
You do not trigger any Motion Sensors this round, even if you move through spaces with floating Barrels.
Out Of Sight
If Brody uses his Binoculars or if Hooper uses his Fish Finder this round, tell them you are NOT there or nearby, even if this is not true.
Note: The token is returned to the box at the end of the round, even if the Crew took neither search action.
Note: If Quint launches a Barrel into your space, you must still announce that you've been hit.
Speed Burst
You may move up to three spaces as one action. This may be done only once. Any other Move actions you take are one space, as normal.
Shark Phase Example: The Shark starts the round at the North Beach (N), and two Swimmers were placed at the North Beach in the Event Phase. The Shark uses their first two actions to eat both Swimmers (one Swimmer per action), leaving them with one more action.
Moving only one space would make it easy for the Crew to locate them, so the Shark uses their Speed Burst Power Token, which allows them to move three spaces for their third action. They move from space N all the way to space 4 in the hopes of eluding the Crew.
On the Round 1 line of the Shark Tracker Pad, the Shark player writes "4" in the Location column (their new location) and writes "2" next to the "N" in the Swimmers Eaten column (they ate two Swimmers at the North Beach).
They circle "SB" in the Power Tokens column, because they used their Speed Burst Power Token.
Phase 3: Crew Phase
During this phase, each Crew Member may take up to 4 actions. The Crew may take their turns in any order, but once a Crew Member starts their turn, they must finish it before the next Crew Member takes their turn.
Each Crew Member has different actions they may choose from, as described in the following sections. Actions can be taken multiple times (unless stated otherwise) and in any order.
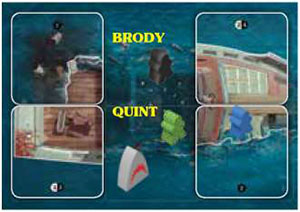
Quint
Quint pilots the Orca in the water around Amity Island to rescue Swimmers and launch Barrels into the water, hoping to hit the Shark.
Quint's possible actions are:
-
Move
Move through water to an adjacent space. Diagonal spaces are not adjacent, and you cannot move across land.
-
Rescue 1 Swimmer
Remove one Swimmer from your space and return it to the supply.
-
Pick Up Barrels
Pick up any number of Barrels in your space from either a Dock, the water, or Hooper's boat. Each source is a separate action. For example, picking up Barrels from a Dock and picking up Barrels floating in the water are two separate actions.
-
Launch A Barrel
(once per round).
Quint launches Barrels into the water using a harpoon gun he has on the Orca. You may launch a Barrel into your own space or an adjacent space. Diagonal spaces are not adjacent. You cannot launch a Barrel over land.
When you launch a Barrel, place the Barrel Token in the space you are targeting. The Shark must announce if they are in that space.
If the Shark is in that space, they are hit and the Barrel is attached to them. Place the Barrel on the Shark's Character Board. If this is the second Barrel attached to the Shark, Act 1 immediately ends (see End of Act 1 on page 6).
If the Shark is not in that space, the Barrel remains in the water. It is now a floating Barrel with a Motion Sensor that the Shark might trigger in future rounds.
Brody
Brody moves around Amity Island to rescue Swimmers, deliver Barrels to the Docks, help locate the Shark, and close Beaches.
Brody's possible actions are:
-
Move
Move across land to an adjacent space. Diagonal spaces are not adjacent, and you cannot move through water.
-
Rescue 1 Swimmer
Remove one Swimmer from your space and return it to the supply.
-
Pick Up 1 Barrel
If you are at the Shop, pick up one Barrel. Place the Barrel under your Mover to indicate you are carrying it. You may carry only one Barrel at a time.
-

Drop 1 Barrel
If you are at a Dock and carrying a Barrel, drop it by placing the Barrel on the Dock's Barrel symbol. There is no limit to the number of Barrels that can be at a Dock.
-
Use Binoculars
(once per round).
If you are at one of the four Beach Spaces, place the Binoculars Token on your space. The Shark must announce if they are in the water at that Beach. If they are, place the Shark Mover there.
Note: Remember that if the Shark played the Out of Sight Power Token this round, they will tell you that they are not there, whether that is true or not.
-
Close A Beach
(once per round).
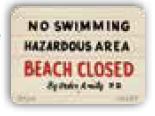
If you are at the Mayor's Office or the Amity P.D., close a Beach. You may close any Beach, as long as it has no Swimmers. Place the Beach Closed Token face up on the Beach.
When an Event card would have you place one or more Swimmers at that Beach, do not place them, but instead flip over the token so it shows "Opening Soon".
The next time an Event card would have you place one or more Swimmers at that Beach, do not place them, but instead remove the Beach Closed Token from the game board.
Note: Only one Beach can be closed at any given time. If a Beach is closed, you may take this action to close a different Beach. Move the Beach Closed Token to the newly closed Beach and make sure to turn it face up.
Hooper
Hooper pilots his speed boat in the water around Amity Island to help locate the Shark, deliver Barrels to Quint, and rescue Swimmers. Hooper's possible actions are:
-
Move
Hooper's boat moves faster than Quint's, so you may move up to 2 spaces as one action. Each move must be through water to an adjacent space. Diagonal spaces are not adjacent, and you cannot move across land.
-
Rescue 1 Swimmer
Remove one Swimmer from your space and return it to the supply.
-
Pick Up Barrels
Pick up any number of Barrels in your space from either a Dock or the water. Each source is a separate action. For example, picking up Barrels from a Dock and picking up Barrels floating in the water are two separate actions.
-
Give Barrels To Quint
If you are in the same space as Quint, give him ALL the Barrels you have on your boat. Place the Barrels next to Quint's Character Board to indicate they are now on the Orca.
Note: Hooper cannot launch Barrels into the water-only Quint has that capability.
-
Use Fish Finder
(once per round).
Place the Fish Finder Token in the water in your space. The Shark must announce where they are in relation to the Fish Finder.
- If the Shark is in the same space, they must tell you. Place the Shark Mover there.
- If the Shark is in an adjacent space that is connected by water, they must tell you they are "nearby". Diagonal spaces are not adjacent.
- If the Shark is neither in the same space nor an adjacent space, they must tell you they are "not there or nearby".
Note: Remember that if the Shark played the Out of Sight Power Token this round, they will tell you that they are not there or nearby, whether that is true or not.
Fish Finder Example #1: Hooper uses his Fish Finder in space 1. The Shark announces that they are nearby, which means that they are in an adjacent space. The Crew now knows that the Shark is in one of four possible locations: space 3, space 5, space N, or space 2.
Fish Finder Example #2: Hooper uses his Fish Finder in space 7. The Shark announces that they are not there or nearby. The Crew now knows that the Shark is NOT in space 3, space W, space 7, or space S.


End of the Round
After all three Crew Members have taken their turn, the round is over. If the Shark played a Power Token that round, the token is returned face down to the box. Begin a new round, starting with the Event Phase.
End of Act 1
Act 1 ends immediately if one of the following things happens:
- The Crew attaches a second Barrel to the Shark.
- The Swimmer Track on the Shark's board reaches the 9 slot.
Proceed to Act 2. Do not move the Clip on the Swimmer Track yet, because its location determines how many cards the Crew and the Shark will receive in Act 2.
Act 2: The Orca
Act 2: Setup
-
Shuffle the Shark Ability cards and randomly give the Shark the number of cards indicated by the Swimmer Track on their Character Board from Act 1. The Shark player may look at their cards, but should keep them hidden from the Crew.
-
Give each Crew Member their two corresponding Gear cards and their Target Token.
-
Shuffle the Crew Gear cards and randomly give the Crew (as a group) the number of cards indicated by the Shark's Swimmer Track. The Crew immediately divides these cards among the three Crew Members however they choose.
-
Each Crew Member places all of their Gear cards face up next to their Character Board.
-
Flip all four Character Boards to the Act 2 side. Attach a clip to each Character Board and slide it over the 0 slot at the top of the Wound Track.
-
Flip the game board to The Orca: Act 2 side.
-
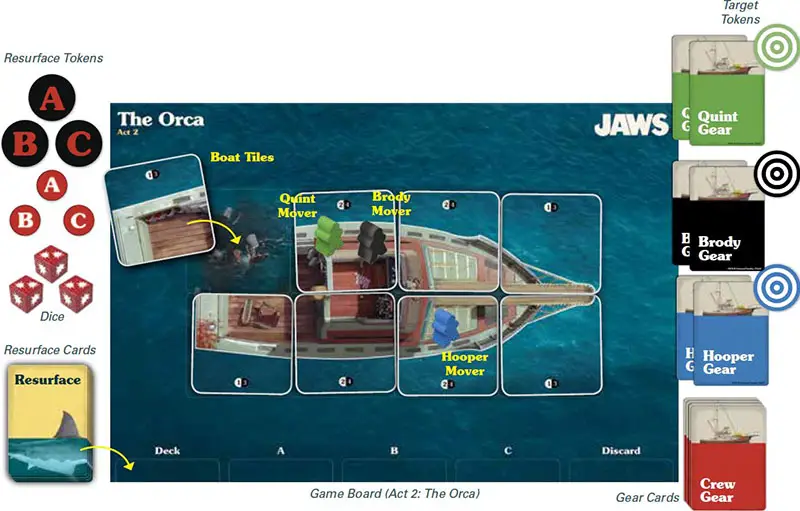
Build the Orca by placing one Boat Tile in each of the eight zones on the game board, as shown in the image above. Make sure each tile is showing the undamaged side.
-
Shuffle the Resurface cards and place them face down in a deck on the designated "Deck" spot on the game board.
-
Each Crew Member places their Mover on a Boat Space of their choice. There is no limit to the number of Crew Members that can share a space.
-
Give the Shark player the three large Resurface Tokens and the Shark Mover.
-
Place the three small Resurface Tokens and the three dice next to the game board.
-
Set aside all the other components, including the extra Shark Ability cards and Crew Gear cards. They will not be used in Act 2.
Act 2: Overview
The Shark begins each round under the water, then resurfaces in one of the eight zones around the Orca. The Crew must predict where the Shark will resurface, hoping to attack it. Then the Shark attacks before diving back into the ocean depths.
Shark Goal: Eliminate all three Crew Members or completely destroy the Orca.
Crew Goal: Eliminate the Shark.
Act 2 is played in rounds, each of which consists of six steps, played in this order:
- Resurface Options
- Shark Chooses
- Crew Prepares
- Shark Reveals
- Crew Attacks
- Shark Attacks
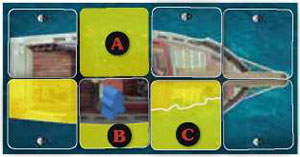
Step 1: Resurface Options
Turn over the top three Resurface cards and place one face up on each spot (A, B, or C) on the game board. The cards should be rotated so the boat outline matches the orientation of the Orca on the game board.
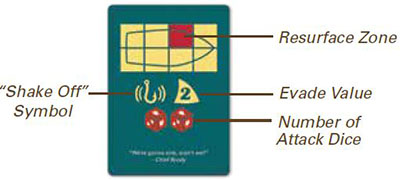
These are the Shark's three resurface options for this round. The Resurface Zone (highlighted in red) is the zone where the Shark will resurface if they choose that card.
Each Resurface card has an Evade value, a number of dice symbols, and possibly a "Shake Off" symbol. These are explained later. Place the small Resurface Tokens (A, B, and C) in the Water Spaces of the corresponding zones so players can more easily see all of the resurface options for the round.
Note: If the Resurface cards run out, shuffle the discard pile to create a new deck.
Step 2: Shark Chooses
The Shark secretly selects one of the three Resurface cards by playing a large Resurface Token (A, B, or C) face down in front of them.
The Shark may also play one Shark Ability card from their hand by placing the card face down underneath their Resurface Token.
Shark Ability Cards
Each Shark Ability card enhances the Shark's turn in some way. The ability is active during the round in which the card is played. The card is removed from the game at the end of the round, regardless of whether the ability was used or not.
Step 3: Crew Prepares
The Crew prepares for the Shark's appearance by moving (optional), choosing Weapons, and placing Target Tokens. The Crew may discuss their options and intentions, but they should not discuss them until after the Shark has locked in their Resurface Token in Step 2.
Move
Each Crew Member may move up to 2 adjacent spaces. You may move through Boat Spaces and/or Water Spaces. However, moving from a Water Space onto an adjacent Boat Space requires climbing back onto the boat and takes both of your moves.
Choose Weapon
Each Crew Member chooses ONE Weapon from their Crew Gear cards, hoping to attack the Shark. There are three types of Weapons, designated by the symbol in the top-left corner of the card.

Melee Weapons
These are close-range Weapons that allow you to roll dice in order to inflict Wounds on the Shark.

Firearm Weapons
These also allow you to roll dice to inflict Wounds on the Shark, but they may be used at any range.

Attachable Weapons
These are close-range Weapons that are attached to the Shark. They have an effect that hinders the shark, and the effect remains active for as long as the Weapon is attached to the Shark.
Each Crew Member places their chosen Weapon card above their Character Board.
Place Target Token

Each Crew Member places their Target Token in the Water Space of the zone where they think the Shark will resurface. Multiple Crew Members may target the same space.

If you are using a Melee Weapon or an Attachable Weapon, you must be in the same space or adjacent to the Water Space you are targeting.
If you are using a Firearm Weapon, you may target any Water Space, regardless of where you are.
Accessories
Crew Gear cards that do not have a symbol in the top-left corner are Accessories that can be used in addition to Weapons. The three types of Accessories are:
-
Chum
After the Shark locks in their Resurface Token in Step 2, Chum may be played. The Shark must reveal one of the two Resurface Tokens that they did NOT choose. This gives the Crew a better chance of predicting where the Shark will resurface. Only one Chum card may be played each round.
-
Ammo
The Pistol and Rifle are each loaded with one shot. Having extra Ammo lets you discard the Ammo instead of the Weapon after you fire it, so you can save the Weapon to use in a later round.
-
Shark Cage
The Shark Cage may be played before the Shark rolls for an attack. The Crew Member who uses it cannot take any Wounds in the round in which it is played.
Step 4: Shark Reveals
The Shark flips over their chosen Resurface Token. Discard the two Resurface cards that were not chosen. Place the Shark Mover in the chosen zone's Water Space and return all Target Tokens that are not in that space.
If the Shark played a Shark Ability card, it is also revealed at this time and its ability goes into effect.
Shake Off
If the chosen Resurface card has a "Shake Off" symbol, the Shark shakes off (discards) all Attachable Weapons that are attached to them.

Spaces & Adjacency
Adjacency dictates how the Crew moves and attacks (with Melee Weapons and Attachable Weapons), and how the Shark attacks.
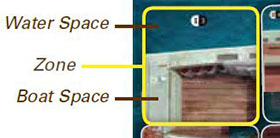
At the start of Act 2, each zone has two spaces-a Boat Space and a Water Space. After a Boat Tile is destroyed (removed from the game), that zone will only have one large Water Space. The borders of all spaces are defined by white lines and tile edges.
Two spaces are adjacent if they share a border (white line or tile edge). Diagonal spaces are not adjacent.
Adjacency Example #1: Hooper's space is adjacent to three Boat Spaces and one Water Space. If he uses a Melee Weapon or an Attachable Weapon, his only option is to target Resurface Zone B.

As the boat gets damaged, different spaces will gain or lose adjacency.
Adjacency Example #2: One Boat Space has been damaged (C) and another has been destroyed (A). Hooper is now adjacent to two Boat Spaces and three Water Spaces because his space shares a border with all of them.
If he uses a Melee Weapon or an Attachable Weapon, he may target any of the three Resurface Zone options because he is adjacent to all of them.
Step 5: Crew Attacks
Each Crew Member who targeted the correct zone may attack the Shark. Crew Members may attack in any order. Crew Members who targeted the wrong zone do not attack.
When you attack the Shark, do the following, based on what type of Weapon you used.
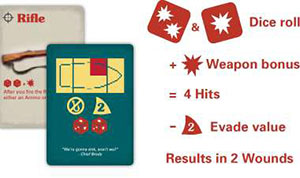
Melee Weapon or Firearm Weapon
Roll the number of dice shown on the card and add up the number of Hits rolled. If the weapon has + , add 1 Hit to the total.
If the total number of Hits is equal to or less than the Shark's Evade value (shown on the Resurface card), then the attack misses and the Shark takes no Wounds.
If the total number of Hits is higher than the Shark's Evade value, the attack is successful. Subtract the Evade value from the total number of Hits, and the Shark takes that many Wounds. The Shark slides the clip on their Wound Track one slot for each Wound taken.
Some Weapons have abilities that affect how they are used. Be sure to read and apply the text on the chosen Weapon.
Attack Example: Hooper is attacking with his Rifle. He rolls two dice and gets 3 Hits. Because the Rifle has + W he adds 1 extra Hit, bringing the total to 4 Hits. The Shark has an Evade value of 2, so the attack is successful.
The Shark takes 2 Wounds (4 Hits minus 2 Evade). The Shark moves the clip two slots on their Wound Tracker.
Attachable Weapon
Automatically attach the Weapon to the Shark. You do not need to roll the dice, and the Shark's Evade value has no effect. Place the card face up in front of the Shark. The Weapon's ability immediately goes into effect and stays in effect until the Shark is able to shake it off.
Step 6: Shark Attacks
The Shark may choose to attack either the boat OR a Crew Member in the water.
Attack The Boat
You may choose one Boat Space to attack. You must be adjacent to the Boat Space you are targeting.
Announce which Boat Space you are attacking. Roll the number of dice shown on the Resurface card, and add up the number of Hits rolled. Apply the results, based on the Hits needed to damage or destroy the Boat Space.
Damage And Destroy
The undamaged side of each Boat Tile shows two numbers.
The smaller number represents the number of Hits the Shark must roll to damage the Boat Space, and the larger number represents the number of Hits required to destroy it.
The damaged side of each Boat Tile shows only one number. This number represents the number of Hits required to destroy the Boat Space.
If you did not roll enough Hits to damage the Boat Space, the attack misses.
If you rolled enough Hits to damage the Boat Space, flip the Boat Tile to the damaged side.
If you rolled enough Hits to destroy the Boat Space, remove the Boat Tile from the game board.
If a Boat Space gets damaged or destroyed, all Crew Members that were on that Boat Space fall into the water. After flipping or removing the Boat Tile, place their Mover(s) in the Water Space of that zone.
Attack A Crew Member
You may choose one Crew Member to attack. The Crew Member must be in the water, and they must be in your space or an adjacent Water Space. You may not attack a Crew Member who is on the boat.
Announce which Crew Member you are attacking, then roll the number of dice shown on the Resurface card. The Crew Member takes one Wound for each Hit rolled. The Crew Member slides the clip on their Wound Track one slot for each Wound taken.
Bonus Attack(s)
Before going underwater again, the Shark may roll a Bonus Attack against each Crew Member that is in the water near them, as follows:
One at a time, roll one die against each Crew Member that is in your space or an adjacent Water Space. The targeted Crew Members take one Wound for each Hit rolled.
Shark Attack Example: The Shark is adjacent to two Boat Spaces and may target either space with their attack. The Shark chooses to attack the damaged Boat Space that Quint is on.
The Resurface card shows two dice symbols, so the Shark rolls two dice. They roll 3 Hits, which is enough to destroy the Boat Space. The Boat Tile is removed from the game board. Quint was on the destroyed Boat Space, so he falls into the water.
Bonus Attack Example: The Shark may roll a Bonus Attack on each Crew Member that is in the Shark's space or an adjacent Water Space.
The Shark rolls one die against Quint and rolls a blank. The Bonus Attack misses and Quint takes no Wounds.
The Shark rolls one die against Brody (because his Water Space is now adjacent to the Shark) and rolls two Hits. Brody takes two Wounds.

Eliminating Crew Members
If a Crew Member's Wound Tracker reaches the  , they have been eliminated from the game. Remove their Crew Mover from the game board and discard all of their Gear cards.
End of the Round
After the Shark finishes their attack and any Bonus Attacks, the round is over and the Shark dives back into the ocean's depths.
Remove the Shark Mover from the game board, return all Target Tokens to their respective Crew Members, and discard the face up Resurface card and the Shark Ability card (if one was used). Begin a new round, starting with Step 1.
End of the Game
The game can end in one of three ways:
- If all three Crew Members have been eliminated, the Shark wins.
- If the Orca has been destroyed (all Boat Tiles have been removed), the Shark wins.
- If the Shark's Wound Tracker reaches the, the Shark is eliminated and the Crew wins.
Playing Act 1 or Act 2 Separately
Either Act 1 or Act 2 may be played as a standalone game with the following modifications:
Act 1
If the Shark's Swimmer Track reaches the 7 slot (or higher), the game ends immediately and the Shark wins.
During setup, give the Shark six random Shark Ability cards. Give each Crew Member their corresponding Gear cards, then give the Crew
Act 2
If the Crew attaches a second Barrel to the Shark before the Swimmer Track reaches 7, the game ends immediately and the Crew wins.
(as a group) seven random Crew Gear cards, which they immediately divide among the three Crew Members however they choose.
Continue Reading
