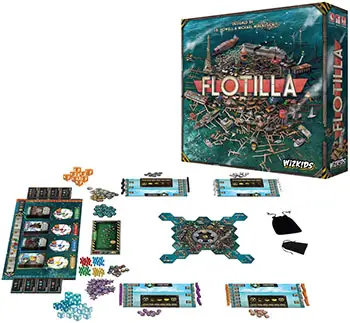
Components
- 10 Toxicity Tracker Tokens
- 2 Survivor Track Tiles
- 5 Player Board
- 20 Skiffs
- 20 Guild Influence Discs
- 1 Survivor Tracker Disc
- 30 Starter Crew Cards
- 10 Reference Cards
- 50 Guild Seal Tokens
- 1 Hub Board
- 30 Outposts
- 16 Artifact Tiles
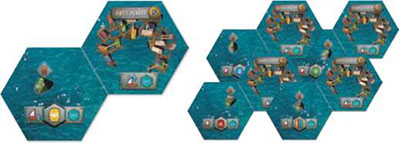
- 92 Ocean Tiles
- 3 Dock Tiles
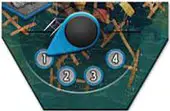
- 5 Starter Tiles
- 1 Sonar Tracker Disc
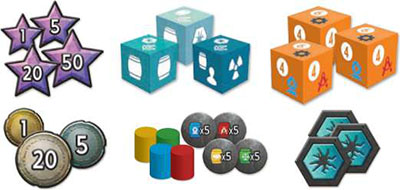
- 65 Currency Tokens
- 67 Victory Point Tokens
- 30 Depletion Tokens
- 1 Artifact Tile Bag
- 46 Crew Cards
- 1 Sonar Tracker
- 100 Resource Barrels
- 16 Resource Tokens
- 33 Objective Tiles
- 1 Ocean Tile Bag
- 16 Dive dice
- 7 Research dice
- 4 Guild Dial Rivets
- 4 Guild Dial Pointers
- 1 Guild Board
- Rulebook
As one of the last few great Captains, you are working to bring prosperity to the Flotilla that houses the last remnants of human civilization.
You will explore the new face of the ocean, salvage whatever you can from the depths, rescue any survivors you come across, build your crew, gain influence with the Flotilla's governing Guilds...and perhaps eventually take what you've gathered and add it to the actual Flotilla itself by joining it with your watercraft and continuing to build the new world!
Flotilla features two distinct modes of gameplay-the Sinkside and the Skyside. All players begin the game as Sinksiders but may choose to "turn" Skyside at any time. When turning, you will flip many of your game components over, and fill a different role for the rest of the game!
The Sinkside
- Easier access to gather resources, and to explore new Ocean Tiles.
- Acquires currency by selling resources to the market, and uses that currency to build Outposts.
The Skyside
- Easier access to currency, but typically only acquires resources by buying them from the market.
- Requires resources to build watercraft tiles into the Flotilla.
It is possible for any number of players to "turn" Skyside whenever they wish (if at all), and it is just as strategically viable to turn at your earliest opportunity as it is to turn at your latest opportunity.
Each time a player turns, the game's dynamics and opportunities will change! And remember, you do not have to "turn" at all!
Object of the Game
When the Victory Point (s.jpg) supply runs out, finish the current round so that all players have had an equal number of turns. Then, each player takes one final turn. At the end of the last round, proceed to final scoring. The player with the most  wins!
wins!
If you would score after the supply runs out, instead take those from the Reserve.
Setup

Prepare Game Boards and Trackers
-
Place the Hub Board in the center of the play area.
Take the Dock and Survivor Track tiles appropriate to your player count, and place them above and on the Hub Board respectively. Return unused Dock and Survivor Track tiles to the box.
Place the Survivor Tracker disc on the first (top) space of the Survivor Track.
-
Place the Guild board off to the side of the play area. Take one resource barrel per color, and place each on its corresponding marked space on the Market track (along the Guild board's top edge).
-
Place the Sonar board below the Guild board, and place the Sonar Tracker disc on its first (leftmost) space.
-
Set each Guild Dial to "1".
-
Randomly determine a first player, and give that player the Starting Tile marked with "First Player".
Give the "Second Player" Starting Tile to the player seated to their left, the "Third Player" Starting Tile to the player after that, etc, until each player has a Starting Tile. Return any unused Starting Tiles to the box.
-
Count out 100
per player to establish the Supply. Set aside any extra to form the Reserve, making sure that the two piles won't be accidentally mixed together.Establish a supply off to the side for all Dive dice, Research dice, resource barrels, Depletion tokens, and currency.
-
Sort the Objective Tiles into similar types, such that each set of three Objective Tiles is stacked with its highest
value on the top, and the lowest value on the bottom of that stack.Select (or randomly choose) one of those sets of tiles per player, and place these sets along the spaces on the left side of the Guild board, with their Sinkside (teal) faces up.
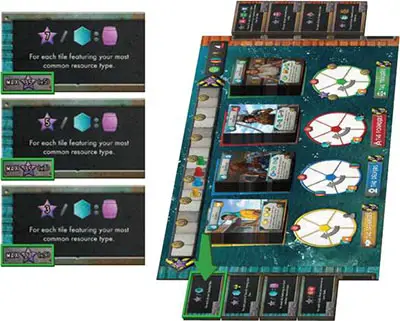
Then select one more of those sets of tiles per player, and place these sets in each of the spaces on the right side of the Guild board, with their Skyside (orange) faces up.
Return the unused set of tiles to the box. For a three-player game, there should be three sets on each side of the board; five players, five on each side of the board, etc.
-
Randomly return one Artifact tile of each color to the box, then put the rest into the smaller Artifact Bag and thoroughly shuffle them. Set this bag off to the side.
Shuffle all Ocean tiles and place them into the Ocean Bag.
-
Separate all non-Starter Crew cards by their Guild and Tier.
-
Return Crew cards to the box based on your player count:

-
Starting with the Speakers' Guild's Crew cards, shuffle the Tier 2 Crew and place them Sinkside (
 ) faceup onto the card-shaped space on the Guild board, above the Founders' Guild icons. Then shuffle the Founders' Tier 1 Crew cards, and place them on top of those Tier 2 Crew (also with their Sinkside faces up).
 -
Repeat this process for each Guild, so that every Guild has a stack of Crew cards (Tier 1 on top, Tier 2 on bottom, where each Tier has a number of cards equal to the number of players).
-
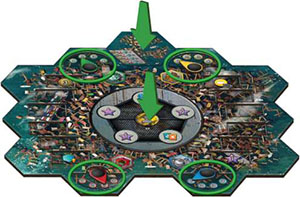
Attach your Starting Tile to the edge of the Hub Board within easy reach for you, leaving an equal margin of space between your tile and your neighbors'.
-
Collect the currency indicated on your Starting Tile.
-
Place your Player Board in front of you, close to the edge of the table, with its "Sinkside" (
) facing up. -
16. Place your three Skiffs onto your Player Board's reserve spaces. Then place your fourth Skiff on your Starting Tile, on the portion marked with
 .
. -
Place each of your Toxicity trackers on the leftmost space of its appropriately-shaped Toxicity track.
-
Take your six Starter Crew cards to form your hand, and leave space to the left of your Player Board for your discard pile.
-
Stack your Guild Seal tokens beside your Player Board.
Game Play
Beginning with the First Player, you will play a single Crew card from your hand (see below), fully resolve its effects, and place it faceup into your discard pile. Then, play passes clockwise to the next player, and proceeds in this fashion until the end of the game.
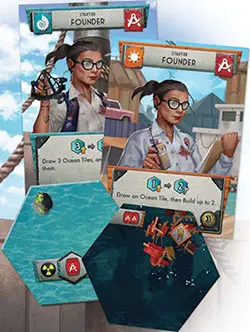
Crew Cards
The Crew card you play each turn will be the source of a majority of your action in the game, and the way you sequence them can be very important. All players begin with the same six "Starter" Crew cards, but can recruit new Crew during the game.
First you will resolve the "Sail" or "Income" effect. Then, resolve its ability as printed.
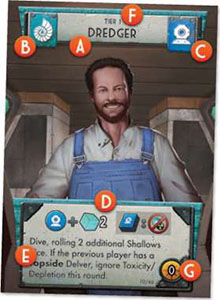
Each Crew card features several attributes:
AA NameBA Sinkside () or Skyside ( ) icon
CA Guild icon (for Guild-affiliated Crew only)DAn icon, to represent its effect textEEffect textFTier (STarTe r, Tier 1, or Tier 2)GA Sail or Income value
Sail value (
 ) is indicated by the number in the compass rose icon on Sinkside cards, and determines how many spaces you may move your Skiffs on the open sea. (For details on moving your Skiffs, see page 16).
Income value (
 ) is indicated by the value in the coin icon on Skyside cards, and determines how much currency you immediately collect.
The Captain
The Captain card allows you to Rally your crew. To Rally, simply pick up all of the Crew cards in your discard pile, and return them to your hand.
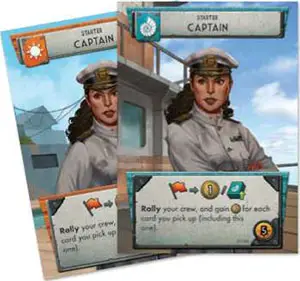
As a Sinksider, whenever you use your Captain to Rally, you may choose to "turn" Skyside and join the Flotilla.
The Scholar
The Scholar card allows you to exactly copy an opponent's Topside card (the top card of their discard pile). This duplicates the card effect, and also the Sail or Income value on that card.

For reference purposes, the Scholar belongs to all Guilds and counts as such for effects that check its affiliation.
Notably, the Sinkside Scholar can only copy a Sinkside card, and the Skyside Scholar can only copy a Skyside card! Copying another Scholar has no effect. If no legal target exists, the Scholar cannot be played.
 The Speakers
Each Crew card from the Speakers' Guild will allow you to gain Influence on the Guild Tracks.
To gain Influence with a Guild, advance your Guild Influence Tracker disc clockwise along the Guild board's appropriate Guild Ring Track. Notably, each Guild Track features an arced arrow: You may choose to skip the third space if you wish.
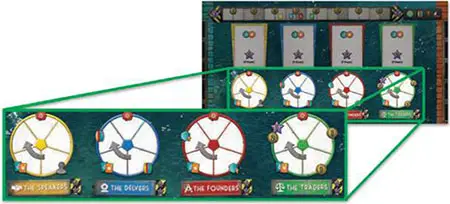
When advancing along the Guild Ring Track, you will gain the bonuses indicated on each space your tracker touches. (When opting to skip the track's third space, you do not gain its bonus!)

Draw one Ocean Tile from the bag. If you are a Sinksider, you may immediately place that tile; as a Skysider, it is added to your Reserve. Don't forget to take any Toxicity indicated on that tile.

Advance the Survivor tracker by one space, and gain any bonuses you pass or land on.

Gain the currency and/or indicated on the space.

Gain one resource of any type, and add it to your reserve on your Player Board.

Place one of your Guild Seal tokens on the Guild's Banner. If you have already placed all of your Guild Seals, instead gain 2 . At the end of the game, the player with the most Seals in a Guild will earn 10 , and second-most earns 5 .
Take the top Crew card from this Guild's slot on the Guild Board, and add it to your hand. This new member is a permanent addition to your Crew. If you would ever need to recruit a Crew card, but the deck is empty, you instead gain 2
Influence is the primary way to recruit new Crew cards, so paying attention here can allow you greater flexibility and greater focus on your long- term goals.
 The Traders
Crew cards from the Traders' Guild will often allow you to gain currency, and then also make a certain number of Transactions.
A single Transaction can be used to perform any of the following actions:
-
Buy an Additional Skiff (Sinkside only)
Pay 12
and place one of the Skiffs from your Player Board onto your Starting Tile's dock . Additional Skiffs can allow you greater access to resources while Diving! -
Buy an Outpost/Tower Objective
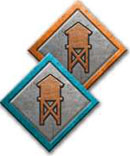
Tile Pick up the topmost Outpost on your Player Board, and pay to the bank an amount of currency indicated in that token's space.
Then, claim the topmost tile from any of the Objective tile stacks (from the left side of the Guild board if you are currently Sinkside, or the right side of the board if you are Skyside).
Tuck that tile below your player board, and immediately score @the
indicated on that tile. Place that Outpost component onto an available Construction Site among your tiles in play.Floating Outposts
If you do not have an available Construction Site, you may pay an additional 10
(if Sinkside) or 20 (if Skyside) to forgo this requirement and place the Outpost token out on the open water.If you do this, simply score the Objective tile as normal.
-
Buy or Sell a Resource from the Market
To buy or sell a resource, pay/gain the amount of currency indicated under that resource type's marker on the Market Track. Then, after you've finished your transactions for the turn, adjust the Market Track accordingly (see below).
For example, if the red tracker indicated a value of 5
, you could use three transactions to buy three red resources for a total of 15 .Note: You cannot buy and sell resources of the same type in the same turn.
Market Fluctuation
Whenever you buy a resource, you make that resource more scarce and therefore increase its position on the Market track. Advance that resource's tracker one space up the track for each of that resource you purchased.
Whenever you sell a resource, you make that resource more available and therefore decrease its Market value. Move that resource's tracker one space down the track for each of that resource you sold.
For each resource you sell that would cause its Market value to drop below its lowest space, you gain 1
. For each resource you buy that would cause its Market value to increase above its highest space, you gain 2
Cargo vs Reserve
Resource barrels on your Skiffs are considered cargo, and cannot yet be sold at the Market. You must first drop that cargo off at your Starting Tile's drop point () to add it to your reserve.
 The Founders
Sinkside and Skyside Founders work differently, but they all allow you to acquire Ocean Tiles in some way: by Drawing, Placing, or Building them.
Drawing/keeping Ocean Tiles
Draw the indicated number of tiles at random from the Ocean Tile bag. If an effect specifies that you may then "keep" a certain number of those, then simply return the excess tiles to the bag.
While Sinkside, Founders will allow you to place the tiles you draw (see below). While Skyside, any tiles you draw are placed into your reserve, so that you can later Build them.
Toxicity On Ocean Tiles
Whenever you draw an Ocean Tile, check it for Toxicity ( ), and advance your Toxicity tracker that many spaces forward. For more information on Toxicity, see page 13.
Note - You take the Toxicity shown on all tiles you draw, regardless of how many of them you keep. You also take Toxicity as shown while Skyside, even though the Toxicity value is only printed on the tiles' Sinkside facings.
Placing Ocean Tiles (sinkside Only)
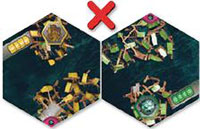
When a Founder or other game effect allows you to place one or more Ocean Tiles, you may place those tiles onto the playing area, obeying the following rules:
An effect that allows you to place an Ocean Tile will only ever allow you to play its Sinkside facing.
You must place the tile flush and adjacent to one of your own Ocean or Starter Tiles, in such a fashion that it does not touch any tile belonging to an opponent.
You cannot place a
 tile next to a
  tile.
tile.
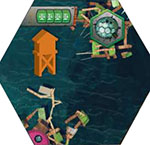
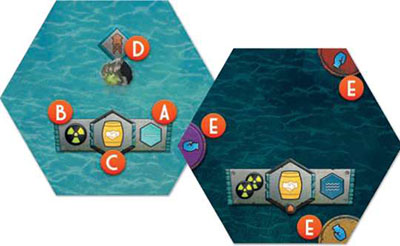
Sinkside Tile Reference
Each Sinkside tile will feature some or all of the following attributes:
AA Depth value (indicated by)
Depth determines how you may place the tile, and also what type of die is rolled when diving for resources at that tile.
BA Toxicity value (indicated by the number of
CA Resource type (indicated by the colored barrel icon in the placard). This resource type shows what color resource you will acquire when diving at this tile.
DUp to one Island, which features a Construction Site.
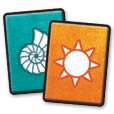
EAn Artifact wedge (indicated by the yellow, red, or purple Artifact circle). When you complete a full circle of Artifact wedges that share a color, you' ve discovered a culturally significant artifact from the lost world, and immediately draw a tile from the Artifact bag.
Building an Ocean Tile (Skyside Only)
When a Founder or other game effect allows you to Build an Ocean Tile, take the following steps:
-
Choose a number of tiles from your reserve, up to the amount indicated on the action you are taking.
-
Pay the resources indicated on those tiles' "Cost" placards.
-
Place the built tiles adjacent to other tiles you control, in such a fashion that they do not touch any of your opponents' tiles. You are not forced to connect the tiles by matching color, and you may place water adjacent to watercraft however you like.
-
Score
immediately based on the value of the district(s) you just added to the board (see below).
Scoring Newly-placed Tiles
When you build a tile as a Skysider, score (A x B) :
-
The value of the district's matching Guild dial, plus one per building of that district's type on the entire watercraft (see: Skyside tile reference). "A" can never exceed 4.
-
The total number of tiles of that district color that are contiguously connected to the new tile, without any breaks.
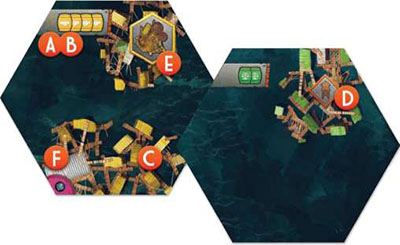
Skyside Tile Reference
Each Skyside Ocean Tile will feature some or all of the following attributes:
AA Cost Placard. Pay these resources when building the tile from your reserve.
BA District Type, determined by the color of resources the tile costs to build, and by the coloration of its features.
CWatercraft. These graphical features represent the new areas you're adding to the Flotilla.Watercraft can be extended by placing further adjacent tiles-all sections of watercraft that visually appear to be connected are considered to be part of the same watercraft, even if they are different district types. Once a watercraft is fully surrounded by water, it can no longer be extended.
Note: these watercraft are considered to be separate, as they do not connect to one another.
DUp to one Construction Site. Much like Islands, these sites can house Outposts.
EUp to one Building. These Buildings allow for greater scoring for their Watercraft.
FA Sonar Station (). When you complete a full circle of three Sonar Stations, you may advance the Sonar tracker and gain the indicated
 The Delvers
Sinkside and Skyside Delvers are very different, but each allows you to roll dice in some way.
While Sinkside, Crew cards from the Delvers' Guild will allow you to Dive from your Skiffs to gather resources from the depths.
Each Delver Crew card will modify the basic Dive action, typically by adding extra dice to your roll.
When diving, you will roll Dive dice, which come in three types:
To Dive, take the following steps:
1. Gather your Dive dice, to include:
- Any dice indicated on your Delver Crew card, and...
- One die for each of your Skiffs that is currently on an undepleted tile. The type of die you take for each Skiff is determined by the depth indicated on that Skiff's tile.
2. Roll those dice, and immediately gain the indicated results (in any order):

Choose one of your Skiffs that is currently on an undepleted tile, and add one resource barrel to that Skiff. The type of resource is determined by the resource type printed on that Skiff's tile.
Important: Each Skiff may hold no more than four resources at once.

Advance your top Toxicity tracker one space on your Toxicity Track.

For every Depletion icon that you roll beyond the first, place a Depletion marker on an undepleted tile where you have one or more Skiffs.
If you need to place more Depletion tokens than you have Skiffs, then you may choose any of your undepleted tiles to place those excess tokens. You can no longer Dive for resources at a Depleted tile!

Advance the Survivor tracker disc one space clockwise around the Survivor Track, and gain any bonuses you land on or pass.

Check the position of the tracker disc on the Sonar Track. Treat all instances of this icon as though it were the icon (or set of icons) indicated on the Sonar tracker's current space.
As the Sonar Track advances, this value can improve greatly!
As a Skysider, Crew cards from the Delvers' Guild will now be focused on delving technologies from recovered salvage!
As technology is one of the most coveted things in the new world, Delvers can be a great source of currency, and can also improve the world for everyone.
However, research is not always reliable! When playing a Delver as a Skysider, you will roll a certain number of Research dice, then manipulate and resolve those dice as the card indicates.
The icons on your Research dice can be spent to gain currency , or even trigger game-changing events. Each icon on the dice you roll can only be used once.

Gain the indicated currency.

If you roll three Breakthrough results, you make a technological breakthrough. You may immediately increase any one Guild Dial by one, which will increase scoring for tile placement for all Skyside players.

If you roll three or more dice showing like-colored Guild icons, you have discovered knowledge pertinent to that matching Guild, and will receive its bounty!
Immediately gain the bonuses printed on all of the Artifact tiles that have been slotted into the central board near that Guild's dial.
For example, if two Delver artifacts have been discovered over the course of the game, then you would receive a total of 2 for rolling a set of three blue Research dice results.

Wild Research: One facing on each die does not feature a Guild icon, but instead features a wild icon. After you roll your dice, you may choose which color you would like this die to count as. It cannot count as more than one color, and you cannot count it more than once.
Special Rules
There are additional special rules. You can find them here.
End of the Game
Once all of the have been taken from the supply, players finish the current round so that all players have had an equal number of turns. Then, each player takes one final turn after this.
During these final rounds, if a player would need to gain , they instead take it out of the reserve that was set aside during setup.
To calculate your final score, gain/lose for the following:
- 1 for every 5 you have remaining
- 1 for every two resources you have remaining
- Gain or lose as indicated by your Scoring Penalty Marker's position on your Toxicity track
- For each Guild: the player with the most Seals on that Guild scores 10 , the player with the second-most Seals on that Guild scores 5 .
You cannot score for a Guild if you have no Seals at that Guild. In case of a tie for the most Seals, the player with the least Toxicity breaks the tie. Further ties are friendly, where all tied players receive the best bonus they qualify for. (In cases where a friendly tie occurs for most Seals, no are awarded for second-most Seals).
The player with the most wins!
In case of a tie, the tied player with the least Toxicity breaks the tie. In case of a further tie, the player with the most Crew cards wins. In case of a further tie, the player with the most remaining money wins.
Should a tie persist, all tied players share the victory.
Continue Reading
