
High above the clouds, the floating realm of Ankar has existed in relative peace for centuries. Home to a number of creatures and beings, several isles have floated independent of each other. The isles are kept afloat and apart by a mysterious energy known as "Source".
But it seems that Source is not limitless. As tensions rise over the availability of this precious resource, as-yet unsolved shifts in the isles' stability have put all of Ankar's nation-states on edge.
Islands are beginning to crash into one another, and an all-out war for each island's supply of Source is about to initiate chaos in the skies.
Components
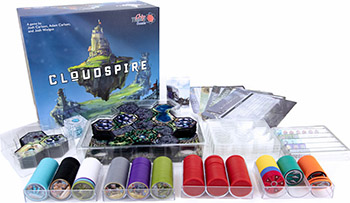
- 4 Neoprene Faction Fortresses
- 8 Neoprene Earthscapes
- 18 Attack Upgrade Chips
- 12 Fortification Upgrade Chips
- 14 Range Upgrade Chips
- 32 Faction Spire Chips
- 60 Faction Unit Chips
- 12 Faction Dice
- 4 Source Tracker Chips
- 69 Health Chips
- 4 Gate Health Tracker Chips
- 19 Landmark Chips
- 4 Faction Mark Chips
- 20 Market Chips
- 1 d6
- 29 Event Cards
- 15 Relic Cards
- 6 Spire Attack Dice
- 4 Chip Trays
- 50 Fortress Advancement Pegs and 1 Container
- 4 Barracks Chip Organizers
- 1 Dice Tray
- 1 Co-Op and 1 Solo Scenario Book
- 5 Reference Sheets
Object of the Game
In Cloudspire, you will advance your fortress, build spires, hire mercenary forces, and send minions and heroes barreling toward opposing fortresses.
Your goal is to defeat your opponents' fortress gates while protecting your own. At the end of the game, the faction with the most powerful fortress will be declared the winner!
Setup
Faction Selection
-
Randomly determine a first player.
-
Starting with the first player and continuing clockwise, each player selects the faction they would like to play.
-
Give each player their faction's reference sheet and matching fortress, as well as the dice and chips of their faction's color (see factions below). Each player should also receive a barracks, health tracker chip, and Source tracker chip.
-
Each player should prepare their barracks so that matching chips sit together and you can see your available units and spires at a glance. Ensure all units are on their basic side (without a star). Set the dice and your faction mark chip to the side for now.
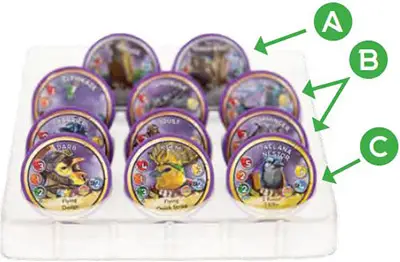
An example of the heir barracks set up, with units and spires sorted by name.
A. SpiresB. MinionsC. Heroes
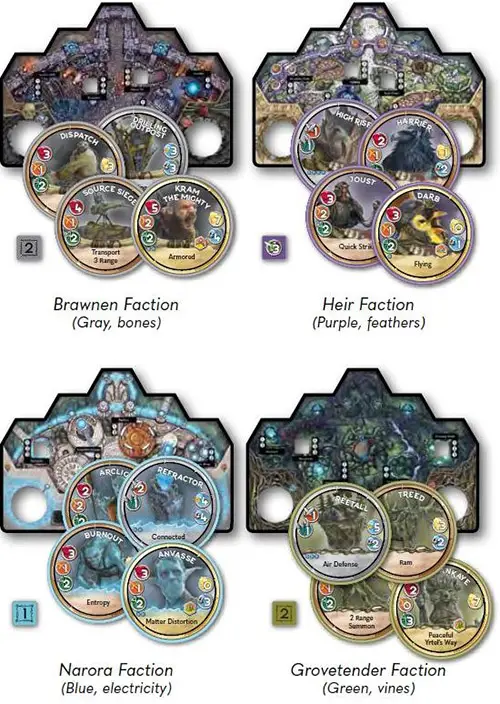
Factions
Island Creation
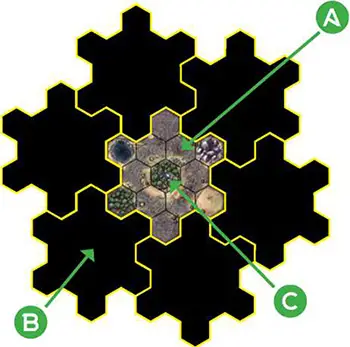
A Center Isle, B 6 Facedown Isles, C. Source Well
Initial board set-up. The center isle is identified as the only hex group with only one Source Well (blue circle) in the very center hex, surrounded by path.
-
Place the center isle in the middle of your play area.
-
Shuffle the 7 remaining isles and place 6 facedown surrounding the center isle as shown. Return the unused isle to the box.
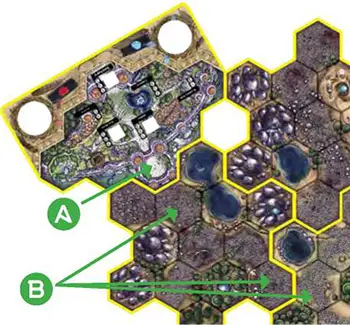
Closeup of fortress placement. Note that the fortress gate (protruding piece) touches the adjacent hex group on all 3 sides, at least one of which must be path. The edge of the fortress may touch another hex group, but may not overlap.
AFortress Gate,BPath Hex. -
The first player selects one facedown isle, reveals it, rotates it to choose its orientation, and sets it back in the same place. All isles must be oriented so that a path hex on the revealed isle is adjacent to a path hex on the center isle.
The first player then attaches their fortress to the isle they revealed such that the following is true:
- The fortress gate hex is adjacent to a path hex.
- The fortress gate hex is touching the isle on all three sides.
- The fortress does not overlap with any revealed or unrevealed isle.
-
In a 2-player game, the second player may select any other isle to orient and attach their fortress to, following the same restrictions.
In a 3- player game, each subsequent player is limited to selecting one of the next three isles (counting clockwise from the previously revealed isle), and in a 4- player game they are limited to one of the next two isles.
-
Continue clockwise, revealing and orienting the remaining isles, ensuring path on the new isle connects to path on the center isle, until all are revealed.
-
Each player should place their gate health tracker chip in the rightmost chip cutout on their fortress, with the side that counts from 1 to 10 faceup and set to 10. Players should place their Source tracker chip in the leftmost chip cutout with the side that counts from 0 to 20 faceup and set to 0.
-
Find landmarks (white chips with various backs). Return the ancient traxxyr to the box, but keep it accessible as you may need it during gameplay. Keeping all landmarks facedown, create a stack of swamp landmarks equal to the number of players.
Place one of these swamp landmarks on the Source Well closest to each fortress gate (if two are equally close, the fortress's owner may choose). Mix the other landmarks together with the remaining swamp landmarks and randomly place one on each remaining Source Well on the isles.
Unused landmarks should be placed to the side of your play area as the landmark stack. These landmarks will not be added into play unless specifically called for.
Landmark Chip Backs

Creating the Market
-
Shuffle all market chips and create a facedown market stack. Beside the stack, flip faceup an amount of chips equal to the number of players +1.
-
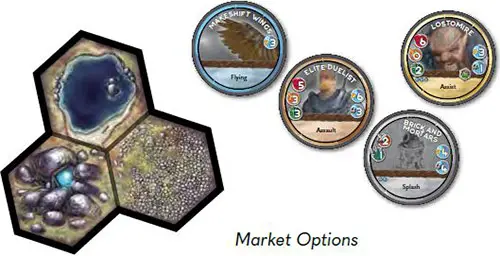
Mix together all earthscapes facedown and create a stack near the market chips. Flip faceup the top earthscape on the stack. The faceup market chips and the topmost earthscape, collectively, are your market options.
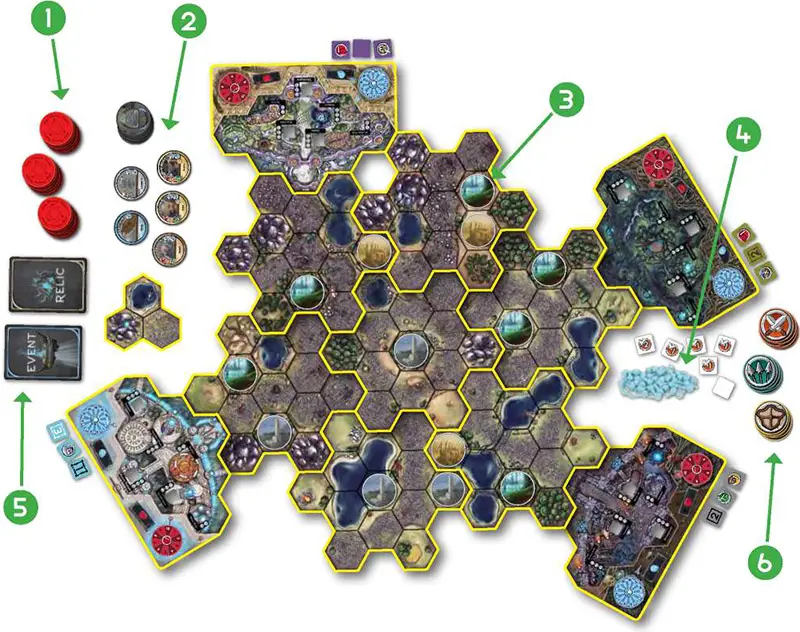
1 Health Chip Supply, 2 Market, 3 Landmarks on Source Wells, 4 Dice and Peg Supply, 5 Event and Relic Decks, 6 Upgrade Chip Supply
Full game set-up. Not shown: faction chips, barracks chip organizers, chip trays, and reference sheets.
The Rest
-
Shuffle the event and relic decks separately and place each near the play area, leaving room for discard piles.
-
Use the provided chip trays to create stacks of attack, range, and fortification upgrades, as well as health chips. Ensure these are within reach of all players.
-
Place the supply of fortress advancement pegs, the spire attack dice, and the D6 within reach of all players.
Game Play
A standard game of Cloudspire is played over 4 waves. Each wave consists of the following phases:
- Event Phase
- Income Phase
- Market Phase
- Build Phase
- Prep Phase
- Onslaught Phase
Each phase starts with the first player and continues clockwise.
I. Event Phase

Note: The Event Phase is skipped in Wave 1.
-
The first player designation passes clockwise.
-
The previous wave's event card is discarded, as well as any "entire wave" relics played in the previous wave. Players should also remove any pegs they have in the bottom of their fortress (denoting the use of limited build options in the previous wave).
-
The first player draws and reads the top card on the event deck. This event sets the tone and parameters all players must adhere to for that specific wave. The event card will indicate in which phase of the wave its effect will trigger. It triggers immediately if it says "Event Phase".
-
Set the event card faceup to the side of the play area, so that it may be referenced by players throughout the wave as needed.
II. Income Phase
All players gain Source as detailed below.

Increase your Source tracker to show this. Note that under normal circumstances, you may have no more than 20 Source. Any Source gained above a faction's maximum capacity is lost.
Any player with a defeated fortress gate (in a 3- or 4-player game) must repair it at this time.
III. Market Phase
-
If any market options have not been fully refilled for any reason, refill them now so that there is an available earthscape option and available market chip options equal to player count +1.
-
Starting with the first player and continuing in turn order, each player may make a single purchase from the market options. Earthscapes cost 2 Source, while market chips will list their cost
 .
.Anytime you spend Source, reduce your Source tracker accordingly. Each market option is refilled immediately after a purchase is made; however, only one earthscape may be purchased each Market Phase.
Purchases from the market should be placed beside your barracks. Market purchases can be utilized in any wave, including the current wave.
IV. Build Phase
During this phase, players have the opportunity to perform build options. Starting with the first player and continuing in turn order, players may take a turn to either perform a build option or pass. Once you have passed, you may no longer take a turn. The phase continues until all players have passed. Build options are as follows:
Construct a spire: Construct a spire from your barracks on a Source Well that you have influence over by paying its Source Cost
. Spires purchased from the market can be constructed at no additional cost.Upgrade a spire: Pay the appropriate upgrade cost to add any number of upgrades, up to the spire's upgrade capacity, to a single spire under your control that's already in play.
Earthscape: Place an earthscape previously purchased from the market where you have influence. You may immediately construct a spire on one of the earthscape's Source Wells as long as you have influence over its hex (paying the Source cost of the spire).
Fortress advancement: Using your faction reference sheet as a guide, you may advance a fortress structure by paying its Source cost. Use the fortress advancement pegs to indicate which advancements you have purchased.
Advancements are progressive and must be purchased in order (i.e. to purchase a level 2 advancement, you must first have purchased the level 1 advancement of the same structure).
Some relics, events, or fortress advancements may grant you additional build options as well.
V. Prep Phase
-
Declare, in turn order, your mark. This indicates which faction's fortress gate all of your minions must make progress towards. Give that player your faction mark chip to set beside their fortress as a visual reminder of this.
Note: this can be skipped in a 2-player game, as you only have one mark option.
-
All players simultaneously use command points (CP) to select units (heroes and/or minions) from their barracks for deployment this wave.
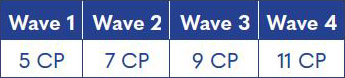
Players do not have to use all of their CP, but any CP left unused is lost. Available CP is dictated by the current wave as outlined below:
Players may have units and spires beside their barracks; these will be either merc units purchased from the market or heroes which have previously been selected and then returned to the fortress.
These units may be selected at no CP cost. They are considered to be in your barracks for all game effects.
Selecting Minions
You may select any number of minions for deployment each wave, limited only by your available CP and units available in your barracks.
Minions can be prepared for deployment in two different ways: grouped or ungrouped. You may group as many or as few minions as you desire.
Selecting Heroes
Each faction has a starting hero with no CP cost. This is the only hero you may select for deployment in Wave 1. Each faction has 2 additional heroes with a CP cost that you may select starting in Wave 2.
Each faction may have no more than 2 heroes (including those purchased from the market) deployed at any time from Wave 2 onwards.Heroes must be deployed ungrouped; they may not be grouped with minions or each other.
Each hero must be deployed either before or after all minions; they may not be deployed in between minions. However, you may deploy one hero before your minions and another afterwards.
-
Players also simultaneously determine how to group their minions and the order in which they will deploy their units. Each player will prepare a deployment stack - a single stack containing all of the units they are deploying this wave.
All minions must be stacked together, with any heroes being deployed before and/or after the minions. Place this deployment stack on your fortress gate hex.
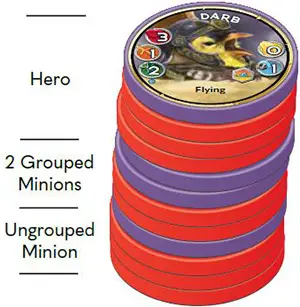
The units will deploy from top down. A deployment stack may look something like this:
The selection of minions and the preparation of the deployment stack can generally be completed by all players simultaneously. However, you are permitted to ask a player that goes before you in turn order which units they are deploying, and in what order, before locking in your deployment stack.
When all players have locked in their deployment stack by placing it on their fortress gate, the Prep Phase is complete.
VI. Onslaught Phase
Each round of the Onslaught Phase consists of all players taking one full turn, starting with the first player. On your turn, you will complete the following stages in order:
-
Start of your Turn
Resolve any talents, events or relics that trigger at the start of your turn.
Use a limited build option to construct or upgrade a spire. This may be done a maximum of two times during each Onslaught Phase. Place a peg in one of the holes at the bottom of your fortress each time you use a limited build option, to track how many you have used.
Limited build options during the Onslaught Phase may only be used to construct or upgrade a spire - you may not advance your fortress or place an earthscape during the Onslaught Phase.
-
Movement
Move minions - all of your minions must complete their movement without interruption, starting with your leading minion.
Move heroes - Each of your heroes may move before or after all of your minions' movement.
Some units may have talents that activate during this stage, either before or after units have moved.
-
Spires Fire
Each opposing player checks if you have any units within range of their spires. If so, their spires will attack and roll for damage. If multiple players' spires are firing, resolve their attacks in turn order. Each spire may fire only once per turn.
-
Exploration
You may explore any landmark that is adjacent to one or more of your units. When you explore a landmark, you will look at its facedown side without showing it to other players.
After exploring a landmark, you must immediately choose whether to reveal it by flipping it up, or leave it facedown. If you reveal it and the landmark has a health stat, place the appropriate number of health chips under the chip immediately.
You may continue exploring landmarks until you decide to stop, or have no more new landmarks to explore.
-
Attack
-
Your units attack in the order of your choosing. Minions must attack if they have a valid target; heroes may optionally do so. Valid targets are opposing units (including landmark minions), opposing spires, and opposing fortress gates within range. Each of your units may only attack once per turn.
-
When one of your units attacks, the targeted unit is dealt damage equal to the attack stat of your unit. Each damage received removes a health chip from the target. If its last health chip is removed, it is defeated.
Each target will retaliate the first time each turn that it is attacked by a unit within its range, unless it is defeated. Retaliation deals damage to the attacker equal to the target's attack stat.
If a grouped minion is defeated, the next minion in the group is immediately revealed and gains health chips equal to its health stat.
Any damage left over from defeating the first grouped minion does not carry over to the next minion in the group. The newly revealed minion does not retaliate on behalf of the defeated unit.
-
When attacking a spire, any amount of damage removes 1 attack or range upgrade chip from the bottom of the spire. An attack dealing 2 or more damage removes a fortification upgrade chip from the bottom of a spire.
An attack cannot remove more than 1 upgrade from a spire. Spires do not retaliate.
-
Collect rewards for any opposing units or spires defeated.
-
Once you have completed a full turn as outlined above, the next player will take their turn. The Onslaught Phase continues until all faction minions in play have been defeated.
When this occurs, the wave immediately ends (the current player does not finish their turn). Start the next wave with the Event Phase or, if you've just completed Wave 4, determine a winner!
End of the Game
The goal of Cloudspire is to defeat the fortress gates of all opposing factions, or to have the most powerful fortress at the end of four waves of play.
The game will end immediately upon the defeat of a faction's fortress gate, if only one faction's fortress gate remains. A fortress gate is considered defeated if it loses its last health. The player whose fortress gate remains is declared the winner.
Otherwise, gameplay continues after a fortress gate has been reduced to 0 health. See page 16 for more details on continuing the game after the defeat of a fortress gate. Note: this will only occur in a 3- or 4-player game, as a 2-player game ends immediately upon the defeat of one faction's fortress gate.
If multiple fortress gates are still intact at the end of four waves, the game ends and players will compare fortress power to determine a winner. Your fortress power is considered to be 0 if your gate has been defeated this wave.
Factions with undefeated fortress gates will calculate their fortress power by adding their gate health to the number of fortress advancements they currently have. The player with the most powerful fortress is the winner.
Example: Wave 4 has ended with both fortress gates intact. The heirs have 5 health left on their fortress gate, and 5 fortress advancements. Their fortress power is therefore 10.
The brawnen's fortress gate has 6 health, and they have 5 fortress advancements, for a fortress power of 11. Since the brawnen have a more powerful fortress, they win the game!
In the event of a tie between factions for fortress power, the faction with the most gate health will win the game. If there is still a tie, the faction with the most remaining Source will win.
If there is *still* a tie, the faction with the most spires in play is the victor. And if somehow there is yet still a tie, the tied factions will share the victory.
Continue Reading