Source
Source is the main resource in Cloudspire. You will accumulate Source throughout the game in a number of different ways; primarily, as income each wave and as rewards for defeating opposing units or spires.
Source can be spent in numerous ways to strengthen your faction, including the following:
- Constructing spires
- Upgrading spires
- Advancing your fortress
- Making purchases from the market

Each fortress has a Source tracker, which shows how much Source is currently available to your faction. Each faction has a default maximum capacity of 20 Source. Any Source gained above a faction's maximum capacity is lost.
Source Wells
Source Wells are features found on some hexes. These hexes also have their own terrain type.
Units can move through or end their movement on a Source Well, provided the Source Well is on a valid terrain type for that unit. Source Wells must be visible -a hex with a unit, spire, landmark, or other chip covering its Source Well is not considered a Source Well for game effects.
Fortress Source Wells are not included in any effect that refers to Source Wells either.
Any effect referring to a "non-path hex" cannot occur on a Source Well.
Isles
Isles are the large hex groups placed at the start of the game, making up the World of Ankar. Each isle contains one or two Source Wells and a number of different types of terrain.
Terrain Types
There are five different types of terrain in Cloudspire: Path, Plains, Forest, Mountains, and Water.
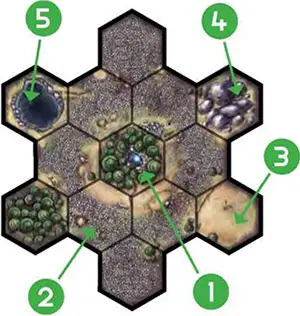
1 Forest (featuring a Source Well), 2 Path, 3 Plains, 4 Mountains, 5 Water.
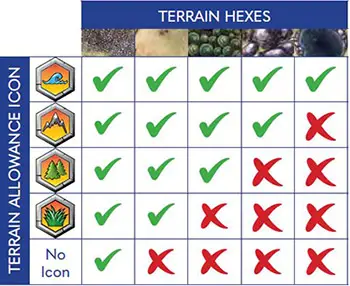
Heroes and some minions have a terrain allowance icon on their chip, indicating the types of terrain that they are able to move on. The majority of minions do not have a terrain allowance icon, as they can only move on path terrain.
Non-path terrain types are tiered in difficulty level, with water being the most difficult to traverse and plains being the easiest. The terrain allowance icon on units indicates the most difficult type of terrain they are able to traverse.
Units may travel on any hexes of this terrain type, as well as any hexes with terrain types of lower difficulty. The following chart shows exactly what terrain types may be moved on or through with each terrain allowance: Terrain Hexes
Fortresses
Your fortress is your faction's home base. Behind its gate is your faction's supply of Source, as well as structures with advancements unique to your faction. You must protect your fortress gate to keep your enemies at bay. The fall of your fortress gate must be avoided at all costs.

1 Fortress Advancements, 2 Fortress Gate Hex, 3 Fortress Source Wells, 4 Source Tracker, 5 Fortress Advancement Die Slots, 6 Fortress Gate Health Tracker.
Fortress Advancements
Fortress advancements are a very important aspect of Cloudspire. They allow you to improve your faction in significant ways and also count towards your fortress power at the end of the game.
Each faction's fortress advancements are unique, allowing for differing strategies to emerge between factions and even within the same faction in subsequent plays.
Each advancement falls within a fortress structure, which are linear and numbered chronologically. Each structure's Level 1 advancement must be built before you are able to build the Level 2 advancement of that structure, and so forth. Place a peg in the hole beside an advancement to indicate that it has been built.
Your faction's reference sheet provides details on the abilities granted by each fortress advancement.
If you build an advancement that grants you the use of a die, add the corresponding die to the appropriate die slot. Your faction reference sheet will provide details on using each fortress advancement die.
If an effect causes you to lose a fortress advancement, remove the peg to show this.
Fortress Gate
The fortress gate is the foremost hex in your fortress, and is what protects your fortress from your opponent(s).
During the Prep Phase, your units selected for deployment are placed here. During the Onslaught Phase, opposing units may target your fortress gate with their attacks, but cannot enter your fortress gate.
If you have units on your fortress gate when attacked (because all of your units have not deployed yet), you may choose to have the attack be applied to the topmost unit instead of your gate. Units on the fortress gate cannot use their talents (but still retaliate as normal).
Your fortress gate health tracker starts the game at 10 health. When an opposing unit attacks your fortress gate, reduce your gate health tracker by the amount of damage that is received. Fortress gates always retaliate when damaged. This retaliation deals 1 damage, has unlimited range, and is dealt even if the gate is defeated. This damage cannot be reduced.
If a fortress gate is reduced to 0 health, it is defeated.
Fortress Gate Pillaging
When you defeat a fortress gate and the game does not end (because more than one fortress gate still has health), you immediately pillage the defeated faction's fortress.
Increase your Source by the amount of Source the defeated faction has (up to your Source capacity) and reduce their Source to 0. The gate health tracker of the defeated fortress is then removed from its slot to signify that their fortress gate has fallen.
Once a fortress is defeated, it cannot be another faction's mark for the rest of the current wave. All players with this faction as their mark must declare a new mark immediately (in turn order).
Repairing Your Gate
If your fortress gate has been defeated, you are not eliminated from the game. During the next wave's Income Phase, you must repair your gate after receiving your Source income.
In order to repair your gate, you must restore it to exactly 3 health by sacrificing (removing) fortress advancements, gaining 1 gate health for each sacrificed advancement. You must sacrifice the highest level advancements possible.
If all remaining fortress advancements have been sacrificed and your fortress is still below 3 health, you must repair your gate using Source. Spend Source, at the cost of 2 Source for each health, until your fortress gate has reached 3 health. It may not be repaired higher than this.
Spires
Check here all detailed information about Spires.
Faction Units
Heroes and minions specific to your faction, as well as any other units under your control (for example, units purchased from the market), are your faction units. You will select these units using your command points (CP) during the Prep Phase and deploy them during the Onslaught Phase.
Faction units are perhaps the most important element of Cloudspire and can be used to take out your foes, explore landmarks, and defend your fortress.
Each faction has 3 heroes (denoted with a gold border) and 12 minions (denoted with a bronze border) that are unique to them. While heroes and minions are distinct from each other in a number of ways, they share similar stats and functions.
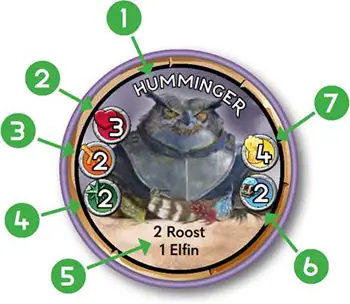 Minion Unit (denoted by the bronze border) |
1 Unit Name, 2 Health Stat, 3 Attack Stat, 4 Movement Stat, 5 Talent(s), 6 Source Reward, 7 CP Cost.
 Hero Unit (denoted by the gold border) |
1 Promoted Icon, 2 Upgrade Chip Capacity, 3 Terrain Allowance.
Deployment
Units are selected and placed into a deployment stack on your fortress gate during the Prep Phase. The order of the units in this stack, from top to bottom, determines the order in which the units will deploy during the Onslaught Phase.
Minion Deployment
You may select any number of minions for deployment each wave, limited only by your available CP and units available in your barracks. Minions may be deployed either ungrouped or grouped. You may deploy both ungrouped and grouped units in the same wave.
When deploying minions ungrouped, simply place health underneath each unit equal to its health stat. You may deploy ungrouped minions in any order you wish.
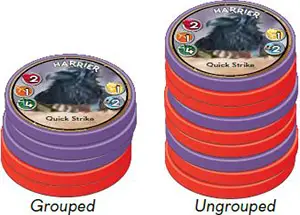
There is no limit to the number of minions that may be placed in a group. The Prep Phase is the only time that a group of units may be formed. When deploying minions as a group, begin by placing all unit chips you would like to group together in a stack. Minions must be grouped in order based on their movement stat  , with the lowest movement stat at the top.
You decide the order on ties. Place health equal to the health stat of the topmost minion underneath the entire group. Only the top minion is considered active. A group of minions may be deployed in any order relative to other grouped or ungrouped minions.
Minions that are grouped act as one unit, using the stats and talents of the topmost minion. Grouped minions must remain grouped until the top unit is reduced to 0 health.
When the top minion is defeated, the next minion in the group becomes active and is immediately given health chips equal to its health stat. Extra damage dealt to the top grouped unit does not carry over to the next unit.
When a new unit in a group is revealed, it continues from the same point in the turn as the previous unit. For example, if the top unit has already attacked before being defeated, the newly revealed unit in the group may not attack. It does, however, still retaliate as normal if attacked this turn. Any unit that is grouped under another unit is inactive and may not be targeted or interacted with in any way.
Hero Deployment
Heroes may never be grouped. Each hero must be deployed either before or after your minions, but not between them. You may split your heroes such that one hero is deployed before your minions and one is deployed after.
You can only deploy your starting hero (with no CP cost) in Wave 1, and can have no more than 2 heroes in play in any subsequent wave.
Movement
Units cannot move on or through a hex that contains any other units, spires, landmarks, or other chips.
Minion Movement
Your minions, in general, move turn by turn along the path towards your mark. This is the opponent's fortress gate you declared during the Prep Phase.
A minion must use its full movement stat while making progress towards its mark, if possible. If a minion cannot use its full movement stat while making progress, it will make progress using as much of its movement as possible.
If a minion cannot make progress, it may optionally make a lateral move (ending its movement no closer or further away from its mark). A minion may never move in such a way that it ends its movement further from its mark than it started.
-
It is the movement stage of the grovetenders' turn. The treed is the grovetender's leading minion, since it can move through forest and is therefore closer to its mark than the war briar.
Minions must use their full movement range and make progress if possible, and cannot move through or onto units or spires. There is therefore only one movement option for the treed.
-
The grovetender's next leading minion is the war briar. This minion has two movement options that would both use its full movement stat and allow it to make progress.
Since it has no terrain allowance icon, it can only move through path so must move towards the path hex adjacent to the brawnen fortress gate.
In both movement options, the war briar is considered to have made progress because it started its movement 3 hexes from its mark and ended its movement 2 hexes away, so it moved closer.
Making Progress
"Making progress" means the minion ends its movement on a hex that is closer to its mark than the hex it started on.
When determining if a hex is closer than your minion's starting position, count the shortest distance in hexes (adhering to your minion's terrain allowance), between the hex your minion is starting its movement on and its mark, and do the same for the hex(es) it may end its movement on (using its full movement stat, or as much of it as possible).
Progress is made if the destination hex is closer to the minion's mark than its starting hex. When counting distance, you should count hexes occupied by units but not spires or landmarks.
Minions may not move back onto a hex they have already moved out of on the same turn. Note that while the minion's ending position must be closer to its mark than its starting position, it does not have to make progress with every hex it moves onto, nor does it have to make the most efficient progress possible.
Minion movement must always begin with your leading minion. The leading minion is the minion that is closest to its mark. If there's a tie, you may choose which minion to lead with.
Most minions do not have a terrain allowance icon, and therefore can only move on or through path terrain.
If, due to a talent or other effect, you have a minion on invalid terrain (terrain it would generally not be able to move onto, or a hex that does not lead to its mark), its next movement must take the shortest route to valid terrain, while making progress, if possible.
Note: On your first turn of the Onslaught Phase, your units will be moving from the deployment stack on the fortress gate onto the adjacent isle. They must be moved one at a time in order from top down.
It is normal for some units to be left in the fortress gate after finishing movement on your first turn or two, especially if you selected slower minions to deploy first!
Blocking Movement
Opposing units and friendly minions may block the progress of your minions.
Your minions are considered blocked when an opposing unit or friendly minion occupies a hex that your minion could otherwise move into or through to make progress on their mark using their full movement (or as much movement as possible). If this occurs, the minion will make progress using as much movement as possible.
The minion may need to defeat an opposing unit blocking its path before it is able to continue to make progress towards its mark.
If one of your heroes blocks the movement of one of your own minions in such a way that the minion cannot make progress towards its mark using its full movement, the hero is displaced.
Your minion moves into the hero's hex, forcing the hero to swap positions. Your hero may be displaced multiple times in a turn, if it is blocking the progress of more than one of your minions.
Note that a minion's path is not considered to be blocked if it is able to make progress on its mark while using its full movement requirement - even if a unit stands in the way of a more optimal path towards its mark.

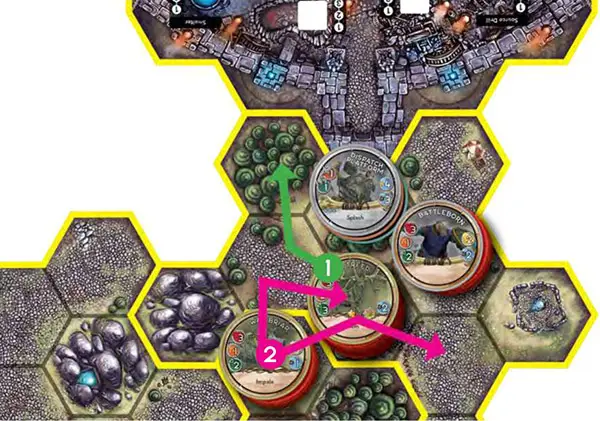
It is the movement stage of the heirs' turn. The heirs could move their hero, Jaelana Nestor, before or after their minions, but will opt not to move her this turn.
-
The joust is the heirs' leading minion, since it is closest to the naroran fortress gate, so it will move first. With a movement stat of 2, the joust has only one option that will use its full movement stat and allow it to make progress on its mark.
It is not considered blocked by Jaelana, since it is able to both use its full movement and make progress.
-
The harrier is unable to use its full movement stat of 4 while making progress on its mark.
It is blocked on the left by the friendly joust minion, and Jaelana stands in the way on the right, preventing the harrier from using as much of its movement as possible while making progress. Heroes cannot block their minions' movement, so the harrier will move into Jaelana's hex
-
Jaelana is displaced and will swap hexes, moving back one hex. The opposing narora minion still blocks the harrier from using its full movement.
Hero Movement
You have free choice in the movement of your heroes. They may move in any direction, following their terrain allowance. Heroes can use some, all, or none of their movement stat.
They can move either before or after your minions, but you may not interrupt the movement of your minions to perform a hero's movement. You may, however, split your heroes' movement so that one hero moves before all of your minions and the other moves afterwards.
Heroes may not stay on the fortress gate hex. A hero that is able to deploy from the fortress must do so.
Returning to the Fortress
A hero may return to the fortress by moving back onto its fortress gate hex. When it does so, it immediately recovers to full health and is placed beside your barracks.
A hero that has returned to its fortress may not be deployed again in the same wave, but it may be deployed again in a future wave without paying its CP cost again.
Attacking
All units have a default attack range of 1. This means that units with an attack stat can only attack units and spires in adjacent hexes.
In order to attack, a unit must have a valid target. Valid targets are opposing units (including landmark minions), opposing spires, and opposing fortress gates within range.
You may choose the order in which your units attack. When one of your units attacks another unit, it deals damage equal to its attack stat to its target. The targeted unit removes health chips equal to the damage it receives.
When attacking a spire, 1 or more damage received will remove a single attack or range upgrade from the bottom of the spire. If the spire has a fortification upgrade on the bottom, your unit must deal at least 2 damage in order to remove it.
Retaliation
When one of your units attacks an opposing unit and that unit is not defeated, it will retaliate if able. A unit retaliates by dealing its attack stat  in damage to the attacking unit.
Each opposing unit will retaliate only once per turn, and only if the attacking unit is within its range. Talents and advancements that affect attacks are not applied to retaliation.
A fortress gate can retaliate multiple times per turn and at unlimited range, dealing 1 damage to each unit that attacks it. Spires do not retaliate.
Defeat
If one of your units defeats an opposing unit or spire, your faction gains the reward listed on the defeated chip:
 : immediately gain # Source.
 : immediately draw # relic cards.
 : you may immediately build a spire on this Source Well at no cost, and ignoring influence restrictions. This cannot exceed your maximum spire limit.
Defeated units do not retaliate. When your faction is responsible for the defeat of a unit or spire, you are granted the reward listed on the defeated chip.
When a unit or spire is defeated, discard it if it is a landmark, merc minion or merc spire. Remove it from the game if it is a hero. Otherwise, return it to its barracks.
If a defeated minion was grouped, add health chips equal to the next minion's health stat underneath the unit chip. This minion continues its turn from where the last minion left off (but does not get to retaliate on behalf of the defeated minion).
If a hero defeats a unit, spire, or fortress gate it may immediately level up.
The current wave ends immediately when all minions in play have been defeated. Heroes in play at this time will remain in place and start the next turn from their current position.
If instead, all opposing units (including heroes) are defeated but you still have heroes and minions in play, your heroes go into campfire mode but the wave continues until your last minion is defeated.
Campfire Mode
At the end of a turn in which only one faction has units in play, that faction's heroes go into campfire mode for the remainder of the wave and are inactive. They do not take turns and cannot be interacted with in any way. That faction's minions continue to act as normal until they are defeated.

Example 1: The battleborn attacks the harrier, dealing 1 damage. The harrier retaliates, dealing 1 damage to the battleborn in return.
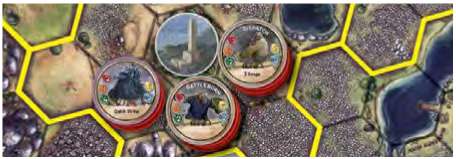
Example 2: The dispatch attacks the harrier 2 hexes away (because it has the talent 2 Range), dealing 1 damage. The harrier cannot retaliate, as the dispatch is not within its range.
The battleborn also attacks the harrier, dealing another 1 damage and defeating it. The harrier does not retaliate because it has been defeated (but would otherwise retaliate).
Minion Attacks
Minions must attack if they have a valid target. Each minion can only attack once per turn. If any of your minions has multiple possible targets, you choose which unit to attack.
Hero Attacks
Heroes have the option of performing an attack on a valid target, but they are not required to do so. Each hero may only attack once per turn.
Units with the talent # Range may attack and retaliate from up to # hexes away. Hexes counted for the purpose of determining Range may be occupied. You may not count through non-hexes such as gaps between hex groups or any other part of the fortress except the fortress gate hex.
Leveling Up
Leveling up improves your units stats and/or talents. There are two types of level ups. The first is promotion. A unit is promoted by flipping it from its basic side to its promoted side with a star  .
.
When this happens, it immediately loses any upgrade chips on it. If it is promoted during the Onslaught Phase, the unit is granted the difference in health chips from its basic side's health stat to its promoted side's health stat, if any.
The other way a unit may level up is to receive upgrade chips. When one of your units receives an upgrade, you may place an attack or fortification upgrade chip beneath their unit chip. When one of your units with the talent # Range receives an upgrade, you may instead choose a range upgrade chip.
An attack upgrade  increases your unit's attack stat by 1. A fortification upgrade
  effectively acts as an extra health chip and is removed first, in place of a health chip, when taking damage. A range upgrade
  increases your unit's range by 1.
Leveling Up Minions
Each faction's minions have a unique way in which they may be promoted. See your faction's reference sheet for details.
Minions generally do not receive upgrades.
Leveling Up Heroes
Heroes may level up when they defeat a unit, spire, or fortress gate. In order to level up a hero, first check its upgrade capacity. If it is not at its capacity  , you may add an upgrade chip to the hero. When leveling up a hero on its basic side at its maximum upgrade capacity, the hero is promoted.
If a hero is on its promoted side and at its maximum upgrade capacity, leveling up has no effect.
Leveling up your hero is optional.
Landmarks
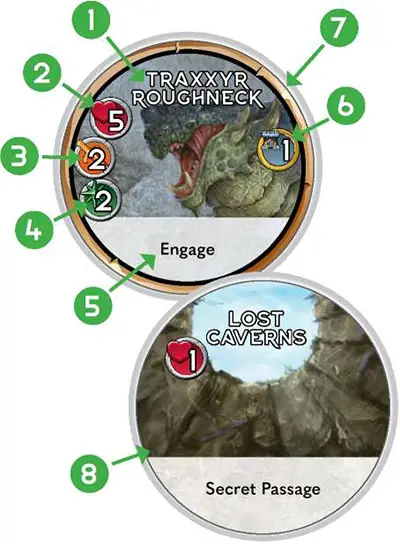
1 Landmark Name, 2 Health Stat, 3. Attack Stat, 4 Movement Stat (ignored unless a faction gains control over this unit), 5 Talent(s), 6 Spire Reward, 7 Bronze Border, 8 No border (denoting this landmark is not a minion)
Landmarks are placed during set-up, facedown and covering each isles' Source Wells. Unrevealed landmarks are not considered units, and can only be interacted with by exploring.
When one of your units explores a landmark you may choose to either reveal it, which will flip it faceup, or keep it unrevealed. Ensure you read the landmark's talents when exploring, as some will have talents triggered by exploration.
If revealed, the landmark will immediately gain health equal to its health stat (if applicable). Revealed landmarks with a bronze border are considered landmark minions and are opposing units to every faction. Landmark minions do not move or attack, but they will retaliate.
If you choose not to reveal the landmark, it remains unrevealed. The landmark may be explored and revealed in later turns.
Landmarks without borders are not considered units. Their talents will outline how to interact with them.
When a landmark is defeated or discarded, it is placed in the landmark discard pile. In the unlikely event that a landmark is needed and the landmark stack is empty, shuffle the discard into a new facedown stack.
The ancient traxxyr is a special landmark, denoted by its unique back and black border. It is only brought into play when specifically instructed. It is not considered a landmark minion (though it will still retaliate when attacked like a minion would).
The Market
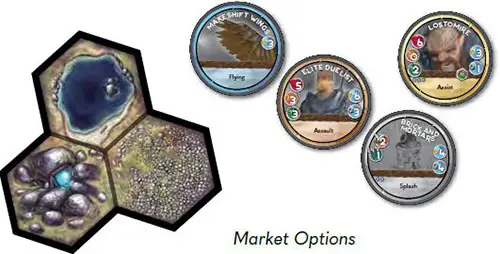
The market is comprised of mercenaries and supplies from the world below that have been transported up to the islands through gateports. Each faction has the opportunity to hire merc heroes and minions, purchase plans for new spires, and buy equipment to help them in their endeavor to defeat their opponents.
The revealed market chips and faceup earthscape make up the market options. The market stack refers to the facedown stack of market chips that you draw chips from when refilling the market chip options.
When instructed to search the market stack, look at market stack chips one at a time from the top down until you find the required chip. Then, shuffle all of the market chips you looked at back into the stack. If instructed to search the market, first look for the required chip in the market options, only searching the market stack if the required chip is not found.
If the market stack is empty, shuffle the market discard to form a new market stack.
Mercs
Mercs can be heroes (with a gold border), minions (with a bronze border), or spires (with a silver border).
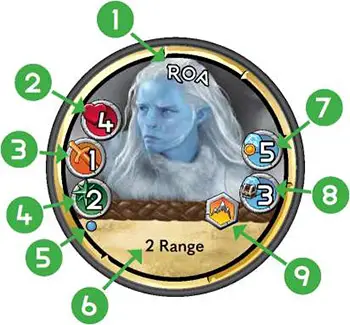
1 Unit Name, 2 Health Stat, 3 Attack Stat, 4 Movement Stat, 5 Upgrade Capacity (Heroes Only), 6 Talent(s), 7 Source Cost, 8 Source Reward, (9) Terrain Allowance.
Merc Units
Merc heroes and minions purchased in the market may be kept beside your barracks until selected for deployment during any Prep Phase. Merc units purchased from the market do not cost any CP to deploy. Merc heroes count towards your 2 hero limit per wave. When merc heroes are defeated, they are removed from the game. Defeated merc minions are placed in the market discard.
Merc units are considered faction units for any game effects referring to "faction units". However, they are not considered units of your faction for effects that name your faction specifically. For example, a talent that affects "non-naroran units" will still affect merc units controlled by the narora faction.
Merc Spires
Merc spires can be constructed as faction spires. They do not cost any Source to construct, as the Source cost was already paid upon its purchase. Merc spires count towards your spire limit.
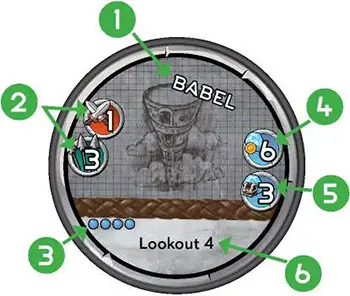
1 Spire Name, 2 Starting Upgrades, 3 Upgrade Capacity, 4 Source Cost, 5 Source Reward, 6 Talent(s).
Merc spires are kept beside your barracks until constructed during the Build Phase, or during the Onslaught Phase at the start of your turn (using one of your two limited build options). When merc spires are defeated, they are placed in a market discard.
Equipment
Equipment (with blue borders) gives additional talents to the heroes they are equipped to.
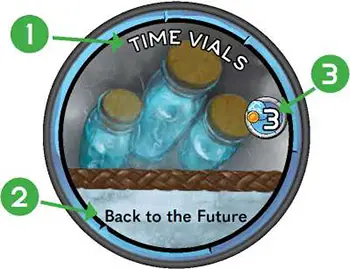
1 Equipment Name, 2 Talent(s), 3 Source Cost
You may equip equipment to a hero when the hero is placed on the fortress gate for deployment. The equipment chip is placed directly underneath the hero's chip. Any player may look at the equipment's talents at any time.
Each hero can have, at most, one piece of equipment. Once equipment is attached to a hero, it cannot be removed. When a hero with equipment is defeated, its equipment is placed in the market discard.
Earthscapes
Earthscapes are hex groups that players can purchase to modify the landscape of Ankar. You can purchase earthscapes during the Market Phase at a cost of 2 Source. You may place your purchased earthscapes on your turn during the Build Phase.
When placing earthscapes, the following rules must be observed:
Earthscapes may be placed on top of existing hex groups to alter the play area. When doing so, they must be placed on an even plane of the play area.
Earthscapes may be placed adjacent to existing hex groups to extend the play area. At least one edge of the earthscapes must line up with an edge of an existing hex group.
You must have influence where you place the earthscape. This means that at least one of its hexes must be either a) on a hex group adjacent to your fortress, or b) on or adjacent to a hex group containing one of your spires.
Earthscapes may be placed on path terrain, but there must always be path terrain connecting every fortress. You may cover up path, but only in such a way that a path connecting each fortress still exists.
Earthscapes cannot be placed on occupied hexes. You may cover empty Source Wells.
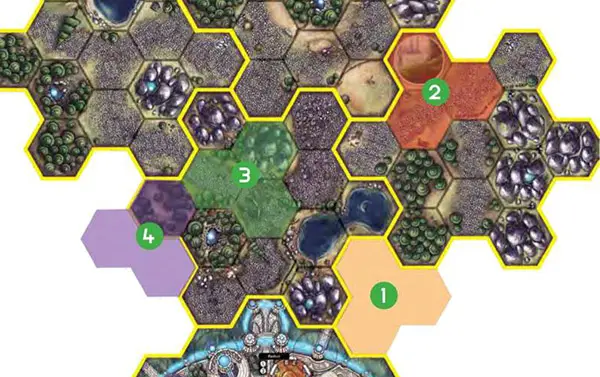
1 The orange earthscape location is just outside your area of influence. A spire must be constructed on an isle adjacent to this earthscape location (within your area of influence) in order to place an earthscape here.
2 The red earthscape location is also outside your influence area; however, even after constructing a spire on an adjacent isle, this is still an invalid placement because one of the hexes within this location is occupied. You may only earthscape over unoccupied hexes.
3 The green location is a valid placement for an earthscape. Take care when placing an earthscape here, as its orientation cannot remove the only path that connects your fortress to the others. Once placed, you may construct a spire on this earthscape by spending its Source cost, as this earthscape's new Source Well(s) will also fall within your area of influence.
4 The purple location meets the influence requirement, as only one hex of the earthscape needs to fall within your area of influence. However, an earthscape cannot be placed here as it would not be on an even plane - it would sit partially on an earthscape and partially on the table which is invalid.
After placing an earthscape, you may immediately construct a spire on one of its Source Wells, if you can. You must pay the Source cost of the spire in order to construct it, and it must be in a hex that your faction has influence over.
When determining if a faction has influence over an earthscape's hex, you must refer to the bottommost hex group underneath it, if applicable. If you have influence over the bottommost hex, you are considered to have influence over the earthscape hex on top.
Hex groups sharing an edge are considered adjacent even if they exist on different planes of the play area.
Events
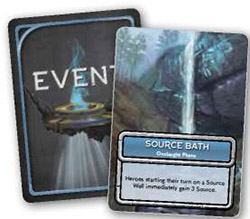
Events are cards drawn during the Event Phase. Events may alter the rules, create a side quest, or impede players in some way for the current wave.
Starting in Wave 2, each wave begins with discarding the previous event card and drawing the top card of the event deck. Events will trigger in a specific phase of the wave.
If it occurs in the Event Phase, resolve it immediately. Otherwise, set it aside after reading and follow its instructions at the start of the appropriate phase.
Relics
Relics are awarded to players for defeating certain landmarks in the form of one-time or ongoing abilities.
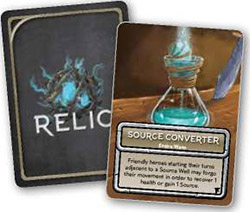
When drawn, "ongoing" relics should be placed faceup immediately, with the effect lasting for the rest of the game. Other relics should be kept secret from other players until played.
Unless otherwise stated, relics can be played at any time during the Onslaught Phase for their effect. Once played, "single-use relics" are applied immediately and then discarded.
"Entire wave" relics are effective immediately upon being played, and should be placed faceup in front of you until the following Event Phase when the card is discarded. There is no limit to the number of relic cards you may hold.
In the unlikely event that you need to draw a relic and the relic deck is empty, shuffle the discard pile into a new facedown relic deck.
Continue Reading