Components
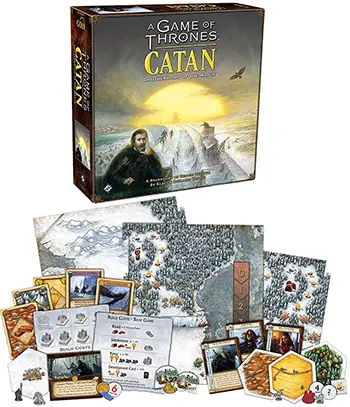
- 128 player pieces
- 5 settlements
- 4 keeps
- 7 guards
- 15 roads
- Build cost card
- 40 wildling pieces
- 24 regulars
- 8 climbers
- 8 giants
- 48 wildling tokens
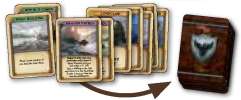
- 95 resource cards
- 27 development cards
- 11 hero cards
- Game board
- 6 frame parts
- 21 terrain tiles
- 21 number tokens
- 5 trading posts
- 2 six-sided dice
- Twelve-sided die
- 4 large plastic wall sections
- 2 card trays
- Special number token
I. Base Game Rules
Note: If you are new to catan, play the base game rules before you play the full game!
-
The kingdoms let you recruit from their slums and prisons; but, otherwise, they have all but forgotten you. You still control the ancient territory called the "Gift".
The Gift is bounded by the Starks' kingdom to the south and the seas to the east and west. To the north stands the Wall-the towering dam holding back the wildlings and the other horrors of the northern wastes. You must settle and expand your holding in the Gift. After all, starving and poorly armed men make poor guards.
-
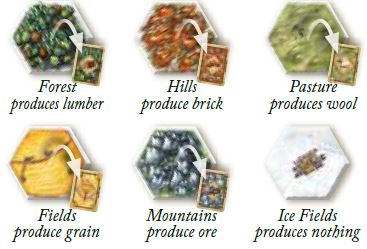
There are 6 terrain types. Five of the terrain types produce a different type of resource. Each resource you receive is represented by a card. Here's what each terrain produces:
-
You begin the game with 2 settlements and 2 roads. Each settlement is worth 1 victory point. You therefore start the game with 2 victory points!
The first player to acquire 10 victory points on his/her turn wins the game.
-
To gain more victory points, you must build new roads and settlements. You can also upgrade settlements to keeps. Each keep is worth 2 victory points. To build or upgrade, you need to acquire resources.
-
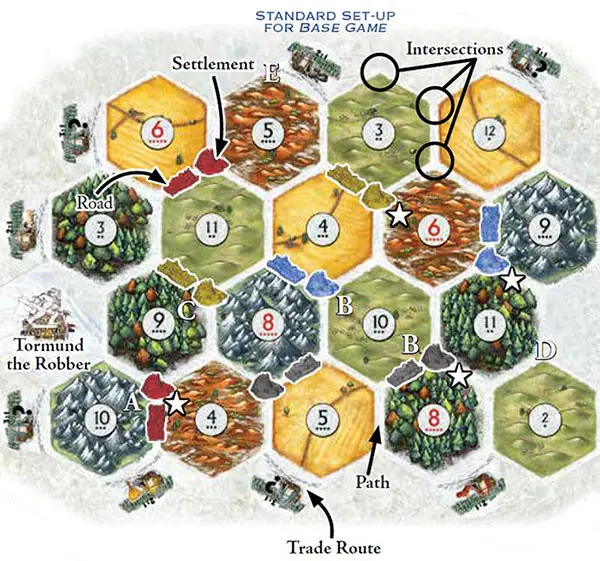
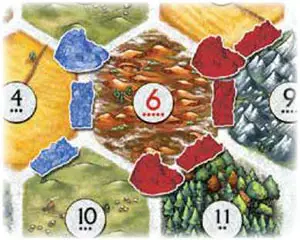
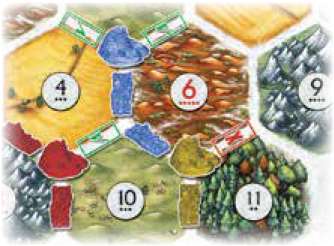
How do you get resources? It's simple. Each turn, 2 dice are rolled to determine which terrain hexes produce resources. Each terrain hex is marked with a round number token. If, for example, a "10" is rolled, all terrain hexes with a "10" number token produce resources - in the illustration on this page, those terrain hexes are mountains (ore) and a pasture (wool).
-
You only collect resources if you own a settlement or a keep bordering a terrain hex producing a resource. In the illustration, the red settlement [A] borders the "10" mountains hex.
The blue and black settlements [B] border the "10" pasture. If a "10" is rolled, the red player receives 1 ore card; and the blue and black players each receive 1 wool card.
-
Since the settlements and keeps usually border on 2-3 terrain types, they can "harvest" up to 3 different resources based on the dice roll. Here, the yellow settlement [C] borders on forest, mountains, and pasture.
A settlement at [D] would only harvest the resources from 2 terrain hexes (pasture and forest). Finally, a settlement at [E] would only harvest the r , resource from 1 terrain hex (hills). However, [E] is also at an ore trade route.
-
Since it's impossible for you to have settlements adjacent to all terrain hexes and number tokens, you may receive certain resources only at rare intervals (or never). This is tough, because building requires specific resource combinations.
-
For this reason, you can trade with the supply or trade with other players. Make them an offer! A successful trade might yield you a big build!
-
You can only build a new settlement on an unoccupied intersection-provided that one of your own roads leads to that intersection and the nearest settlement is at least 2 intersections away.
-
Carefully consider where you build settlements. There are numbers of varying size and pips (dots) on each number token. The taller the number (and the more pips it has), the more likely you are to roll that number during the game.
Bottom line: The more frequently a number is rolled, the more often the hexes with those numbers produce resources. You should consider settling on hexes that have good potential for production (e.g., 6 & 8 versus 2 or 12). However, these same hexes are often primary targets for Tormund the Robber.
Setup
Sort the resource cards into 5 stacks. Put them face up next to the board to form the supply.
Set the 11 hero cards and the 2 "New Recruits cards aside. You don't use them in the base game. Shuffle the development cards. Place them face down by the board.

Place the special cards "LONGEST ROAD" and "LARGEST PATROL" beside the board, 2 VP side up. Place the two 6-sided dice beside the board.
Setting Up the Players
Leave the 12 sided die, gray figures, wall, and the guards in the box. You won't need them in the base game.
Then, each player does the following:
Choose a player color. Take all of the player pieces of that color and a building cost card. Place them in front of you.
Place 2 settlements and 2 roads of your color as indicated in the illustration on page 1.
You receive 1 resource for each terrain hex adjacent to your starting settlement (your settlement marked with a white star on page 1). Take the appropriate resource cards from their stacks. Keep your resource cards hidden from your opponents.
Example: In the illustration on page 1, see the blue settlement on the right, marked with a star. Blue receives 1 brick, 1 lumber, and 1 ore for his settlement.
Game Play
On your turn, you perform the following steps in the order listed:
Step 1: Roll the 6-sided dice for resource production first (the result applies to all players).
Step 2: You may trade resource cards with other players and/or trade with the supply.
Step 3: You may build roads settlements and/or keeps and/or buy development cards. You may also play 1 development card at any time during your turn.
After you're done, pass the dice to the player to your left, who then continues the game with step 1. The oldest player goes first.
1. Resource Production
You begin your turn by rolling the two 6-sided dice. The sum of the dice determines which terrain hex(es) produce resources.
Each player who has a settlement on an intersection that borders a terrain hex marked with the number rolled receives 1 resource card of the hex's type. For an example, see resource production
If you have 2 or 3 settlements bordering that hex, you receive 1 resource card for each settlement. You receive 2 resource cards for each keep you own that borders that hex.
If there are not enough of a given resource in the supply to fulfill everyone's production, look in the Rules Reference.
Example: If a "6" is rolled, Red receives 2 brick for his 2 settlements. Blue receives 1 brick for his 1 settlement. If a "4" is rolled, Blue receives 1 grain. If Blue's settlement were a keep, he would receive 2 grain instead.
2. Trade
After the dice roll is resolved, you may trade freely to gain resource cards (using either or both types of trades below):
A. Trade with Players
On your turn, you can trade resource cards with any of the other players. You can announce which resources you need and what you are willing to trade for them. The other players can also make their own proposals and counteroffers to you.
Important: Players may only trade with the player whose turn it is. The other players may not trade among themselves.
B. Trade with the Supply
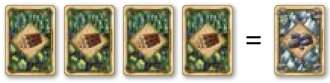
You can also trade without the other players! During your turn, you can always trade at 4:1 by putting 4 identical resource cards back in the supply and taking any 1 resource card of your choice from it.
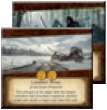
If you have a settlement/keep on a trade route, you can trade with the supply at a more favorable rate: 3:1 or 2:1 as indicated by the trade route.
 Trade w/supply 4:1 without a trade route |
 Trade w/supply with a 3:1 trade route |
 Trade w/supply with 2:1 lumber trade route |
Important: The 4:1 trade is always possible, even if you do not have a settlement or keep on a trade route.
3. Build
Now you can build. Through building, you can increase your victory points, expand your road network, improve your resource production, and/or buy useful development cards. To build, you must pay specific combinations of resource cards (see the Build Costs Card).
Take the appropriate number of roads, settlements, and/or keeps you built from your supply. Place them immediately on the board. Return the resource cards you spent to their respective supply stacks.
You cannot build more pieces than what is available in your pool-a maximum of 5 settlements, 4 keeps, and 15 roads.
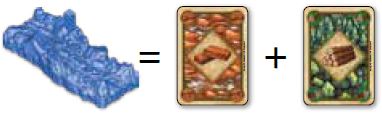
A. Road Requires: Brick & Lumber
A new road must always connect to one of your existing roads, settlements, or keeps. Only 1 road can be built on any given path.
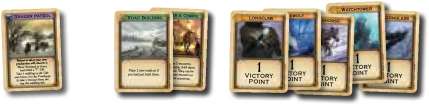
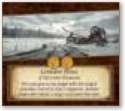 Longest Road |
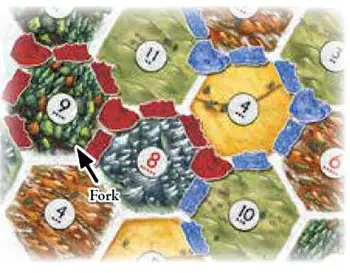
The first player to build a continuous road (not counting forks) of at least 5 road segments that is not interrupted by a foreign road or keep receives the special card "Longest Road".
If another player succeeds in building a longer road than the one created by the current owner of the "Longest Road" card, that player immediately takes the special card (and its 2 victory points). In this case, there is a 4 victory point swing!
Road Build Example: Blue may build a road on the paths marked in green. Blue cannot build on the path marked in red, for yellow's settlement blocks the way.
Longest Road Example: Red has a continuous connection of 6 roads (not counting the fork); therefore she has the "Longest Road". Blue's 7-road linkage is interrupted by one of Red's settlements. So, Blue's longest road is 5.
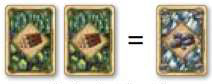
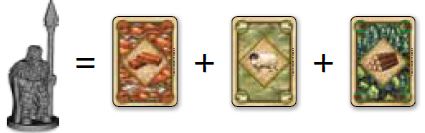
B. Settlement Requires: 1 Brick, 1 Wool, 1 Grain, And 1 Lumber

Take special note of the "Distance Rule": you may only build a settlement at an intersection if all 3 of the adjacent intersections are vacant (i.e., none are occupied by any settlements or keeps-even yours).
Each of your settlements must connect to at least one of your own roads. When a terrain hex produces, you receive resources regardless of whose turn it is. You receive 1 resource card for each settlement you have adjacent to that terrain hex.
Each settlement is worth 1 victory point.
Example: Red may build a settlement on the intersection marked in green. Red cannot build on the intersections marked in red because she has to observe the distance rule.

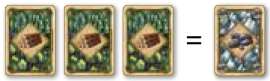
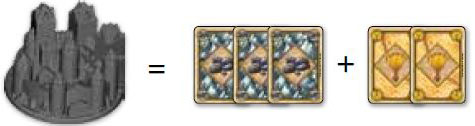
C. Keep requires: 3 Ore & 2 Grain
You may only establish a keep by upgrading 1 of your settlements.
When you upgrade a settlement to a keep, put that settlement piece back in your supply and replace it with a keep piece.
A keep allows you to acquire 2 resource cards for an adjacent terrain hex that produces resources.
Each keep is worth 2 victory points.
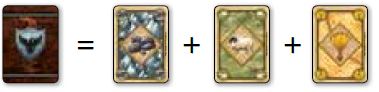
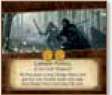
D. Buying a Development Card requires: Ore, Wool, & Grain
When you buy a development card, draw the top card from the deck.
There are 3 different kinds of development cards: ranger patrol (purple banner), progress (green), and victory point (orange). Each has a different effect.
Development cards never go back into the supply, and you cannot buy development cards if the supply is empty.
Keep your development cards hidden (in your hand) until you use them, so your opponents can't anticipate your play.
4. Special Cases
A. Rolling a "7" and Activating Tormund

If you roll a "7", no one receives any resources. Instead, each player who has more than 7 resource cards must select half (rounded down) of his/her resource cards and return them to the supply.
Then you must move Tormund. Proceed as follows:
-
You must move Tormund immediately to a number token on any other terrain hex.
-
Then you steal 1 (random) resource card from 1 opponent who has a settlement or keep adjacent to the target terrain hex. The player who is robbed holds his/her resource card hand face down.
You then take 1 card at random. If the target hex is adjacent to 2 or more players' settlements or keeps, you choose which one you want to steal from.
Important: If the production number for the hex containing Tormund is rolled, the owners of adjacent settlements and keeps do not receive resources. Tormund prevents it.
B. Playing Development Cards
At any time during your turn, you may play 1 development card (put it face up on the table). That card, however, may not be a card you bought during the same turn (except for a victory point card, as described below)!
Ranger Patrols
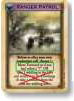
In the base game, when you play a ranger patrol card, you can only use the option: Move Tormund as if you had rolled a "7". You must immediately move him.
Once played, ranger patrol cards remain face up in front of you. The first player to have 3 ranger patrol cards in front of himself receives the special card "Largest Patrol", which is worth 2 victory points.
If another player has more ranger patrol cards in front of him than the current holder of the Largest Patrol card, he immediately takes the special card and its 2 victory points.
 Largest Patrol |
Progress Cards
If you play a progress card, follow its instructions. Then remove the card from the game (i.e., toss it in the box).
Victory Point Cards
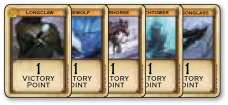
You must keep victory point cards hidden. You may only reveal them during your turn and when you are sure that you have 10 victory points-that is, to win the game.
Of course, you can reveal them after the end of the game if someone else wins. You may play any number of victory point cards during your turn, even during the turn you purchase them (if playing them gives you the win).
End of the Game
If you have-or reach-10 victory points on your turn, the game ends immediately and you win!
You can only win during your turn. You cannot win during another player's turn. If somehow you find that you have 10+ victory points during another player's turn, you must wait until your next turn.

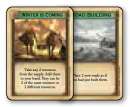
II. Brotherhood of the Watch Rules
You serve as a shield against the darkness. You form the rear guards for the thrones of the south. You are the Night's Watch! You do not play the Game of Thrones-you are the only thing that holds back the wildlings trying to migrate to the warmer southern lands. Because winter is coming...
You are recognized by your fellow brothers of the Night's Watch as a natural leader. You oversee a small cadre in their day-to-day duties. It is your duty to insure that the defenses of the Wall are properly manned by guards. To accomplish this, you need to secure a steady supply of resources that flow from the small settlements, fortified keeps, and roads in the Gift. If you do your job well, you will become the new Lord Commander.
Important: The rules for Brotherhood of the Watch use all of the base rules, with the following changes:
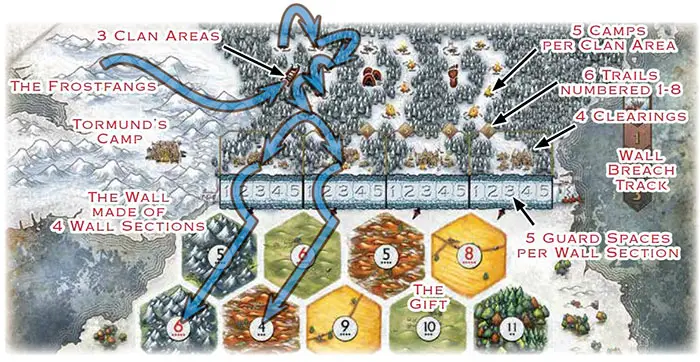
The Wall, The Gift, & The Wildlings
The board represents the region of northern Westeros that contains the Wall and the Gift. The Wall protects the kingdoms to the south and the gift of land that supports the guards on that Wall. This board is made up of the terrain hexes of the Gift and the frame pieces that hold those hexes together.
The frame has spaces for the clan areas, camps, trails, and clearings north of the Wall.
The wildlings start the game in an area called the Frostfangs. During play, certain actions (like building a settlement) trigger wildling migration.
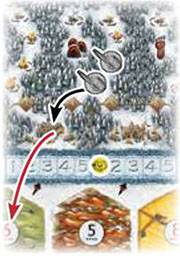
Wildlings migrate from the Frostfangs to the clan areas where they prepare themselves in camps. Later, the wildlings follow a trail from the camps to a clearing at the base of the Wall. When there are more wildlings in a clearing than guards on the wall section defending against that clearing, the wildlings breach the Wall to enter the Gift. If the camps in a clan area get too crowded, the wildlings rush the Wall.
In the image of the game board below, we identify all of the areas that are crucial to the movement of the wildlings. Black arrows indicate specific areas. Blue arrows indicate the general flow of wildling movement.
Constructing the Board
For your first game of Brotherhood of the Watch, we suggest that you use the "Standard Set-up for Brotherhood of the Watch" depicted on the back of this rule book.
First, assemble the frame. Second, create the Gift by placing the terrain hexes into the frame-again as shown. Use all 21 terrain hexes in a 4-player game. Use 16 hexes in a 3-player game. Third, place the number tokens on top of the designated terrain hexes as shown.
Note: It can be a lot of fun (and challenging) to play with a variable game board (with the terrain hexes arranged randomly). You can change the board each game. This allows you to explore new strategies.
But always remember that, while you randomize the terrain hexes, you do not randomize the number tokens.
If you want to use the variable set up, you can find the guidelines in the Rules Reference under Set-Up, Variable Also look for useful tips under Set-Up Phase
Setup
If you are experienced players, use the variable set-up guidelines (see Reference Rules under Set-Up, Variable and Set-Up Phase).
General Set-up
Follow the base game set-up instructions on page 2, with the following additions:
- Place the wildling die beside the production dice.
- Place the 4 wall sections on the board as shown in the illustration on page 5.
- Shuffle all of the development cards to form the stack.
 Place the Longest Road & Largest Patrol cards 1 VP side up.
- Place your build cost card face up (wildling tokens depicted).
- Place the breach marker on the "0" space of the wall breach track.
- Place the 8 VP tokens beside the board.
- Each player rolls the production dice, highest roll goes first.
Set-Up the Wildlings

Place the wildling figures on the Frostfangs area of the board. Place all of the wildling tokens face down next to the board and mix them up so that nobody knows which is which.
Place 1 wildling token face down on each settlement space on your build cost card. Then place 1 of your settlements on top of each of these wildling tokens.
Place 2 wildling tokens and 1 keep on each keep space on your build cost card.
Leave any remaining tokens face down beside the board to form a wildling token pool.
Prepare the Hero Cards
Place all of the hero cards next to the board, "A-side" up, to form a display. Each player takes 1 Hero Card as follows:
In a 4-player game: Player 1 takes "A4" Yarwick, player 2 takes "A3" Tarley, player 3 takes "A2" Marsh, and player 4 takes "A1" Mormont.
In a 3-player game: Player 1 takes "A3" Tarley, player 2 takes "A2" Marsh, and player 3 takes "A1" Mormont.
Set-up, Brotherhood of the Watch
Set-up is the same as in the base game, with the following additions:
Take 7 guard pieces in your player color.
The Brotherhood of the Watch set-up has 3 rounds instead of 2. Rounds 1 and 2 are just like in the base game (place 1 settlement & 1 road). In round 3, place 1 guard on the wall (starting with player 1 and continuing clockwise).
Game Play
A turn in Brotherhood of the Watch is the same as in the base game, except that you roll 3 dice. You must now roll the 12-sided wildling die in addition to the production dice. The result of the wildling die determines which, if any, of the wildlings advance.
Step 1 - Roll the 3 dice. First resolve the two 6-sided production dice (the result applies to all players). Next resolve any wildling advance indicated by the 12-sided wildling die.
Step 2 - You may trade resource cards with other players and/or trade with the supply
Step 3 - You may build roads V settlements V and/or keeps recruit guards and/or buy development cards V.
After you're done, pass the dice to the player to your left, who then continues the game with step 1.
Begin your turn by rolling all 3 dice. The sum of the 2 production dice determines which terrain hex(es) produce(s) resources. The result of the wildling die determines which wildling(s) advance(s) (if any).
1. Roll the 3 dice
Handle resource production the same way as in the base game.
Note: A terrain hex blocked by a wildling does not produce.
Wildling Advance
A trail is a numbered connection between a camp and an adjacent clearing The wildling die roll result (i.e., 1 to 12) can match a number on one of the trails. If there is a wildling in the camp connected to this trail number, that wildling advances down the trail to the clearing.
Example: The cave people clan area has 2 wildlings in it. This area is connected to two trails (the "4" trail and the "5" trail).
You roll a "4" on the wildling die. So you must advance the wildling in the camp adjacent to the "4" trail to the clearing.
There is no guard on the wall section defending that clearing. So there is a wall breach.
If you rolled a "5", the wildling would have advanced down the "5" trail to the clearing that is defended by a guard. No breach would occur in that case.
If there are multiple wildlings in that clan area, the wildling in the camp closest to the numbered trails advances. The other wildlings in that clan area each move 1 camp closer to the clearings to fill unoccupied camps.
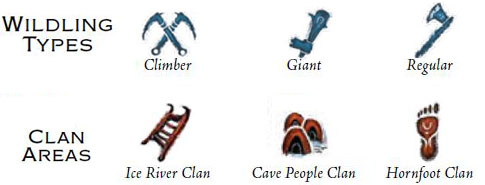
Wildlings
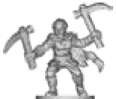
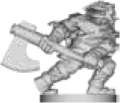
There are 3 types of wildlings: climbers, giants, and regular wildlings When a wildling advances to a clearing:
-
A climber immediately jumps over the Wall and blocks the first hex not occupied by a wildling directly south of the wall section. This does not count as a wall breach.
-

A giant removes itself and removes the guard on the "1" space of the wall section defending that clearing. Take back your guard, and return the giant to the Frostfangs.
If any guards remain on that wall section, they each move to the next lowest number on that wall section. If a giant advances to a clearing and there is no guard on that wall section, the giant breaches the wall.
-
A regular wildling stays in the clearing if the number of regular wildlings in the clearing is equal to or less than the number of guards on the wall section defending that clearing. If there are more wildlings than guards, the wildlings breach the wall.
Wall Breaches
When a wall breach V occurs, if there is a guard in the 1 space of that wall section, remove it and return it to its owner. Any other guards on that wall section (from lowest to highest) fill in the lowest-numbered, unoccupied space(s).
Then, one at a time, each of the wildlings on that clearing jumps over the Wall. Each one blocks the first hex not occupied by a wildling directly south of the wall (as indicated by the red arrows). A blocked terrain hex does not produce.
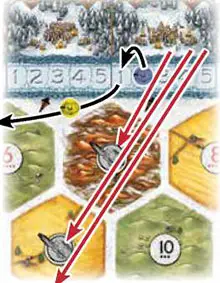
Example: There are 2 regular wildlings in the "5, 6" clearing and 2 guards on the wall section defending that clearing.
You roll a "5" on the wildling die. There is a regular wildling at the camp beside the "5" trail.
That wildling advances down the trail into the "5/6" clearing. There are now 3 wildlings in the clearing and only 2 guards defending.
The wildlings breach the wall. Return the guard in the "1" space on the wall to its owner.
Then move the 3 wildlings over the wall to block the first 3 hexes south. Finally, move the remaining guard on the wall from the "2" space to the "1" space.
After a wall breach, move the breach marker 1 space down on the breach track. 3 wall breaches end the game.

Wildling Rush
When a fifth wildling moves to a clan area that already has 4 wildlings, a wildling rush occurs. The wildlings in the two camps closest to the trails immediately advance.
The wildling in the lowest camp uses the lower numbered trail (red arrow in example) and the wildling in the next closest camp uses the higher numbered trail (blue arrow).
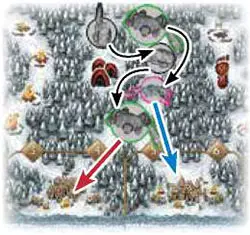
Then, the 3 remaining wildlings fill in the camps ^. Move the wildling in the 3rd camp to the 1st camp, move the one in the 4th camp to the 2nd camp, and move the one in the 5th camp to the 3rd camp (black arrows).
2. Trade with The Supply y (3:1)
Trading is handled the same as in the base game, with the following exception: the standard rate for a trade with the supply is 3:1 (instead of 4:1).
4. Build
Building is the same as in the base game, with the following additions:
- You may build guards.
- When you build a settlement, build a keep, or take a special VP card, you reveal wildling tokens. The corresponding wildling(s) must migrate to their clan area.
- Longest Road and Largest Patrol are only worth 1 VP each.
Create new Wildlings with Wildling Tokens

One wildling token starts under each of the settlements on your build cost card. 2 start under each keep.
When you build a settlement, you must reveal the token and migrate a wildling from the Frostfangs to a clan area. The wildling token specifies the type of wildling that migrates (in blue) and which clan area it migrates to (in red). Follow this process twice for each keep. When you build a keep, place a wildling token from the pool under the settlement you return to your build cost card.
Each time you take the Longest Road or Largest Patrol special card, you must draw a random wildling token from the pool beside the game board to "migrate" a wildling.
Place any used wildling token(s) face up beside the game board. If the face-down wildling token pool is ever depleted, re-mix the face-up tokens to form a new pool.
Building a Guard Requires: 1 Brick, 1 WooL, & 1 Lumber
After you pay for a guard, place it onto the lowest-numbered, unoccupied space on a wall section of your choice.
As long as you have 3 guards anywhere on the Wall, you receive 1 VP token. As long as you have 5+ guards anywhere on the Wall, you receive 1 additional VP token (2 VPs total). If the number of your guards on the wall falls below either threshold, return the VP token to the supply.
Hero Cards
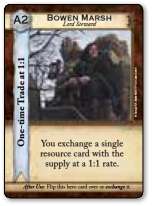
Your hero card gives you a specific advantage as described on the card. The first time you use your hero's advantage, you have 2 choices:
Return it to the hero card display. Then take 1 other hero card of your choice from the display. Place this new hero "A-side" up in front of you.
Turn your hero card over to its "B-side". This allows you to use the hero's ability again on a subsequent turn. After you use your hero card a second time, you must return it to the hero card display ("A-side" up). Then take 1 other hero card of your choice from the display.
There is a summary of all of the heroes on the back cover of the Rules Reference.
Important: You are not allowed to use a hero card during the same turn you take it. You cannot trade, give away, or steal hero cards.
End of the Game
Brotherhood of the Watch can end in 3 ways:
-
If the Wall has been breached 3 times, the game ends immediately. If you have the most guards on the wall at this point, you win. If tied, see below.
-
If the number of wildlings in the Gift exceeds 7 (8 or more) the game ends immediately. If you have the most guards on the wall at this point, you win. If tied, see below.
-
If you have 10 VPs at the END of your turn, you win.
Important: Unlike most Catan games, you only win at the END of your turn. You must still advance the wildlings as usual throughout your entire turn. This could cause the game to end immediately (see 1 or 2 above).
ResoLving Ties for Most Guards
The tied player with the most VPs wins.
If still tied, the tied player with the oldest guard on the wall wins (guard on the lowest number in any wall section).
If still tied, the player with the guard in the most western location wins (closest to the Frostfangs).
Standard Set-up For Brotherhood of the Watch
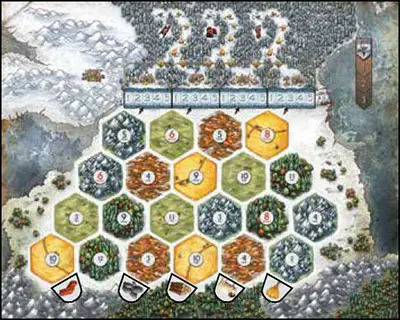 4 pLayer Set-up |
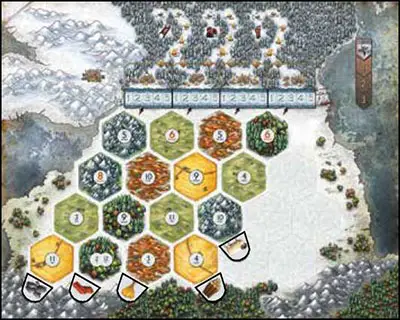 3 pLayer Set-up |
Continue Reading