A dice game for many geniuses who wish to play at the same time. Recommended for those ages 10+. To win at Can't Stop Express you need the courage to take risks, but also the ability to predict and plan.
Components
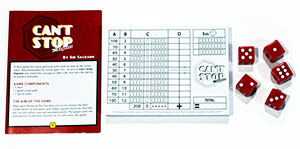
- 5 dice
- 1 giant score pad
- 1 set of rules
Object of the Game
After each throw of the five dice you try to choose the best combination of two pairs, and make a good choice for the fifth die.
For this effort, you are awarded points. The player with the most points at the end (usually 24-25 rolls) wins the game.
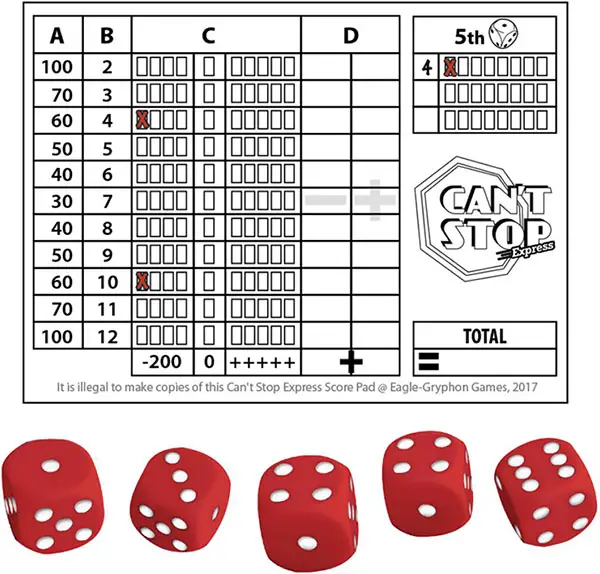
The Parts of the Score Pad
-
"Points" - the values which can be gained from the possibilities of rolling two pairs of dice.
-
"Pair"- the total which is made by rolling two dice.
-
"Number"-here you check off your chosen pairs as they are rolled each turn.
-
"Results" - at the end of the game, here is where you total up the results of the scoring pairs you have selected. (Note that negative totals are tallied on the left side of Column D and positive scores are tallied on the right side of Column D as indicated by the -/+ watermarks in the 7 row).
-
"5th die" - here you mark the 3 chosen numbers in the leftmost box and then track your use of the 5th die rolled each turn. When you check off the last box in any of these tracks your game is over.
Total - "Final total" - Here is where you tally your final score based on the subtotals in the D Column.
Game Play
Each player gets a pencil and a page from the score pad. Each turn one player rolls all five dice. (You can take turns, or have one player manage it. It does not matter who rolls the dice as all players will use the same dice throw for the turn).
None of the players are allowed to touch or move the dice on the table after they have been thrown.
The throw of the dice is valid for and used by all of the players at the same time. In each player's mind (no touching the dice or talking to other players), each player decides for themselves which 4 dice to use to make two pairs, and which die to use for the 5th die.
For each throw of the dice, each die may only be used once - either as one of a pair, or as the"5th die". Only after all players have entered their choices on the score pad are the dice thrown again. Allow approximately 30 to 40 seconds for each throw of the dice for players to make their choices. If you wish, you may use a timer to enforce the time limit.
The "5th Die"
In each of the first three turns, each player must select a unique 5th die to add to their chart in the three left boxes and must also mark the use of that die number by filling in the first check box.
Once players have completed the first three turns they will have three unique 5th die numbers in the three left boxes of their chart. Going forward, each player must use one of these three numbers for each throw if one of those numbers is available. They must also mark it off on their chart. If more than one of the numbers is available, players may choose which one of the three to use and mark off on their chart.
Sometimes it will occur that a throw will not contain one of the three numbers chosen by a player. In this instance the player has a "free th row" where the "5th die" cannot and need not be chosen.
The player must still choose two pairs from the 5 available dice and mark them on their score pad. However in this instance the player may ignore the unused "5th die". Note that no"free throw" is available until the fourth turn after all players have chosen their 3 unique "5th die" values.
End of the Game
The game may not finish for all players at the same time. Once a player has filled in the eighth box for one of his values of the "5th die", then the game is over for him.
The other players only finish when they have also crossed the "5th die" for the eighth time for one of their three"5th box" numbers.
Once the last player is out, the game is over.
The Scoring
Column C on the score pad consists of three parts - sets of four, one and five boxes. For each chosen pair of dice, one of these boxes is filled in or marked with an "X". Depending on the number of boxes filled in for a pair, the player is awarded plus or minus points as follows:
200 minus points are awarded for each value/row which has been filled in only one, two, three or four times. Write -200 for each such row on the left side of Column D of the score pad.
Variant: for new players or young players, change the negative value to 150 or 100 points so as to be less discouraging. This is a tough game to score positive points!
0 points are awarded for each value/rowthat has been filled in exactly five times or none at all. Write 0 for each such row on the right side of column D of the score pad.
Plus points are awarded for each value that has been filled in at least six times:
For the sixth to tenth boxes in a row, the player is awarded plus points. Each filled in box (6-10) in a row then gets the value of the points which appear in column A.
For Example: For a pair of dice with the sum of 8 (see Column B on the score pad), 160 points have been entered. The player has nine boxes filled in this row. Therefore he receives 40 points for each of the boxes six, seven, eight and nine. Four boxes times 40 points each = 160 plus points which are written in the left side of Column D on the score pad.
The Winner
When more than one player is playing, the player with the most plus points is the winner. If you play alone, then always note your best score, and try to beat this in subsequent games.
Inexperienced players will often end up with a negative score because they concentrate too much on the relatively-seldom rolled pairs of 2,3,11 and 12. It is likely better to choose values between 4 and 10.
There might be fewer points to be made here, but the chances are that they will occur more often. Experienced (and fortunate) players can expect to get 800 or more plus points. One thousand or more points is a really excellent result.
Some Examples
Following you will find some examples from four phases of the game.
Example 1: The First Throw.
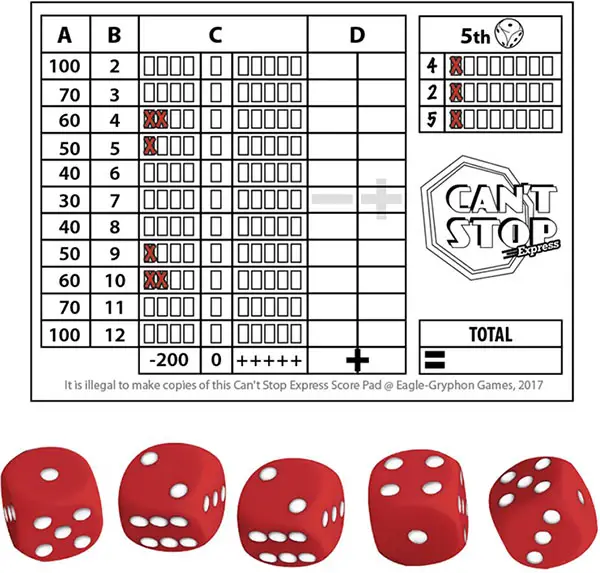
The first throw shows the following numbers: 1-3-4-4-6. Player A decides to take the pairs 4 (1 +3) and 10 (4+6). For the"5th die" he chooses the 4. (See illustration 1)
Example 2: The Third Throw.
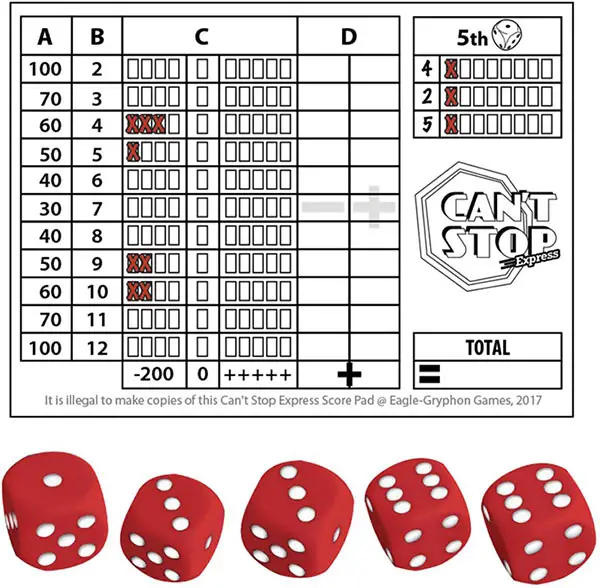
The third throw shows the following numbers: 1 -2-2-4-5. Player A now chooses the pairs 4 (2+2) and 5 (1+4). The"5th die"this time is the 5. (See illustration 2)
If, in the first three rounds, the roll of the dice does not allow a player to choose a NEW unique "5th die" number [because all the dice match their current "5th die" number(s)], then they must still take a number as their "5th die" marking off another box for that number. They also must still choose a NEW 5th die number on a subsequent roll until they have all three unique "5th die" numbers chosen.
Example 3: The Fourth Throw.
This time the dice show the numbers: 1-3-3-6-6. As none of the numbers is to be found in the column "5th die" the player has one of the rare "free throws" He doesn't need to make a cross for the "5th die" and therefore chooses the pairs 4 (1 +3) and 9 (3+6). (See illustration 3)
Note: Players may still use two dice to make a number that they have already marked off 10 times, but they will not score any points for this selection. You might do this if you don't want to open a new row or so that you can take a preferred "5th die" selection (to avoid going out, or to place it in a lesser used row).
Example 4: The Scoring.
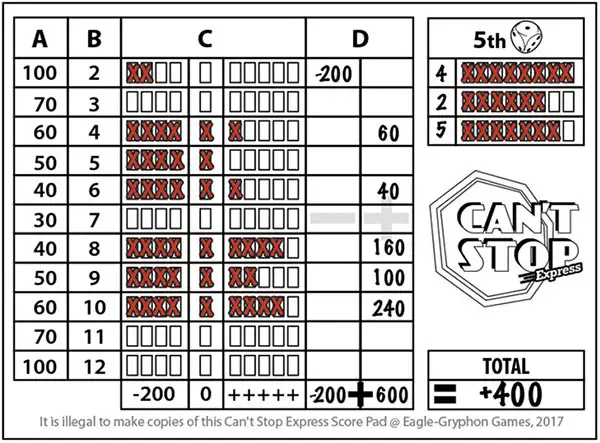
Player A finishes his game as he fills in the number 4, as the "5th die", for the 8th time. In the row for pairs totaling two he gets 200 minus points, as he only crossed it twice. In the other rows he gets a total of 600 plus points. (See illustration 4)
Continue Reading


