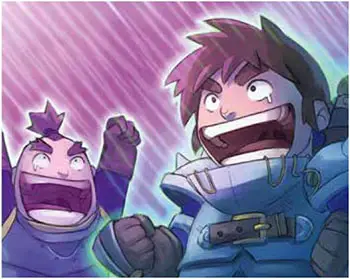
Arcadia Quest is a campaign game for 2 to 4 players, in which each player controls a Guild with three unique Heroes. These Guilds compete against each other and against the obstacles in the game in order to accomplish a series of scenarios that will lead them to ultimate victory against the Vampire Lord Fang.
Players are able to choose the path their campaign takes, navigating through six out of eleven available scenarios, so each time the campaign is played it can have a different configuration of scenarios. The feats accomplished by a Guild in each scenario can grant it a significant strategic advantage in a following scenario.
During a scenario, each player pits his three Heroes against the Heroes of the other players, and the nasty Monsters that swarm the once-noble city of Arcadia.
Fulfilling specific Quests, finding treasure and killing enemies, a Guild emerges victorious in each scenario, and its Heroes are able to evolve and acquire more powerful items and weapons.
Over the course of the campaign, Heroes will have to prepare themselves if they want to have any hope of surviving the final showdown against the vampire lord and his minions!
Components
- 37 highly-detailed figures
- 185 Upgrade and Death Curse cards
- 54 Monsters and Hero cards
- 21 Quest cards
- 300+ tokens
- 9 double-sided game tiles
- 14 custom dice
- 1 Campaign Book
- 1 Campaign Sheet pad
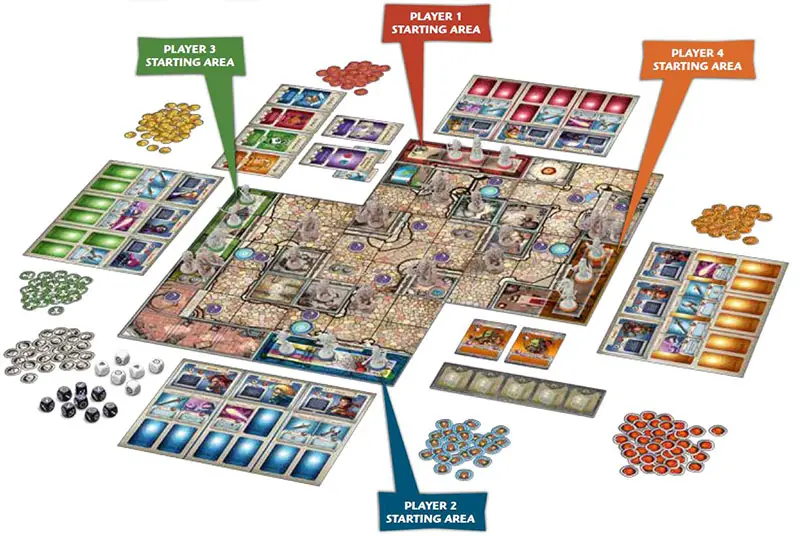
Guild Setup
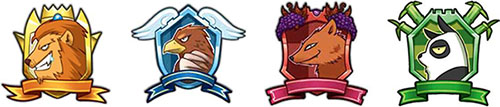
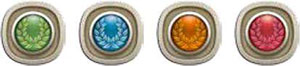
The first thing players starting a new Arcadia Quest campaign need to do is create their Guilds. There are four different Guilds to choose from: Orange (Lion), Blue (Eagle), Red (Fox) and Green (Panda).
Each player receives the Guild Dashboard for his chosen Guild, which will help him organize his Heroes, and his corresponding Guild tokens, which will be used to track his Guild's actions.
Choosing Heroes
The players now have to carefully pick the 3 Heroes that will defend their Guild throughout the campaign. This is a key moment, since creating the right team can be a decisive factor in the upcoming adventures. The players look through the Hero cards and each chooses 3 of them to form his Guild.
Advanced: Drafting Heroes
Once players are more familiarized with the game and each Hero's capabilities, they may want to pick their Heroes in a more structured fashion. If all players agree, they can choose their Heroes at the start of a campaign by using the drafting method.
Shuffle all the Hero cards and divide them among the players as equally as possible (it's not a problem if a player gets one more card than another).
Each player browses his Hero cards in secret and picks one Hero for his Guild, placing it face down in front of him. All players then pass the remaining cards to the player to his left. From the cards they now received, each player picks another Hero for his Guild and places it face down in front of him.
The remaining cards are passed to the left one last time and the players select their last Hero. Any remaining Hero cards are removed from the game and returned to the box.
The players then place their Hero cards face up in the Hero card slots of their Guild Dashboard (the order does not matter). They also take the corresponding figures for their Heroes and carefully attach them to the figure bases in their Guild's color to help identify them (the three extra purple bases are used to identify special Monsters).
These are the 3 Heroes that will defend each Guild through the entire campaign, it is not possible to change Heroes unless a new campaign is started.
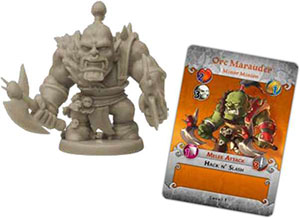
Anatomy of a Hero
Each of the Heroes in Arcadia Quest is unique with different traits and special abilities, players should take these into consideration when picking their Heroes. The Hero cards all display the following characteristics:
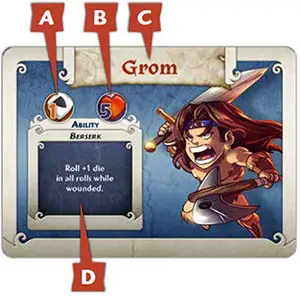
A Defense - This tells you how many Defense dice this Hero can roll to try to prevent an attack from inflicting Wounds.
B Life - This number indicates how many Wounds are necessary to kill this Hero.
C. Name - This is the name of the Hero.
D Ability - This is the Hero's Natural Ability, a special characteristic that truly sets him apart from anybody else. These Abilities are always in effect, following the parameters of their descriptive text.
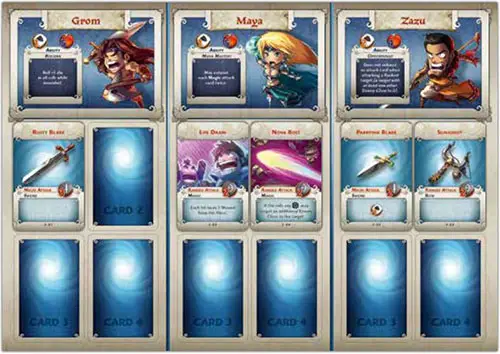
Starting Equipment
Before beginning with the first Scenario in the campaign, each Guild receives 5 Upgrade cards as starting equipment. Take the Starter deck and give each player one of each type of card: Rusty Blade, Parrying Blade, Slingshot, Life Drain and Nova Bolt. Each player can distribute his 5 cards among his 3 Heroes in any way he chooses.
On the Guild Dashboard, each Hero has an inventory of 4 card slots, located under his Hero card. Each Hero can only use the 4 cards in his inventory, not the cards of the entire Guild.
Example: The player controlling the Blue Guild has chosen Grom, Maya and Zazu as his Heroes. He decides to give the Rusty Blade to Grom, Life Drain and Nova Bolt to Maya and the Parrying Blade and Slingshot to Zazu.
Campaign For Arcadia
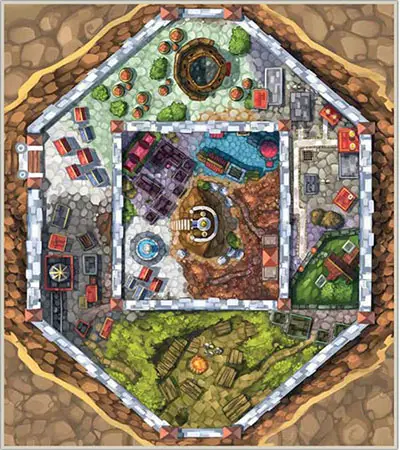
In order to defeat the evil rule of Lord Fang, the Heroes will need to first make their way from the outskirts to the very heart of the city of Arcadia. As they progress, they diminish the power base of the vampire lord, while gaining more power themselves. Only after much adventuring will they be ready to face the vampire lord in the flesh.
The Arcadia Quest campaign, presented in detail in the Campaign Book, is divided into three stages: the Outer Circle, the Inner Circle and the Final Showdown. During a campaign, just six of the eleven scenarios contained in the Campaign Book will be played, so a new campaign can take a different path and offer all new scenarios to the players.
Outer Circle - These are the districts just within the outer wall of the city. Of the six scenarios available in the Outer Circle, three must be completed before the players move into the Inner Circle.
Inner Circle - This is the protected citadel of Arcadia, within the city's second wall. Of the four scenarios available in the Inner Circle, two must be completed before the players move to the Final Showdown.
Final Showdown - At the very center of the city sits the Temple of Dawning Twilight. All campaigns end there with the Final Showdown scenario.
At the beginning of the campaign, players choose together which of the Outer Circle scenarios will be the first (it is recommended that first-time players begin the campaign with the District of Hammers scenario). Afterwards, the winner of the previous scenario chooses which scenario will be played next.
Scenario Setup
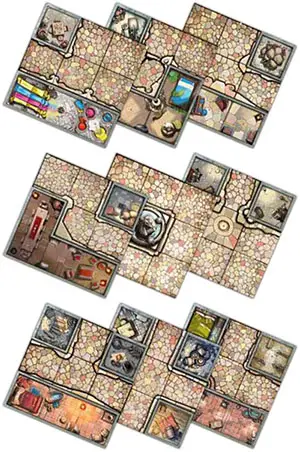
The Campaign Book contains detailed descriptions of all the scenarios that make up the campaign. Once a scenario has been chosen to play, it must be set up on the play area.
The entry for the scenario contains a detailed list of all the components used in it, as well as the quantity required. To ensure no component is left out of the scenario, first separate the amount of each component requested, before setting up the game board.
-
Tiles - Each side of the 9 gaming tiles displays an identifying code. Find the tiles listed in the scenario map and position them with the same orientation presented on the map.
-
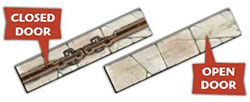
Doors - Place the door tokens as indicated on the scenario map. Notice that some door tokens start the game with the "closed" side up, while others start with the "open" side up.
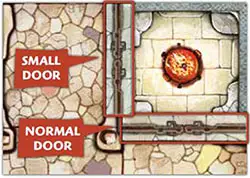
Some scenarios call for the use of small door tokens, when two doors share the same corner. This is done simply to facilitate the manipulation of the tokens, but the small doors work exactly the same way as the normal doors.
-
Portals - Place the portal tokens as indicated on the scenario map. There are two colors of portals, one on each side of the token, make sure to place each portal token with the correct side up.

-
Quest tokens - Most scenarios request that one or more of the Quest tokens be placed on the board facing up. Get the requested Quest tokens and place them in the indicated spaces, with the colored side up.
-
Exploration tokens - After making sure to put back in the box any remaining Quest tokens, shuffle the 14 Exploration tokens face down. Each scenario indicates the number of Exploration tokens that will be used in the game.
Randomly pick that number of tokens and place them in the indicated spaces on the board, face down. The remaining Exploration tokens should be placed back in the box, still face down so nobody knows their content.
-
Spawn tokens - Shuffle face down the 5 Spawn tokens. Separate the number of Spawn tokens requested by the scenario and place them in the spaces indicated on the map. Return any remaining Spawn tokens to the box, then flip up the tokens on the board.
-
Monsters - Each scenario lists the type and quantities of Monsters that take part in it. Gather the requested Monster figures and place them in the spaces indicated in the map. Also arrange the Monster cards of all the listed Monsters next to the game board, so that all players can see them.
Important: Each monster type has up to four cards, with each one representing that monster at a specific level. For all Monsters, use only the card for the level equal to the number of the scenario being played.
So, for example, when you're playing the 1st scenario in your campaign, all Monster cards should be at Level 1; but when you're playing your 3rd scenario, all Monster cards will be at Level 3 (use the "Level 2-3" cards).
-
Quest cards - In order to win a scenario, players must accomplish the feats listed on that scenario's Quest cards. Take the Quest cards listed in the scenario and arrange them next to the game board, so all the players can see them.
Some Quest cards may have one or two Reward cards associated with them in the scenario description, in which case, tuck the indicated Reward cards under that Quest card. Only the PvP Quest cards related to the Guilds that are actually being used are put into play.
-
Spawn tile - Place the spawn tile next to the game board.
-
Common Area - Place in a common area around the game board, within reach of all players, the piles of Wound tokens, Death tokens and coins, as well as the Attack and Defense dice.
-
Heroes Starting Areas - Indicated in the scenario map are the Starting Areas for each Guild. Each player is randomly assigned one of them.
Put one Guild token from each player in a dice bag or closed hand and randomly place one token next to each starting area, this will be the starting area for each Guild. Players must sit around the table in the same order as their starting areas.
Each player then places his Hero figures in any of the indicated spaces of his starting area, in any way he chooses (up to two figures may occupy the same Space).
On a 3-player game the Player 4 Starting Area is not used. On a 2-player game the Player 3 and Player 4 Starting Areas are not used.
The Game Board
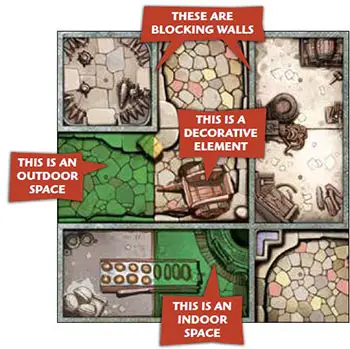
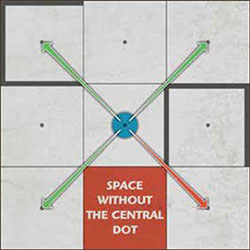
Arcadia is played on a game board consisting of several tiles arranged together according to the scenario map. These tiles represent the streets and buildings of the city of Arcadia. Each tile is divided into 9 equal Spaces, each with a dot marking its center. These spaces can be occupied by a maximum of two characters each.
Some Spaces are divided by walls which block Movement and Line of Sight. These blocking elements are identified by a gray hatching texture. The tiles also display several other decorative elements, which do not affect the game in any way and are there just to flesh out the setting.
A Space without the central dot is considered a blocking Space. Only these and elements with the identifying gray hatching texture are blocking elements, everything else can be ignored for gameplay purposes.
Important Terms
Character
A Hero or a Monster.
Ally
For a Hero, this is another Hero of the same Guild. For a Monster, this is any other Monster.
Enemy
For a Hero, this is any Hero from a different Guild and any Monster. For a Monster, this is any Hero.
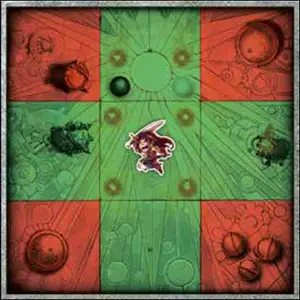
Close
Many rules and cards in the game refer to something being Close to something else. To be Close to something means to be either sharing the same Space, or to be on any of the four orthogonal Spaces that share an open edge with it.
- A Space that's diagonal from it is not Close.
- A Space whose shared edge is blocked by a wall or closed door is not Close.
Example: The green Spaces and any characters in them are considered to be Close to Grom, while the red Spaces are not.
The Player Turn
A game of Arcadia Quest is played over a series of Player Turns, in clockwise order. The first player takes his turn, then the player to his left takes his turn, and so on. This sequence goes on uninterrupted until a player wins the scenario, ending that game.
The first player to take his turn at the start of a scenario is the one sitting to the left of the player who won the last scenario. At the very first scenario of a campaign, however, the first player is chosen randomly.
When a player takes his turn, he may do one of two things:
- Activate a Hero.
- Rest his Guild.
Each turn, the player can only do one or the other, never both.
A. Hero Activation
The player chooses a single one of his Heroes to activate (activating the same Hero turn after turn is allowed). That Hero is now considered "active" and may perform, in any order, his Movement and one Attack, or one Attack and then his Movement.
The Movement can't be interrupted by the Attack and then resumed afterwards, it must be performed all at once either before or after the Attack. The Hero may also choose to perform just his Attack or just his Movement.
Movement
All Heroes have 3 Movement points available to use on each activation. By spending his available Movement points, a Character is able to move around the board. For each Movement point spent, the Character can either:
- Move one Space.
- Use a portal.
- Open or close a door at the edge of his Space.
The Character doesn't have to use all of his available Movement points, though any remaining points don't carry over to his next activation.
-
Move
Moving one Space means taking the active figure from its current Space to one of the four Close spaces that share an edge with it. Diagonal movement is not allowed. If there is a wall or a closed door between the Character and the Space he wishes to enter, that move is not possible.
-
Portals
Portals allow Characters to teleport from one side of the board to the other very quickly during their movement. A Character standing in a Space that contains a portal can spend one Movement point to immediately take his figure and place it in any other Space containing a portal of the same color.
If the destination Space is Blocked to the Character, he can't use that portal. If the Space is just Full, the portal can be used, though the Character must be able to end his Movement in a free Space (see next page). Using a portal does not trigger a Guard Reaction from a Close Monster.
-
Doors
Door tokens can be flipped to their closed or open position by spending one Movement point. The manipulated door must be at the edge of the space occupied by the active Character.
Closed doors work just like a wall, blocking Movement and Line of Sight. Open doors create a Space-wide passage between two Spaces, allowing Movement and Line of Sight.
Example: Below we see Grom performing three possible Movements:
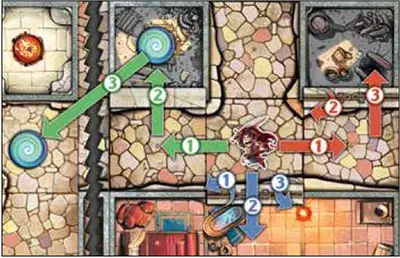
Green: 1 - Move one Space; 2 - Move one Space across an open door; 3 - Use a portal to go to a different part of the board.
Red: 1 - Move one Space; 2 - Flip open a door; 3 - Move one Space across the now open door.
Blue: 1 - Flip open a door; 2 - Move one Space across the now open door; 3 - Flip the door back closed.
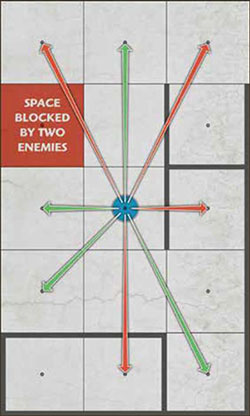
Full Or Blocked Spaces
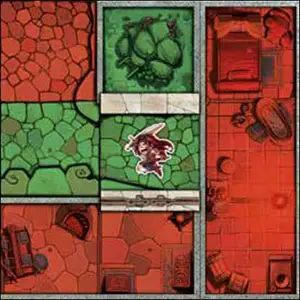
Each Space can contain a maximum of two Characters at a time. A Space with up to one character in it is still considered to be free, since other characters, enemy or allied, can still enter it and shoot through it normally.
Full - A Space with two characters in it is considered Full and nobody else can end their Movement inside it. If at least one of those two Characters is an ally of the active Character, he can move through the Space (though not end his Movement inside it) and it does not block his Line of Sight.
Blocked - A Space with two enemies of the active character is considered Blocked. That means that he can't move through it, and it blocks his Line of Sight.
Example: In the distribution above, Grom (a Blue Guild Hero) is the active character. He considers the green Spaces as Free, the yellow Spaces as Full and the red Spaces as Blocked.

Attack
The active Hero may attempt to attack an enemy of his choosing, be it a Monster or an enemy Hero. There are several different kinds of attack that Heroes can obtain throughout the game, with a variety of capabilities and special effects. To perform an attack, the player executes the following steps:
-
Select Attack Card
The player chooses one unexhausted Attack card located in the active Hero's inventory to use.
-
Confirm Target
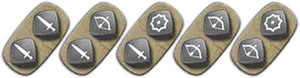
The player selects his target, making sure the Attack card he chose is able to reach it. There are two basic types of attack: Melee or Ranged. The type of an attack is indicated in the card being used to perform it.

Melee - A Melee attack can only target Enemies situated in a Space Close to the active Character.

Ranged - A Ranged attack can target Enemies on any Space on the board, as long as the active Character has a clear Line of Sight to it.
-
Exhaust Attack Card
Before resolving the attack, the player must exhaust the Attack card being used by placing one of his Guild tokens on top of it. This exhausts the card, showing that it has been used. An ex- hausted card cannot be used again to perform an attack until it is unexhausted.
-
Attack Dice Pool
The attacking player gathers a number of black Attack dice equal to the number indicated on the Attack card being used. If he's accessing any bonuses granted by other cards, those extra Attack dice are also added to his pool.
-
Defense Dice Pool
If the targeted Character has any Defense listed on his card, the player controlling him gathers a number of white Defense dice equal to that character's Defense.
If a targeted Hero possesses any cards with extra Defense icons, those dice are added as well. All of a Hero's cards with extra Defense icons always add to his Defense pool, whether they are exhausted or not.
-
Rolling Dice
The Attack dice and the Defense dice are rolled to decide the effect of the attack. What symbol constitutes a success on a die roll depends on the type of roll being made:
This symbol scores a successful hit in a Melee Attack roll.
This symbol scores a successful hit in a Ranged Attack roll.

This symbol scores a successful save in a Defense roll.

This symbol is a CRIT, and always counts as a success, no matter the type of roll.
Besides being a success itself, each CRIT result allows an extra die to be rolled, adding its result to the total. If that roll also results in a CRIT, another extra die is rolled, and so on. In some cases, rolling a CRIT also activates a special effect listed in the card being used.
-
Attack Results
Once all dice have been rolled, compare the number of hits scored by the attacker with the number of saves obtained by the target's Defense (if he had any). Each save cancels one hit.
If there are still any hits remaining, the target suffers a number of Wounds equal to the number of exceeding hits. Place that number of Wound tokens on the targeted Hero's card, or in case of a Monster, next to its figure.
-
Special Effects
Some cards possess special effects listed on them. These take effect following the parameters described in the card. Some effects always happen, whenever the card is used, while others need to be triggered by specific circumstances, like rolling hits or CRITS, or inflicting a Wound.
The timing of when these special effects take place can be very important at times. Unless stated otherwise, each special effect takes place immediately when its triggering event happens. If two effects would happen simultaneoulsy, the controlling player decides the order in which they are executed.
For example, if any CRITS are rolled when attacking with the Nova Bolt card, the attack may also target a second Enemy Close to the primary target. Both targets suffer the full number of hits obtained in the Attack roll.
No matter how many targets an attack affects, you always make only a single attack roll, and it applies to all targets. If any special effects change the amount of dice you should roll against a specific target, the quantity of dice rolled is determined by your primary target only, and is not affected by who your secondary target(s) may be.
-
Kills And Rewards
When a Character suffers a number of Wounds equal to his Life, he is killed. A killed Monster is removed from the board and placed in the first available slot in the Spawn Tile, while a killed Hero is placed on his Hero card.
When a Hero kills a Monster, his Guild immediately gets the number of coins listed in that Monster's card. When a Hero kills an enemy Hero, his Guild gets one coin. When a Monster kills a Hero, all other Guilds get one coin. If a Hero is killed by any other game circumstances, like traps, all other Guilds also get one coin.
The credit for killing a Character goes to the Character that inflicts the last Wound, responsible for removing the Character from the board. It does not matter if someone else inflicted more Wounds to the killed Character, all the credit goes to the one who scores the final blow!
When a Hero is killed, any Exploration tokens (including Quest tokens) he was carrying are placed on the Space he was occupying, and can then be picked up by another Hero normally.
If the Hero was killed by an enemy Hero, that Hero can automatically get one of those tokens and place it on his Hero card (he doesn't even have to be near the killed Hero). Each time a Hero is killed, place a Death token on his card to mark the number of times he dies. Death tokens cannot be moved or removed from a Hero until the next Upgrade Phase.
Line Of Sight
When using Ranged attacks, it is necessary to check whether or not the active Character has a clear Line of Sight to his target. A Ranged attack has no limitation in regards to distance, the only requirement for it is that there be a free Line of Sight (LOS) to the target.
To check the Line of Sight, draw an imaginary line from the center of the active Character's Space to the center of its target's Space. There is free Line of Sight if this line is not interrupted by any blocking element - a wall, a closed door or a Blocked Space.
The Line of Sight is not blocked if it only skims a blocking corner, passing at an angle exactly through the intersection of four Spaces where only one side is blocked. If both sides of the intersection are blocked, however, the Line of Sight is blocked.
Finally, the Line of Sight can never cross an area that is not part of the board. If it ever leaves the tiles, it is blocked.
Rest
Instead of Activating a Hero, a player can choose to spend his turn allowing his Heroes to Rest. When a Guild Rests, none of its Heroes are activated, they are not allowed to perform any Movement or Attacks whatsoever during this turn.
The Heroes rest and prepare themselves to continue their quest. The resting player may perform all of the following:
Unexhaust Cards
Remove all Guild tokens from all cards in the Guild's dashboard, unexhausting all of them. The cards are ready to be used once again in the following turns.
Reorganize Items
The player may reorganize his cards, moving any number of them among any of his Heroes. Death Curse cards, however, cannot be moved around.
Exploration tokens can also be moved among any of his Heroes, though Quest tokens cannot be moved and must remain with the Hero that collected it.
Resurrect Heroes
Any of the player's killed Heroes may be resurrected and brought back into the game. Remove all Wound tokens from that Hero only and place his figure back on the board.
The resurrected Hero can be placed either on that Guild's Starting Area, or Close to any allied Hero that was already on the board at the beginning of his turn.
The Monsters
There is no "Monster turn" in the game. The monsters swarming the streets and houses of Arcadia are passive agents in the scenarios. They are not actively hunting down the Heroes, but will do anything they can to stop their advance and retaliate their attacks.
Read here all detailed information about the monsters of Arcadia Quest.
Quests
Each scenario possesses a number of Quests that the Heroes must accomplish in order to be victorious.
The specific Quest cards for each scenario are listed in their description and they're divided into two kinds: Player vs. Player (PvP) and Player vs. Environment (PvE). PvP Quests relate to defeating the Heroes of the enemy Guilds.
PvE Quests are specific feats related to the scenario at hand, such as defeating a specific Monster or performing a specific task. During a scenario, as soon as a player accomplishes the task described in one of the Quest cards, he fulfills that Quest.
Place a Guild token belonging to that player on top of the Quest card to mark its completion. Each player can only fulfill each Quest a single time per scenario. For most Quests, however, it is possible for several different players to accomplish them during the scenario.
First Bonus
The first player to place his Guild token on one of the Quests immediately gets a "First Bonus" in the form of one coin. Any other player that subsequently accomplishes that same Quest does not get the bonus. Each of the Quest cards offers this bonus individually.
Reward Cards
Some Quests may have one or more Reward cards associated with them, as indicated in the Campaign Book. When a player accomplishes that Quest, his Guild immediately gets one of the available Reward cards.
The card is immediately placed in the inventory of any of that Guild's Heroes and it can be used normally from then on (the player can discard one of his Upgrade cards to make room for his new Reward card if necessary). If a player accomplishes a Quest, but all of its associated Reward cards have already been taken, he doesn't get any cards.
Winning The Scenario
In a 3 or 4-player game, the first Guild to accomplish 3 Quests is the winner of the scenario, as long as at least one of those is a PvE Quest. When a player fulfills his third Quest, at least one them being PvE, the scenario immediately ends and that player is victorious.
If a player has got three PvP Quests, he still needs to get a PvE Quests in order to win and end the scenario. He could also win with two PvE Quests and a single PvP one, or with two PvPs and one PvE.
In a 2-player game, victory is achieved by fulfilling only 2 Quests.
Note: It is impossible for a player to get the PvP Quest related to killing a Hero of his own Guild.
Coin Rewards
During their adventures, heroes accomplish many deeds that earn them not only renown, but also wealth and power. They gather coins for their Guild, that will help them acquire new equipment, weapons and abilities to help them in their ongoing campaign. A player's Guild can earn coins in several ways:
- Every time a Hero kills a Monster, his Guild gets the number of coins listed in that Monster's card.
- Every time a Hero kills an Enemy Hero, his Guild gets one coin.
- Every time a Hero is killed by a Monster or other neutral game element, all Guilds - except the one to which that Hero belongs - get one coin.
- Every time a Hero is the first in the scenario to accomplish each of the Quests, his Guild gets one coin.
- At the end of the scenario, each Guild gets one coin for each Quest it accomplished.
- At the end of the scenario, each Treasure Chest token in a Hero's possession gives the coin value listed on it to his Guild.
These rewards stack so, for example, if you were the first to kill a Green Guild Hero, you would immediately get one coin for killing an Enemy Hero, plus one coin for being the first to accomplish the "Kill a Hero from the Green Guild" Quest, and then at the end of the scenario you would get another coin for having accomplished that Quest.
If you killed more Green Guild Heroes during that scenario, you would only get one extra coin for each kill, since you had already accomplished the Quest.
Upgrade Phase
Once a scenario is over, and before the next one begins, the Upgrade Phase takes place. In this lull between the action, the Heroes improve themselves, get better equipment, lick their wounds and decide where they will go next.
Death Curses
Thanks to the Guilds' power, Heroes are able to come back to life with relative ease after being killed during their adventures.
However, losing one's life must not be taken lightly, for death still takes its toll. Any Hero that is killed during a scenario may suffer a debilitating curse. The more times he dies, the bigger the chance of suffering a grievous curse.
At the start of every Upgrade Phase, any Hero with a Death Curse card from a previous scenario returns it to the deck. The Death Curse deck is reshuffled and any Hero that received a Death token during the previous scenario receives a number of Death Curse cards equal to the number of Death tokens he possesses. Each Hero must keep the Death Curse card with the highest value among those he receives, discarding the others along with his
Death tokens. Each Death Curse card has a different effect described in it that will afflict the Hero throughout the next scenario. As indicated, some Death Curse cards are merely placed next to that Hero's card, while others must occupy one of that Hero's inventory slots.
In that case, it is possible to keep an upgrade card under it, though that card cannot be accessed until the curse is removed. The only way to remove a Death Curse card before the next Upgrade Phase is to use a Healing Potion token.
Upgrades
In the course of the Heroes' adventures in Arcadia, they become gradually more powerful, learning new tricks, new powers and getting hold of better weapons and equipment. The better a Guild performs in a scenario, the more resources it has to improve its Heroes for the next scenario.
During a scenario, each Guild earns coins for the feats it accomplishes, like killing enemies and fulfilling Quests. These coins are not used during the scenarios themselves, but will be very useful during each Upgrade Phase.
Shuffle the Upgrade deck corresponding to the number of the scenario that's just been completed (Level 1 deck after the first scenario, Level 2 deck after the second scenario, and so on). Each player is dealt 6 cards from that deck. He chooses 2 cards that he wants to reserve for himself and places them face down in front of him, passing the remaining cards to the player to his left.
From the new cards they received, each player reserves 2 more cards and passes the rest to the left. After that drafting is done, each player takes the 6 cards he ended up with and decides which ones he wants to purchase for his Heroes, using his Guild's coins. Each card has a listed cost, and during each Upgrade Phase each player can only purchase a maximum of 3 cards.
The remaining Upgrade cards are returned to the box and the spent coins are returned to the common pile. If a player doesn't spend all his coins in this purchase, he may save a single coin to spend in the next Upgrade Phase, though any coins beyond that are returned to the common pile.
Each player then distributes his new Upgrade cards among his Heroes, being allowed to completely rearrange all cards. If a Guild has more than 12 Upgrade cards, it will have to discard any excess cards.
Onwards!
For the next scenario to begin, remove any tokens from the Heroes (Wound, Exploration, etc). The player who won the previous scenario chooses the next scenario that will be played, obeying the campaign progression rules.
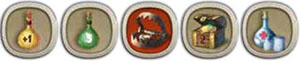
Exploration Tokens
During setup, several Exploration tokens are scattered around the board. According to the scenario instructions, some may be laid out face down and others are face up.
These tokens represent (mostly) useful things the Heroes may find while exploring the city, and even some important objectives they are trying to achieve in their quest!
Collecting an Exploration token does not require a Movement Point or any other action. Whenever an active Hero is standing in the same Space as an Exploration token, and there are no Enemies in that same Space, the Hero must automatically collect the token.
The token's content is revealed and it is then in possession of the Hero who collected it (place it on that Hero's card). Each Exploration token has a different effect, that only affects the Hero in possession of the token:
Quest - These are special Exploration tokens, whose workings are explained in each scenario.

Healing Potion - An active Hero may freely discard this token during his turn to recover all his Life, discarding any Wound tokens and Death Curse cards he may possess. This can't be used while an attack is being resolved.

Refreshing Potion - An active Hero may freely discard this token during his turn to unexhaust all of his cards, removing all Guild tokens from the cards belonging to that Hero.

Extra Turn Potion - The Hero may freely discard this token at the end of his turn to immediately perform another full turn. That same Hero is activated again normally.

Treasure Chest - At the end of the Scenario, each Treasure Chest token gives the Coin value listed on it to the Guild who possesses it.

Trap - The Hero who collects it immediately suffers an automatic Wound and the token is discarded.
Exploration tokens can be freely exchanged among a Guild's Heroes whenever that Guild Rests. Quest tokens, however, can't be exchanged. A killed Hero drops all of his Exploration tokens on the Space he occupied. If he was killed by an enemy Hero, that Hero can automatically get one of his Exploration tokens (even a Quest token).
Any Exploration token in possession of a Hero at the end of a scenario is returned to the game. Nobody starts a scenario in possession of Exploration.
Upgrade Cards
The Upgrade cards acquired by each Guild as the campaign progresses are what will truly set them apart from the rest. Through the use and combination of different cards, each Hero is able to use his natural characteristics to their full potential, or build up a whole unique new role for himself in the game.
Read here all detailed information about upgrade cards.
Campaign
As the Heroes accomplish their deeds, they gain notoriety, resources and possible allies. Arcadia tends to remember the accomplishments of adventurers and often times Heroes might find an unexpected aid along their path, depending on what they did before.
Some Quests, when fulfilled, reward the Guild who accomplished them with a Title. Each Title offers an advantage that this Guild will be able to enjoy when playing certain subsequent scenarios.
Most scenarios - with the exception of "District of Hammers", "Brightsun Arena" and "The Temple of Light" - have one Quest associated to a Title. When a Hero fulfills one of these Quests, his Guild receives the associated Title, which should be noted in the Campaign Sheet.
This Title has no effect on the current scenario, but it will grant an advantage if the player goes on to play a scenario that benefits from it.
Each scenario description specifies which of its Quests is associated to a Title, what is the advantage it brings, and which subsequent scenarios benefit from that Title. In addition, the advantage of each Title is also explained in the description of the scenarios where they can be used.
Read here all detailed information about the campaign.
End of the Game
Once the last scenario of the campaign has been played, Arcadia has finally been liberated!
The Guild that wins the last scenario is the winner, of the game.
Continue Reading


