"A Feast for Odin" is a saga in the form of a board game. You are reliving the cultural achievements, mercantile expeditions, and pillages of those tribes we know as "Vikings" today-a term that was used quite differently towards the end of the first millennium.
When the northerners went out for a raid, they used to say they headed out for a "viking". Their Scandinavian ancestors, however, were much more than just pirates. They were explorers and founders of states. Leif Eriksson is said to be the first European in America, long before Columbus.
In what is known today as Normandy, the intruders were not called Vikings but "Normans". One of them is the famous William the Conqueror who invaded England in 1066. He managed to do what the king of Norway failed to do only a few years prior: conquer the Throne of England.
The reason why the people of these times became such strong seafarers is due to their unfortunate agricultural situation. Crop shortfalls caused great distress.
Object of the Game
In this game, you will raid and explore new territories. You will also experience their day-to-day activities: collecting goods to achieve a financially secure position in society.
In the end, the player whose possessions bear the greatest value will be declared the winner.

Components
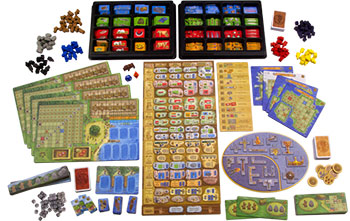
- 2 Dice
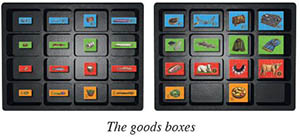
- 2 goods boxes to store the goods tiles
- 1 large action board with action spaces
- 4 home boards (one for each player)
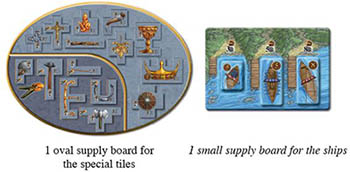
- 1 small supply board for the ships
- 4 two-sided exploration boards
- 1 oval supply board for the special tiles
- 15 special tiles
- 2 extension tiles to extend the action board
- 190 Occupation Tiles
- 47 red Weapon cards
- 346 goods tiles
- 1 large round overview tile
- 19 Building tiles
- 32 ship tiles
- Money
- 96 Wooden Goods (32x wood, 24x stone, and 40x ore)
- 48 Viking Tiles
- 1 brown start player moose
- 1 white round tracking cube
- 7 Thing Penalty tiles
- 12 plastic bags
- 1 appendix
- 1 almanac
Introduction
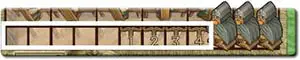
This game comes with a large number of goods tiles. In order to save you the hassle of storing the tiles in an assortment of plastic bags, we have provided two goods boxes so that you can better store and organize the goods tiles.
Each row stores goods of the same color and each column stores goods of the same shape. Note that orange and red goods of the same shape are on two sides of the same tile, as are green and blue goods. Divide these goods (except for sheep and cattle) into two piles and place each pile in its designated compartment.


For example, every "beans" tile has milk on the other side.
The game provides more tiles than you would normally need, even more than you can fit into the goods boxes. Store any excess tiles as a reserve in the provided bags.
The following table shows how you should organize the goods tiles in the goods boxes. The goods boxes have alternating small and large compartments. In the first goods box, the small compartments are reserved for goods of the size of peas and beans, and the large ones are reserved for goods of the size of flax and grain.
In the second goods box, the small compartments are meant for goods of the size of cabbage and fruits, and the large ones for goods of the size of sheep and cattle.
General Overview
If you are new to the game, here is a guide to understand the general overview.
Setup
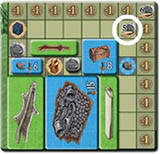
Action Board and Goods Boxes
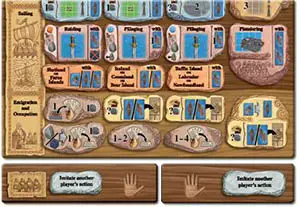
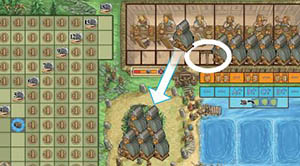
Place the large action board in the middle of the table. In a 4-player game, add the two extension tiles to the game board as shown in the illustration, randomly choosing which side is face up. (In games with 1 to 3 players, you do not need these tiles).
Open the goods boxes and place them on the table next to each other, so that all players can easily access them.
Supply Boards for Special Tiles and Ships
Place the supply boards for special tiles and ships next to the goods boxes. Aside from the blue standard goods in the top row of the goods boxes, there is a number of special tiles. Unlike the standard goods, which are supposed to be in unlimited supply, there is only one copy of each special tile. They are considered to be blue and follow the same rules as the blue good tiles. (Also, the special tiles are the same color on both sides).
Place the special tiles on the oval supply board. The other supply board is for the three types of ships. Sort the ships by type and place them face up in separate stacks on the supply board.
Occupation and Weapon Cards
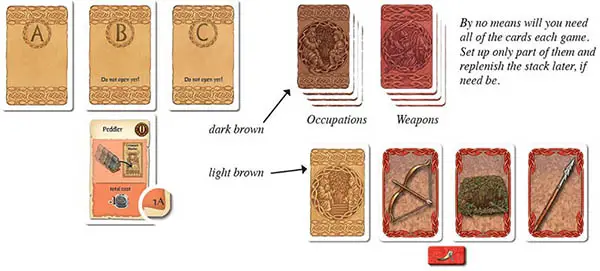
There is an "A", "B" or "C" at the bottom right of the occupation cards, indicating to which deck each card belongs. We recommend beginners only use cards from deck A, while experienced players use cards from both deck B and C, or just shuffle every deck together. Sort the occupation cards according to their light or dark brown back to form two stacks.
An illustration at the top left of the game board indicates what you receive at the start of the game: Each player draws 1 starting card from the stack of light brown occupation cards into their hand. (After that, remove the remaining light brown cards from the game). Each player takes 1 "bow and arrow", 1 "snare", and 1 "spear" weapon card, as well as 1 "mead" goods tile.
Shuffle the remaining weapon cards and place them face down in a stack on the table. Shuffle the occupation cards with a dark brown back and also place them face down in a stack on the table.
Your Personal Boards and the Vikings
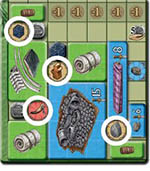
Each player takes a home board.
The home boards are two-sided. One side is for a game lasting 7 rounds (long game), the other for a game lasting over 6 rounds (short game). Decide how many rounds you wish to play and place the according side face up.
Place a Viking on each numbered space of the "Banquet Table" track (at the top right) of your home board and the rest on the "Thing Square" (the Vikings' meeting place). The latter are your starting Vikings. (Consequently, in the short game, you start the game with one more Viking).
To the right of the Thing Square, there is the bay with landing stages for ships. To the left of the Thing Square, there is the main placement area for your valuable goods.

The long game is the main version of the game. We recommend the short game to all players who would like to familiarize themselves with the game mechanics first. On the other hand, veteran players who know every aspect of the game by heart might find the shorter version more challenging.
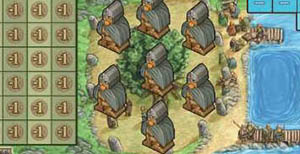
Mountain Strips, Building Resources, And Silver
Shuffle the eight mountain strips and turn two of them face up (three strips in a 4-player game). The remaining mountain strips form a face down draw pile. Place the depicted goods on the spaces of the face up mountain strips.
Sort the remaining wood, stone, ore, and silver tokens by type and place them ready at hand.
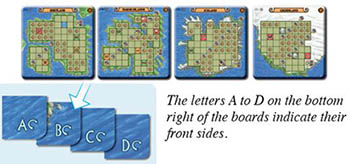
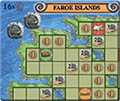
Exploration Boards
Lay out the four exploration boards with their "Shetland", "Faroe Islands", "Iceland", and "Greenland" sides facing up in that order.
Overview Tiles
Place the round overview tile on the table and place the white round tracking cube on space 1.
Building Tiles
Place the "shed", "stone house", and "long house" building tiles in separate stacks on the table.
Game Play
Randomly determine who receives the grey start player moose.
The long game is played over 7 rounds (the short game over 6 rounds). Each round consists of the following 12 phases, which are played one after another in that order.
Phase 1: A New Viking
Take the leftmost Viking from the "Banquet Table" of your home board and place it with your other Vikings on the Thing Square.
(The now empty space indicates the number of the current round).
Each round, including the first, you receive a new Viking.
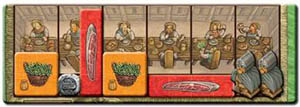
Phase 2: Harvest
Below the new round number, there is note indicating what you will receive during harvest.
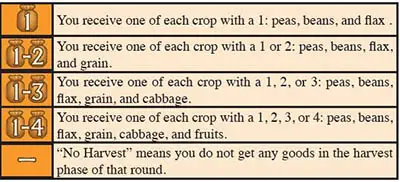
Long game:

- During harvest, you can only get orange goods.
- Take the goods from the general supply and place them in your personal supply.
The numbers on the tiles mean:
Phase 3: Turn Exploration Boards and Placing Silver
In the action phase (phase 5), you can use your ships to claim additional placement areas on the exploration boards. Some exploration boards are available at the start, others become available later.
This is why each exploration board that has not been claimed by a player is turned to its back side at some point. A symbol below the harvest notes on your home board indicates when to turn each exploration board.
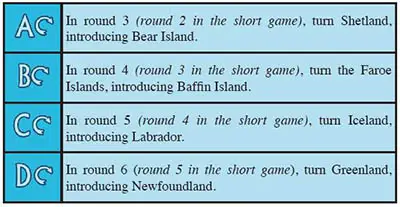
Increasing the Value of an Unclaimed Exploration Board
Each round in which you should turn an exploration board (short game: rounds 2 to 5; long game: rounds 3 to 6), place 2 silver on each unclaimed exploration board not being turned. Exploration boards that players have already taken do not receive silver.
- When you turn an exploration board with silver on it, return the silver to the general supply.
- Place silver on the other exploration boards even if the exploration board that is supposed to be turned has already been claimed by a player.
- There is no phase 3 in the first and last round. In those rounds, no exploration board is turned and no silver is placed on any of them.
Example: In round 3, 2 silver are placed on the Faroe Islands. In round 4, the Faroe Islands are turned to become Baffin Island and the 2 silver placed there last round are returned to the general supply.
When you explain the game, it is a good idea to mention the goal of the game first and the phases of a round shortly after. You can show that the game is played over six or seven rounds by pointing the players to the seven Vikings on the "Banquet Table".
Once they are focused on that, you can easily explain the first three phases with the information provided below it.
Phase 4: Draw a New Weapon
Each players draws a new weapon card and places it face up in their supply.
You could draw a long sword, the only type of weapon you do not have from the start.
Phase 5: Actions
Beginning with the start player and in clockwise order, take one or more Vikings from your Thing Square and place them on exactly one unoccupied action space of the action board. Continue doing so until all players have passed or placed all of their available Vikings.
You can pass even if you have Vikings left in your Thing Square. Once you have passed, you cannot place any more Vikings that round. (When you have none left, you must pass).
Important: each action space can only be occupied once per round.
Another important rule: each action space in the first column requires one Viking to activate. Each action space in the second/third/fourth column requires two/three/four Vikings, respectively.
The effect of each action space is explained in the next major section (starting on page 14). You can tell what most effects do from their illustration.
You must use an action space immediately after you occupy it. To occupy an action space, you must use at least one of its effects (paying a cost is also considered an effect in and of itself).
The action spaces on the action board are organized in groups of similar effects. The wood grain background helps to emphasize this. The type of action spaces in each group is stated in the left margin of the action board.
Also, note the actions you can take at any time during the course of the game.
During your first play, you might be overwhelmed by the sheer number of action spaces. Concentrate in the early game on exploring the available options.
Use the first few rounds to prepare yourself for what is to come. You will take the really important and crucial actions later.
The action phase ends as soon as all players have placed all of their Vikings or passed.
Due to the varying number of Vikings that are required on each action space, some players can run out of Vikings earlier than others. A player without Vikings must pass. Continue until all players have passed.
Phase 6: Determine Start Player
The player who placed Vikings last in the action phase receives the start player moose and will be the start player in the next action phase.
Phase 7: Income
This game differentiates between income and bonuses. Income is paid in silver (this phase), bonuses are paid in goods (phase 10).
During the game, you will place green, blue goods tiles, ore tokens and silver coins on your home board. The smallest uncovered value on the "income diagonal" indicates the amount of silver you receive this phase.
In this example, "5" is the smallest uncovered value, so you would receive an income of 5 silver.
Important: You must cover the income values in ascending diagonal order. This is explained further on page 12 (Anytime Actions).
By claiming exploration boards, you can produce additional income. Income from an exploration board is handled like income from your home board.
When explaining the game, now is a good time to explain, in detail, the placement of green and blue goods tiles on your home board. Income is where these rules really matter a lot.
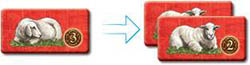
Phase 8: Animal Breeding
At the bottom right of your home board, you can find storage spaces (stables) for your "sheep" and "cattle" goods tiles. Please note that these tiles show the same animal on both sides-one side shows the non-pregnant animal, the other the pregnant one.
In this phase, your animals breed, according to the following rules:
-
If you have at least 1 sheep with the "pregnant sheep" side facing up, turn all of them to the other side and take 1 "sheep" tile for each tile you just turned (and place them with the "non- pregnant" side facing up in your stable).
-
If you have at least 2 sheep but no "pregnant sheep", turn 1 of them to the "pregnant sheep" side.
The same applies to cattle.
Consequently, your sheep and cattle can breed every 2 rounds.
Examples Of Animal Breeding:
- You have three sheep, one of which is pregnant. The pregnant one gets a newborn, the other two remain non-pregnant. Afterward you have four non-pregnant sheep.
- You have four non-pregnant sheep. Still, you can only turn one of them to the pregnant side.
- You have two sheep, one of which is pregnant. During the action phase, you spend the non-pregnant one. In the breeding phase of that round, you are now left with a single pregnant sheep. It still receives a newborn, even though it is the only sheep in the stable.
Phase 9: Feast
This phase focuses on the spaces of the "Banquet Table" track with no Vikings.
In this example: 3 spaces have Vikings on them, 9 are empty.
Place orange and red food tiles from your supply (or stable) and/or "1 silver" coins on each empty space of the "Banquet Table", according to the following rules:
-
Orange tiles (farm products) cannot be placed next to each other.
These rules are also depicted below the Banquet Table.
-
Red tiles (animal products) also cannot be placed next to each other.
-
Silver coins can be placed next to each other. (Ore cannot be placed on the "Banquet Table").
-
One tile of each type may be placed horizontally to take up more space at the table (like salt meat in the example below). All other tiles of that type must be placed vertically (square tiles are exempt from this rule, as it does not matter).
You should serve salt meat only once per feast to be efficient. Bean dishes, on the other hand, can be served multiple times without penalty.
Every tile you place on the "Banquet Table" must cover at least one of the squares below the table and fit in the allowed space (it cannot overhang). If you are not careful, you may have to inefficiently place several tiles vertically to follow this rule.
Thing Penalty
For each space of your "Banquet Table" on which you could not or did not want to place anything, you must take a "Thing Penalty" tile and place it in your supply. You must keep these tiles for the rest of the game. (This should not happen too often, because the feast happens after you receive income. Income should always provide enough silver to cover the spaces).

At the end of the game, you lose 3 points for each penalty tile you have.
At the end of this phase, move the goods on your "Banquet Table" to the general supply.
This empty space means you must take a penalty tile.
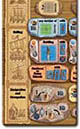
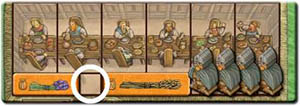
Phase 10: Bonus
Some spaces in the placement area of your home board show a goods symbol. These spaces count as already covered, but you can cover them with goods tiles, if need be (according to the placement rules). If you leave a goods space uncovered, but instead cover the 8 spaces around it, you will receive that good as a bonus each round.

The depicted ore space is on the edge of the placement area, so you only need to cover five spaces around it to receive ore as a bonus.
Tip for experienced players: if you place goods tiles in your placement area before the income phase, you will then receive silver that you can use right away to possibly get bonuses as well. (For instance, the silver that enabled the ore bonus in the example above could have been silver the player received that round).
The player whose home board is shown to the left would receive 1 mead, 1 wood, 1 stone, and 1 ore each round.
You receive your bonus all at the same time.
Phase 11: Update and Add new Mountain Strips
Mountain strips provide building resources that you can get during the action phase.

Acquire your resources here.
In this phase, remove the leftmost resource (i.e., closest to the arrow) from each face-up mountain strip and return it to the general supply (this can be wood, stone, ore or silver).
If all spaces are empty, remove the mountain strip.
Then turn a new mountain strip face up and place the depicted goods on it. (This way there can be more face-up mountain strips than at the start of the game).

At the left, the mountain strip at the top is about to be removed. At the right, the mountain strip at the bottom has just been added.
In the 4-player long game, there are not enough mountain strips for all 7 rounds. You simply do not add any in round 7.
Phase 12: Remove Placed Vikings from the Action Board
Return your Vikings from the action board to your Thing Square. (Then proceed with phase 1 of the next round).
Anytime Actions
There is a variety of actions you can take literally at any time during the game (usually even during a main action).
Here you find a detailed list of all anytime actions.
The Action Spaces
The action board features a variety of action spaces. (How and when to use them has been explained in the "Phase 5: Actions").
Here you find a detailed list of all action spaces.
Card Effects
Here you find a detailed list of the occupation card effects.
Running Out Op Components
For now, you can skip the following section. Come back to it if you run out of components. There are only a few components that are limited by the provided amounts.
Houses: There is a limited number of sheds and houses in the game. If you run out, you may not take any more of those tiles.
Exploration boards: Since there are only four exploration boards, players may only explore up to four times during the course of the game.
Ships, goods tiles, building resources, and weapon cards are considered to have an unlimited supply.
Ships: Improvise if you run out of a certain type of ship.
Goods tiles: If you run out of goods, you could return goods to the general supply from sections of your placement areas that have already been fully covered. You can then either cover them with other goods or silver, or simply remember they were already covered.
Building resources: In case you run out of building resources, look at the back sides of the seven "Thing Penalty" tiles and take the appropriate one as replacement.

This tile stands for 5 stone.
Weapon cards: When the draw pile runs out of cards, shuffle the discard pile and form a new face down draw pile. If you are about to receive a consolatory weapon and you cannot find a proper one in both the discard and draw pile, proceed as with the building resources. Each penalty tile is worth 3 weapons of one kind.
End of the Game
The game ends immediately after the Feast phase of the final round. You do not receive any bonus during the final round.
If you have sheds or stone houses, you can place wood and stone left in your supply on the designated spaces of those tiles. (The tiles show you exactly how many they require).
If you have goods tiles left in your supply, you can still place them in the placement areas of your boards and houses, if possible.
Then score your points using the provided scoring pad.

The player whose possessions are worth the most wins the game. The points values of your boards and tiles are printed on the shield icons.
In case of a tie, there are multiple winners.
Positive Points
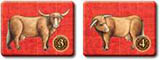
- Ships: each whaling boat is worth 3 points, each knarr 5 points, and each longship 8 points.
- Emigrations: each knarr used for emigration is worth 18 points, each such longship 21 points.
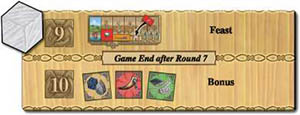
- Exploration: The Exploration boards vary in value (4 to 38 points). Their value is printed in the top right corner.
- Sheds and houses: sheds are worth 8 points, stone houses 10 points, and long houses 17 points, as printed in the top right corner.
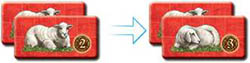
- Sheep and cattle: each sheep is worth 2 points (3 points if pregnant), each cattle is worth 3 points (4 points if pregnant).
- Occupations: the value of your occupation cards is printed in the top right corner. Only occupation cards in play count.
- Silver: determine the total of silver in your supply. Silver on your boards is worthless.
- Final income: instead of paying out the income of the final round, you can write it down in the "Final Income" category of
Negative Points
- From your total of positive points, subtract the negative points for your boards and buildings, including your home board and exploration boards as well as your sheds and houses. (Also, do not forget your Thing Penalties, if any).
- It may occur that a player places goods tiles adjacent to each other even though they were not allowed to do so. Correct the mistake immediately when that happens. If you notice a mistake too late, you can punish the culprit during the scoring with 1 Thing Penalty for each wrongly placed pair of tiles. Here are 2 examples:

In the example on the left, a player has placed three green goods in a row, so there are two green-green pairs. This is punishable by two Thing Penalties for a total of -6 points.
In the example on the right, the mistake is more severe. The three goods have been placed such that any two of them are adjacent to each other. So there are three green-green pairs, which is punishable by three Thing Penalties for a total of -9 points.
Continue Reading