The action board features a variety of action spaces.

General Rule:
Some actions require you to have a specific type of ship. You may use the same ship multiple times per round for different actions.
Example: You have a single longship in your bay. With this ship, you can
- head out on a raid first
- then explore "Newfoundland",
- and emigrate that same round.
All the actions mentioned in the example above are explained on the following pages. Most action spaces (like the production spaces) have a rather simple effect, so we will explain those first.
Production Spaces

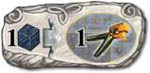
On the green spaces of the action board, you receive exactly what is depicted, e.g., 1 stockfish.
In particular:
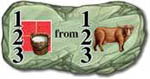
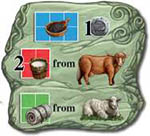
Here, you receive 1 milk if you have 1 cattle, 2 milk if you have 2 cattle, and 3 milk if you have 3 or more cattle.
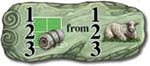
Here, you receive 1 wool if you have 1 sheep, 2 wool if you have 2 sheep, and 3 wool if you have 3 or more sheep.
Here, you receive 1 spices and 1 silver. Additionally, you receive 2 milk if you have at least 1 cattle, and 1 wool if you have at least 1 sheep.
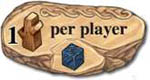
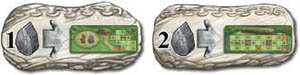
On this space, you receive wood and ore from the general supply. While you only ever get 1 ore here, you also get 1 wood per player: in a 1/2/3/4 player game, this is 1/2/3/4 wood.
In general:
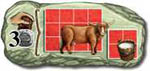
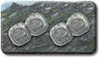
If a good costs silver, the price is printed below a purse icon at the left of the action space. 1 cattle and 1 milk cost a total of 3 silver.
Tip: Most new players overrate the Weekly Market. Your Vikings are well provided for during the harvests. Usually, you will not need much more food than that.
On the other hand, they tend to overlook the long-term potential of animal breeding.
Exchange Spaces
The dark yellow action spaces relate to house building, ship building, and crafting. On these, you exchange something (usually building resources from your supply) for something else, but only once. In particular:
On the action space at the top left of the game board, you can pay 2 wood to receive a shed.
Note that the number of shed and house tiles is limited.
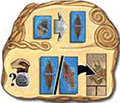
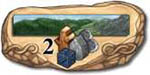
Here, you may build the indicated ship (and only that ship) for 1 or 2 wood:

The number of ships is not limited. The only limitation is the number of landing stages in your bay: you can only have up to 3 whaling boats and up to 4 large ships (knarrs, longships).
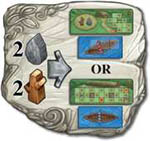
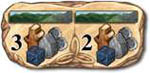
On this space, you can choose what to get for 2 stone and 2 wood: either you take a stone house and a longship, or a long house and a knarr.
Here, you may exchange an orange "flax" tile for the larger and more valuable green "linen" tile.
On this space, you may spend green "hide" and "linen" tiles to make "clothing", for which you also receive 2 silver.
At the Smithy, you may spend 1 ore to receive a tile with a forge tongs symbol.
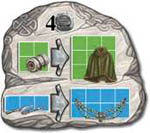
Here, you receive 4 silver. Additionally, you may exchange a green "wool" tile for a "robe" tile, and/or a blue "silverware" tile for a "jewelry" tile.

On these three action spaces, you can exchange stone and/or wood or ore for blue "rune stone" and "chest" tiles. On the first two of these spaces, you also receive 1 silver.
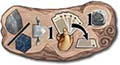
Playing a single occupation costs 1 stone or 1 ore, and you receive 1 silver.
Here, you may exchange a whaling boat* for a knarr (if you wish), before using that knarr or another large ship to emigrate.
If the whaling boat you exchange has ore on it, you lose that ore.
Mountain Actions
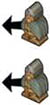
Some of the golden brown action spaces allow you to take building resources and silver from mountain strips.

When taking resources from a mountain strip, always take them from left to right (i.e., goods closest to the arrow first).
The 2 silver at the right are considered a single item. After taking the last "2 silver", remove the mountain strip from the game.
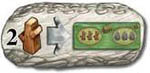
The "Take 2 Building Resources" action allows you to take (up to) 2 items from one mountain strip of your choice.
You may choose a mountain strip with fewer resources than you are allowed to take (you may not take resources from another mountain strip to make up for it).
The "Take 3+2 Building Resources" action allows you to take (up to) 3 items from one mountain strip and (up to) 2 items from another mountain strip. You may not take 5 resources from the same mountain strip.

For instance, you could take 3 wood from one mountain strip, and an ore and the silver from another.
The "Take 2+2+2+2 Building Resources" action allows you to take (up to) 2 items each from (up to) four mountain strips. Here, you cannot take 4 or 6 items from one mountain strip.
Trading Actions
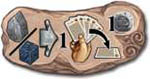
The other golden brown action spaces allow you to exchange goods in your supply for more valuable ones.
The "Up 1 Good" action allows you to exchange exactly 1 goods tile for the next more valuable one: either an orange for a red one, or a red for a green one, or a green for a blue one. The old and new tile must have the same shape and dimensions.
The "Up 2 Goods" action allows you to exchange up to 2 goods tiles for the next more valuable one. Both tiles may be of the same type, but you may not "upgrade" a single tile twice (from orange to green, or from red to blue).
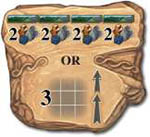
The "Up Up 2Goods" action allows you to "upgrade" 2 goods twice: you may exchange an orange good for a green one, or a red good for a blue one. (In addition, you also take 4 resources from one mountain strip).
Other action spaces on the game action board allow you to exchange more than 2 goods.
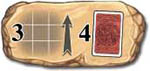
One of the action spaces described here also provides 4 weapon cards. This means you draw 4 random weapons (and place them face up in front of you).
Before you exchange your goods for more valuable ones via "ft Goods" actions, check how many and which goods you will need for the Feast phase. We recommend you place those goods on the "Banquet Table" during the action phase ahead of time.
Blue, yellow, red, and brown action spaces are special. Blue stands for overseas trading, yellow for emigration, red for hunting, raiding, and pillaging. Brown is the color of occupation cards.
Knarr Action Spaces
Blue is the color of action spaces that require a knarr, providing blue luxury goods for trade.
Overseas Trading
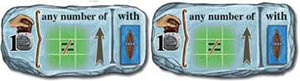
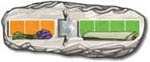
The two "Overseas Trading" action spaces are located in the first and second column of the action board. On overseas trading spaces, you can pay 1 silver to turn any number of different green goods tiles to their blue side. To do so, however, you must have at least one knarr in your bay.
Green tiles in the placement areas of your boards may not be turned to their blue sides (you may not bypass the rule that disallows the placement of green tiles next to each other).
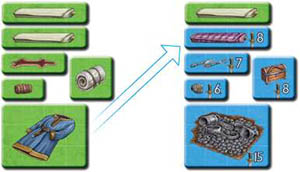
In this example, during a single "Overseas Trading" action, you may turn 1 oil, 1 hide, 1 wool, 1 linen, and 1 clothing to their blue sides. (The other linen tile must remain on its green side).
Special Sale
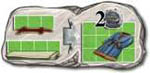
The "Special Sale" action space is located in the third column of the action board.

Each special tile shows a silver cost. If you have at least one knarr, you can buy (up to) 2 special tiles by paying their cost. (The English Crown is the only special tile that may not be bought.
We did ask Her Majesty Queen Elizabeth II when she was in Frankfurt on June 25th, 2015. She rejected our request in her usual polite manner).
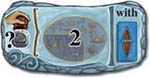
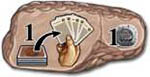
Emigration
Yellow is the color of emigration. On "Emigration" action spaces, you may turn a knarr or a longship in your possession to its back side and place it on the leftmost space of your "Banquet Table". This tile is no longer a ship, but it reduces the amount of food you have to serve during a feast.
The next time you emigrate, place the second ship to the right of the first one. As you can see, each time you emigrate, you need less food for the feast. In this example, the next feast will only require covering 5 spaces.
To take this action, you must pay an amount of silver equal to the current round.
In the very rare case that you emigrated so frequently that there is no more space for another ship on the Banquet Table, you cannot take the emigration action anymore.
You do not lose any Vikings in the process of emigration. (Your Viking figures represent the leaders of your tribes, and they would never abandon you).
Raiding, Pillaging, And Hunting
Red action spaces provide actions that require you to roll a die.

The orange eight-sided die is used on action spaces that depict an orange die symbol. The same applies to the blue twelve-sided die on action spaces with a blue die symbol.
In General:
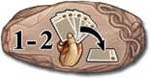
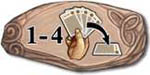
When raiding (with the orange die) and pillaging (with the blue die), you want to roll high.
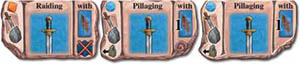
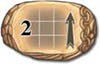
On spaces with a die symbol at the top of the action board, you want to roll low.

In each case, you may roll the die up to three times. (Each re-roll invalidates the previous roll). You can stop rolling at any time. When finished (and after modifying the roll, if need be), announce your battle result. Then declare your die action a success or failure.
Raiding
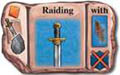
To take a "Raiding" action, you must have at least one longship. It does not matter whether or not there is ore on the ship (see "Anytime Actions"), because you may not use it for this action anyway.
Success
Every blue goods tile has a sword value. After you roll the orange eight-sided die, you can take exactly one blue goods tile with a sword value equal to or lower than you rolled.
Each stone and "long sword" weapon card you spend increases your die roll by 1 (even above 8). This modified value is considered your "battle result".
Failure
Your raid automatically fails if your battle result is 5 or less.
Regardless of the result, you may willingly declare your raid a failure. Upon failure, you receive a consolatory 1 stone and 1 long sword**** from the general supply.

At the left of the "Raiding" action space, there are stone and sword symbols. These symbols serve two purposes.
- They show which goods and weapons you may spend to increase your roll.
- They remind you of the consolation prize you receive upon failure.
The symbols on the "Pillaging" and "Hunting" action spaces are to be treated the same way.
Pillaging
As with "Raiding", you want to roll high when pillaging.
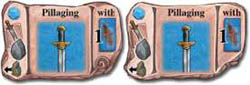
To do so, you must have a longship. If you have more than one longship, you must use the longship with the most ore on it.
Success
When pillaging, add 1 to your dice roll for each ore on your longship (even above 12), keeping the ore. After you roll the blue twelve-sided die, you can take exactly one blue goods tile with a sword value equal to or lower than you rolled.
You can spend stone and long swords from your supply to increase the roll by 1 per item spent. This modified value is considered your "battle result".
Failure
Your raid automatically fails if your battle result is 5 or less. You may willingly declare it a failure, regardless of the result.
Upon failure, you receive a consolatory 1 stone and 1 long sword from the general supply. Additionally, after each failed pillaging attempt, you may return 1 Viking from the respective action space to your Thing Square and use it again later that round.

The English Crown has the highest sword value and is worth 2 points.

At the bottom left of the "Pillaging" action spaces, you can see a Viking symbol and an arrow pointing left. This is a reminder of the consolatory Viking you receive upon failure.
Let us talk a little bit about the luck factor in this game. Rolling dice is frowned upon in development games-with good reason. In this game, failure is designed such that it is only marginally worse than, for example, taking 2 stone (compared to stone and long sword) or 2 wood (see failure in the next section) from a mountain strip. When you fail, your next roll is more likely to succeed. Bad rolls do not prevent success, they just delay it a little. For me, it is an essential part of the game to provide that feeling of adventure.
Hunting Game, Laying A Snare And Whaling
When hunting game and laying a snare, you roll the orange eight- sided die. When whaling, you roll the blue twelve-sided die. In all of these cases, you want to roll low.
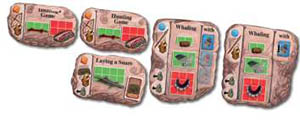
Success
When whaling, reduce the value of your roll by one for each ore (even preprinted ore) on the whaling boat(s) you are using to perform the action (you keep the ore). This can lead to a negative value; any negative value is treated as a 0.
Then, in every case (Hunting Game, Laying a Snare and whaling), pay a number of wood and/or proper weapons equal to this value to declare a successful action and receive the reward depicted on the action space.
Failure
If you declare your attempt at this action a failure, you do not have to pay anything. (You may not declare a result of 0 as a failure). Upon failure, you receive a consolatory 1 wood and 1 weapon of the proper type from the general supply. Additionally, when you fail laying a snare, you may return 1 Viking from the action space to your Thing Square. When you fail whaling, you may even return 2 Vikings. You may use the returned Vikings again later that round.
When given the choice to spend a weapon instead of wood, spend the weapon. As with real life, wood is more versatile than weapons.
If your battle result is 0, you may not declare the attempt a failure.
You must stop immediately, and you may not re-roll.
At the bottom left of the "Whaling" action spaces, you can see two Viking symbols and an arrow pointing left.
This reminds you of the 2 consolatory Vikings you can return to your Thing Square on failure.
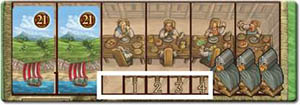
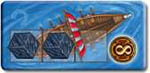
Peculiarities Of Whaling
There are two different "Whaling" action spaces.
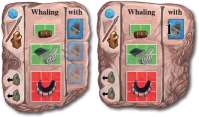
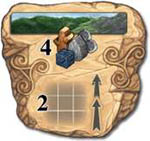
On the major "Whaling" action space (at the left), you can use one to three of your whaling boats. In column 4 (at the right), there is a minor "Whaling" action space, on which you can only use a single whaling boat.
You may wonder why whaling with 3 whaling boats only requires 3 Vikings, while whaling with a single whaling boat requires 4. The latter is only a minor action space, meaning it is intended for players for whom whaling is just a side project, since they have so few whaling boats.
Similarly, there are two types of action spaces that require a longship. Pillaging works best with longships that are equipped with lots of ore. Raiding and Plundering can be done with longships that are low on ore.

The "Plundering" action space is also considered a red action space.
Here, you can extort ransom money in the form of a blue "silver hoard" goods tile without battle-but you must have at least two longships to do so.
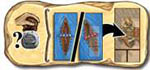
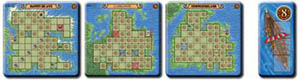
Exploration
Orange is the color of exploration. By exploring, you may add exploration boards to your home board to gain additional placement areas. There are four unique exploration boards- which side faces up depends on the current round (see phase 3 of a round). When taking an exploration action, place the required number of Vikings on the action space and take the corresponding exploration board.
If there is silver on the exploration board you claim, place it in your supply.
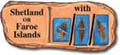
In order to take "Shetland" or "Faroe Islands" exploration board, you must have a whaling boat, knarr, or longship, and you must place 1 Viking. This is only possible on the action space requiring 1 Viking.
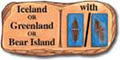
"Iceland", "Greenland", and "Bear Island" each require a knarr or longship, as well as 2 Vikings.

Places on the American continent ("Baffin Island", "Labrador", and "Newfoundland") each require 3 Vikings and a longship.
In all of the above cases, you keep the ship you explore with.
Occupation
You start the game with a single light brown occupation card (see Setup), which you keep hidden in your hand. During the game, you will receive additional dark brown occupation cards. You must play an occupation card before you can use its effect (see also the following section "About the Occupation Card Effects").
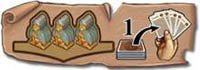
On this action space, you draw a random dark brown occupation card from the draw pile and put it into your hand. Additionally, you receive 1 silver.
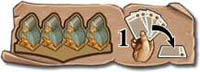
Here, you may pay 1 stone or 1 ore to play an occupation card from your hand. Additionally, you receive 1 silver.
Here, you may play up to 2 occupation cards from your hand, one after another.
On this action space, you may play up to 4 occupation cards from your hand, one after another.
Bonus for Placing Three Vikings
Each time you place the three required Vikings on an action space in the third column, before taking the action, you receive a dark brown occupation card from the draw pile into your hand. You may look at that card immediately. (This bonus is only available on action spaces in the third column).
The previously mentioned action space is located in the third column. It is the only action space, on which you may draw an occupation card and play it right away.
Bonus for Placing Four Vikings
Each time you place the four required Vikings on an action space in the fourth column, before or after taking the action, you may play an occupation card from your hand. (This bonus is only available on action spaces in the fourth column).
- You can use the effect of the played card immediately.
- If you do not have any occupation cards left in your hand, you cannot play one, obviously.
Continue Reading