It is the beginning of the Meiji era. Once just a sleepy fishing village, the opening of foreign trade in Yokoha- ma and the decline of Edo led Yokohama to become the premier hub of trade in all of Japan. During this period, Japanese products such as copper and raw silk were established in Yokohama to be exported to foreign countries.
In addition, foreign technology and culture were incorporated into Japan, and modernization slow- ly swept over the streets of the city. Behind all of these incredible developments were the capable merchants of Yokohama.
Each player is a merchant of Yokohama, vying to gain fame through successful business ventures.
There are a number of ways to gain fame, such as dis- playing trade goods ordered by foreign traders, learning foreign technology, and developing the city by building shophouses and trading houses. In order to fulfill these goals, players will need to roam the streets of Yokoha- ma, gaining its various benefits. In addition, it may be a good idea to seek the cooperation of foreign mercenar-
Which player will become the most capable merchant of Yokohama?
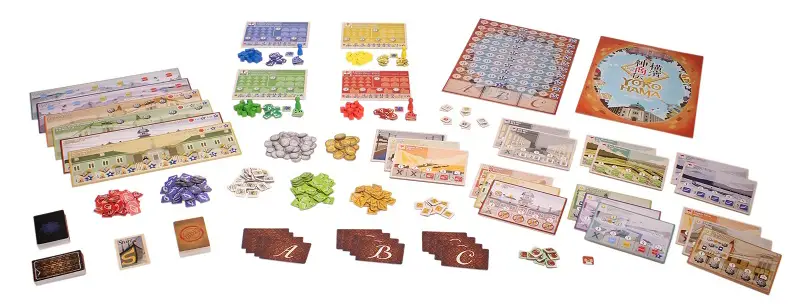
Components
- Player components (RED, Blue, Yellow, Green)
- Trade Good components
- 23 Imported Goods tokens
- Money
- 1 Station token 1
- 10 Foreign Mercenaries
- 20 5-POWER tokens Front Back
- 18 Area Boards
- 6 Management Boards ・
- 36 Order cards Front Back
- 30 Technology cards Front Back
- 12 Achievement Card (4 cards each of A, Band C) Front
- 24 Building Site cards Front
- Start Player Card
- 4 Warehouse tiles
- 4 100-point counters
- 1 Victory Point track
- 4 Player Summaries
- 1 Rulebook
Setup
1. Depending on the number of players, the following components will not be used. Return these components to the box.
| Players | Area Boards | |
|---|---|---|
| Laboratory B, Port B, Chinatown, Canal, Copper Mine × 1, Silk Mill × 1, Tea Plantation × 1, Fishing port × 1 | Laboratory B, Port B | |
| 3 players | Laboratory B, Copper Mine × 1, Silk Mill × 1, Tea Plantation × 1 | Laboratory B |
| 4 players | none | none |
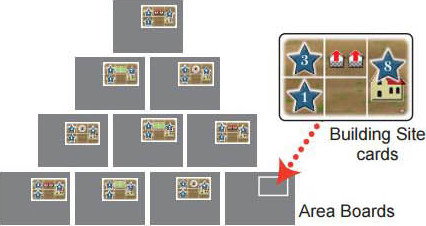
2. Shuffle the Area Boards face down, and turn them face up one by one in the following configuration:
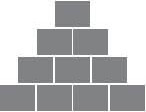
2 Players:
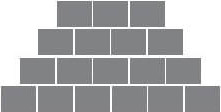
3 Players:

4 Players:
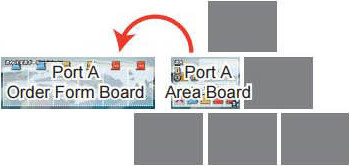
3. Place each Management Board (long) next to the cor- Example: The Port A Order Form Board is placed next responding Area Board.
Example: The Port A Order Form Board is placed next to the Port A Area Board.
4. Shuffle all the Building Site cards face-down and place 1 Building Site card face-up on each Area Board on the space stipulated. The remaining Building Site cards will not be used in the game and should be re- turned back to the box.
5. Shuffle all the 5-power tokens face-down and place 1 face-up on each Area Board on the 5-space on each Area Board. The remaining 5-POWER tokens will not be used in the game and should be returned back to the box.

6. Place the Victory Point track in the playing area.
7. Place the following components near the Area Boards:
- 1-Yen tokens
- 3-Yen tokens
- Copper tokens
- Raw Silk tokens
- Tea tokens
- Seafood tokens
- Imported Goods tokens
- Foreign Mercenary tokens (place all of them face-up)
- Station token
- 100-Point tokens
8. The player who most recently visited Yokohama receives the Start Player Card and becomes the starting player. If this method does not work in determining a starting player, use any preferred method in choosing a starting player.
The Start Player Card does not switch possession during the duration of the game.
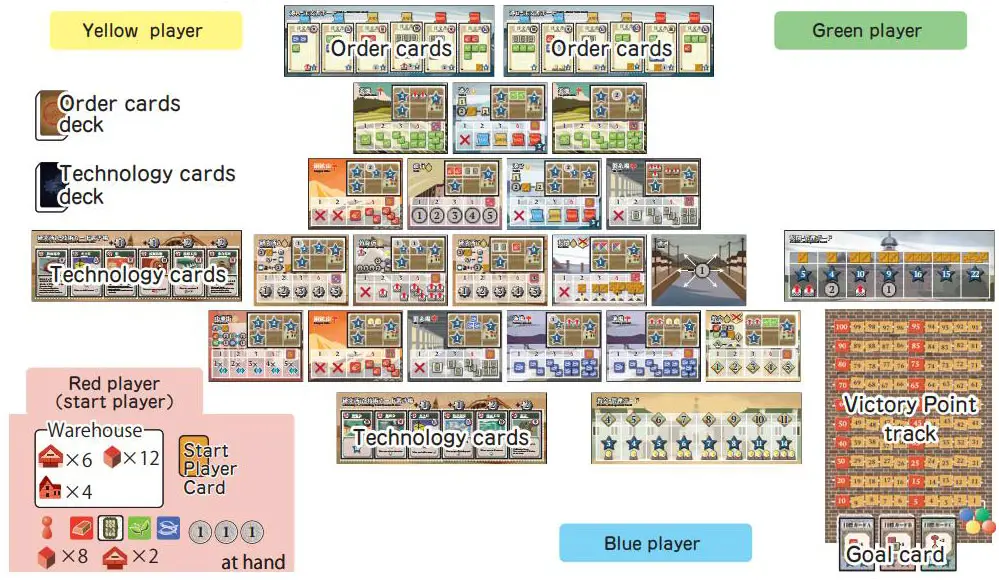
9. Each player chooses a color and receives the following components in their color:
- 1 Warehouse tile
- 1 President pawn (in the player' s hand).
- 20 Assistant pawns (Place 8 in the player's hand and place the remaining 12 on top of the Warehouse tile).
- 1 scoring disc (to be placed on the 0 space of the Victory Point track)
- 8 Shophouse tokens (Place 2 in the player's hand and place the remaining 6 top of the Warehouse tile).
- 4 Trading House tokens (Place all 4 on top of the Warehouse tile).
- 1 Copper token
- 1 Raw Silk token
- 1 Tea token
- 1 Seafood token
- Money (The starting player begins with 3 Yen, and the other players begin with 4 Yen).
Note: In this game, there is a distinction between the player' s hand and their 'warehouse'. Place items meant to be in the 'warehouse' on top of the Ware- house tile and keep items meant to be in the player' s 'hand' separate from the Warehouse tile.
10. Divide the Achievement cards into A, B, and C decks and shuffle them face down. Draw 1 card from each deck and place them face up next to the Victory Point track. The remaining Achievement cards will not be used in the game and should be returned back to the box.
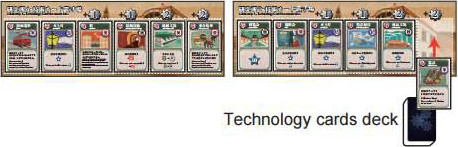
11. Shuffle all the Technology cards face down and place them in a deck in the playing area. From this deck, draw and place Technology cards face up in each space of Laboratory A (and B) Technology Card Placement Area until all spaces on both Laboratories A (and B) Technology Card Placement Area are filled.
12. Shuffle all of the Order cards face down and place them in a deck in the playing area. According to the number of players, return the following numbers of cards back to the box: Players numbers of cards back to the box: 2 players: 16, 3 players: 5, 4 players: 0.
From this deck, draw and place Order cards face up in each space Port A (and B) Order Form Board until all spaces on both Port A (and B) Order Form Board are filled.
Each player now draws two Order cards from the re- maining deck. In secret, each player must choose 1 Or- der card to keep and return the other card to the box.
The setup of the game is now complete!
Example setup 4 Players:
General Rules
The following rules apply throughout the game:
In this game, Trade Goods (Copper, Raw Silk, Tea, Seafood), Imported Goods and Money are not limited by the number of components. Please use a suitable substitute if you run out. Money can be made into change at any time.
All information is public except for Order cards in the possession of players. Place components such that all players may easily see them.
Each player may have a maximum of 3 Order cards in their hand. Players may not discard any Order cards. There is no limit to the number of Technology cards in each player's hand. However, players may only own 1 card of the same name.
Victory Points are gained by moving the scoring disc of each player's color on the Victory Point track. If a player obtains more than 100 points, they receive a 100-POINT token and move their scoring disc to the corresponding amount on the Victory Point track.
Flow Of The Game
The game progresses in turns clockwise from the start player. Each player takes a turn until the End of the Game conditions are met. When the End of the Game conditions are met, there is one more game turn , and a final score calculation is tallied to determine the winner.
For the End of the Game conditions, please refer to the section 'End of Game Conditions'.
Flow Of A Turn
On a player' sturn, they do the following three phases in order. At the end of their turn, play progresses clock- wise to the next player.
- Additional Action phase (first half)
- Placement step
- Movement step
- Area Action step
- 5-POWER bonus step (OPTIONAL)
- Shophouse and Trading House Construction step (optional)
- Recovery step
- Main Action phase
- Additional Action Phase (second half)
The Additional Action phases in A (first half) and C We will first describe B (the Main Action phase) here, and the Additional Action phases thereafter.
B. Main Action Phase
The Main Action phase is done in order from top to bottom. Steps 1 to 3 and 6 are compulsory, and Steps 4 and 5 can be omitted if the player chooses. An exception to this rule is that if the player was not able to carry out Step 2, they may not be able to carry out Steps 3-6.
1. Placement Step
The player may choose 1 of the 2 following options:
Place 1 Assistant pawn into 3 different areas: Choose 3 different areas, and place Assistant pawns from their hand to the areas one by one.
Place 2 Assistant pawns into the same area: Select 1 area, and place two Assistant pawns from their hand to the area.
Regardless of whether the player chooses a) or b), placement of Assistant pawns are subject to following Placement rules:
Placement Rules
If there is a President pawn in the area in which you place an Assistant pawn, you have to pay 1 Yen for each Assistant pawn you place to the player owning the President pawn. If there is more than one Presi- dent pawn in the area, you have to pay 1 Yen to each of the owning players. If you have insufficient money, you may not place an Assistant pawn in the area.
You may not place an Assistant pawn in the Canal.
If you do not have enough Assistant pawns in hand to place, or if you choose not to, you do not need to place all 3 Assistant pawns. In other words, you may place 1, 2 or 3 Assistant pawns.
You may not place any Assistant pawns from the Warehouse tile or the Management boards.
Example: For his Placement step, Hisashi chose a (placing Assistant pawns in 3 three different areas). Hisashi chooses the Copper Mine, Employment Agency and Laboratory A and places his Assistant pawns one by one in these areas. Firstly, as the Copper Mine contains no other President pawns, he places 1 Assistant pawn there without payment.
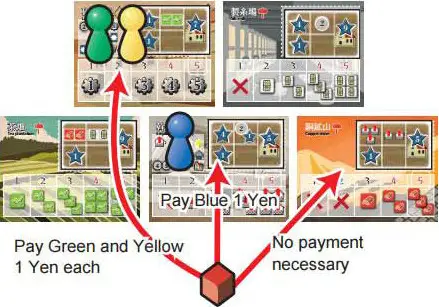
Secondly, as the mediation office contains a Blue President pawn, he pays 1 Yen to the Blue player and places 1 Assistant pawn in the area. Thirdly, Laboratory A contains both the Green and Yellow President pawns. To place an Assistant pawn, Hisashi must pay a total of 2 Yen; Yen each to the Green and Yellow player.
However, he does not have enough money, so sadly he may not place his Assistant pawn in Laboratory A. Instead, he places an Assistant pawn on the Silk Mill.
2. Movement Step
The player may choose 1 of the 2 following actions:
- a) Move their President pawn
- b) Return their President pawn to their hand
A) Move Their President Pawn
The movement method is different depending on whether the President pawn is in the player's hand or on an existing Area. If the President pawn is in the player's hand, the player may place the President pawn in any Possible Action Area.
If the player's President pawn is already on an existing Area (i.e. not in the player's hand), you must move the President pawn step by step to your desired destination using the following Movement rules:
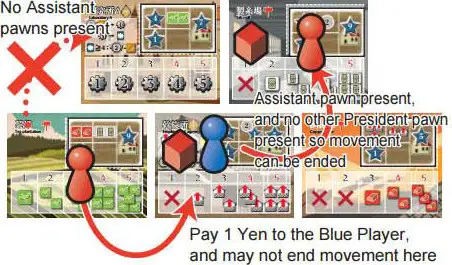
Movement Rules
The President pawn may move 1 step from its current Area to an adjacent Area. At least one of that player' s Assistant pawns must be in the destination area. Shophouses and Trading Houses do not act as Assistant pawns for this purpose. If you have Shophouses and/or Trading Houses in the Area but no Assistant pawns, you may not move to this Area.
If the Area that the President pawn is moved into is a Possible Action Area (as described above), the player may choose to either stop their movement, or continue moving their President pawn. This may be carried out any number of times.
If the Area that the President pawn is moved into is not a Possible Action Area, i.e. there is one or more players' President pawns in this Area, the player may not stop their movement. They must immediately pay each other President pawn in the Area 1 Yen and continue their movement.
The President pawn may not return to the Area that it started in.
Example: Hisashi's (Red player's) President pawn is on the Tea Plantation area. Hisashi wants to move the President pawn to the Silk Mill.
First, he tries to move the President pawn to the Silk Mill through Laboratory A. However, since he has no Assistant pawns in the Area, he cannot move his President pawn to Laboratory A. Next, Hisashi attempts to move to the Silk Mill through the Employment Agency. There is an Assistant pawn of his colour, so he may stop in that space.
However, the Blue player's President pawn is currently on the Employment Agency Area, so Hisashi pays the Blue player 1 Yen to land in that space. He then moves to the Silk Mill, which contains an Assistant pawn of his colour, and ends his movement.
B) Return Their President Pawn To Their Hand
If this action is chosen, Step 3-6 is skipped; proceed directly to Phase C (Additional Action Phase). Return your President pawn to your hand, and you may also return any Assistant pawns from any Area to your hand. You may not return Assistant pawns placed on Management Boards.
3. Area Action Step
In this step, the player carries out the action where their President pawn is located. However, if you utilized Foreign Mercenaries in the Additional Action phase, you may carry out an action in the specified area rather than in the area your President pawn is in.
At this time, the player calculates and determines the amount of Power the player possesses in the Area
| Token type | Power obtained |
|---|---|
| President pawn | 1 Power |
| Assistant pawn | 1 Power each |
| Shophouse token | 1 Power |
| Trading House token | 1 Power |
| Station token | 1 Power |
Use the table to tally the Power value. If the Power value tallies 6 or higher, it is still considered as a maxi- mum value of 5.
The Power value is used to carry out the action in the Area. For specific actions, refer to the section on De- tailed Area Actions.
If there are any Trading Houses owned by other players in the Area in which the action is being carried out, the owner receives 1 Yen from the bank.
Note: If your own Trading House is on the Area in which your action is being carried out, you do not re- ceive money from the bank.
4. 5-power Bonus Step (optional)
If, in Step 3 (Area Action Step), the player carried out an action of 5 Power, they may carry out this action.
If the 5-Power token in the corresponding Area is still present, the player takes it and places it in front of them and resolves the effect. After resolving the effect, they turn the 5-Power token face-down, and keeps it in their possession.
The effects of 5-Power tokens are explained in detail in the section on' Description of Powers'
5. Shophouse And Trading House Construction Step (optional)
If, in Step 3 (AREA Action Step), the player carried outan action of 4 or more Power, they may carry out this action.
Choose one of the following two actions:
- a) Build a Shophouse
- b) Build a Trading House
A) Build A Shophouse
Refer to the Building Site card on the Area in which the action was carried out in Step 3 (AREA Action Step). The player may build a Shophouse only if they do not have a Shophouse already on the Building Site card.
Place a Shophouse token from your hand onto an empty Shop- house space on the Building Site card. You may not build on a space that another player already has a Shophouse token on. Gain the benefits stated on the space that you built your Shophouse on.
B) Build A Trading House
Refer to the Building Site card on the Area in which the action was carried out in Step 3 (AREA Action Step). The player may build a Trading House only if the Trading House space on the Building Site card is empty.
Place a Trading House token from your hand onto the empty Trading House space. Gain the benefits stated on the space that you built your Trading House on.
Example: Hisashi carried out an action of 5 power in the Silk Mill. He has a Shophouse token and a Trading House token in his hand. As Hisashi already has a Shop- house token on the Silk Mill Building Site card, he will not be able to build a Shophouse. Hisashi decides to build a Trading House. Hisashi places his Trading House token on the Silk Mill Building Site card and gains 9 Victory Points as stated on the space.
6. Pawn Recovery Step
Take all of the Assistant pawns from the Area in which you carried out Step 3 (AREA Action Step) and return them all to your hand.
Note: No matter how many Assistant pawns are on the Area, return ALL of them to your hand.
Example: Hisashi had three Assistant pawns in the Silk Mill, and he returns all three to his hand.
Additional Action Phase
In each Additional Action phase, you may do the fol- lowing actions as many times as you like and in any order:
- a) Use of Foreign Mercenaries (once per turn)
- b) Fulfilling an Achievement card
- c) Fulfilling an Order card
For example, a player may carry out: c) fulfilling an Order card → a) Use of Foreign Mercenaries → c) fulfilling an Order card.
A) Use Of Foreign Mercenaries (once Per Turn)
You may only use Foreign Mercenaries once on your turn. For example, if you use this action in A. Additional Action Phase (first half), you may not use it in C. Additional Action Phase (second half).
Turn one of your Foreign Mercenary tokens face down and choose one Area. This Area has to meet the following 2 conditions: it has to contain at least 1 of your Assistant pawns and your President pawn may not be in the Area.
It is possible to choose an Area that contains another player's President pawn. If you choose an Area that contains another player's President pawn, you do not need to pay them any money.
If you carry out this action, you continue with the same steps of the main phase in order, i.e: 3. Area Action step, 4. 5-Power bonus step, 5. Shophouse and Trading House construction step, 6. Recovery step.
B) Fulfilling An Achievement Card
If you have met the requirements written on an Achievement card, you may place an Assistant pawn from your hand to the card and gain the corresponding Victory Points. The first player who achieved the requirements score the leftmost points, while all later players score the rightmost points. Please refer to the 'Achievement cards' section for more detailed information.
Note: Each player may only fulfill the same Achievement Card once in a game.
Example: Hisashi has 5 Copper tokens in his possession. There is an Achievement card that requires 5 Copper as a condition to complete the Goal card. Hisashi fulfills the Achievement card, and places an Assistant pawn from his hand to the Achievement card. Since Daryl and Seiji already have Assistant pawns located on the Achievement card, Hisashi scores the rightmost Victory Point total, which is 6 points.
C) Fulfilling An Order Card
Place an Order card from your hand face-up in front of you. Pay the corresponding Trade Goods. Afterwards, gain the corresponding reward as noted on the Order card. After fulfilling an Order card, check if new Country icons match in order to obtain Foreign Mercenary tokens. For more information on this, please refer to the next section on 'Matching Country icons'.
Matching Country Icons
When you successfully complete an Order card, or when you obtain a Technology card, you will see Country icons, such as the following...

Every time you obtain a multiple of 2 (i.e. 2, 4, 6) of the same Country icon on completed Order cards or Technology cards, you receive a Foreign Mercenary token of that country. However, if there are none in the supply, you do not receive any.
Example:Hisashi has an Order card with the English icon  and a Technology card with the French icon
  in front of him. Hisashi completes the Order card, and places another Order card in front of him that has the English icon. Since there are 2 English icons in total, Hisashi receives the English Foreign Mercenary token from the supply.
End of the Game
The game ends when any of the following conditions are met:
One or more of the players have built all 4 Trading Houses.
One or more of the players have built all 8 Shophouses.
After replenishing Order cards, the Order deck has run out and there is an empty space on the card area of the Port Order Form Board.
A number of Assistant pawns on the Church Manage- ment Board has been placed (2 Players: 4; 3 Players: 5; 4 Players: 6)
A number of Assistant pawns on the Customs Man- agement Board has been placed (2 Players: 4; 3 Players: 5; 4 Players: 6)
Finish playing out the round ending with the player to the right of the Start player, then there is one final round for all players. Thus, all players will play an equal number of turns. After this, there is a final score calculation and the game ends.
The player with the most Victory points wins the game. In the case of a tie, the player closest to the Start player wins ties.
Example: The order of play started and continued in this fashion: Red: Hisashi → Blue: Daryl → Green: Seiji → Yel- low: Nobuaki. Seiji built all 4 of his Trading Houses, fulfilling one of the game end conditions. After Seiji' s turn, Nobuaki takes his turn. After Nobuaki' sturn, all players take 1 final turn.
Final Score Calculation
Calculate the final score in the following order:
- Church bonus
- Customs bonus
- Technology bonus
- Country bonus
- Remainder Scoring
1. Church Bonus
Each player tallies up the number of Assistant pawns on the Church Management board. The player with the highest number of Assistant pawns receives 6 Victory points, and the second highest receives 3 Victory points.
In the case of a tie, the player who has the rightmost Assistant pawn breaks ties. If there is only 1 player on the Church Management board, that player earns 6 points and no other player receives points. If there are no players on the Church Management board, no players earn any points.
Example: The Church Management board ended in the following state:
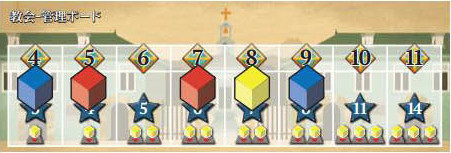
The final tally of Assistant pawns was: Red 2, Blue 2, and Yellow 1. Red and Blue have the same number of pawns on the board, so we have to look at the position of the pawns. Blue owns the rightmost pawn, so Blue receives 6 points. Red is second place and receives 3 points. Yellow does not receive any points.
2. Customs Bonus
Each player tallies up the number of Assistant pawns on the Customs Management board. The player with the highest number of Assistant pawns receives 8 Victory points, and the second highest receives 4 Victory points.
In the case of a tie, the player who has the rightmost Assistant pawn breaks ties. If there is only 1 player on the Customs Management board, that player earns 8 points and no other player receives points. If there are no players on the Customs Management board, no players earn any points.
Example: The Customs Management board ended in the following state:
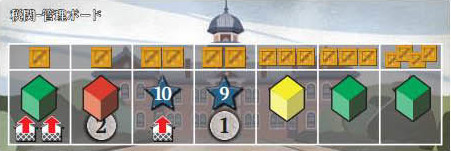
The final tally of Assistant pawns was: Red 1, Green 3, and Yellow 1. Green is in first place and receives 8 Victory points. Red and Yellow have the same number of pawns on the board, so we have to look at the position of the pawns. Yellow owns the rightmost pawn, so Yellow is in second place and receives 4 points. Red does not receive any points.
3. Technology Bonus
Each player tallies the total Industry value on all of their Technology cards. The player with the highest total Industry value receives 10 Victory points, and the second highest receives 5 Victory points. In the case of a tie,
the player who is the closest clockwise to the Start play- er breaks ties (THE Start player himself is considered to be the closest). If there is only 1 player with Technology cards, that player earns 10 points and no other player receives points. If there are no players who own Technology cards, no players earn any points.
4. Country Bonus
At this point, return all unfulfilled Order cards to the box. Each player now looks at the number of different Country icons they have in their possession from their Technology cards and completed Order cards and divides them into sets. 1 icon may only be used once per set. The following table shows how many bonus points a player receives:
- A set of 5 different Country icons → 12 Victory points
- A set of 4 different Country icons → 8 Victory points
- A set of 3 different Country icons → 4 Victory points
- A set of 2 different Country icons → 2 Victory points
Example: Hisashi has the following icons from his Technology cards and completed Order cards:
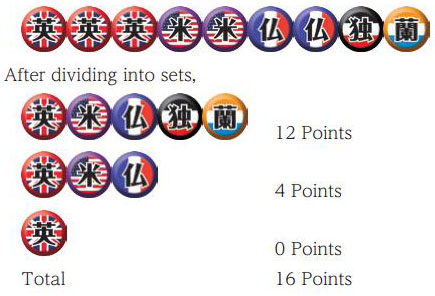
Hisashi receives 16 bonus points from Countries in total.
5. Remainder Scoring
Below is the conversion rate for remaining tokens in the players' possession:
- Unused Foreign Mercenary tokens: 1 Victory point each
- Imported Goods tokens: 1 Victory point each.
- Every 3 Trade Good tokens: 1 Victory point
- Every 2 Yen: 1 Victory point
Continue Reading
