Components
- 1 game board
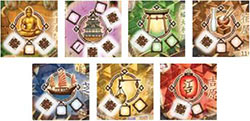
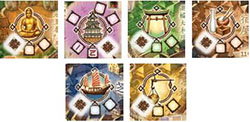
- 59 Mission Cards
- 50 Action Cards
- 27 Bonus Cards
- 27 Event Cards
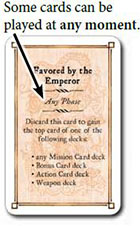
- 5 Favor Cards
- 84 Mon Tokens
- 16 Annexes
- 40 Weapons
- 7 Geisha counters
- 5 Blessing counters
- 10 Placeholder Counters
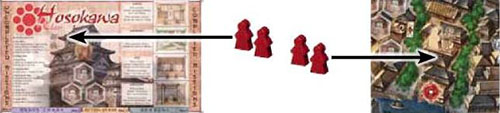
- 20 wooden Disciples
- 15 wooden Markers
- 1 Watch Patrol coin
- 1 "District inaccessible" counter
- 2 wooden Watch Patrols
- 1 wooden Round Marker
- 5 Clan boards
Object of the Game
As leader of your Clan you try to earn as many Prestige Points as possible. You mainly gain Prestige Points by completing Mission Cards, by activating Disciples at certain locations on the game board, and by having fulfilled the tasks of Bonus Cards at the end of the game.
Each player counts his Prestige Points by moving his own Marker along the Score Track on the game board.
Geisha or Samurai
Yedo is a game for determined players. Every once in a while fate may strike in unpleasant ways. While building up the power of your Clan, you may encounter quite a few setbacks.

For your first game, we recommend to use the Geisha setting. Here, fate will not be too hard on you, and you'll get to know the twists of the game.
But don't expect a walk in the park either! To play the Geisha setting, follow the usual rules and those in the yellow Geisha boxes. Ignore the brown Samurai boxes.

On the other hand, setbacks will not unsettle a true samurai . His strength lies in accepting every twist of fate and turning it into greatness.
So when you feel ready to handle this, you should play the Samurai setting of the game by following the usual rules and the instructions given in the brown Samurai boxes. Ignore the yellow Geisha boxes.
Setup

Some Action Cards and Event Cards have "Samurai" written at the top right corner. Remove these "Samurai" cards from the game and return them to the box. They are not needed.
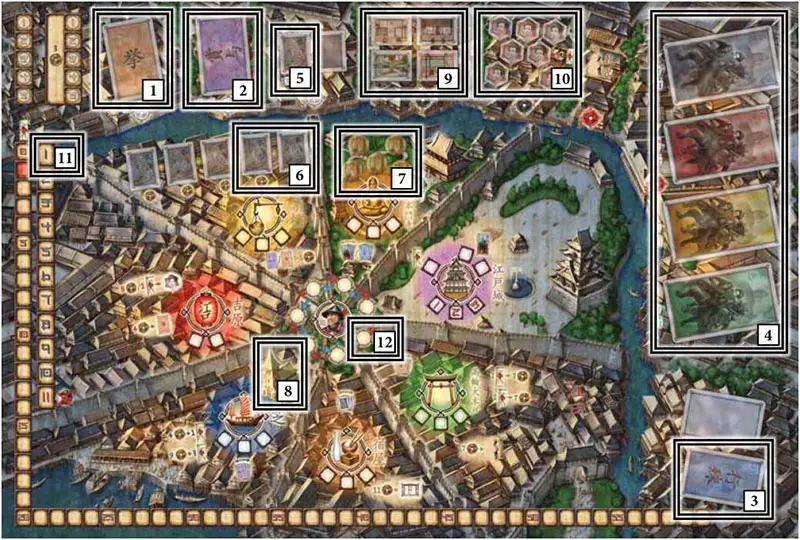
Put the game board in the middle of the table.
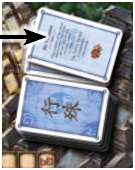
Shuffle the Action Cards and place them as a face down deck onto the indicated space on the board 1. Do the same with the Bonus Cards 2, the Event Cards 3, and each of the 4 colors of Mission Cards 4.
Shuffle the Weapons and put them as a face down deck onto the indicated space 5. Then take 2 Weapons from the top of the deck and put them face up onto both 6  spaces on the right of the Market
 6.
Place one Blessing counter per player onto the indicated spaces in the Temple District 7. Return any spare Blessing counters to the box.
Place all Mon as a supply next to the game board. This supply will be called the "bank". Then put 3 Mon onto the Church in the Harbor District 8.
Sort the Annexes by type, forming 4 piles. Depending on the number of players, each pile contains a certain number of Annex tiles:
- 2 players: 2 tiles
- 3 players: 2 tiles
- 4 players: 3 tiles
- 5 players: all 4 tiles
Place the piles face up onto their spaces on the game board 9. Return any spare Annex tiles to the box.
Depending on the number of players, put a certain number of Geisha counters onto the indicated spaces on the game board 10:
- 2 players: 3 Geisha
- 3 players: 5 Geisha
- 4 players: 6 Geisha
- 5 players: all 7 Geisha
Return any spare Geisha counters to the box.

Take the "District inaccessible" counter and place it next to the game board. It is needed later.
Place the gray Round Marker on space "1" of the Round Track 11.

Take the Watch Patrol coin and flip it to determine the starting color of the Watch Patrol. Take the Watch Patrol of that color and place it onto the Watch Patrol circuit space in the Gates District 12. The Watch Patrol of the other color is placed next to the game board. Return the coin to the box.

Depending on the number of players, reduce the number of Assignment spaces in the Districts by covering them with Placeholder counters:
-
In a 2-player game:
Put a Placeholder counter onto each of the 10 spaces shown on the right.
-
In a 3-player game:
Put a Placeholder counter onto each of the 6 spaces shown on the right.
-
In a 4-player game:
Put a Placeholder counter onto the following space:

-
In a 5-player game:
No space is covered.
Each player picks a Clan board and takes the 4 Disciples and 3 Markers of the corresponding color.
Each player places 2 of his Disciples onto his Clan House and the remaining 2 on the "Reserve" space on the game board.
Determine a starting player at random. The starting player places one of his Markers onto the "1" spot of the Player Order Track and another one onto the "1" spot of the Bidding Track.
In a clockwise direction, all other players do the same by placing their Markers onto the next free numbered spot on both tracks. For now, the player order is set in a clockwise direction; later in the game the player order is likely to change.
Finally, each player receives his starting capital and assets:
-
4 Mission Cards: The player who is last on the Player Order Track draws the top card of any of the 4 Mission Card decks, keeping it hidden from the other players.
Then, in a counter-clockwise direction, each other player also draws the top card of any of the 4 Mission Card decks. Repeat this procedure until each player has 4 Mission Cards.
Important: At least one of your 4 Mission Cards must be a Red or Black Mission Card.
Remember, the difficulty of completing Mission Cards is indicated by their color. Apart from the one Red or Black Mission that you must take, we recommend you concentrate on Green and Yellow Mission Cards in the beginning as they can be completed faster and thereby provide the money you need to prepare for harder Missions.
-
12 Mon: Each player receives 12 Mon from the bank.
-
1 Action Card:

In player order, each player draws the top card of the Action Card deck.

In player order, each player takes the top 3 cards of the Action Card deck. He keeps one of these cards and returns the other 2 face down to the bottom of the deck.
-
1 Favor of the Shogun: Take the 5 Favor Cards and display them face up in a row. First, the last player on the Player Order Track takes one of the cards and immediately receives the assets shown on it.
Then he flips his Favor Card over to the Blackmail side and places it close to his Clan board. In reversed player order, each other player chooses one of the remaining Favor Cards, receives the listed assets, and places the Blackmail Card next to his board.
After each player has received his favor, return any remaining Favor Cards to the box.
Game Play
A game of Yedo is played over 11 rounds. Each round comprises the following 7 phases that are always executed in the same order:
- The Prep Phase - Preparations for the round
- The Bidding Phase - Players bid on assets
- The Event Phase - An event is revealed that affects aspects of the gameplay
- The Assigning Phase - Players place their Disciples onto the game board and their Annexes
- The Watch Patrol Phase - The Watch Patrol moves and arrests Disciples in the District in which it stops
- The Trade Phase - Players may trade assets with each other in the Tavern District and the Market District
- The Action Phase - Players activate their Disciples to gain assets, Prestige Points, or to complete Missions
The game usually ends after 11 rounds. Alternatively the game ends at the end of any round in which a player completes the Mission "Kill the Shogun". At the end of the game, players score Prestige Points for Bonus Cards and unused Blackmail Cards.
These are added to the Prestige Points they gained throughout the game. The player who scores the most Prestige Points in total wins the game.
The Action Cards
Players can play Action Cards throughout the game to alter certain aspects of the gameplay.
After an Action Card has been played (or discarded) it is placed face down at the bottom of the Action Card deck.
If two or more players want to play a similar Action Card at the exact same moment (and they cannot work it out in any other way), the player farther up the Player Order Track goes first and the others follow accordingly.
1. The Prep Phase
Note: Skip the Prep Phase in the first round, since all preparations for this round are already made during the setup.
In the Prep Phase you always do the following 4 steps.
-

Move the Round Marker on the Round Track one space forward to indicate the number of the new round.
-
All players return their Markers from the Bidding spaces and the Egress space (see 2. Bidding Phase) to the Bidding Track in the order currently displayed on the Player Order Track.

-
Add Mon from the bank to the Church in the Harbor District:
- If the Church is empty, put 3 Mon on it.
- If the there is still Mon left on the church, add only 1 Mon to it.
-
Each player who owns the Annex "Dojo" receives 1 Mon from the bank.

Remove the Watch Patrol entirely from the game for the final round.
2. The Bidding Phase
During the Bidding Phase, players can participate in a number of auctions to acquire one extra asset each. Each round, the same kinds of assets are put up for auction. There are 7 auction categories in total: Action Cards, Bonus Cards, Weapons, Annexes, Geisha, Disciples, Mission Cards.
The player who wins an auction category with his bid receives the reward of that category.
Important: At the start of the Bidding Phase, each player is asked in player order if he wants to take part in this round's auctions.
If a player is unable (because of insufficient funds) or unwilling to participate, he may now drop out of the Bidding Phase by moving his Marker from the Bidding Track to the Egress space.
For this he receives 3 Mon from the bank.
Note: The Bidding Phase in the 2-player game and the 3-player game differs slightly from the Bidding Phase with 4 and 5 players. First, read the description of the Bidding Phase in the 4 and 5-player game. The differences with 2 and 3 players are mentioned afterwards.
The Bidding Phase with 4 or 5 Players
The player who is farthest up the Bidding Track starts an auction by announcing an auction category of his choice; for example, Weapons. By announcing the category, the player automatically places the minimum bid for that category (which is stated next to the Bidding space  of that category; 5 Mon for Annexes and Geisha, 3 Mon for all other categories). He may not bid more or less Mon.
Then, the next player on the Bidding Track may either place a higher bid or pass. This continues down the Bidding Track until each player on the Bidding track has once either chosen to top the prior bid or to pass.
Finally, the player farthest up the Bidding Track is the last to choose to top the highest bid or pass. The auction is won by the player who placed the highest bid.
The winner pays his bid to the bank, takes his Marker from the Bidding Track and places it onto the Bidding space of the auction category he just won. This auction category is closed for the rest of this Bidding Phase and the player is not allowed to participate in other auctions this round. Finally, the player receives the reward of his auction category.
Then, the next auction is announced by the player who is now farthest up the Bidding Track (which may be the same player as before if he didn't win the prior auction). The player chooses an auction category which is not yet closed and the procedure described above is repeated.
Play continues in this manner until each player has either won an auction or chosen to drop out of the Bidding Phase.
Further rules and notes:
If the minimum bid of the announcer is not topped by another player, he gets the reward by paying the minimum bid.
If it is a player's turn to announce a category, he may instead choose to drop out of the Bidding phase immediately (by moving his Marker from the Bidding Track to the Egress space). However, for this he does not receive any Mon.
Mon is not kept hidden. The Mon of each player must be displayed clearly in front of him.
No player may place a bid that he cannot afford to pay. (If a player wins an auction and cannot pay his bid, he does not acquire any assets, but loses all his Mon anyway. Then he drops out of the Bidding Phase and the auction category is not closed).
If it is a player's turn to announce a category, he may choose any auction category that is not yet closed. However, if a player wins this category, he must always pay his bid even if he cannot acquire the respective asset (because the supply is exhausted, for example).
The Bidding Phase with 2 or 3 Players
All of the rules described above apply. However, there is one important dif- ference: There are only 3 main auction categories, each of which comprises 2 or 3 subcategories:

The White category: comprising the Action Card, Bonus Card, and Weapon categories (minimum bid: 3 Mon)

The Black category: comprising the Annex and Geisha categories (minimum bid: 5 Mon)

The Red category: comprising the Disciple and Mission Card categories (minimum bid: 3 Mon)
Players can only announce one of the 3 main categories. The player who wins that category chooses one of its subcategories and receives that asset.
Then he moves his Marker from the Bidding Track to the subcategory's Bidding space. The main cat- egory of that color (including all its subcategories) is then closed for the rest of the round.
List of rewards in the Auction Categories
-
Action Cards
Draw the top 3 cards of the Action Card deck. Keep one of them.
Discard the other 2 by placing them face down at the bottom of the Action Card deck.
-
Bonus Cards
Draw the top 3 cards of the Bonus Card deck. Keep one of them.
Discard the other 2 by placing them face down at the bottom of the Action Card deck.
-
Weapons
Draw the top 3 Weapons of the Weapon deck. Keep one of them.
Discard the other 2 by placing them face up onto the Weapon discard pile.
-
Annexes
Take one Annex of your choice (that you do not own yet) and place it onto the appropriate space on your Clan board. You also receive 2 Prestige Points.
You may win the auction for that category even if you already own all available Annexes or if the supply is exhausted. In that case, you only gain 2 Prestige Points.
-
Geisha
Take one Geisha and place it onto an appropriate space on your Clan board.
You also receive 2 Prestige Points. (If you win the auction for this cat- egory and the supply is exhausted, you only gain 2 Prestige Points).
-
Disciples
Take one of your Disciples from the Reserve space and place it onto your Clan House.
-
Mission Cards
Draw the top 3 cards of one Mission Card deck of your choice. Keep one of the 3 cards. Discard the other 2 by placing them face down at the bottom of their Mission Card deck.
Note: If there are fewer than 3 Mission Cards available in the deck of your choice, you can only choose from those.
If a Mission Card deck is exhausted, you cannot gain a Mission Card of that color.
3. The Event Phase
In the Event Phase you always do the following 2 steps:
-
Adjust the Market
If there are Weapons on the 3 leftmost spaces of the Market (8
), clear those 3 spaces by sliding the 2 leftmost Weapons over to the right; onto the 6 spaces. The other Weapons previously on the 6 spaces and the one on the middle space (if any) drop out of the Market and are discarded onto the Weapon discard pile.Then take the top 3 Weapons from the Weapon deck and place them from left to right in the order they appear onto the first 3 spaces of the Market.
Note: If the Weapon deck is exhausted, shuffle the Weapon discard pile and place it as the new deck.
-
Reveal an Event Card
Take the top card of the Event Card deck and read the text out loud. Then place the card face up onto the "Current Event" pile, covering the event of the previous round. The new event takes effect immediately.
This can be an effect that must be carried out right away or an effect that spans the entire round; just follow the instructions on the card.
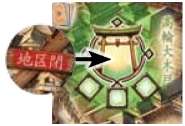
If an Event Card makes a District inaccessible for the rest of the round, take the "District inaccessible" counter and place it onto the District.

In the Samurai setting, there are a few rather cruel events that make every player lose certain assets. (For example, the event " Earthquake" makes you lose 1 Disciple and 1 Annex).
However, these effects can be reduced for any players who return a Blessing counter from their Clan boards to the Temple District. So it is always a good idea to have a Blessing!
4. The Assigning Phase
In the Assigning Phase, players place their available Disciples onto the game board or their own Annexes to enable these Disciples to perform certain actions in Phase 7.
In player order, each player places one Disciple at a time until all Disciples are placed. The player whose marker is farthest up the Player Order Track begins by placing one of his Disciples onto either:
any free Assignment space in an accessible District
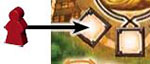
or one of the Annexes he has already built on his Clan board
Then, the player who comes second on the Player Order Track gets to place a Disciple, then the third player, and so on. After each Player has placed one Disciple, the first player assigns his second Disciple, etc. This continues until all Disciples are assigned.
Each Assignment space and Annex only accommodates one Disciple. If all spaces in a District are occupied (either by a Disciple or a Placeholder counter), no other Disciple can be placed there.
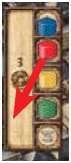
 No player may assign more than one Disciple to the Bower (the 3 numbered Assignment spaces in the Castle District).
If due to an event, the "District inaccessible" counter is placed on a District, you cannot place your Disciple onto any of its Assignment spaces (unless you play the Action Card "Heart of the Dragon").
A player must assign all his Disciples, even if he would rather not. Cowardice and laziness have no place in Yedo!
5. The Watch Patrol Phase
In the Watch Patrol Phase the Watch Patrol moves to another District. All Disciples in that District are arrested.
The Watch Patrol Phase consists of 4 subphases:
-
Move the Watch Patrol to the next District
Move the Watch Patrol to the next space along its circuit (following the arrows).
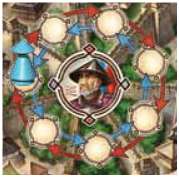
The direction in which the Watch Patrol moves is determined by its color: the red Watch Patrol moves clockwise, the blue Watch Patrol moves counterclockwise.
Note: There is always only one Watch Patrol on the game board. The color of the Watch Patrol just indicates the direction of its movement. It can change as a result of certain events, by playing certain Action Cards, or by completing certain Missions.
-
Play action cards to influence the watch patrol's movement
In player order, each player may play one Action Card to influence the move- ment of the Watch Patrol. (For example, the Action Card "Double-time!" makes the Watch Patrol move one additional District).
Note: The limit of one card applies only to "Phase 5b" Action Cards. Other possible Action Cards (such as "Feint" or "Walls Have Ears") can still be played as usual.
At the end of this subphase, the Watch Patrol will have reached its final destination; it will arrest all Disciples in that District, except for any saved with Action cards (see next subphase).
-
Play Action Cards To Save Disciples From Being Arrested
In player order, each player may play one Action Card (or his Blackmail Card) to save one or more of his Disciples from being arrested. Played Blackmail Cards are returned to the box.
Note: The limit of one card applies only to "Phase 5c" Action Cards. Other possible Action Cards (such as "Feint" or "Walls Have Ears") can still be played as usual.
-
Arrest Disciples
In the Watch Patrol's District, all Disciples who have not been saved by means of an Action Card are immediately arrested. Return them to the Reserve on the game board.
Example: The blue Watch Patrol ends its movement in the Red Light District. The green and yellow Disciples are arrested.
Very important: No player can lose either of his last 2 Disciples.
If a player's Disciple is arrested when that player has already 2 Disciples in the Reserve, the arrested Disciple returns to its Clan House. This also applies to other cases in which a player loses a Disciple.
Reminder for round 11:

In the final round, skip the Watch Patrol Phase as there is no Watch Patrol on the board.
6. The Trade Phase
In the Trade Phase, certain players can trade assets with each other.
-
Trade Weapons in the Market District
All players who have at least one Disciple in the Market District may exchange Weapons and Mon among themselves.
-
Trade all kinds of assets in the Tavern District
All players who have at least one Disciple in the Tavern District may exchange any of the following assets among themselves:
- Weapons
- Geisha
- Mon
- Uncompleted Mission Cards
- Action Cards
- Bonus Cards
Annexes, Blessing counters, Disciples, and completed Mission Cards may not be traded!
If the deal includes any cards (Action, Bonus, or uncompleted Mission Cards), these are kept face down at all times. In other words, a player only gets to see the cards he acquired after the deal has been concluded. You are not allowed to give any specifics about the cards you want to trade (names, categories, requirements, rewards, etc).. However, you may of course point out that you think a card is a good fit for another player.
You may not trade in secret. All players must be informed of what kind of assets are traded.
You can prepare a deal in Phase 4 by proposing your deal to a player and asking him to join your Disciple in the Market or Tavern District.
After all deals are closed, the Disciples involved remain in the District where they were placed.
7. The Action Phase
After each Player has activated his first Disciple, the first player activates his second Disciple, etc.
During this Phase, all players activate their Disciples to perform certain actions. In player order, each player activates one of his Disciples at a time: the first player activates one of his Disciples first, then the player who comes second on the Player Order Track, then the third player, and so on.
If you activate a Disciple on an Assignment space on the game board, you can use it to either:
- complete one of your Missions or
- perform one of the actions associated with that Assignment space.
If you activate a Disciple on one of your Annexes you can: c) use the special ability of that Annex.
After your activated Disciple has completed its action, immediately return it to your Clan House.
The Action Phase ends when there are no Disciples left on any Assignment spaces and Annexes.
Note: As long as you still have Disciples on the game board or on Annexes yo must activate one of them in your turn, even if you would rather not. (If you cannot do anything useful, return it to your Clan House anyway).
-
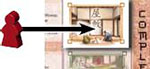
Completing a Mission
You can activate a Disciple on an Assignment space to complete one Mission.
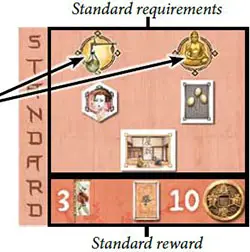
All Missions have Standard requirements, which (among other things) always include at least one District. To complete that Mission, you must:
- activate a Disciple that is placed in one of the Districts shown And
- meet every Standard requirement stated.
For the Mission above this would mean: You must have a Disciple both in the Market District AND the Temple District. You must also own a Geisha, a Metsubushi , and a Yashiki.
To complete the Mission you activate either the Disciple in the Market Dis- trict or the Disciple in the Temple District (the other Disciple stays on the game board and may perform another action later).
For completing the Standard requirements of the Mission, you gain the Standard reward (shown in the darker bar below the requirements). So the Mission above would give you 3 Prestige Points, 1 Action Card, and 10 Mon.
In addition to the mandatory Standard requirements, the Mission also states optional Bonus requirements. When you complete the Standard requirements and at the same time meet all the Bonus requirements, you receive the Bonus reward in addition to the Standard reward.
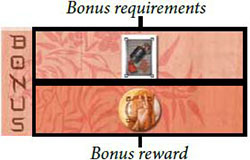
However, the Bonus reward can never be earned alone, it can only be earned in addition to the Standard reward. Sometimes you will have to decide whether you want to complete just the Standard requirements or to wait until you can meet all Standard and Bonus requirements.
Either way, when you complete a Mission you always do it in the following order:
- Lay the Mission Card face up on the table
- Show that you meet all Standard requirements
- Activate your Disciple
- Collect the Standard reward
- (if possible) Show that you meet all Bonus requirements
- (if possible) Collect the Bonus Reward
- Place the Mission Card face down onto your "Completed Mission Card" pile next to your Clan board
-
Performing the action of an assignment Space
Each Assignment space on the game board is located in a District. Each District has its own actions that you can take when you activate a Disciple there.
You can always choose one of the actions that are available in that District at that time (usually no matter how many players have chosen that action before). The only exception is the Castle District where each Assignment space has one specific action.
-
Using An Annex
Note: To use an Annex you must have already built it. The Annex spaces on the Clan boards only indicate where each type of Annex is placed.
Yashiki (mansion)
-
When you activate your disciple here: Place one of your uncompleted Mission Cards face down at the bottom of the Mission Card deck of its color. Then gain the top card of one Mission Card deck of your choice.
Each type of Annex has one special ability which you can use when you activate a Disciple there. Also, each Annex has one further ability.
-
Further Ability: A Disciple that you placed here can alternatively be used in the following way: When you complete a Mission that requires a Geisha (that you do not have), you may return the Disciple on the Yashiki immediately to your Clan House and count it as one additional Geisha for that Mission. (But you do not receive a Geisha counter!)
Karesansui (sacred Garden)
-
When you activate your disciple here: Perform a "Foresight" of your choice. Take the top 3 cards of one of the following: the Action Card deck, the Bonus Card deck, the Weapon deck, or any one Mission Card deck, and look at them. Arrange them in any order and return them face down to the top of the same deck.
You may instead choose to look at the top 3 cards of the Event Card deck and return them in the same order face down to the top of the deck.
-
Further ability: A Disciple that you placed here can alternatively be used in the following way: When you complete a Mission that requires a Blessing (that you do not have), you may return the Disciple on the Karesansui immediately to your Clan House and count it as a Blessing for that Mission.
Dojo (training Room)
-
When you activate your disciple here: Discard one of your Weapons by placing it face up on the Weapon discard pile. Then, gain the top Weapon of the Weapon deck.
-
Further Ability: The following permanent ability takes immediate effect when you build the Dojo. You do not have to have placed a Dis- ciple here to use it! At the beginning of each round, you receive 1 Mon.
Kobudo-ryu (weapons School)
-
When you activate your Disciple here: Discard one of your Action Cards by placing it face down at the bottom of the Action Card deck. Then gain the top Action Card of the Action Card deck.
-
Further Ability: The following permanent ability takes immediate effect when you build the Kobudo-Ryu. You do not have to have placed a Disciple here to use it!
The cost of each Weapon that you buy on the Market is reduced by 3 Mon. (So you only pay 5 Mon or 3 Mon).
-
End of the Game

After the 11th round is completed in full, the game ends.
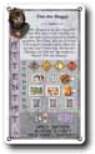
The game may end prematurely if a player manages to complete the hardest Mission, "Kill the Shogun". The round in which this happens is finished in full (so each player still activates his remaining Disciples). Then the game ends.
After the game has ended, a final scoring takes place.
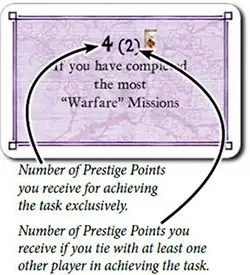
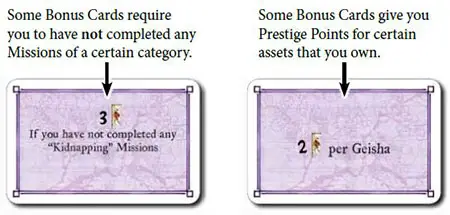
Each completed Bonus Card that a player owns grants that player Prestige Points. (Remember, no player may have more than 2 Bonus Cards in total). Important: Some Bonus Cards have a value in brackets.
This is the number of Prestige Points you receive if both you and one or more of your opponents meet the requirements of the Bonus Card. Your opponents do not receive these Prestige Points.
For example, the Bonus Card on the right gives you 4 Prestige Points if you managed to complete more Missions of the "Warfare" category during the game than any other player.
If there is a tie, because at least one other player managed to have the most completed "Warfare" Missions too (so you both have the same number), you only receive the number in brackets (2 Prestige Points).
The tied player does not receive anything. If any player has completed more Warfare Missions than you, you get no Prestige Points at all.
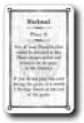
After all players have received their Prestige Points for Bonus Cards, check which players still own their Blackmail Card. Those players get 2 additional Prestige Points.
The player who now has the most Prestige Points in total (whose Marker has advanced farthest on the Score Track) wins the game.
In the case of a tie, the tied player whose Marker is farther up the Player Order Track wins.
Continue Reading