The vast hordes of the Dark Lord and the stout defenders of the West play a central role in War of the Ring, and their mustering and employment is crucial. From their initial starting positions (as described in Setting up the Game), the Armies of both players will swell with reinforcements and move to battle according to the following rules.
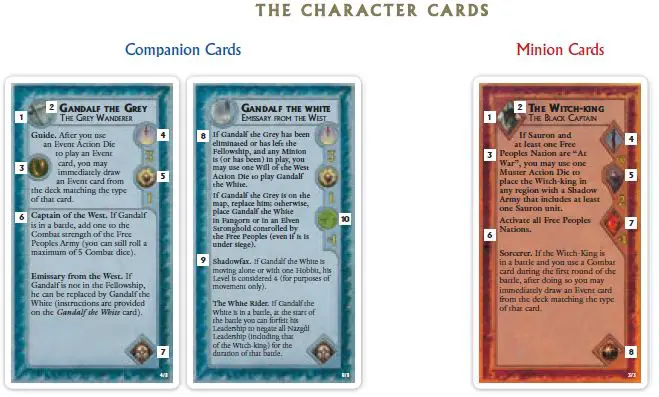
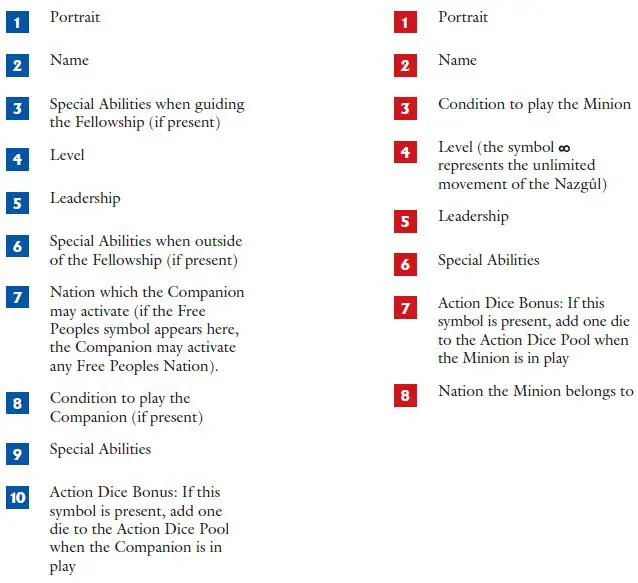
I. Characters
Playing Free Peoples Characters
Free Peoples Characters (Companions) are brought into play in two ways:
Companions enter play when they are separated from the Fellowship;
Gandalf the White and Aragorn - Heir to Isildur, are brought into play using a Will of the West die. Use the rules specified by their Character card.

Playing Shadow Characters
Shadow Characters (Minions) are brought into play using a Muster die. This use of a Muster die does not follow the normal rules for recruitment - use the rules specified by the Character card.
Moving Characters
Characters are moved on the game board during the Action Resolution phase by using a Character Action die result (the Sword icon), or by playing an Event card that allows the movement of Characters.
A Character Action die result can be used:
- To move all Companions who are not in the Fellowship (Free Peoples player only).
- To move all Nazgul and Minions (Shadow player only).
Note: If a Character's Level is 0, he cannot move, even when attached to an Army.
Moving Companions

When the Free Peoples player uses a Character Action die result to move his Characters, all Companions on the map may be moved a number of regions equal to or less than their Level.
However, a group of Companions in the same region can be moved to a common destination at a distance equal to or less than the highest Level in the group.
The Free Peoples player can create more than one group from the Companions in the same region, which may then move independently to different destinations.
When Companions move, they are subject to the following rules:
They are unaffected by any enemy Army. When moving alone or with other Companions, they can enter or leave a region that contains Shadow units, but must stop upon entering a region containing a Stronghold controlled by the Shadow player.
They can never leave or enter a region containing a friendly Stronghold besieged by an enemy Army (except as a result of certain Event card effects).
They cannot cross impassable terrain (black borders).
Moving Nazgul and Minions
When the Shadow player uses a Character Action die result to move his Characters, each Nazgul (including the Witch- king) can be moved to any region on the game board with a single move. One, some, or all Nazgul can be moved this way using a single Character Action die result.
The only restriction is that the Nazgul can never move this way into a region that contains a Stronghold controlled by the Free Peoples player, unless that Stronghold is besieged by a Shadow Army.
Note that in War of the Ring, for the purposes of rules clarity, the Witch-king is considered to be a Nazgul (including with respect to all references to "Nazgul" on Event cards, unless differentiated in the card text by the use of his name or the "Minion" title).
The Mouth of Sauron and Saruman do not possess the unlimited movement ability of the Nazgul; they are subject to the following rules:
Saruman can never leave the Orthanc region.
The Mouth of Sauron can move up to three regions if moving alone. Like Companions, he cannot cross impassable terrain, he ignores any enemy Army when moving alone and cannot leave or enter a region that contains a friendly Stronghold besieged by an enemy Army.
Like the Nazgul, any Minion moving without an Army cannot be moved into a region containing a Stronghold controlled by the Free Peoples unless it is besieged by a Shadow Army.
II. Armies And Stacking
Army Composition
All friendly Army units, Leaders and Characters inside a single region form an Army. An Army can be composed of units belonging to different Nations fighting on the same side.
If a moving Army enters a region occupied by another friendly Army, the two Armies are merged into a single Army at the end of the action. Likewise, an Army can be splitted by simply moving part of its units into an adjacent region and leaving the rest behind.
Stacking Limit
A single region can contain a maximum of 10 Army units.
If, at the end of any action (for example, after moving or mustering troops), more than 10 units are in the same region, the excess units must be removed from the game by the controlling player.
Units removed in this way can re-enter the game later as reinforcements.
Army Boxes
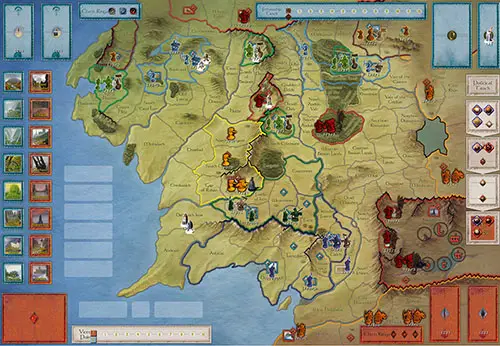
Along the left side of the board can be found three numbered Army Boxes.
If the size and number of plastic figures happen to be troublesome to physically fit in a single region, the controlling player may move some or all his figures from a region to a free Army Box, placing the corresponding numbered Army counter in the region for identification purposes. Figures can be moved back to the board from the Army Box at any time.
Players must be careful not to exceed the stacking limit when making use of an Army Box. For all game purposes, the figures in the box are considered to be in the region containing the Army counter.
Example: The Free Peoples player moves an Army composed of 10 Gondor regular units in Lossarnach, and finds out that they take up too much space. Army Box number 3 is free, so the player removes 8 of the Gondor regular figures and places them in the Army Box. He then places the Army counter number 3 in Lossarnach with the remaining two figures. Whenever it becomes necessary, the counter may be replaced by the figures in the box.
III. Recruiting Troops
Recruiting new Units and Leaders
Additional Army units and Leaders are brought into the game during the Action Resolution phase by using a Muster Action die result (a Helmet icon) as an action, or by playing an Event card that recruits new units.
To bring reinforcements onto the board when using a Muster Action die result, the new figures must belong to a Nation "At War".
Using a single Muster Action die result, a player can bring the following figures into play:
- two Regular units, or
- two Leaders/Nazgul, or
- one Regular unit and one Leader/Nazgul, or
- one Elite unit.
All newly recruited figures are taken from the player's available reinforcements and can only be placed in a free City, Town, or Stronghold of the Nation to which they belong.
When two regular units or Leaders, or a combination of the two, are brought into play using a Muster Action die result, they can belong to different Nations, as long as both Nations concerned are "At War" and each figure is placed in a City, Town, or Stronghold of the Nation to which the unit belongs.
Nazgul are always recruited in the Strongholds of the Sauron Nation.
Recruiting Restrictions
When mustering two figures (units and/or Leaders) using a Muster Action die result, the two figures must always be placed in separate Settlements.
You cannot muster or recruit troops in a Settlement controlled by the enemy. You cannot muster troops in a Stronghold besieged by the enemy.
Reinforcements are limited to the available figures. Thus, if all figures of a type are in play, no additional figures of that type can be recruited. Shadow units and Nazgul removed as casualties are placed back among the available reinforcements (thus allowing for an almost limitless mustering).
All Characters (including Shadow Minions), Free Peoples units and Free Peoples Leaders, are permanently out of the game if eliminated; they should be placed in an area designated for casualties (such as back in the box) and are no longer eligible for recruitment.
Using an Event card to Recruit Troops
When a player uses Event cards whose effects is to recruit troops in a certain region (or regions), he is allowed to recruit in that region even if:
- the troops belong to a Nation which hasn't reached the "At War" step yet;
- the region includes a Stronghold under siege.
Other restrictions still apply, including:
the figures must be available to be recruited;
the recruitment cannot be made if the region is not free (with the notable exception of a Stronghold under siege previously indicated).
Example: The "Riders of Theoden" Event card lets a player recruit troops in a Rohan region containing a Companion. If there is a Companion in Eastemnet, but that region also contains enemy troops, it is not possible to recruit there. However, if the Companion is with a Free Peoples Army besieged in Helm's Deep, recruitment is possible.
IV. Army Movement
Moving an Army
Armies are moved on the game board during the Action Resolution phase by using either an Army Action die result or a Character Action die result (if the moving Army contains a Leader or Character), or an Event card that allows the movement of Armies.
A player using an Army Action die result can move two different Armies, but can not move the same Army twice. A player using a Character Action die result can move a single Army containing at least one Leader or Character. An Army is moved by simply moving its units to an adjacent region.
Splitting an Army
It is not mandatory that you move all units in an Army. An Army can split itself into two different Armies by moving only a portion of its units to an adjacent region.
Free Peoples Leaders can never be in a region without combat units, so if a moving Army completely vacates a region, all such Leaders must follow the Army. If the Army splits, Leaders may choose to either move or stay behind. When a player uses a Character Action die result to move an Army and the Army splits, at least one Leader or Character must join the moving units.
Note that, unless used as the subject to move an Army with a Character Action die result, Characters (Companions and Minions) and Nazgul are not obliged to move with an Army, as they can remain in a region on their own.
Movement Restrictions
The moving units, as well as Leaders and Characters, can be chosen freely, as long as no figure is moved twice using the same action (this includes movement effectuated by Event cards, unless the card explicitly has different instructions).
Thus, during the same action, it is never possible to move an Army into a region containing another friendly Army (joining the two Armies into one), and then move the
new combined Army with the second movement allowance, as this would move the units in the first Army twice. For purposes of moving under one action, these Armies should be kept separate until both movements have been taken.
Note: An Army can move multiple times in a single turn, as long as it uses a different Action die for each movement.
Any region entered by a moving Army must be either a free region (see Free Regions, on page 10) or an enemy-controlled Settlement that is free of enemy Army units. These are known as "regions that are free for the purposes of Army movement".
If a region is occupied by enemy units, it cannot be entered but must be attacked (see page 28).
After moving an Army into a region, you can not exceed the stacking limit of 10 units.
If a moving Army includes any units from a Nation which is not yet "At War" on the Political Track (see page 35), it cannot enter a region that is inside the borders of another Nation (even if friendly).
An Army can never move into a region that is completely separated from the region the Army is currently in by a black line (which denotes impassable terrain). The same restriction applies to Characters (see page 24) and to the Fellowship (see page 38).
Using an Event card to Move Armies
When using Event cards whose effects allow a player to move Armies, all regular movement restrictions must be respected. Some Event cards allow a player to move one or more Armies through more than one region, and the following additional rules apply:
-
Each Army to be moved is defined at the beginning of its movement (it is possible to split the Army before moving). The Army cannot pick up or drop figures along the way.
-
If an Army moves through an enemy-controlled Settlement, it captures that Settlement.
-
If an Army moves through regions containing other friendly Armies, stacking limits are checked only after all the multiple movements have been completed.
V. Battle Resolution
Attacking with Armies
An Army is allowed to attack an enemy Army during the Action Resolution phase by using an Army or a Character Action die result, or by playing an Event card that allows an Army to attack.
Only Armies belonging to a Nation "At War" on the Political Track can start a battle. A player can use an Army Action die result, or a Character Action die result (if the Army contains at least one Leader or Character), for the following purposes:
To attack an enemy Army in an adjacent region.
To initiate a siege or a sortie against an enemy Army in the same region (see page 32).
Note that, unlike when used merely for movement, an Army Action die result can only activate a single Army for the purpose of attacking.
An Army using a Character Action die result to make an attack must contain at least one Leader or Character.
Note: When a battle is initiated, attacking units do not actually move into the region they are attacking, but instead stay in their present region for the duration of the attack. Only if the battle is over and won, the attacker may move his attacking units into the embattled region.
Splitting an Attacking Army
It is not mandatory for all figures composing an Army chosen to attack to participate in the battle.
When a player is about to attack, he can split the Army into two, dividing the figures contained in the region into an attacking Army and into a second Army, called the rearguard, that will not take part in the upcoming battle.
Each of the two newly-created Armies must contain at least one Army unit, while Leaders, Companions, or Minions can be distributed among the two Armies as the player sees fit.
Note: If the player is using a Character Action die result to attack, the newly-created attacking Army must contain at least one Leader or one Character.
The Army chosen as the rearguard does not affect the battle in any way, it cannot be targeted by Combat card effects, its figures cannot be chosen as casualties, and it cannot advance into the contested region if the battle is won.
If the attacking Army includes one or more figures belonging to Nations not "At War", then it is mandatory to split the Army (leaving with the rearguard any figure which is not "At War").
Note that all defending figures (units, Leaders and Characters) are always considered to be part of the battle.
Combat Strength and Leadership
Attacking and defending Army units, Leaders, and Characters all participate in determining the Combat Strength and Leadership of the Armies involved in battle.
-
The Combat Strength of an Army is equal to the total number of its Army units (Regular and Elite units). Combat Strength determines the number of dice rolled in the Combat roll, up to a maximum of five dice. This means that units in excess of five do not add to the number of dice rolled by an Army, but an Army with more than five units is usually able to retain its full Combat Strength for a longer period-see Remove Casualties, on page 30.
Example: An Army containing three Regular units and one Elite unit has a Combat Strength of 4. Alternately, an Army of six Regular units and two Elite units has a Combat Strength of 8, but will still only roll the maximum of five dice.
-
The Leadership of an Army is equal to the number of Leaders (or Nazgul), plus the Leadership ratings of all participating Characters (as shown on each Character card). Leadership determines the maximum number of dice that may be rolled in the Leader re-roll, up to a maximum of five dice.
Often, Combat cards and Character special abilities modify the Combat Strength and Leadership rating of an Army involved in battle. In either case, the maximum of five dice can never be exceeded, regardless of modifiers.
Resolving a Battle
A battle is resolved in a series of Combat rounds. During each round, both players follow the steps below:
- Play a Combat card (optional).
- Roll the dice for the Combat roll.
- Roll the dice for the Leader re-roll.
- Remove casualties.
- Choose to Cease the attack or Retreat.
Each step is resolved simultaneously by the players (both perform step 1, both perform step 2, etc)..
1. Play a Combat Card
At the beginning of each Combat round, each player may play one Event card from his hand as a Combat card.
First, the attacker declares whether he wants to use a Combat card and chooses the card. Then, the defender declares if he wants to use a Combat card and chooses the card. The defender may play a Combat card even if the attacker chooses not to.
Cards are chosen secretly, then revealed simultaneously. However, the back of the chosen card is always visible to the opponent.
It is important that each player carefully reads the text on his Combat card before choosing it, especially with respect to its requirements, modifiers, and application.
Unless otherwise specified, the effects of a card only apply for the current Combat round. Combat cards are always discarded as soon as the Combat round is over.
Timing of Combat Cards.
The text of a Combat card should establish with reasonable clarity when the effects of a card should be applied during the battle.
In the case of any uncertainty as to timing, the initiative number in the bottom left corner of the card indicates which card must be applied first: the card with the lower number is applied first.
Example: The Shadow player is the attacker and plays "Durin's Bane", which allows him to roll a special attack before the normal combat begins (Initiative: 2). The Free Peoples player has played "Scouts", however, which allows him to retreat his Army before normal Combat begins (Initiative: 1).
Since "Scouts" has a smaller number, it is resolved first and the Free Peoples Army retreats before the special attack of "Durin's Bane" is possible. Both cards are then discarded.
If the two cards have the same initiative, the effects of the defender's card are always applied first.
Note that if a Combat card has more than one effect (for example, the "Mumakil" card), it has one initiative number for each effect with a different timing.
Requirements of Combat Cards.
-
Some Combat cards have specific requirements (indicated in boldface under the Combat title) that must be met for the card to be played. For example, some cards can be played only if friendly Elite units are involved in the battle.
-
Many cards require a player to forfeit Leadership, which means that the selected figure (or figures) whose Leadership is forfeited does not count as a Leader (for the purpose of determining the Leadership rating) for that Combat round. You may not forfeit the Leadership of a figure, if that Leadership has been canceled for any reason.
Attack Rolls of Combat Cards.
Some Combat cards allow an additional attack to be made, either before the Combat roll (step 2) or after the removal of casualties (step 4). Unless otherwise specified, these attacks use the same base hit number as the Combat roll. They are carried out in the same manner as the Combat roll (see below), with three exceptions:
- A Leader re-roll is never applicable.
- Any modifier to the Combat roll granted by the opposing player's Combat card does not apply.
- Any casualties are removed immediately, and they are not influenced by any effect of the opponent's Combat card.
2. Roll the Dice for the Combat Roll
During this step, each player rolls a number of Combat dice equal to the Combat Strength of their respective Armies (up to a maximum of five dice).
Each die rolled scores a hit on a result of '5' or '6.' The effects of Combat cards, Strongholds, Cities, and Fortifications, however, may raise or lower the target number required to hit.
3. Roll the Dice for the Leader Re-roll
After the Combat roll, both players can re-roll a number of failed die rolls equal to their Leadership (up to a maximum of five dice).
The result required to score a hit on the Leader re-roll remains the same as the result required for the Combat roll (unless modified by a specific Combat card effect).
Example: A player has five Army units and three Leaders in a battle. His Combat Strength is thus 5 and his Leadership is 3. He rolls five dice as a Combat roll, getting '1,' '3,' '5,' '5,' '6' (three hits).
His Leadership is 3, but only two dice failed to hit, so he picks them up and rolls those two dice again. This time one die hits, for a grand total of four hits.
Modifiers to Rolls
Combat rolls and Leader re-rolls can be modified by cards or special abilities. Modifiers to rolls are indicated by "add one", "add two", and so on. The modifier is added to the result of each rolled die, and then the modified result is compared to the number needed to hit. Multiple modifiers are cumulative, so they must be added together to get the total modifier.
Example: If you add one to the dice in the Combat roll, the roll will score a hit on the result of a '4,' '5,' or '6' rather than only '5' or '6.'
Usually, Combat card effects will instruct a player to modify only the Combat roll, or the Leader re-roll, or both.
Note: A roll of a '1' is always a miss, and a roll of a '6' is always a hit, regardless of any modifiers.
4. Remove Casualties
After both players have completed their Combat roll and Leader re-roll, they remove their losses.
The number of hits the opponent scored determines the number of casualties that a player's Army must take. The attacker decides first how to remove his units, and casualties are determined as follows:
For each hit scored by the opponent:
- remove one Regular unit, or
- replace one Elite unit with one Regular unit of the same Nation.
For every two hits, the player can remove casualties as above, twice, or can simply remove one Elite unit.
Example: A player has taken two hits. He can either remove two Regular units, or can replace two Elite units with two Regular ones, or can remove one Elite unit.
When replacing one Elite unit with a Regular one, the Regular unit can be taken from the previous casualties (if any). Otherwise, the player takes the replacement from the available reinforcements, if able.
Any Elite units thus replaced by the Free Peoples player are placed among the casualties. If no Regular units are available in either the casualties or the reinforcements, the Elite unit cannot be replaced and is eliminated without further effect.
Free Peoples And Shadow Casualties
As described earlier, casualties taken among the Free Peoples units are placed aside and are considered out of the game. It is therefore important that casualties not be placed in the same area as the available Free Peoples reinforcements.
The Shadow player, on the other hand, does not have this problem, and his units are never out of the game. Shadow casualties may therefore be placed back with the available reinforcements.
Elimination Of Leaders And Characters
If all the Army units involved in a battle are eliminated, then all Leaders (including Characters) that were part of that Army are also immediately removed from play.
Just like with Army casualties, Free Peoples Leaders are permanently out of the game. Nazgul can still re-enter as reinforcements.
Characters (including all Shadow Minions - Saruman, the Mouth of Sauron and the Witch-king) that are eliminated are always permanently removed from the game unless their Character card specifies otherwise.
Note that Characters in a region without friendly Army units are never drawn into battle, as they can exist in a region that contains enemy Army units. Except as a result of certain Event card effects, Characters (Minions and Companions) are only vulnerable when accompanying a friendly Army in battle, and can therefore be deviously difficult to eliminate.
5. Choose to Cease the Attack, or Retreat
At the end of each Combat round, the attacking player has the option to cease the attack.
If the attacker chooses to continue the battle, however, then the defender has the option to retreat. If the defender declines to retreat, another Combat round is initiated.
If the attacking Army ceases its attack, then its surviving units simply remain where they were at the start of the battle. If the defending player chooses to retreat, however, his entire Army must immediately retreat to an adjacent free region. If no such region is available, the defender cannot choose to retreat.
Special Exceptions:
- An Army defending a region that contains a friendly Stronghold may retreat into the Stronghold itself at the beginning of any Combat round by Retreating into a siege (see later).
- A besieged Army cannot retreat.
- If the retreating Army contains a Character of Level 0, that Character is left behind in the region.
End of Battle
A battle ends when the attacker ceases to fight, the defender retreats, or when one or both Armies are completely eliminated.
If the defending Army is eliminated or retreats, the attacker may immediately move all or part of the attacking Army into the embattled region.
If an embattled region invaded by a successful attacker contains an enemy Stronghold, and that Stronghold contains enemy units, the Stronghold becomes besieged (see Attacking a Stronghold, below).
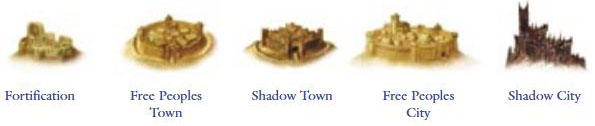
VI. Fortifications, Cities, Strongholds, And Sieges
Many battles in The Lord of the Rings were fought as armies sought to either defend or conquer a fortress, ford, city, or the like. Fortifications, Cities, and Strongholds are therefore a central element in War of the Ring, as detailed in the following rules.
Attacking a City or Fortification
During an attack against an enemy defending a region containing a City or Fortification, during the first round of combat only the attacker hits on a result of '6' or higher (instead of '5' or higher).
After the first Combat round is resolved, normal rules apply.
Attacking a Stronghold
When attacking an enemy defending a region containing a Stronghold, before every combat round, the defender must choose to either fight a field battle or retreat into a siege.
Fighting a Field Battle
A field battle is resolved normally as described before.
Retreating into a Siege
As soon as the defender retreats into a siege, the region around the Stronghold is left open to the enemy, who may immediately advance into the region.
If the attacking Army chooses to advance, the Stronghold is now considered under siege and the battle is over. The defending figures are now considered to be inside the Stronghold itself and are placed in the appropriate Stronghold Box found on the game board (if needed for space considerations).
A Stronghold under siege can contain a maximum of five Army units (and any number of Leaders). Any unit in excess of five is removed immediately when a Stronghold comes under siege. Units removed in this way can re-enter the game later as reinforcements.
A siege ends if the attacking Army leaves the region, or if at any time the attacking or defending Army is completely eliminated. During the siege, the region surrounding the Stronghold is considered free for the besieging player, while the Stronghold itself remain controlled by the player under siege.
When a siege ends, move any surviving defenders from the Stronghold Box to its region on the map again.
Conducting a Siege
When a Stronghold is under siege, the troops within can only be attacked by an Army in the same region using an Action die for battle during the Action Resolution phase.
Any battle starting against a besieged Army is considered a siege battle. During a siege battle, the attacker hits only on a result of '6' or higher, while the defender hits on a result of '5' or higher as normal.
Also, unlike a normal combat, a siege battle only lasts for one Combat round, unless the attacker decides to voluntarily reduce one of his participating Elite units to a Regular unit. If the attacker decides to do so, the siege battle lasts for an additional round.
It is possible to extend a siege battle repeatedly, as long as the attacker has available Elite units to reduce at the end of a round. If a siege battle ends and there are still defending and besieging units left, the defenders are still considered under siege.
Restrictions
A defending Army under siege may never choose to retreat to an adjacent region.
An Army besieging a Stronghold is free to move away from the region. If no Army units are left behind, the Stronghold is no longer under siege.
Sortie
An Army inside a Stronghold under siege may attack the besieging Army by using an Action die for battle during the Action Resolution phase.
A battle in which the attacker is under siege is called a sortie. In a sortie, the besieged Army fights a field battle for at least one round, forfeiting the advantages of defending the Stronghold.
A rearguard may be formed and left behind in the Stronghold. Combat is resolved normally (with both Armies scoring hits on a '5' or higher) but, if the attacker wants to cease the battle, the attacking Army moves back into the Stronghold.
The besieging defending Army may retreat to a free adjacent region as usual. If the attacking Army wins the sortie, it cannot advance outside of the region.
Relieving a Siege
An Army in an adjacent region can attack an enemy Army besieging a friendly Stronghold using the normal rules. The Army inside the Stronghold does not participate in the battle.
The attacking Army cannot advance into the region containing the Stronghold unless the besieging Army is destroyed or retreats.
Reinforcing a Siege
While a Stronghold is under siege, the besieging player can move new troops into the region (because it is a free region). This is considered a movement, not an attack.
VII. Capturing a Settlement
At the start of the game, all Settlements belong to the Nation in which their region is located. A settlement is considered captured when:
An enemy Army enters a region containing a City, or Town, or unoccupied Stronghold, or
All the units defending a Stronghold are eliminated and the besieging Army still has at least one unit remaining in the region.
The capturing player places a Settlement Control marker on the region to indicate his control. A captured City, Town or Stronghold cannot be used for mustering troops or advancing the Political Track.
Captured Cities and Strongholds award the capturing player Victory points for the purpose of determining a Military Victory (see page 44). Advance the Victory Point marker of the capturing player on the Victory Point Track by one step for a captured City, or two steps for a captured Stronghold.
If the original owner of the region is able to recapture it, the Settlement Control marker is removed and any Victory points earned from the conquest are lost.
Settlement Control Markers
 Free Peoples Settlement Control Marker.
 Shadow Settlement Control.
Continue Reading


