Viscounts of the West Kingdom is set at a time when the King's reign began to decline, circa 980 AD. Choosing peace over prosperity, our once strong King began offering our enemies gold and land to lay down their axes.
But peace is a tenuous affair. As poverty spread, many people lost faith in his ability to lead and sought independence from the crown. Since finding favor in his courts, our future has also become uncertain.
As viscounts, we must be wise and decisive. Loyalty is to be upheld, but gaining favor among the people must be our priority, should there be a sudden shift in power.
Components
- 4 Corruption and 4 Virtue Markers
- 80 Workers
- 50 Silver
- 4 Viscounts
- 12 Trading Posts, 12 Workshops, 12 Guildhalls
- 72 Resources
- 1 Castle
- 1 Start Player Marker
- 35 Manuscripts
- 4 Player Boards
- 5 Main Board Segments
- 110 Townsfolk Cards
- 4 Cleric Bonus Cards
- 1 Castle Leader Card
- 1 Poverty and Prosperity Card
- 10 Player Cards
- 1 AI Reference Card
- 8 Starting Scheme Cards
- 8 Future Scheme Cards
- 4 Multiplier Cards
- 30 Debt and Deed Cards
- Instructions
Object of the Game
The aim of Viscounts of the West Kingdom is to be the player with the most victory points (VP) at the game's end. Points are gained by constructing buildings, writing manuscripts, working in the castle and acquiring deeds for new land.
Players begin with a handful of townsfolk, but should quickly seek out more suitable talents to advance their endeavours. Each turn they will be travelling around the kingdom, looking to increase their influence among the various areas of society.
The game ends once the Kingdom reaches poverty or prosperity - or potentially both!
Setup
Follow these steps to set up Viscounts of the West Kingdom:
-
Turn the 5 Main Board Segments faceup to the correct side, depending on the number of players in the game (see the numbers printed on the inside edge of each Main Board Segment).
Mix up the Segments and place them in a random order (ignore the numbers in red for now), so that the inside edges form a circle.
-
Place the Castle in the middle of the Main Board, so that it clicks into place, locking all the Segments together. The orientation of the Castle should be random.
-
Shuffle all the Neutral Townsfolk Cards and separate them into 5 roughly-equal piles. Place 1 pile faceup onto each of the indicated spaces of the Main Board.
-
Find the 5 grey-backed Manuscripts (the rest are black).
Place these facedown on the table, forming 5 piles. Mix up all the black-backed Manuscripts and place 6 facedown on top of each pile. There should now be 7 in each pile.
Place 1 pile faceup onto each of the indicated spaces of the Main Board (all the grey-backed Manuscripts should now be visible on the top of each pile).

Note: While both Townsfolk Cards and Manuscripts remain in faceup piles, players are not permitted to look through them.
If some players have issues with this, they can create the piles so that they are facedown, with only the top-most card/tile faceup. However, this will require more upkeep from players throughout the game.
-
Place all Silver, Ink Wells, Gold, Stone and Multiplier Cards in a Main Supply near the Main Board. Also, place the 4 Cleric Bonus Cards and Castle Leader Card nearby.
-
Give each player 1 Player Board (with the side shown below, faceup) and the following components in their chosen player color:
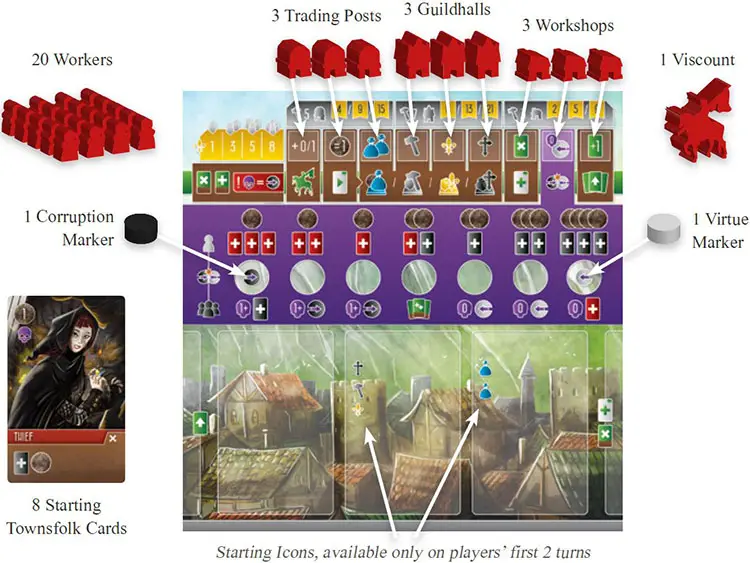
-
Randomly decide on a start player and give them the Start Player Marker. This will remain with them for the rest of the game.
-
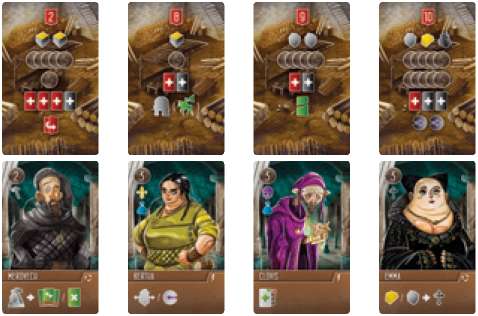
Shuffle the Player Cards and lay out a number of cards in a line, equal to the number of players in the game, plus 1.
Then shuffle the Hero Townsfolk Cards and place 1 below each of the Player Cards, forming pairs of cards (1 Hero Townsfolk Card for each Player Card. This image shows how it might look for a game with 3 players.
-
In reverse turn order (starting with the player to the right of the Start Player Marker and moving counter-clockwise around the table, each player selects 1 pair of cards and follows these steps:
Place their Viscount on the matching numbered space of the Main Board (based on the number at the top of their chosen Player Card).
Gain all resources, Silver, Debts and Deeds, as listed on their Player Card.
Take any additional steps indicated at the bottom of their Player Card (flipping Deeds, gaining Virtue, etc).
Flip over their Player Card and place it alongside the top left side of their Player Board as a reference.
Shuffle their Hero Townsfolk Card with their 8 Starting Townsfolk Cards and any other Neutral Townsfolk Cards gained during Setup, to form a facedown Draw Pile to the left of their Player Board.
Players should each draw a starting hand of 3 cards from the top of their Draw Piles.
Note: Player Cards 3, 5 and 6 can use their effects on any Segment. Player Card 8 must be used on the same space as that player's Viscount. Player Card 9 can be used to Destroy any of their cards before shuffling.
-
On top of the Poverty Card, place a number of Debt Cards (unpaid-side faceup), based on the player count.
Place all remaining Debt Cards below the Poverty Card. On top of the Prosperity Card, place a number of Deed Cards (acquired-side faceup), based on the player count. Place all remaining Deed Cards below the Prosperity Card.
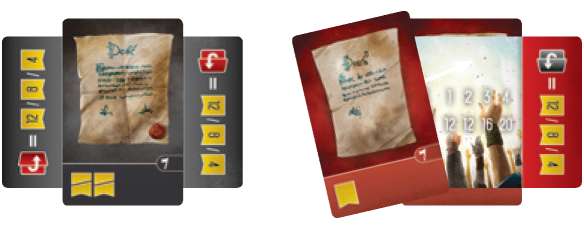
Note that the number of Debts and Deeds are not always equal at different player counts.
Debts and Deeds
Before we dive too far into the gameplay, it may help to talk about Debts and Deeds first. As mentioned during Setup, Debts are stacked above and below the Poverty Card, while Deeds are stacked above and below the Prosperity Card.
Throughout the game, players will be gaining Debts and Deeds. These are always taken from the tops of these 2 piles.
The game's end is triggered once either the Poverty Card or Prosperity Card are revealed. Whenever the Poverty or Prosperity Cards are revealed, turn them over and place them alongside the Debts and Deeds piles.
This way players can continue to draw from these piles if required. Both Debts and Deeds are considered to be unlimited. In the rare case that they run out, players should use the Multiplier Cards to accommodate.
Throughout the game, players will also have the chance to flip both Debts and Deeds:

At the game's end, unpaid Debts, will cause players to lose 2 VP. When flipping a Debt (from unpaid to paid, players immediately gain any 1 resource. At the game's end, acquired Deeds will gain players 1 VP.
However, if players manage to flip their Deeds (from acquired to approved), they will instead gain 3 VP.
If the Poverty or Prosperity Cards are revealed, the players who flipped the most cards (of the indicated type) will also gain additional points.
This causes a seesaw effect - as the Debt pile starts to run out, players become aware that the players with the most flipped Deeds will score more points from the Poverty Card.
Therefore, players might aim towards gaining more Deeds, which will then push the game closer towards the Prosperity Card being revealed.
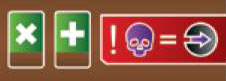
Virtue, Corruption & Criminals
Another key concept to understand is how Virtue and Corruption impact the game. Players will be gaining both through various actions and effects. Gaining Virtue and Corruption is also the most common way to advance towards gaining Debts and Deeds.
Any time players gain Corruption  , they must move their Corruption Marker 1 space to the right on their Player Board. Likewise, any time players gain Virtue
  , they must move their Virtue Marker 1 space to the left on their Player Board.
If they cannot move either token (because they have already reached the opposite end, then any additional movements are ignored. If players ever gain both Corruption and Virtue at the same time, they must resolve the Corruption movement first.
Once Corruption and Virtue Makers collide, they remain stuck together and will continue to move together.

How Corruption and Virtue collisions are resolved will be explained in detail later. But for now, this i page should help make the next few pages make a little more sense when reading for the first time.

Criminals are wilds! This won't make too much sense when reading this for the first time, but we will elaborate more throughout the rules.
Just note that when taking primary actions, each Criminal Icon can count as any other single Icon. However, they do not count as other Icons for other purposes.
Townsfolk Card Layout
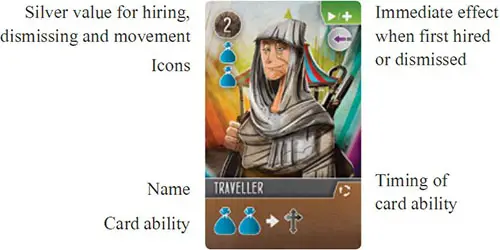
This indicates either a cost, action, requirement, or event on its left side and reward or some other effect on its right side.
For example this Traveller allows players to treat each pair of Merchant Icons as a Cleric Icon, while on their Player Board.
Game Play
Viscounts of the West Kingdom is played over an undetermined series of Rounds. Each Round consists of each player taking 1 turn (beginning with the player with the Start Player Marker , followed by the player on their left (clockwise around the table , and so on. All Victory Points will be calculated at the game's end.
Players will be moving through a number of phases on each turn, with the main objective being to move their Viscount clockwise around the Main Board to take 1 of 4 primary actions and potentially hire new Townsfolk.
The phases that players take each turn are laid out from left-to-right across their Player Boards:
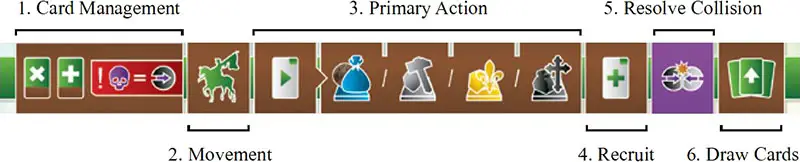
Phase 1: Card Management
During this phase, players will be managing a shifting line of Townsfolk Cards on their Player Boards. These cards will provide players with Icons, useful for taking the 4 primary actions.
When a card is first added to the line, it also determines a player's movement for that turn. All cards have either an immediate  , ongoing
  or drop-off
  effect.
During this phase, players must follow these steps:
-
Move all Townsfolk Cards currently on their Player Board, 1 space to the right.
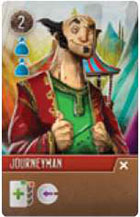
If this causes a card to drop off the right side of their Player Board, it should be placed faceup into their discard pile on the right. If this card has a drop-off effect, it must be resolved now.
For example, this Journeyman rewards the current player with a Free Hire and 1 Virtue when dropping off their Player Board.
-
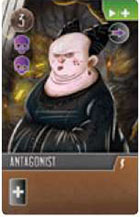
Place 1 Townsfolk Card from their hand into the left-most space of their Player Board. If this was a Criminal
 , that player immediately gains 1 Corruption for each Criminal icon on their Player Board.
Also, if this card had an immediate effect, it must be resolved now.
For example, this Antagonist would cause the current player to gain 2 Corruption when played, plus 1 more Corruption for each other Criminal Icon on their Player Board.
In addition to that, this card would also cause them to immediately gain 1 Debt Card.
It is possible for players to have only 3 cards. They are never allowed to have fewer than 3. On a turn with 3 cards, the right card would drop off, then be "shuffled" to form a new Draw Pile, before being placed into the left space of the Player Board.
If a player starts their turn with no cards in hand, they must blindly play the top card from their Draw Pile, to their Player Board.
Phase 2: Movement

During this phase, players will be moving their Viscount clockwise around the Main Board. The distance they must move is equal to the Silver value at the top-left of the Townsfolk Card they just played.
Players can never move fewer spaces than this amount, but may pay Silver to move further (1 Silver per additional space).

If a Viscount ever finishes their movement on the same space as an opposing Viscount, that opposing player may immediately rearrange the Townsfolk Cards on their own Player Board. Players are reminded of this on their Player Cards.
When moving, players must follow the arrows leaving their current space. They can never move backwards. However, it is possible to do a complete loop of the Main Board, finishing right back where they started. This would cost a lot of Silver though.
Phase 3: Primary Action

During this phase, players will take just 1 of the 4 possible primary actions.
Regardless of which action they take, players will be using a combination of Icons on their Player Boards (excluding discard piles, spending resources, or using Icons on a dismissed Townsfolk, to help fund their chosen action.
The 4 primary actions are:


As part of their primary action, players may dismiss the faceup Townsfolk Card adjacent to their Viscount to gain more Icons. However, players can only do this if the Townsfolk Card has Icons matching the primary action they are taking (note that Criminal Icons are wilds).
The cost to dismiss a Townsfolk Card is the Silver value at the top-left of the card. Players can only ever dismiss 1 Townsfolk Card each turn. When dismissing Townsfolk, players must pay the required Silver, then remove the card entirely from the game.
They temporarily gain all Icons printed down the left- side of that Townsfolk Card for their primary action and also gain the immediate effects printed on the top-right of the card. Any abilities at the bottom of dismissed Townsfolk Cards have no effect.
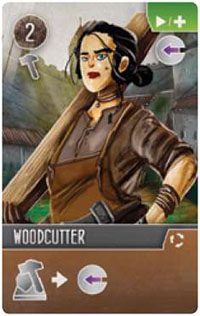
For example, this Woodcutter would cost 2 Silver to dismiss and immediately rewards 1 Virtue. The current player would also gain 1 additional Builder Icon for their primary action.

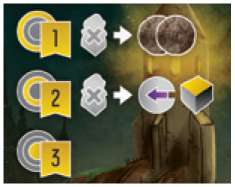
Trade can only be done on the outside path of the Main Board. To fund this action, players may count Merchant Icons  and Criminal Icons on their Player Board, spend Silver (1 per extra Merchant Icon) or spend Silver to dismiss the Townsfolk Card adjacent to their Viscount.
What they gain in return is dependent on the location of their Viscount. Each space along the outside path has an exchange associated with it. Players may use this exchange as many times as they wish, so long as they can afford it. The possible exchanges are:

Gain 1 Silver per Merchant Icon. Note that spending Silver to fund this action has no additional gain.
However, it may still be useful to spend Silver to dismiss Townsfolk for additional Merchant Icons, or to make use of their dismiss abilities (top-right of each Townsfolk Card).

Gain 1 Ink Well, 1 Gold or 1 Stone, per 2 Merchant Icons. A single Merchant Icon gains nothing.

Destroy 1 Townsfolk Card per 3 Merchant Icons. Destroying cards helps to refine a player's deck. Any time players destroy cards, they are removed from the game entirely.
Players gain Silver from the supply, equal to the Silver value printed on the cards being destroyed.
When destroying cards, players may either do so from their hand, or blindly from the top of their Draw Pile. Destroying cards is always optional.

Flip 1 Debt or 1 Deed per 4 Merchant Icons. When flipping | multiple cards, players may do so in any combination.

Constructing a Building can only be done on the outside path of the Main Board. To fund this action, players may count Builder Icons  and Criminal Icons on their Player Board, spend Stone (1 per extra Builder Icon) or spend Silver to dismiss the Townsfolk Card adjacent to their Viscount.
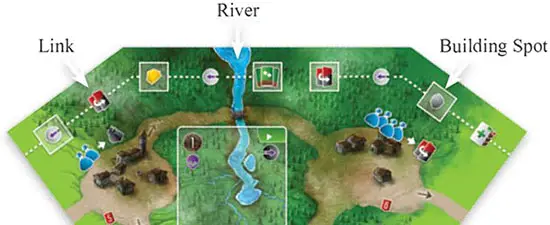
When constructing a Building, there must be an available (empty) Building Spot  at the location of the current player's Viscount. Note that on each Segment of the Main Board, a River divides the various Building Spots.
Only the Building Spots on the left of the River are accessible from the left space, while only the ones on the right are accessible from the right space.
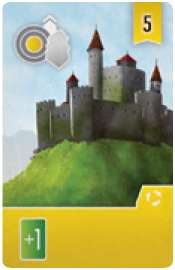
If there is an available Building Spot, a player can then decide which Building they wish to construct. Players can choose any 1 of the 9 available Buildings on their Player Board. The costs of these are shown along the top of Player Boards. If players have constructed all their Buildings, they can no longer take this action.

Workshops require 3 Builder Icons.

Trading Posts require 5 Builder Icons.

Guildhalls require 7 Builder Icons.

Players will score VPs for constructed Buildings, as indicated along the top of Player Boards. The more of a certain type they build, the more points they gain.
After deciding which Building to construct, players must fund the action (as mentioned above^. They then place the Building from their Player Board, onto the chosen Building Spot.
When doing so, the current player immediately gains the effect shown on the chosen Building Spot. Also, if the Building they place Links to a previously constructed Building, both players on either end of that Link, gain the printed effect along that line. If however, the current player has Buildings on both ends of the Link, they only gain the effect once.
Once placed onto the Main Board, each Building reveals an ongoing ability for the rest of the game. These are each positioned above the phase in which they are relevant.
The first Trading Post gives players the option to move 1 additional space for free when moving their Viscount, if they desire. The second Trading Post makes all Townsfolk cost only 1 Silver to dismiss.
The third Trading Post and all 3 Guildhalls give players permanent Icons on their Player Boards. The first Workshop gives players a Discard ability each time they hire a Townsfolk (by any means.
The second Workshop rewards players with 1 Virtue if they have no Criminals on their Player Board during collisions (explained later. The third Workshop increases players' hand limits by 1 card.

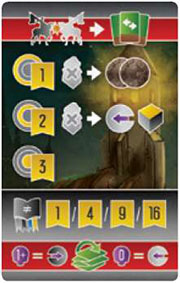
Placing Workers can only be done on the inside path of the Main Board. To fund this action, players may count Noble Icons  and Criminal Icons on their Player Board, spend Gold (1 per extra Noble Icon) or spend Silver to dismiss the Townsfolk Card adjacent to their Viscount.
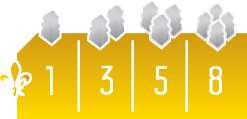
When placing Workers, players may use either 1, 3, 5 or 8 Noble Icons, to place 1, 2, 3 or 4 Workers. There is a reminder of this in the top-left area of Player Boards.
When placing Workers as a primary action, they are always placed into the first tier of the Castle, adjacent to the current player's Viscount. Players must have at least 1 Worker in their supply to take this action.
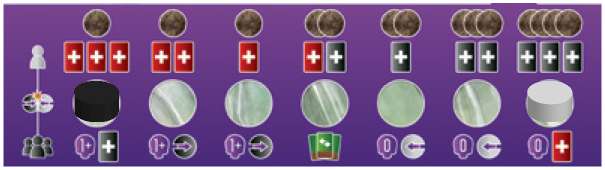
After placing their Workers, the current player must check to see if they now have 3 or more of their own Workers in the first tier of Castle section where they just placed their Workers. If they do, the following takes place:
Move 1 of their Workers from that section of the Castle, inwards from the first tier, to the second tier.
Immediately resolve the effect printed on the second tier of the Castle where they moved their Worker to.
Move 1 Worker from the same first tier section of the Castle clockwise around the Castle to the adjacent section. Also move 1 Worker in counter-clockwise direction in the same fashion.
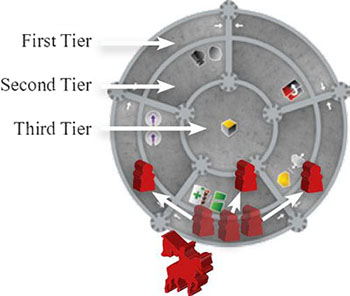
In the example above, the transparent Red Workers show where the 3 Workers were placed. The opaque Red Workers show where they would move to. Doing this would have given the current player an immediate effect of either a Free Hire or Destroy.
After resolving any Castle movement, the current player must check to see if they now have 3 or more Workers in another first-tier section. This can happen due to Workers moving around the first tiers. They would then resolve this tier in the same fashion as the previous.
If players have more than 1 tier with 3 or more Workers present, they can resolve them in any order. Note that all effects from moving Workers inwards must be resolved immediately.
After resolving all first tier movements, the current player must then look to the second tier. Again, if there are 3 or more of their Workers present in a section, they must move 1 Worker inwards to the third tier, immediately gaining any 1 resource (as printed on the Castle).
However, unlike the first tier, Workers never move clockwise or counterclockwise around the second tier. This allows players to create quick paths towards the third tier, by keeping 2 Workers stationed in a particular section of the second tier.
Once the current player has finished all their Castle movements, they must then check to see if there are more than 3 Workers (regardless of color) in any of the first or second tier sections. If there are, they must bump of a number of Workers, until only 3 remain from that section. The current player decides which Workers will be bumped off. They can even choose their own Workers.
Workers bumped of the Castle are always returned to their owner's supply. That player also gains an immediate reward. When bumped off the first tier, players gain 2 Silver.
When bumped off the second tier, players gain 1 Virtue and any 1 resource of their choice. Workers can never be bumped off the third tier. Players are reminded of this on their Player Cards. The Player Card also reminds players of how Workers score at the end of the game. Each Worker in the Castle scores VPs equal to the tier which they are on.
The Castle Leader Card is immediately awarded to the first player to move a Worker into the third tier of the Castle. This card should be kept alongside the current leader's Player Board.
However, should another player ever have more Workers in the third tier than the current leader, they take the Castle Leader Card from the previous leader and place it alongside their Player Board.
Whoever holds the Castle Leader Card at the game's end will score an additional 5 VP. Also, when drawing cards in phase 6 of each turn, the player holding this card has an increased hand limit of 1.
Note that if the leader loses this card, they do no need to discard down to their new hand limit. They simply just apply their new hand limit next time they need to draw cards.
Note: It is possible for players to have 3 of their Workers on a section of the Castle when it is not their turn (such as from a Building Link, or some other immediate effect).
In this case, the current player would resolve their movement first, followed by the opposing player. Once this is fully resolved, the current player continues their turn.

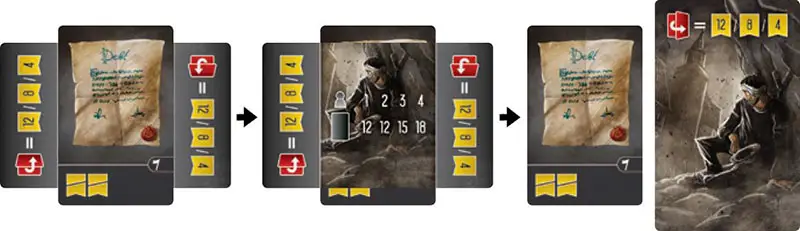
Transcribing Manuscripts can only be done on the inside path of the Main Board. To fund this action, players may count Cleric Icons  and Criminal Icons on their Player Board, spend Ink Wells (1 per extra Cleric Icon) or spend Silver to dismiss the Townsfolk Card adjacent to their Viscount.
To transcribe a Manuscript, players require a certain number of Cleric Icons, as shown on the Manuscript adjacent to their Viscount. Once they have fulfilled this requirement (with Icons, Ink Wells or a dismissed Townsfolk Card, they add the Manuscript alongside their Player Board. If it had an immediate effect , they must resolve that now. Players may only transcribe 1 Manuscript each turn.
The first player to transcribe 3 Manuscripts of the same ribbon color, immediately collects the corresponding Cleric Bonus Card and adds it alongside their Player Board. These are each worth 3 VP at the game's end.
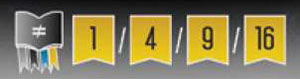
Players score VPs as printed on certain Manuscripts, in addition to VPs for their sets of different-colored ribbons. Players may have multiple sets.
For example, a set of Manuscripts with 3 different ribbons would score 9 VP.
If a pile of Manuscripts on the Main Board runs out, do not attempt to refill it. There are pre-printed Manuscripts on the Main Board. They cannot be collected, but players can still transcribe them to use their immediate effects.
Phase 4: Recruit

After finishing their primary action, players may hire the faceup Townsfolk Card currently sitting adjacent to their Viscount on the Main Board. The cost to hire a Townsfolk Card is the Silver value at the top-left of the card.
Players can only ever hire 1 Townsfolk Card during this phase. When hiring Townsfolk, players must pay the required Silver, then place the card into their discard pile. They must also immediately resolve the effects printed on the top-right of the card.
If a pile of Townsfolk Cards on the Main Board runs out, do not attempt to refill it. There are pre-printed cards on the Main Board. They cannot be hired, but players can still use their immediate effects when dismissing Townsfolk.
Phase 5: Resolve Collision

If at this point (and only at this point , the current player's Virtue and Corruption Markers are on the same space of their Player Board, they must resolve the effects now. There are a number of effects, and players must resolve them in the following order:
All players that have constructed their second Workshop, with no Criminals on their Player Boards gain 1 Virtue
All Townsfolk Cards on Player Boards that have effects during collisions are resolved.
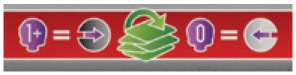
The current player gains the items printed directly above where their Virtue and Corruption Markers sit.
All opposing players gain the items printed directly below where the current Player's Markers sit, if applicable.
Once all the above effects have been resolved, the current player resets their Corruption and Virtue Markers to the far ends of their Player Board.
Phase 6: Draw Cards

During this phase, players draw cards from their Draw Pile until they have reached their hand limit, or have no cards left in their Draw Pile (or discard pile) to draw from. This limit starts at 3, but can be increased throughout the game.
It is possible for players to already be at their hand limit, or to even exceed their hand limit at this point. In this case, they simply do not draw any new cards.
If players ever need to draw cards (at any point of the game) and their Draw Pile is empty, they must shuffle their discards to form a new Draw Pile.
At this point, they need to check their Player Board for Criminals. If they have 1 or more Criminal Icons, they gain 1 Corruption (never more than 1. If they have no Criminal Icons, they gain 1 Virtue.
Players are reminded of this on their Player Cards. Note that it is possible for Corruption and Virtue Markers to collide when shuffling. But keep in mind that this won't be resolved until that player reaches phase 5 on their turn (this would be on their next turn, if already in phase 6 when shuffling)..
As soon as the current player has drawn cards to refill their hand, the next player in clockwise order starts their turn, beginning in phase 1 and moving through to phase 6, followed by the next player, and so on.
End of the Game
The end of the game is triggered once either the Poverty Card or Prosperity Card is revealed.
At this point, the current Round is finished, then 1 final Round takes place, so that all players have had the same number of turns. In other words, the player sitting to the right of the player holding the Start Player Marker will always have the last turn.
Note that it is possible for both Poverty and Prosperity Cards to be revealed. This is called the Divided Kingdom, meaning that both cards will be active during final scoring.
Note: All Townsfolk Cards on Player Boards with ongoing effects , do not have any effect during final scoring.
Once the game has ended, players should add up their score for the following areas:
-
 Constructed Buildings
As printed across the tops of Player Boards.
-

Workers in the Castle
VPs for each Worker, equal to the tier in the Castle.
-

Transcribed Manuscripts
VPs for sets of different ribbon colors and from specific Manuscripts.
-

Castle Leader Card and Cleric Bonus Cards
VPs as printed on each card. -
 Unpaid Debts
-2 VP each
-

Acquired Deeds
1 VP each
-

Approved Deeds
3 VP each
-
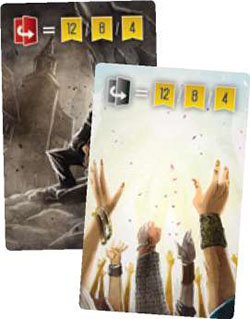
Poverty Card (if revealed)
The players with the most, second-most and third-most flipped Deeds gain 12, 8 and 4 VP.
Note that players must have at least 1 flipped Deed to qualify. In the case of a tie, players split the VPs between each level as equally as possible.
-
Prosperity Card (if revealed)
This works the same way as the Poverty Card, but for flipped Debts, instead of flipped Deeds.
In games with less than 3 players, the middle (8 VP) reward is ignored on Poverty and Prosperity Cards.
Continue Reading