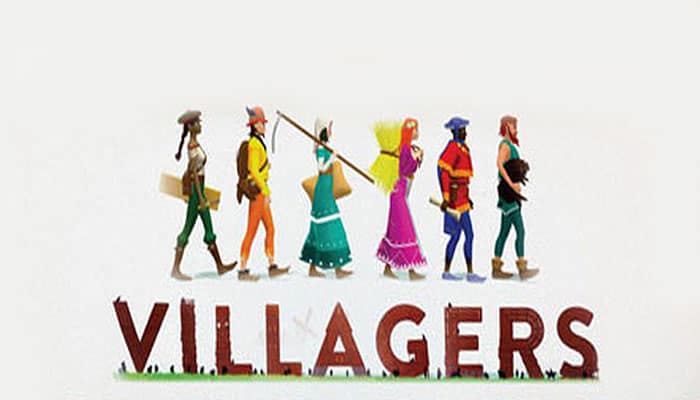
Components
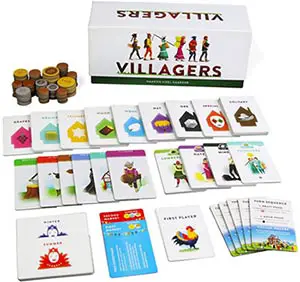
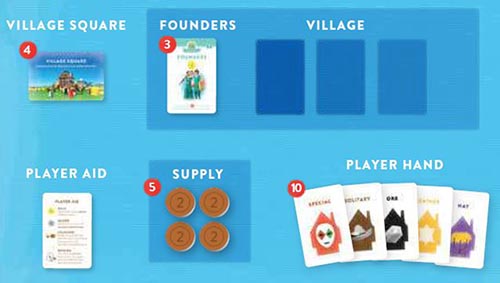
- 5 Village Square cards
- 5 Player Aid Cards
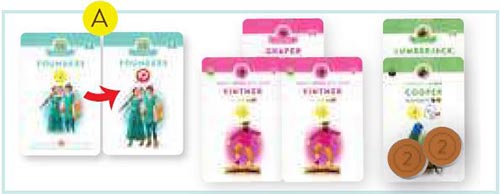
- 5 Founders
- 6 Starting Road Villagers
- 30 Basic Villagers: Lumberjacks, Miners and Hayers
- 94 Other villagers
- 2 Market Cards
- First Player Card and End of Draft Phase Card
- 150 Coins
- 24 Event Cards
- Countess Card and Jester Card
- Instructions
Setup
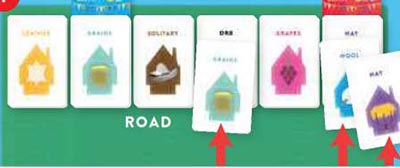
1 Find the 6 Starting Road Villagers marked with and place them face-up in a line in the center of the table. This is the Rood.
2 Find the 10 Hayers, 10 Lumberjacks and 10 Miners and place them face-up in separate stacks.
3 Give each player a Founders card and place it with the 2 Gold side facing up. The Founders card forms the start of each Village.
4 Give each player a Village Square and place it next to their Village.
5 Give each player 8 Gold, this is their starting Supply. Place the rest of the Gold in an area next to the Rood to form the Bonk.
6 Give the First Player Cord to the player who has lived in the same place the longest.
7 If it's a 2 or 3 player game: remove the cards marked with 4J, those are the Wool and Leather suits.
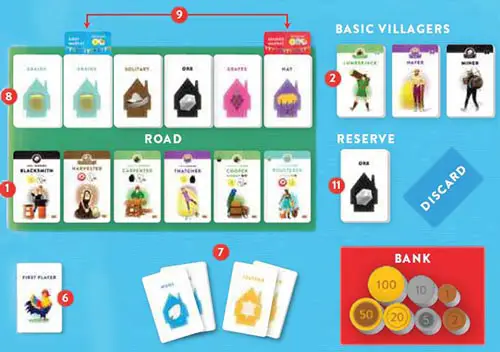
8 Shuffle the rest of the cards and form 6 face-down stacks each with twice as many cards as there are players in the game. In a 5 player game for example you would make 6 stacks with 10 cards in each. Line these stacks up above the Starting Road Villagers.
9 Add the First Market Card beneath the second stack, and the Second Market Card beneath the sixth stack. The Road is now complete.
10 From the remaining cards deal 5 cards face-down to each player. These are the Player Hands.
11 Place the rest of the cards in a stack next to the Road, this is called the Reserve.
That's it, the game is now ready to be played.
Game Play
The game is played over several rounds until all the face-down stacks of villager cards on the Road A have been emptied. Each round is divided into 2 phases carried out in order:
- The Draft Phase: players draft villagers from the Road.
- The Build Phase: players play villagers from their hand into their Villages
B.
In addition there are 2 Market Phases in the game, where players earn Gold. Whoever has the most Gold C at the end of the game is the winner.
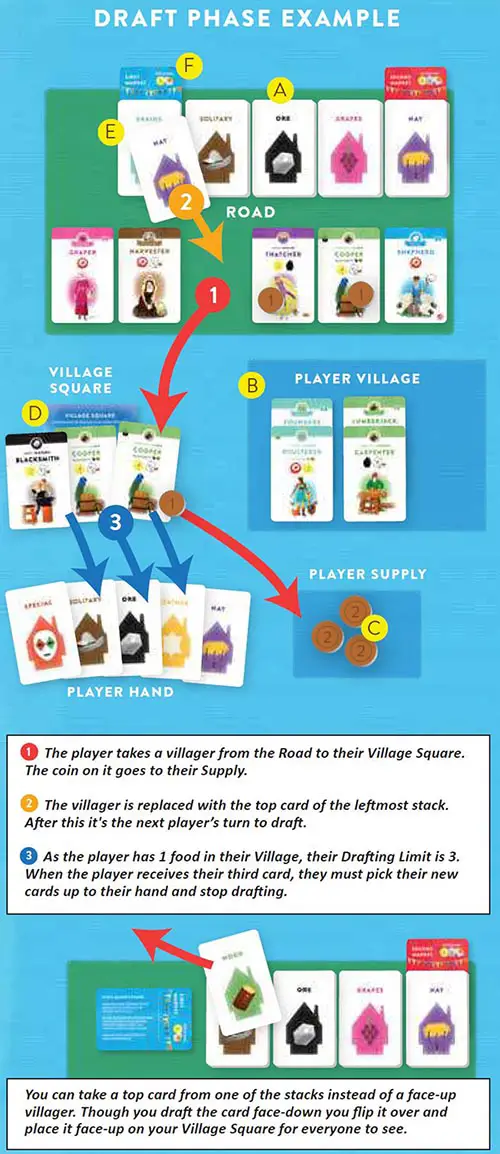
I. The Draft Phase
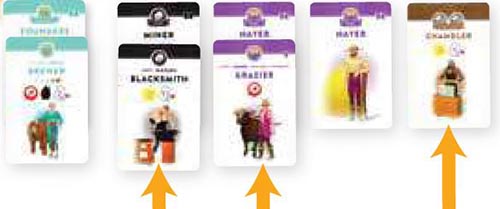
In this phase players take turns to take (or "draft") villagers from the Road. They may draft any of the face-up villagers from the Road, or blindly draft the top card from any of the stacks.
You must draft 2 villagers, plus 1 for each Food  in your Village. This is called your Drafting Limit. If you have 1 Food for example, you must draft 3 villagers. You can never draft more than 5 villagers, even if you have 4 or more Food.
Draft one villager, then the next player in clockwise order drafts a villager. The player with the First Player Card goes first. The villagers you draft are placed face-up on your Village Square D.
Keep drafting in rounds until you have as many villagers on your Village Card as your Drafting Limit, then take your new cards up to your hand. When all players have drafted up to their limit, continue with the next step, Updating The Road.
If the card you draft has a coin (placed, not printed) on it, take the coin to your Supply. When drafting from the face-up cards, replace the card with the top card of the leftmost stack E.
Do not draft or move the Market Phase Cards F, these should remain in their place until the Market Phase. When a stack is emptied, the stack is no longer in the game.
Near the end of the game when all stacks are emptied, use cards from the Reserve instead to replace the face-up cards on the Road. Players may draft face-down cards from the top of the Reserve only when all other stacks are empty. If the Reserve and all stacks are empty, no cards are replaced.
Updating the Road
After all players are done drafting do the following:
-
Discard any villagers on the Road with coins on them.

-
Deal new cards to replace the discarded Villagers from the Reserve. Ifthe Reserve is empty, deal cards from the leftmost stack on the Racid.

-
Put 1 Gold on each of the face-up villagers on the Road.

-
Start the Build Phase.
Updating the road in 2 player games
After both players are done drafting do the following:
Each player in reverse turn order may choose to place 1 Gold from the Bank on a villager on the Road. You are allowed to place Gold on the same villager, or not place any Gold if you wish.
Discard all face-up villagers on the Road with no coins on them.
Deal new cards to replace the discarded Villagers from the Reserve. If the Reserve is empty, deal cards from the leftmost stack on the Road.
Start the Build Phase.
Cards with coins on them can stay several rounds, and coins can accumulate on the same villager.

II. Build Phase
In this phase players take turns placing villagers from their hands into their own Villages. Once a villager has been placed, you cannot pick it up again.
The players can by default place 2 villagers, plus one extra for each Builder  in their Village at the beginning of the Build Phase. If you have 2 Builders in your Village for example you can place 4 villagers. This is called your Build Limit. You can never place more than 5 villagers, even if you have 4 or more Builders. You can play fewer villagers than your Build Limit if you wish.
Each player finishes all their actions in the Build Phase before passing to the next player.
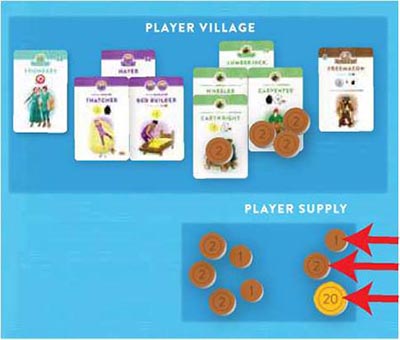
At the beginning of your Build Phase, tell the other players how many Villagers you're allowed to place. Put all the villagers you intend to use on your Village Square card, before you place them in your Village.
This makes it easy for everyone to keep track of how many villagers you're placing, making sure you don't go over your Build Limit.
Production Chains
If a villager has a Production Chain Text A on top of the card, it must form part of a Production Chain when placed. Any villagers listed before the villagers own name must be placed beneath it in the order listed. A Cartwright for example, must be placed on top of a Lumberjack and Wheeler.

When placing cards on top of each other, place them so that everything below the name of the card beneath is covered up. Once a card has been covered by another, the symbols below its Villager Name are no longer in play.
If you cover your Founders with a Swineherd for example, you can no longer use the Food or Gold on the Founders.
The Production Chain does not have to be finished right away. You could for example place a Lumberjack and Wheeler in turn one, then place the Cartwright on top in a later turn. The cards have to be placed in order though, you have to play the first card in a chain first, then the second and so on.
The first villagers in a Production Chain can have up to 2 villagers on top of them, creating 2 branches in the same Production Chain. A Lumberjack for example can have a Carpenter and a Wheeler on top, and the Wheeler's Production Chain might later be extended with a Cartwright.
You are allowed to have 2 or more of the same villager in your village if you wish.
Getting Basic Villagers
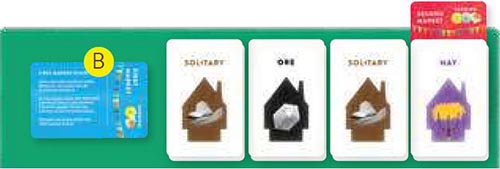
In the Build Phase you can also get Basic Villagers. Those are Lumberjacks, Hayers and Miners. All the villagers in the Hay, Ore and Wood suits need to be placed on top of these.
To get a Basic Villager, first return a villager from your hand to one of the stacks on the Road, then take a Basic Villager of your choice and place in your Village . You can do this up to three times per Build Phase. You don't have to show the other players the fronts of the returned cards.
If the stacks on the Road are all empty (as they will be in the last Build Phase), return villagers to the top of the Reserve instead. If that is empty as well, discard the returned villagers.
Basic Villagers do not count towards your Build Limit when placed in your Village, and neither do they count towards your maximum Build Limit of 5 villagers. They have nothing to do with your Build Limit!
Example:
The player returns 3 villagers to the stacks of their choice on the Road. Then they place 3 Basic Villagers of their choice into their Village.
The player then does their 3 Build Actions, placing a Blacksmith on the new Miner, a Grazier on one of the Hayers, and finally a Chandler. The Chandler is a Solitary Villager and so does not go on top of any other villager.

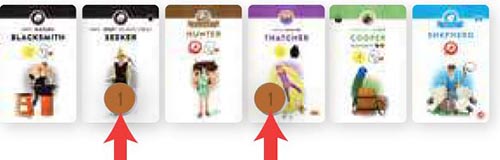
Padlocks
When playing a villager with a Padlock A, you must first unlock it. Check if you or any other player has the villager named next to the Unlocking Symbol in their Village. This is called the Unlocking Villager B.

If you have the Unlocking Villager in your own Village, place 2 Gold from the Bank on that villager.
If another player has the Unlocking Villager, place 2 Gold from your Supply on it.
If no one has the Unlocking Villager, you must pay 2 Gold to the Bank to unlock the villager you're placing.
If several copies of the Unlocking Villager are available, you get to choose which one you pay. You cannot choose to pay the Bank if the Unlocking Villager is present in another player's Village. Also note that you could use a villager you just placed in the current Build Phase to unlock another villager you're playing.
The Keyring Symbol
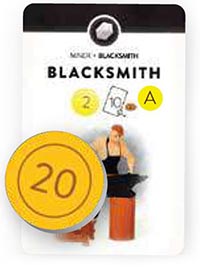
The number in the Keyring Symbol A tells you how many villagers there are in the game that have to pay this Villager gold to be unlocked.
The Blacksmith for example can potentially unlock 10 villagers and accumulate up to 20 Gold in this way.
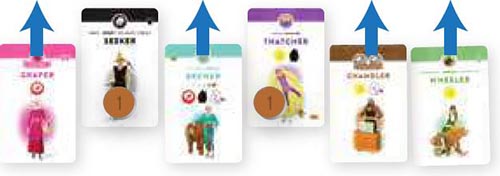
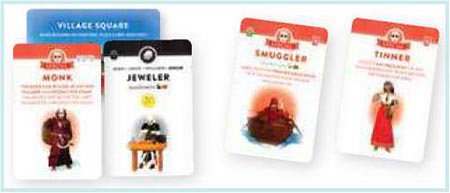
Playing Special Villagers
You can also play the red Special villagers on your turn in the Build Phase. These give you powerful special actions. Their rules are printed on the cards.
Special Villagers that have a Discard Symbol A are discarded immediately after use, they do not count towards your Build Limit. You can play as many of them as you want!

Special Villagers that do not have the Discard Symbol, like the Monk, do count towards your Build Limit as they are placed in Villages when played.
Special Villagers cannot be used to steal another player's Founders.
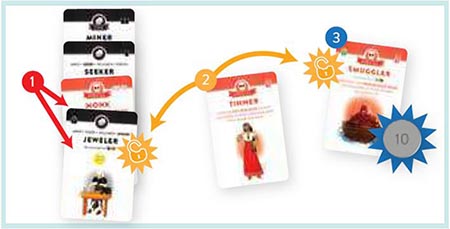
Special Villagers Example:
The player will play a Monk and a Jeweler. This brings them to their Build Limit of 2 villagers. In addition they will play a Smuggler and a Tinner. These two will be discarded after use and so do not count towards the Build Limit.
1The Monk is kind of a "wild" villager in this game, so the player uses him to take the place of a Spelunker between the Seeker and Jeweler.
2Next he uses the Tinner to unlock the Padlock on the Jeweler, as it lets you unlock any Padlocks for free.3The player also plays the Smuggler to earn half the value of the Jeweler, immediately earning 10 gold.The Smuggler also has a Padlock, the player uses the Tinner to unlock it for free. Finally the player discards the Tinner and Smuggler.
End the Build Phase
When all players are done with their Build Phase, check if any players have no Food in their Village. Players with no Food in their Village after the Build Phase have to flip their Founders Card A over to the other side that has one Food on it.
Once flipped to that side, the Founders can never be flipped back to the side with Gold on it.
The player has no Food in their Village, and must flip their Founders over to the Food side.
Finally the player with the First Player Card passes it to the player on their left, and the Build Phase is over. Start the next Draft Phase, unless a Market Phase is triggered.
First Market Phase
When the two first (leftmost) stacks on the Road are emptied, The First Market Phase happens after that turn's Build Phase. The First Market Phase Card B is a reminder of this.
In the First Market Phase all players earn as much Gold as printed on the cards in their Village, plus as much as the coins placed on them. Do not pick up the coins placed on the cards, as they will be scored again in the Second Market Phase.
Only the top card of each Production Chain is included, Gold Symbols covered by other cards do not earn any Gold.
Each player in turn order takes the Gold they earned from the Bank
and places it in their Supply. Silver Symbols do not give you any Gold in the First Market Phase. When all players are done earning their Gold, the First Market Phase is over. Discard the First Market Card and start the next Draft Phase.
The first two stacks have been emptied, meaning there will be a Market Phase at the end of this round. The Market Card has been turned to the side to remind players not to place cards on it.
First Market Phase Example:
It's the player's turn in the Market Phase. All they have to do is add up the numbers on the visible Gold symbols in their Village, plus the coins on the villagers.
They ignore the Freemason as his Silver Symbol only scores in the Second Market Phase. They earn a total of 23 Gold. They take 23 Gold from the Bank and add it to their Supply.
Note that the coins on the villagers are not removed, as they will be scored again in the Second Market Phase.
Second Market Phase
When all stacks on the Road have been emptied The Second Market Phase happens after that turn's Build Phase. It is resolved exactly like the First Market Phase, except this time Silver Symbols are also scored.
In this final scoring phase, coins placed on villagers can be scored by simply moving them to each player's Supply. But make sure to score the Silver Symbols before moving the coins as it can impact the scoring of cards like the Agent.
Silver Symbols
Some cards have Silver Symbols A on them and a description of a conditional amount of Gold to be earned. The rules for each of these villagers are written on the cards. Only your own villagers are taken into account when scoring these. A Grocer for example only scores Food Symbols in your own Village.

The reason these have Silver instead of Gold Symbols is because some card effects only affect Gold and not Silver. A Wood Carver for example scores the value of the Shipwright's Gold Symbol, but it does not score the value of the Log Rafter's Silver Symbol.
Only Food, Builders and Gold Symbols on the top villagers of each Production Chain are included in the Silver scoring. The Suit Symbols and Padlocks on top of the cards are always included for scoring purposes though, even when not on the top cards of Production Chains.
Some Special and Silver scoring villagers also specify that they earn as much as the printed Gold value, this is to tell you not to include any coins placed on the villagers when you calculate it.
For example a Wood Carver used to score a Cartwright will not score more than 9 Gold, even though the Cartwright can have up to an additional 4 Gold in coins placed on it.
End of the Game
After the Second Market Phase has been resolved, the game is over. The winner is the player with the most Gold in their Supply.
If two or more players are tied for the win the player with the fewest villagers in their Village is the winner.
Second Market Phase with Silver Scoring Example:
The player has 2 Grocers. Each of them earns 3 Gold for each Food symbol in the Village. So they earn 9 Gold each. In addition there are 4 Gold printed on the villager cards in the Village.
The player takes a total of 22 Gold from the Bank (9+9+4). Finally the coins on the Carpenter are moved to the Supply to be included in the final scoring.
Now all that remains is to count up the Gold in the Supply and compare the score with the other players to determine the winner of the game.

Continue Reading
