
Unbroken is a solo card game of survival and revenge. You play as an unfortunate adventurer who was left for dead in monster-infested caverns. Your goal is to collect enough resources to defeat four progressively more difficult monsters on your way to freedom and vengeance.
If you are to succeed, you will need to gather every bit of your resolve and be smart with the resources found in these catacombs.
The game is played over the course of four levels. In each level, you begin with the Travel Phase, in which you collect resources and prepare yourself for the coming battle.
Then you encounter the monster in the Combat Phase. Should you survive the battle, you progress to the next level. If you defeat the monster at level IV, you are victorious.
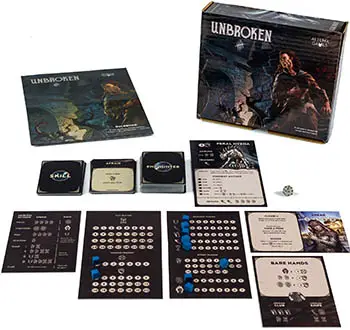
Components
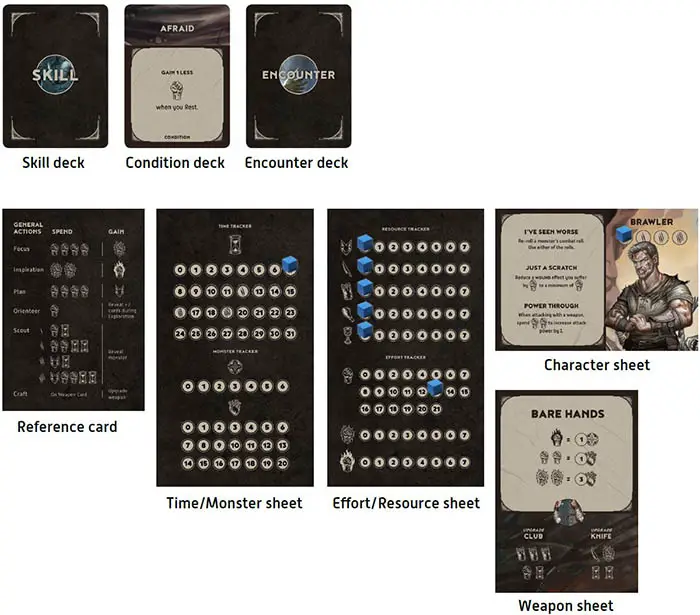
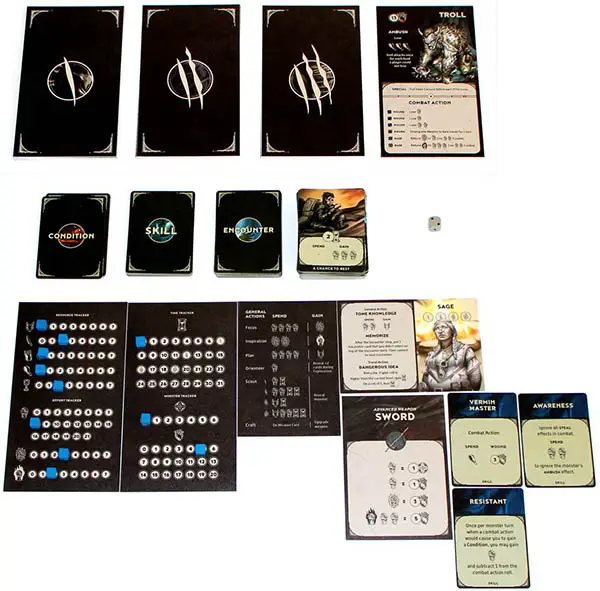
- 3 Display Sheets
- 24 Monster Sheets
- 88 Encounter Cards
- 4 Character Sheets
- 24 Skill Cards
- 7 Weapon Sheets
- 10 Condition Cards
- 20 Tokens
- 1 Six-sided Die (d6)
- Rulebook
Setup
-
Place the 3 display sheets - reference sheet, time/monster tracker and effort/resource tracker - in front of you, forming your display. Place a token on the "I" icon of your time tracker, to indicate 7 time.
-
Place token to indicate 13 small effort on your effort tracker. Place additional tokens to indicate "0" of each other resource (including Medium and Large Effort).
-
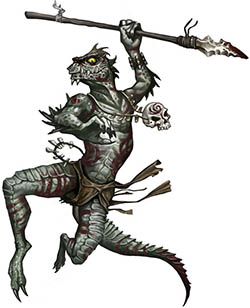
Select a character to play and place that character sheet in your display. Put the remaining character sheets back in the box. Place a token on the leftmost space of your character sheet's ability bar.
-
Find the Bare Hands weapon sheet and place it in your display. Set the remaining weapon sheets in a face-up stack off to the side.
-
Shuffle the deck of encounter cards and the deck of skill cards separately and place them face down, with space next to each for a discard pile. Set the condition cards in a face-up deck, without shuffling.
Travel Phase
In the Travel Phase, you will spend time preparing for battle. Look around for supplies and rest up for the combat that will ensue, but don't take too much time or you'll get ambushed by the monster! Follow these three steps:
Step 1: Preparation Step
You may take as many general actions (listed on the reference sheet) as you wish during this step. Your character sheet and skill cards might provide additional actions.
For each action you take, you must spend the listed resources. If you don't have the resources, you cannot take the action. (At this time, you can take actions specified as "travel actions" or "general actions", but not "combat actions").
General actions are extremely important. In particular, scouting yields crucial information about the upcoming fight, and weapon crafting is the only reliable way to be able to inflict heavy damage to stronger monsters. Make sure you are prepared!
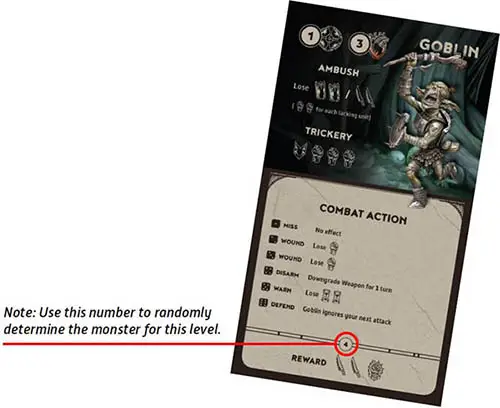
Revealing a monster through Scouting: If you take the Scout general action during preparation step - roll a six-sided die. Pick the monster marked with the number you have rolled from the monster sheets of the level that you are on.
Place the sheet it in your play area - this is the monster you will encounter this game. It is now considered revealed. You can see all the monster's strengths and weaknesses and prepare for the fight accordingly.
When you have taken as many actions as you wish and can afford, move on to the next step (unless taking an action causes your available time to reach zero, in which case you proceed immediately to the Ambush Step of the Battle Phase).
Step 2: Decision Step
In this step, you must make a decision: are you ready to encounter the monster? If you are, skip the rest of the Travel Phase and proceed immediately to the Trickery Step of the Combat Phase. But if you think you need more time to prepare for the fight, proceed to the Exploration Step.
Note: If you chose to "commit to next encounter" as a part of a previous Exploration Step, you must continue on to the Exploration Step.
Step 3: Exploration Step
Reveal two cards (certain effects may increase or decrease this number) from the encounter deck. Choose one of these cards, putting the others in the encounter discard pile. Now you must choose whether to resolve the encounter or to rest.
Encounter
To resolve an encounter, apply the effect on your chosen card, spending and gaining resources as indicated. Spending and gaining resources in this manner is known as the encounter effect.
Rest
To rest, gain a number of small effort equal to the time value of the card, found in the upper right corner.
If you previously resolved an encounter card that instructed you to "commit to next encounter", you reveal only one card - regardless of effects or modifiers - and must resolve the encounter; you cannot rest instead. If you cannot perform the exchange on an encounter you have committed to (because you lack the resources) - discard it.
Once you have carried out your rest or encounter, move the token on your time resource bar according to the time value of the chosen encounter card - this represents how much time you spent - and then put the card in the discard pile. (e.g. if you had 5 time and just rested through an encounter with time value 2 - you now have 3 time remaining).
If this causes your available time to reach zero, that means your preparations took too long and the monster ambushed you; proceed immediately to the Ambush Step of the Combat Phase.
End of Phase
If you were not ambushed in the Exploration Step, go back to the beginning of the Travel Phase, and repeat the sequence: Preparation Step - Decision Step - Exploration Step. This will continue until either you decide you are ready for combat or the monster ambushes you.
 A game in progress |
Combat Phase
Step 1A: Ambush Step
If this level's monster has not yet been revealed, reveal it now. Roll a six-sided die. Pick the monster marked with the number you have rolled from the monster sheets of the level that you are on. Place the sheet it in your play area - this is the monster you will fight.
Reset the token on your time resource bar to the space with the Level icon corresponding to the next level (e.g., "IV" if you are in level III). If this is the final (Level IV) monster - remove the token from the Time resource bar. You have reached the final challenge of your journey.
If you were ambushed (i.e., your time resource bar reached 0), apply the monster's ambush effect (if any) and then proceed directly to the Battle Step.
Note: Revealing the monster by scouting during the Travel Phase does not prevent an ambush! You are always ambushed if your available time falls to zero.
Not all monsters have Ambush effects. In rare cases a "-" shows that there is no effect - you were lucky and can proceed to the Battle Step unhindered. Learning that a monster won't ambush you ahead of time can allow you take advantage of longer preparation time knowing that ambush is not a threat.
Step 1B: Trickery Step
If this level's monster has not yet been revealed, reveal it now. Roll a six-sided die. Pick the monster marked with the number you have rolled from the monster sheets of the level that you are on. Place the sheet it
in your play area - this is the monster you will fight.
Reset the token on your time resource bar to the space with the Level icon corresponding to the next level (e.g., "IV" if you are in level III). If this is the final (Level IV) monster - remove the token from the Time resource bar. You have reached the final challenge of your journey.
You may now choose to trick the monster, avoiding combat entirely, if you can pay the trickery cost, which is listed on the monster sheet. (Some monsters do not have a trickery cost and cannot be tricked).
If you pay the trickery cost, proceed to the Hunger Step. You do not receive any rewards if you bypass the monster this way. If you choose to fight the monster, continue to the Battle Step.
Step 2: Battle Step
It is in this step that you battle the monster. This takes place in a series of combat rounds, until either you have defeated the monster or you cannot spend effort when required, collapsing from wounds and exhaustion. In each round of combat, the player takes a turn, then the monster takes a turn. (If playing on Hard difficulty, the monster will get to take the first turn).
On the Monster Tracker place a token on the "0" space of both Armor and Wound trackers.
Note: Conditions will often modify the base combat rules. Make sure you keep any active condition cards handy to remind yourself of their effects.
Player Turns
During your turn in combat, choose one of the following options (though you may always skip your turn if you choose to do so):
- Attack With Weapon
- Take An Action
A. Attack with Weapon
To attack with your weapon, spend the effort indicated on your current weapon sheet and then apply the result, which will inflict wounds or break armor.
If inflicting wounds, the attack power indicates how many wounds you inflict. Move the token across the wound tracker on the Monster tracker one space for each wound inflicted. If the wound token reaches a number equal to or greater than the Health value indicated on the monster sheet - you have defeated the monster!
Any armor the monster has must be broken before you can inflict any wounds, unless noted otherwise. Move the token across the armor tracker on the Monster tracker one space for each armor broken. Until the armor resource bar reaches the number indicated on the monster sheet - you may not inflict wounds through weapon attacks and actions, unless specifically noted otherwise.
Some monsters incur additional costs that you need to pay when you attack with a weapon. (These additional costs do not apply when you take actions that inflict wounds through your skills).
Some effects may increase or decrease the monster's listed Health and Armor values. This will change the numbers that tokens would need to reach on armor bar (to start inflicting wounds) or on wound resource bar (to defeat the monster).
B. Take an Action
To take an action, choose any that is currently available to you, from the reference sheet, your character sheet, your skill cards, or unique options presented by the monster. (At this time, you can take actions specified as "combat actions" or "general actions", but not "travel actions").
Certain combat actions even allow you to inflict wounds to the monster without using your weapon and may even ignore the monster's armor! If a skill inflicts wounds or breaks armor - follow the instructions above for tracking these using wound/armor trackers.
Monster Turns
During the monster's turn in combat, you will roll the six-sided die to determine what action the monster will take. Consult the combat actions table on the monster sheet and apply the monster effect that matches the die roll.
Certain skills and character abilities will allow you to manipulate the monster's combat rolls or mitigate the consequences of the monster's attacks. Not that regardless of modifications the roll result cannot exceed 6 or fall below 1. If a monster effect cannot be applied, apply the alternative effect (listed in brackets) instead. If there's no alternative effect, nothing happens.
If a monster effect would cause you to gain a condition you have already gained for the next level, reroll it. If it would cause you to immediately gain a condition you already have - extend the duration of the condition by the listed time. If one of your skills allows you to ignore a specific type of monster effect, nothing happens when that combat action is rolled.
If a monster effect causes you to lose time, adjust the token on your time resource bar accordingly - you'll have that much less time in the next level. However, if you are in level IV, spend an equal number of small effort instead.
Battle Outcome
There are only two possible outcomes of the Battle Step.
-
If the token on the wound tracker reaches the number equal to monster's health - you have defeated the monster and are victorious. Proceed to the Rewards Step.
-
If you are forced to spend effort and cannot, then you have fallen to the perils of the catacombs and lost the game.
Step 3: Rewards Step
For defeating the monster, you gain the resources listed in the rewards section of the defeated monster's sheet. In addition, you reveal the top two cards from the skill deck, keeping one and putting the other in the corresponding discard pile.
If you tricked the monster, you do not gain any of the rewards listed on the monster sheet. You do not get to gain a new skill.
Step 4: Hunger Step
You must now eat food equal to the level of the monster you have just defeated - this is known as your food requirement. You gain one small effort for each food that you eat.
If you cannot (or choose not to) meet the food requirement, you must spend one small effort for the first food you do no eat, two for the second food, three for the third food, etc. If you do not have enough effort to spend for food you do not eat, you die of starvation and lose the game.
Tip: If you have plenty of effort remaining, you can decide to eat less food than the current requirement, in order to save the food for a more crucial moment later on.
Example: After defeating the Level 3 Minotaur, Kira's Huntress must eat 3 Food. She only has 2 Food. Further, she decides to save one for the final level and only eats 1 Food. She regains 1 small effort for eating it.
Then, because she ate 2 food less than required, she loses 3 small effort (one for the first missing food, two for the second missing food)
End of Phase
If the monster you have just defeated was level IV, congratulations - you won the game! You exacted your revenge and made it out of the hellish pits of the catacombs! Otherwise, you must proceed on to the next level. Before you do, get ready for the next level by doing the following:
-
Place tokens on your character's ability bar equal to the level you are about to start (e.g., if starting level II, place two tokens on the character sheet).
-
Discard any currently active conditions you have, putting them back in the condition deck, and move any new conditions - which you would have gained during combat - next to your character sheet; these new conditions will be active for the next level.
-
Discard the defeated monster, removing it from the game.
End of the Game
The game will end in one of two ways:
you defeat the final monster in level IV (victory)
you cannot spend effort when required to either during Combat or Hunger (defeat /death of starvation).
Calculating your Score
If you managed to win, your final score is calculated based on the remaining resources you possess. Each remaining resource (except small effort) has a point value:

After totaling your points, check the scale below to see how impressive your victory was!

Continue Reading
