The 1920's... Small City was founded just a few years ago and is still just a fledgling town at this stage.
Nonetheless, the Town Center is prosperous and the managers of the strange CliniC have been duly incarcerated for years... but Small City cannot be built from buildings alone: We need infrastructure, a transportation network to cart people where they need to go, and at high speed!
The few citizens of Small City start the game in different portions of the city (residential neighborhoods, factories, shops, and entertainment venues), and want to get around without having to wear out the soles of their shoes.
Over the course of the game, you will build a tramway to connect these places together in order to earn money and gain Happiness Points, the measure of success in this game.
But be careful not to rush your citizens around too much just to serve your own goals, because the more you move them, the more harried they feel, and the higher the ambient Stress level in the city - especially if you send them back to work when they are due a little rest and relaxation at home....
Components
- 1 map of Small City
- 1 two-sided Tramways Schedule board
- 5 small player boards
- 106 cards
- 40 meeples
- 75 discs
- 120 Rail tiles
- 4 two-sided Hand Limit tiles
- 16 Building tiles
- 1 Round marker
- 20 small Building Type tiles
- 52 coins
- Rulebook
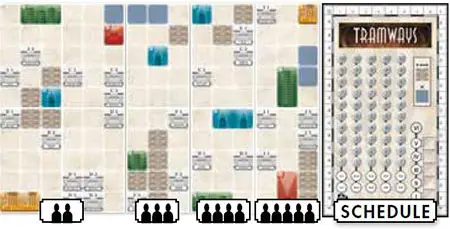
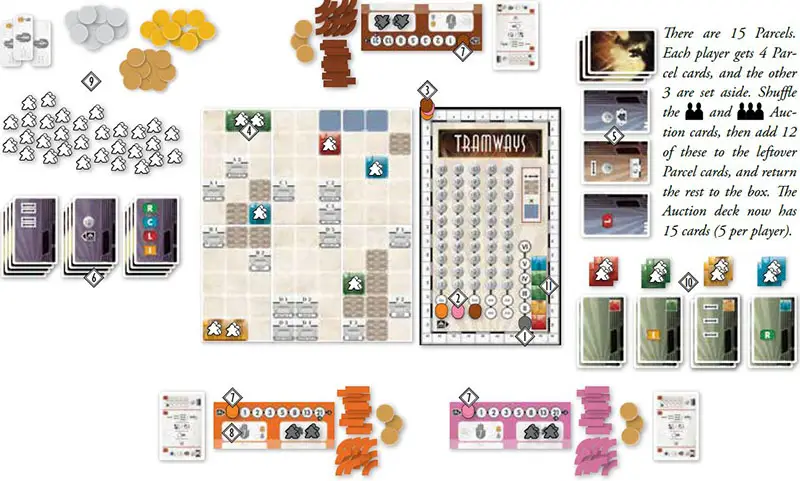
Setup
Set up the Small City map in front of all players, as follows:

Select 2 x  modular map boards (for each board, choose whether to use the normal 1920 side or the difficult 1910* side; you can mix and match), where is the number of players.
On board B, the side with * B1 * is the difficult 1910 side. Three of the boards have "J" Parcel spaces; be sure not to use more than one J board.
There must be at least 4 x gray Parcel spaces in the game, so if there aren't enough, change your selection until you have at least 4 x gray Parcel spaces. For each such space on the map, the corresponding Parcel card will be included in the game; return the other Parcel cards to the box.
Arrange the boards however you like into a 2 x rectangle, as illustrated below. Place the Tramways Schedule board to the right of the map, multiplayer-side-up.
Note: Actually, you can arrange the boards to make the Small City map any shape you like, you can rotate the boards any ways you like, you could even leave a hole in the middle of the map; however, for your first few games, please play with the recommended rectangular shape.
-
Variant for 2 expert players: Only play with 3 modular boards (3x1), but keep 8 Parcel spaces anyway!
-
Each player chooses a player color. Take the discs and Rail tiles of your color, 2 grey Rail Worker meeples, a player board, and $3. Note: How much money you have is public information.
-
Each player chooses whether to use the normal side of the player board (2 rail workers, longer Stress track) or the difficult side (1 rail worker, shorter Stress track).
-

Normal Game: Shuffle the Parcel card deck and deal 4 Parcel cards to each player. Mark the 4 spaces for which you have cards with player discs of your color, but keep the cards in your hand.
-
Advanced Game: First establish a random turn order, then lay out the entire Parcel card deck face-up; you are going to draft pairs of cards in turn order, then reverse turn order.
So, the first player takes 2 cards, the second player takes 2 cards... the last player takes 4 cards, then reverse direction: The penultimate player takes 2 cards... the first player takes 2 cards. Now each player has 4 cards.
-
Set aside any remaining Parcel cards corresponding to map spaces; you will need them in a moment.
-
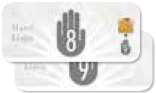
Give each player 2 Generic cards: one with a Build 2 Rail symbol + a Rail Worker symbol, and one with $1 + Build. Return any remaining Generic cards to the box.
-
Place the Round marker on the first space of the Round track
1. -
Take one disc from each player to be a turn order marker, then place these discs in a random order on the turn order portion of the Tramways Schedule Board
2. -
Place another disc of each player's color on space 0 of the Happiness Points (HP) track
3. -
Place a white Passenger meeple on each R, L, C, and I space on the map. This means the 2-space rectangles will have 2 meeples: 1 per space
4. -
Create the Auction deck as follows: Shuffle the Auction cards corresponding to the number of players (2-player game:
 ; 3-player game: +
  ; 4-player game: + + @mmmm.jpg; 5-player game, use all of them).
Add Auction cards to the leftover Parcel cards until there is a total of 5 cards per player in the Auction deck. Return the remaining Auction cards to the box.
-
Shuffle the Auction deck and place
cards next to the board face-up, [email protected]| is equal to the number of players.Note: All Parcel cards will be purchased by the end of the game
5. -
Original DC Rule: Shuffle the 20 Development cards and create
Ticket Books (decks) of 4 Tickets (cards) each. Return the remaining Development cards to the box.Flip the top card of each Ticket Book face-up so everyone can see it. (Note: Cards in the Ticket Books are not the only Tickets in the game).
In reverse turn order, select a Ticket Book, secretly look at all the Tickets in it, then take one of your choice and add it to the 6 cards in your hand; these 7 cards will constitute your initial hand. Then, put the Ticket Book back on the table with any one card from that Ticket Book face-up on top
6. -
Alternate DC Rule: Shuffle the 20 Development cards and give 4 Tickets to each player (return the remaining Development cards to the box). Each player secretly chooses one of the four, and the rest go to make a deck, which is then shuffled.
During play, 3 Development cards are on display face-up. Whenever you deliver a passenger to a Commerce Building, pick from the ones on display, then refill; or draw blind if you don't like cards on display.
-
After each player has taken one Ticket via the Original or Alternate DC Rule, place a disc of your color on space "1" of the Stress track on your player board (it is always pleasantly stressful to play an Alban Viard game).
7(Notice that your hand limit of 7 is depicted on your player board)
8. -
All remaining coins and meeples constitute the common reserve. Place the Ticket Books, or what's left of them, near the main Map and Schedule board. These Tickets can be purchased later during the game
9. -
Place matching sets of
- 1 Building tiles and - 1 Building cards of each color near the boards. So in a 3-player game, place 2 green Residence tiles near 2 Residence cards, 2 yellow Industrial tiles near 2 Industrial cards, 2 blue Commerce tiles near 2 Commerce cards, and 2 red Leisure tiles near 2 Leisure cards. Place a white Passenger on each Building tile 10.Exception: In a 2-player game, use 2 Industrial tiles and cards. Return any remaining Building cards and tiles to the box.
-
Give each player one Rules Reminder card; return any extras to the box.
-
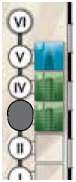
Finally, load a cup with the 20 Building Type tiles. Randomly draw and place 5 of these tiles in the boxes near the Round track spaces. They show which type of building will be supplied at the end of each of the 5 Rounds.
11
Three-player Setup Example:
General Aspects
The game lasts 6 Rounds. The first 5 Rounds have the same format, but the 6th Round is slightly different.
Although you take turns taking actions, you never refill your hand after an action until the end of the Administration Phase.
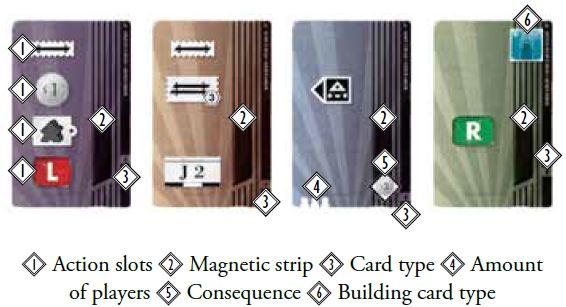
Players use cards that represent Tickets. Each Ticket has 4 Action Icon slots, but not every Action Icon slot will have an Action Icon in it. Nonetheless, each time you play a Ticket, you must use at least one Action Icon on it. After you use a Ticket, place it in your discard pile.
The magnetic strip is considered an Action Icon.
You may use more than one Action Icon on the same card in the same turn, but in order to do so, you must immediately increase your Stress level by 1 for each Action Icon you use (from that same card) after the first. You can choose the order in which you use the Action Icons.
You are never allowed to play a Ticket if you cannot perform the chosen action(s) completely.
Some Tickets have a Consequence in the lower-right corner: You must always apply the Consequence first, before performing an action from an Action Icon on the Ticket. If you use multiple Action Icons on the same card, the Consequence only applies once, before you use any Action Icons from the Ticket.
These rules generally will talk about playing Action Icons, rather than Tickets because you can always choose how many Action Icons to use on any given Ticket (if you don't mind taking on stress). When a rule talks about playing Action Icons, understand that this always involves playing one or more Tickets from your hand.
 Each time you become the start player after the Auction Phase, you increase your Stress level by one, and each time you reach 21 on the Stress track, or have to go beyond 21 (your marker stays on 21), you lose 1 Happiness Point (HP).
Card Anatomy
Game Play
Each Round is divided into 3 distinct Phases :
- Phase 1: Auction
- Phase 2: Actions
- Phase 3: Administration
Phase 1: Auction
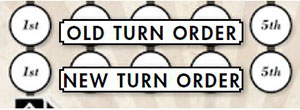
In this phase, each player will get one new card. First, move all the Turn Order discs up to the second row to show the old turn order.
Then the starting player begins by either passing and taking the last available position in the new turn order (move your disc down to the last position available in the bottom row) or placing a bid using any combination of personal cash and/or Money Action Icons (cards with a coin as an Action Icon) from her hand.
If you pay entirely with Money Action Icons, the bank will give you change in cash. Each bid must be paid immediately. Each bid must be different than all bids before it this bidding round (i.e. your bid cannot be on the same number as any bid to the left of it), and it must be different from your previous bid.
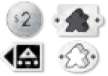
So, let's say the first player bids $2; the second player could bid $1 or $3 or anything else other than $2; the third player would have to pick a third amount, and so on. However, when the next round of bidding starts, the first player can change her bid from $2 to anything else, because nobody's bid marker is to the left of hers.
If you already have the highest bid when your turn comes around (if someone to the left of you has bid the same amount as you, you do not have the highest bid), you automatically take the earliest available position in the turn order (move your disc down to the first position available in the bottom row).
Otherwise, you must either change your bid (and pay the new amount - yes, it's cumulative!) respecting the rules above, or pass. You cannot bid repeat your previous bid.
To summarize, when it is your turn to bid, you have three possibilities:
You were already winning (not tied), so you automatically move to the earliest available position in the new turn order.
Change your bid from your previous bid (remember: it can't be the same as any disc to the left of it), and pay that amount.
Pass, so you automatically move to the last available position in the new turn order.
Although the track is limited to $10, if you want to bid more, just stack another disc for each additional $10. Example: Put 3 discs on the $3 space to bid $23, and pay $23 in cash and/or cards.
After all players have moved to the bottom row by either passing or already being in the lead when it is their turn to bid, the new turn order has been established.
The first player in the new turn order immediately increases his Stress level by one. Now each player in turn order takes one face-up Auction card of his choice and adds it to his hand.
It is OK if this causes you to exceed your hand limit. Then the Auction Phase ends. Flip new cards from the Auction deck face-up for the next round (unless this is Round 5).
Please note:

Anyone who has chosen a Parcel card immediately places a disc of their color on the space on the map corresponding to the Parcel Number Action Icon on the card.

Anyone who has chosen a Void Ticket must immediately discard one non-Void card from their hand as a consequence.
The player immediately places this discarded card in their personal discard. It is a one- time consequence during the entire game.
Phase 2: Actions
This phase comprises two rounds of actions, each executed in turn order:
Action Round 1: Each player either:
- performs one action, or
- takes $2 from the reserve.
Action Round 2: Each player either:
- performs two actions, or
- performs one action and takes $2 from the reserve, or
- performs no actions and still takes only $2 from the reserve.
Definition: When you play an Action Icon, you show the card with that Action Icon to the other players, and then put it in your discard; however, before you discard it, you may play additional Action Icons from the same card for one Stress each.
A. Build or Upgrade Rails
You may either Build New Rails on a Link or Upgrade an Existing Link.
A complete link is a string of one player's Rail tiles that connects one Building or Parcel to another in an uninterrupted path. The start of the link must point to a Parcel or a Building; the end of the link must also point to a Parcel or a Building. A
Build New Rails on a Link
In order to build rails on a link, you must do the following:
-
Play one or more of the following Action Icons:
Build 1 / 2 / 3 Rail

-

Discard 1 Rail Worker from your reserve.
-
If you complete the link, you must play a destination Action Icon corresponding to one of the ends of the link:
If you connected to a Parcel space, you could play that space's Parcel Number Action Icon.
If you connected to a Building space, you could play that Building Type Action Icon.
Thus, if you connected a Building to a Parcel, you could play either Action Icon: the Building Type or that Parcel Number.
The number of Rail tiles you must build is equal to the precise total number of Rail symbols  in the Action Icons you played (no fewer, no more). If you do not have any Rail symbols, or if you do not have any Rail Workers, you cannot take this action.
Rails must start from either an existing building (not necessarily one of your buildings), a Parcel space that belongs to you, or an incomplete link that belongs to you.
Remember: In order to play a card, you must perform the complete action associated with the Action Icon(s) you choose.
The menu of actions from which you can choose is as follows:
- Build Or Upgrade Rails.
- Build Or Upgrade A Building.
- Move One Passenger.
Note: During this phase, you are not allowed to play the following Action Icons: Money, Get 1 Rail Worker, Add 1 Passenger, Decrease Stress.
Example: During the Action Phase, you can play this card to Build 2 Rails, but you cannot use the Get 1 Rail Worker Action Icon.
Note: You can take on stress to reduce the number of cards you need to play for the action you have chosen; however, this does not allow you to take additional actions on your turn.
Rails that connect two locations (a location is either a Parcel space or a colored Building space) are considered a complete link.
You may use one of the Build Rail symbols you played to redirect the last Rail tile in an incomplete link: Return the Rail tile to your reserve, and place a new one there, pointed in a new direction (rebuilding it the same way is cheating!).
Example: Were you to play a Build 3 Rail Action Icon to redirect your incomplete link, you would need to use the other 2 Rail symbols to build 2 Rail tiles. You are allowed to start a new incomplete link, even if you have other incomplete links.
Because you must discard 1 Rail Worker each time you work on a link, leaving a link incomplete ends up costing more Rail Workers to complete it.
If you have an incomplete link, you must work on it each Round of the game until it is complete; otherwise, you lose the entire link. If you fail to work on (redirect and/or continue) the link for an entire game round, all the Rail tiles in that link are removed and returned to your reserve!
You are allowed to:
-
build a Rail tile on a beige (plains) space.
-

build a Rail tile on a brown (mountain) space, but each such space costs an additional Build Rail symbol.
-

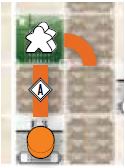
build a second rail on a single space, if you create a crossroad as shown to the right, or place 2 non-overlapping curves as shown to the right.
-
build a Rail tile on a gray (Parcel) space that belongs to you (this costs the usual Build 1 Rail Action Icon), but not on a gray space that belongs to an opponent or is not yet claimed.
-
build a Rail beside a gray (Parcel) space that does not belong to you, as long as the Rail does not connect to the Parcel space.
-
connect two of your incomplete links, but of course you will need to play a destination Action Icon for either end of the newly completed link.
You are not allowed to:

- build a Rail tile on a blue (Lake) space.
- build a Rail tile on a Building space.
- build Rail that connects to a Parcel space you do not own.
- connect two incomplete links that belong to different players.
 build a second rail on a single space in any way other than the crossroad and 2 non-overlapping curves depicted to the left.
- point Rail off the edge of the board.
- work on an opponent's Link.
Remember that you can never play a Get 1 Rail Worker Action Icon during this phase, even if it is a second (or third, or fourth) Action Icon and you would gain Stress for using it. This means you need to have all of your required Rail Workers before starting this phase!
Each player has a limited number of Rail tiles of each type (curves and straight lines), so you must manage them carefully. You are not allowed to destroy any of your Rail tiles already built; the only ways to reclaim Rail tiles is by not working on an incomplete link during a round, which will bring the wasted Rail tiles back to your reserve, or by building a Building on a Parcel on which you have a Rail tile.
Because you can have no more than 2 Rail Workers, at the end of a Round, you will have either:
- 2 new complete links
- 1 new complete link
- 1 new complete link and 1 incomplete link
- 1 incomplete link
- 2 incomplete links
- 0 incomplete links and 0 new complete links, which is usually not a good sign
Upgrade an Existing Link
In order to Upgrade an Existing Link, you must do the following:
- Play an Upgrade Link Action Icon.

- Play a destination Action Icon.
- Flip the Rail tiles in the link to their "upgraded" side.
- Earn 3 HP.
To upgrade an existing link you must play 2 Action Icons: Upgrade Link and one for one of the two destinations of the link. An upgraded link earns you additional money during the game (see Moving Passengers).
When you upgrade a link, you also earn 3 HP. Flip the Rail tiles to their "upgraded" side. You cannot upgrade an upgraded link any further. You can never upgrade an incomplete link. Also, no matter how generous you feel, you cannot upgrade a link that belongs to an opponent. =:)
B. Construct or Upgrade a Building
Construct a New Building
In order to Construct a New Building, you must do the following:
- Play a Construct Building Action Icon

- Play a Parcel Action Icon.
- Place the corresponding type of Building tile on the indicated Parcel.
- Take the corresponding type of Building card into your hand.
- Add 1 new Passenger to the Building tile.
- Earn 1 HP.
To construct a New Building, you must play a Build Building Action Icon , and the Parcel Number Action Icon showing the Parcel Number where that tile will be constructed  (this means you can neither build a new Building on an unclaimed Parcel nor on an opponent's Parcel).
Then you choose one of the remaining Building tiles and place it on the board covering the designated Parcel. Take a Building card corresponding to the building type (there is one Building tile per Building card and vice versa) into your hand, ready to be used, and add 1 new Passenger on the new tile.
This may cause you to exceed your hand limit, and that is OK for now. You also get 1 HP. You are even allowed to build a Building on your own Parcel tile that already has a Rail tile on it.
Some Buildings already printed on the board occupy multiple spaces. In the same way, if players build the same type of Building tile on adjacent spaces, they create a larger single Building, even if multiple players own the individual tiles.
Note: Adjacent Building tiles of different types never "merge" to form a single Building, and adjacent Parcels are never considered to be connected; however, orthogonally adjacent Buildings of the same type always merge, even if one of them is upgraded)..
Building an Industry (I tile) grants you an additional power by making your hand size larger for the rest of the game. Place the correct Hand Limit Tile onto the player board to cover the footprint of the old one (or flip the old Hand Limit Tile, as appropriate). The maximum hand size is 9.

Upgrade an Existing Building
In order to Upgrade an Existing Building, you must do the following:
- Play an Upgrade Building Action Icon.

- Play a Building Type icon
 matching the building.
 - Flip the Building tile to its "upgraded" side.
- If the Building has no Passengers, add 1 new Passenger to the upgraded building.@
- Earn 3 HP.
You must play the Upgrade Building Action Icon and a Building Type Action Icon matching the building that you are upgrading.
Then flip the Building tile to show the upgraded building, add a new Passenger to the tile if there is not already one there, and earn 3 HP. You cannot upgrade an upgraded building any further. You cannot upgrade the buildings pre-printed on the map, nor can you upgrade your opponents' buildings.
C. Move a Passenger
In order to Move a Passenger, you must do the following:
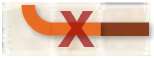
- Play a valid Ticket (a card depicting a magnetic strip on the right side, lower half).
- Play a valid Destination Action Icon.
Remember: A Destination can be either a Parcel or a Building. This action only allows you to move one Passenger.
Remember: You could use both the magnetic strip and the Destination Action Icon from a single card; however, if you do, your Stress increases by 1.
All cards of the game represent Tickets and may be used to move any Passengers on the map. So, most of the cards have a magnetic strip to show that it can be used as a Ticket to move a Passenger.
Expired Tickets ("Void") cannot be used to move Passengers: They have no magnetic strip and are only present in the Auction card deck.
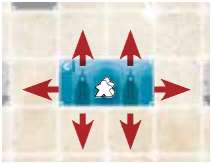
A Passenger on a multi-space building (whether pre-printed or player-built) can leave the building from any side of it that has a completed link coming out of it.
The Passenger must stop at the first building along the string of Rail links which matches its destination type (R/C/L/I or the specific Parcel).
A Passenger cannot cross the same building/Parcel twice.
After the Passenger has reached its first matching destination (which does not have to be the shortest trip available), remove the Passenger from the board:
-
For each link the Passenger traverses, the link's owner earns 1 HP, regardless of whether the link is upgraded. (It does not matter who owns the buildings that the Passenger touches - not even the building where the Passenger starts).
-
The Passenger's final destination also grants you, the delivering player, a special bonus:
-
 Commerce: Increase your Stress by one. Then you may either immediately get $5 from the bank or take a Development card (D) from one of the Ticket Books and add it to your hand, just like during setup (or see Development card variant). It's OK if this causes you to exceed your hand limit for now.
 -
 Industry: Increase your Stress by one. You get one Rail Worker from the common reserve, and add it to the space on your player board (limit 2 as always). If you have already reached the upper limit, you do not take the worker, but you still increase your Stress level (and move the Passenger).
 -
 Residence: Decrease your Stress by one. Home sweet home.... If you have already reached the leftmost Stress track space, you do not lower your Stress level, but you still move the Passenger.
 -
 Leisure: You may immediately buy Happiness Points at the usual Small City costs: 1 HP costs $1, 2 HP cost $3, 3 HP cost $6 and so forth. You can use your cash and/or Money Action Icons. If you used entirely Money Action Icons, the bank will give you change in cash.
 -
Parcel: Moving a Passenger to a Parcel space does not grant you any bonus.
-
-
For each Rail tile the Passenger traversed, the Rail tile's owner earns $1 (The Total on each Complete Link earns +50%, rounded up, if it is an Upgraded Rail tile), as follows:
If the Link belongs to you, the delivering player, you get the money from the bank.
If the Link belongs to an opponent, you, the delivering player, must pay the opponent.
These payments occur in the exact order the Passenger traverse the links, so you cannot use money you would earn later in the journey to pay an opponent now.
If that means you can't pay for the Passenger to use an opponent's link, the Passenger still completes the trip, but no more payments occur during the trip (you must pay the maximum you have in cash), and you increase your Stress by one due to the awkward situation!
(You keep the HP benefits from each link and the special bonus from the final destination).
To help you keep track of this process, move the Passenger along the links as you go. For Step 1, move the Passenger to each link. For Step 2, lay the Passenger down in the destination space.
For Step 3, start the Passenger at the beginning again, and move the Passenger to each link (in the correct order). Then return the Passenger to the reserve when the process is finished.
Remember:
Upgraded Links earn their owner 50% more money, rounded up.
Apply the 21 or more Stress rules on the HP track.

Phase 3: Administration
You may play any of the following Action Icons from your cards remaining in your hand from Phases 1 & 2 (remember the usual rules of increasing stress for using multiple Action Icons per card, and that you cannot play an Action Icon unless you can perform the complete action (no sneaky discards):
-

Get Money: Take the indicated amount of money from the bank.
-

Get 1 Rail Worker: Hire a gray worker meeple.
Remember: You cannot have more than 2 Rail Workers in front of you.
-

Decrease Stress: Move one step left on your Stress track. If you are already on the leftmost space, you cannot play this Icon.
-

Add 1 Passenger: Place 1 Passenger from the reserve on any building. Remember: Each space can only hold 1 Passenger, so square buildings can host no more than 1 Passenger and rectangular pre-printed buildings can host no more than 2 Passengers.
-
Discard cards: You may discard one card for free, and must pay $1 for each additional card you discard in Phase 3.
Remember:
Any card you play or discard goes into your personal discard.
A card's Consequence must be applied whether you play or discard the card.
Consequences must be applied before performing the Action.
End of the Round
Refill hand (Rounds 1-4 only): After you have taken your Administration Phase actions (simultaneously with the other players), refill your hand by drawing cards from your deck.
If there are not enough cards in your deck, draw those cards, then shuffle your discard to create a new deck, and continue drawing. Do not reshuffle your discard if there are enough cards to fill your hand, even if your deck is empty!
Remember that players who have built Industries have an increased hand limit and will refill their hands to 8 or 9 (max). instead of 7.

Stress causes unhappiness: At the end of the round, if you still have 21 on your Stress track, you lose 1 HP.
New Passengers arrive: Add 1 new Passenger on each empty space of each building that matches the Building Type tile in the space beside the current Round space on the Tramways Schedule board. Remove this Building Type tile from the game. Move the Round marker to the next space on the Round track.
When the Auction deck is empty (after 5 Rounds), the first portion of the game is over. Then you will play one more round as follows:
There will be no cards available in Phase 1. That means that the Auction Phase will only set the turn order. The winner of this last auction will increase his Stress by 2 instead of 1!
Now lay out all the cards from your deck and discard (but keep your remaining hand cards from Round 5 in your hand; you are stuck with those). Fill your hand to its limit with any cards you want from your face-up deck layout. Then, put all cards remaining in your face-up deck layout in the game box.
The rest of Round 6 works like Rounds 1-5, except that you skip the End of Round Phase: After the Administration Phase, the game is over.
End of the Game
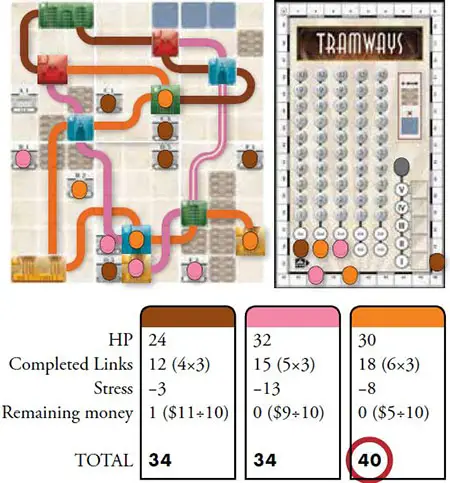
Your final score is equal to the sum of the following:
- The HP you accumulated on the Happiness Points track during the game.
- 3 HP for each complete link (regardless of whether it is upgraded). Incomplete links are worthless.
- 1 HP for each $10 you still have remaining at the end of the game.
- Negative HP equal to your Stress level (i.e. -1 to -21 HP).
The player with the most HP is the winner; if there is a tie, then the wealthiest tied player wins; if there is still a tie, rejoice in shared victory.
Continue Reading
