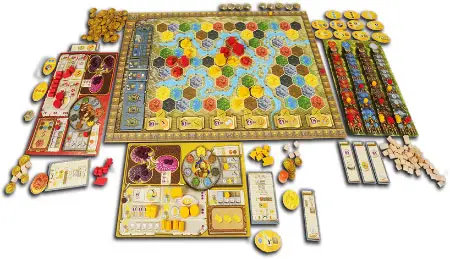
Game Components
- 1 Game board and 1 Cult board
- 7 Faction boards
- 56 Terrain tiles
- 65 natural-colored Workers
- 40 small Coins, 25 medium coins, 20 big coins
- 65 purple Power tokens
- 7 x 8 Dwellings
- 7 x 4 trading houses
- 7 x 1 stronghold
- 7 x 3 temples
- 7 x 1 sanctuary
- 7 x 7 priests
- 7 x 7 Markers
- 7 x 3 bridges
- 1 orange Starting player token
- 17 Action tokens and 1 Game end token
- 5 "100 Victory points" tokens
- 28 oval Favor tiles
- 10 Town tiles
- 9 Bonus cards
- 8 rectangular Scoring tiles
- 5 "Actions" Overview tiles
- 12 zip-lock bags
Setup
The setup of Terra Mystica is quiet complex.
Object of the game
At the end of the game, the player with the most Victory points wins the game. Victory points are depicted as brown squares containing a laurel wreath.
Tutorial Video
Game play
Each of the six rounds goes through three phases:
- Phase I: Income Phase
- Phase II: Action Phase
- Phase III: Cult bonuses and Clean-up Phase
Phase I. Income
Collect new Workers, Coins, Priests, and Power.
You also go through this phase on the 1st round. Consequently, you first collect your faction-specific starting income and then also the income for the 1st round.
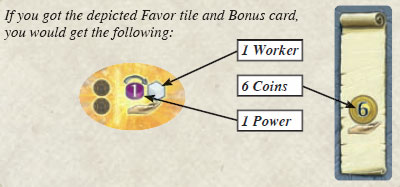
Your income depends on the Structures you have built, on the Bonus card you have chosen, and (later in the game) on the Favor tiles you own. On all components, income is symbolized by an open hand.
Basic income for Structures
Workers: Take a number of Workers from the general supply equal to the number of visible Worker symbols on your Dwelling track.

Coins: Take a number of Coins from the general supply equal to the number of visible Coin symbols on your Trading house track.
Priests: Take a number of Priests from your supply equal to the number of visible Priest symbols on your Temple track. Another Priest symbol will be visible once you have built your Sanctuary.
Both the Swarmlings' Sanctuary and the Darklings' Sanctuary provide 2 Priests.
Put the newly gained Workers, Coins, and Priests on your Faction board. If the supply of Workers or Coins runs out, replace the missing components with something else. Only your supply of Priests is limited.
Power: Power is gained according to the visible Power symbols on the Trading house track. The Stronghold usually provides additional Power (except for the Alchemists who collect 6 Coins instead, or the Chaos Magicians who collect 2 Workers instead, or the Fakirs who collect 1 Priest instead).
Additional income for cards and tiles
Beside the income collected via your Faction board, add the income depicted on your Bonus card.
The Bowls of Power
Each player has 12 Power tokens that are distributed among three Bowls. Power actions require Power in Bowl III (the one on the right).
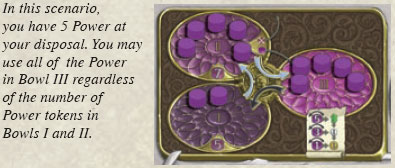
Whenever you gain Power in the game (as income, when an opponent builds Structures, or by advancing on the Cult tracks), you do not get new Power tokens, but rather move the existing ones from Bowl to Bowl. Also, when spending Power on a Power action, you do not lose Power tokens, but move them around again.
Power tokens move (always in clockwise order) according to the following rules:
When gaining Power, proceed in the following order.
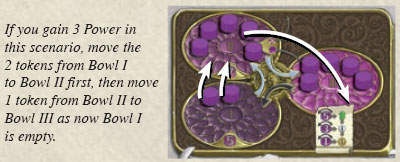
If there are Power tokens in Bowl I, for each 1 Power you gain move one token from Bowl I to Bowl II.
Once Bowl I is empty, for each 1 Power you gain move one token from Bowl II to Bowl III.
Once all Power tokens are in Bowl III, you cannot gain further Power.
You can only spend Power tokens that are in Bowl III. Move them to Bowl I when spending them.
Phase II. Actions
During the Action phase, beginning with the Starting player and in clockwise order, each player takes exactly one Action. Continue to do so until no player wants to take any more Actions.
There are eight possible Actions to choose from. Except for passing, all Actions can be taken multiple times during the same Action phase (but only once per turn).
1. Transform and Build
First, you may change the type of one Terrain space. Then, if you have changed its type to your Home terrain, you may immediately build a Dwelling on that space.
Building a Dwelling
In order to build a Dwelling on a Terrain space, this space needs to be:
- of your color (i.e. it needs to be your Home terrain)
- unoccupied
- directly or indirectly adjacent to one of your
- Structures ("Adjacency" is defined in the next section).
Also, you need to pay its building costs. Each Dwelling costs 1 Worker and 2 Coins. (Exceptions: The Engineers build Dwellings for 1 Worker and 1 Coin, the Swarmlings for 2 Workers and 3 Coins).
Transforming a Terrain space
To ensure the first condition is met, you are allowed to transform one unoccupied Terrain space into your Home terrain immediately before building a Dwelling. Place a Terrain tile of your color on that space.

Transformation has its price: Each step between the source and destination terrain on the Transformation cycle of your Faction board costs 1 Spade. Thus, transforming adjacent types of terrain (on the Transformation cycle) into one another costs 1 Spade, with a maximum cost of up to 3 Spades if they are on opposite sides of the cycle as you can move in either direction on the cycle.
(Exception: Giants always have to pay exactly 2 Spades to transform any type of terrain into their Home terrain).
Spades can be acquired in a variety of ways. You may exchange Workers for Spades. The Exchange track of your Faction board displays the Exchange rate: At the beginning of the game, this is usually 3 Workers for 1 Spade (see Action #3).

1 or 2 Spades can be acquired via certain Power actions. One of the Bonus cards provides 1 Spade.
(Halflings and Giants gain additional Spades for immediate use after building their Stronghold).
Spades may only be applied to a single Terrain space. However, there are two special cases:
If the Spades gained via a Power action or Bonus card do not suffice to transform a Terrain space into your Home terrain, you may exchange Workers for the missing Spades (at the current Exchange rate of your Exchange track).
When gaining 2 Spades, if you only need one of them to transform a Terrain space into your Home terrain, you may apply the second Spade on another Terrain space. However, you may not place a Dwelling on this second space.
(The same is true when the Halflings build their Stronghold, immediately gaining 3 Spades, see last page).
Details on building Dwellings
When building, take Structures (incl. Dwellings) from left to right off your Faction board. If the current Scoring tile depicts a Dwelling, you get 2 Victory points for each Dwelling you build. This Scoring tile awards 2 Victory points for building Dwellings.
Details on using Spades
You may not save Spades for future Actions. Spades need to be used immediately.
If the left side of the current Scoring tile depicts a Spade, you get Victory points for using Spades during the current Action phase. This Scoring tile awards 2 Victory points for using Spades.
After transforming a Terrain space, you do not need to build a Dwelling immediately. You can do this in another Action at a later point in time.
You do not need to transform a Terrain space into your Home terrain, you may stop at any other type of terrain (e.g. if you can not afford more Spades). However, during their turns, your opponents may claim that Terrain space for themselves. (Terrain spaces with Terrain tiles on them but no Structures are considered unoccupied).
Even when transforming a Terrain space without building a Dwelling, the transformed Terrain space needs to be directly or indirectly adjacent to one of your Structures.
You may not transform a Terrain space containing Structures. You may also get Spades via Cult bonuses. As these Spades are gained outside the Action phase, you may not build a Dwelling immediately afterwards, nor do you get to exchange Workers for more Spades. (You have to wait for the next Action phase to build a Dwelling).
Adjacency
Due to some other rules, it is important to distinguish between direct and indirect adjacency of Terrain spaces. (This distinction does not matter when building Dwellings, which is what this section is all about).
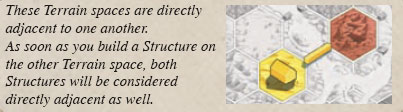
Direct adjacency
Terrain spaces and Structures are considered directly adjacent to one another if they share a hexagon edge. Additionally, Terrain spaces and Structures separated by a River but connected via a Bridge are also considered directly adjacent to one another.
Indirect adjacency
Terrain spaces and Structures are considered indirectly adjacent to one another if they are (not directly adjacent to one another, but) separated by one or more River spaces and your Shipping value is high enough to cover the distance. (Shipping is another Action and will be explained in the next section).
Terrain spaces and Structures that Dwarves can reach via Tunneling and Fakirs via Carpet Flight are also considered indirectly adjacent to one another.

Note: When building Dwellings, your opponents get the chance to gain Power. This will be explained in Action #4 "Upgrading a Structure". Before that, let us have a look at the following two Actions that facilitate building Dwellings for the remainder of the game: advancing on the Shipping track and lowering the Exchange rate for Spades.
2. Advancing on the Shipping track
Terrain spaces and Structures need to be indirectly adjacent to one another if you want to expand beyond River spaces.
In order to transform Terrain spaces or build Structures beyond River spaces, as an Action, you may move the Marker on your Shipping track forward one space. Your Faction board displays the costs of this Action: 1 Priest and 4 Coins.
As a reward for taking this Action, get a number of Victory points as indicated on the Shipping space you move to.
3. Lowering the Exchange rate for Spades
At the beginning of the game, Spades cost 3 Workers each (see Action #1). In order to reduce this cost down to 2 Workers or even down to 1 Worker, as an Action, you may move the Marker on your Exchange track up one space. Your Faction board displays the costs of this Action: 2 Workers, 5 Coins, and 1 Priest.
Exception: Halflings pay fewer Coins, and Darklings do not even have an Exchange track as they exchange Priests for Spades.
As a reward for taking this Action, you get 6 Victory points.
4. Upgrading a Structure
Structures can be upgraded step by step. The costs for each upgrade are depicted on the Faction board to the left of a Structure.
Always take newly placed Structures from left to right off your Faction board.
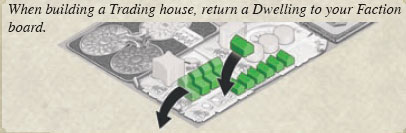
When upgrading, you are replacing Structures by one another. Take the Structure that you wish to upgrade off the Game board and return it to your Faction board. This reduces your income for the given type of Structure. (When returning Structures to your Faction board, always put them as far to the right as possible on their proper track). Place the new Structure on the same space on the Game board where the just removed Structure has been. When building a Trading house, return a Dwelling to your Faction board.
There are four possible upgrades (two of which can only be done once per game).
Upgrading a Dwelling to a Trading house costs 2 Workers and 6 Coins. If there is at least one opponent's Structure directly adjacent to that Dwelling, you only need to pay 3 Coins instead of 6. If the current Scoring tile depicts a Trading house, get 3 Victory points for this upgrade.
Upgrading a Trading house to a Stronghold costs a number of Workers and Coins depending on the faction. After building its Stronghold, each faction gains a specific special ability.
If the current Scoring tile depicts a Stronghold, get 5 Victory points for this upgrade.
Upgrading a Trading house to a Temple costs 2 Workers and 5 Coins. As a reward, immediately choose and take one Favor tile and put it face-up in front of you. You may immediately take advantage of the newly gained Favor tile, or use it during the current Action phase, respectively). You may not take a Favor tile that you already have.
Upgrading a Temple to a Sanctuary costs a number of Workers and Coins depending on the faction. This is also awarded with a Favor tile. If the current Scoring tile depicts a Sanctuary, get 5 Victory points for this upgrade.
Finally, more about the already mentioned rewards you get when an opponent builds a Structure.
Power via Structures
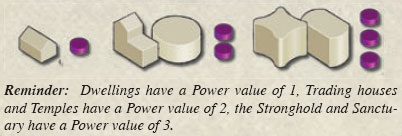
Each Structure has a Power value. The Power value of each Structure is depicted to the right of its track on the Faction board:
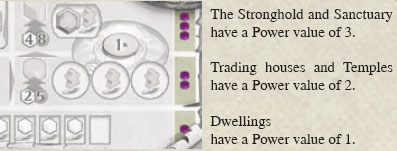
When building a Dwelling (Action #1) or upgrading a Structure (Action #4), you must inform the owners of Structures directly adjacent to your Structure that they may gain Power.
In order to determine the total number of Power an opponent may gain, add up the Power values of their Structures directly adjacent to your newly built Structure.
You do not gain Power for your own Structures. Power can only be gained when an opponent builds Structures.
Beginning with the player to the left of the active player and in clockwise order, each affected opponent needs to decide whether to actually gain the Power or not. The next section explains why you might want to refuse to gain Power.
The price of Power
Unfortunately, Power gained via Structures is not free. To gain that Power, you need to lose a number of Victory points equal to one fewer than the number of Power gained.
Thus, gaining 1/2/3/4/… Power costs 0/1/2/3/… Victory points.
You may not end up with a negative score when losing Victory points.
You may not gain less Power in order to save Victory points. Either take it all or gain nothing. (Exceptions: If you have not enough Power tokens in Bowls I and II, gain as many Power as needed to move all of them to Bowl III and lose Victory points accordingly. Also, you may gain less Power to avoid a negative score. In this case, only gain as many Power as needed to end up with 0 Victory points).
You only lose Victory points when gaining Power via Structures. You do not lose any Victory points when gaining Power otherwise.
You gain Power:
- when an opponent builds Structures (as explained above).
- as income from your Trading houses and Stronghold (and Temples if you are playing the Engineers).
- as income from two specific Bonus cards.
- as income from two specific Favor tiles.
- as a one-time reward when founding a Town and taking the specific Town tile (see page 14 for details on founding a Town).
- as a one-time Cult bonus in Phase III if the specific Scoring tile is up for the current round.
- when advancing on the Cult tracks.
Power via Cult tracks

Power can also be gained on the Cult tracks of Earth, Water, Fire, and Air. You gain 1/2/2/3 Power when advancing to the 3rd/5th/7th/10th space of a Cult track. You only gain this Power once when advancing to or passing by these spaces.
The Nomad player (yellow) gains 4 Power for advancing these 3 spaces in the Cult of Air. Only one player on space 10 Only one player may advance to space 10 of each Cult track. To do so, you also need to have founded a Town for each space 10 you want to advance to. See page 14 for details on founding a Town.
5. Send a Priest to the Order of a Cult
There are 4 spaces below each of the Cult tracks of Earth, Water, Fire, and Air that each can hold exactly 1 Priest. As an Action, you may place one of your Priests on one such space to advance 3 or 2 spaces (as indicated on the space) on the corresponding Cult track.
You may gain Power when advancing on a track (see "Power via Cult tracks" above).
There is no way of getting these Priests back. Keep in mind that you only have a total of 7 Priests at your disposal.
If you do not want to lose a Priest, alternatively, return him to your supply (next to your Faction board) and only advance 1 space.
6. Power actions
There are two types of Power actions: fully-fledged Actions and auxiliary Actions.
Power actions on the Game board
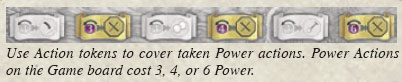
The Power actions on the Game board (indicated by orange octagons) may only be taken once per round. First come, first served.
Whenever taking one of these Actions, move a number of Power tokens from Bowl III to Bowl I equal to its indicated cost. Then, put an Action token on its space on the Game board to indicate that this Action may not be taken any more this round.
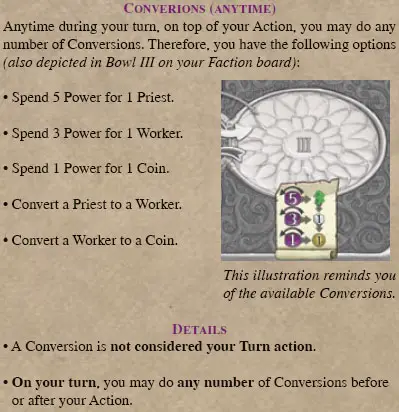
Sacrificing Power
f you do not have enough Power in Bowl III to take a specific Power or Conversion action, on top of your Action, you may move Power tokens from Bowl II to Bowl III and then immediately take the desired Action. However, for each Power token moved in this fashion, you need to remove 1 Power token from Bowl II from the game. From now on, you will irrevocably have to deal with fewerPower tokens in your cycle. (You may not sacrifice Power if you only have 1 Power token in Bowl II).
7. Special actions
Each Special action may be taken only once per round.
Special actions, like Power actions, are indicated by orange octagons and can be gained in a variety of ways.
Some factions unlock a Special action when building their Stronghold.
One Favor tile and one Bonus card provide a Special action to advance 1 space on a Cult track. Another Bonus card provides a free Spade for transforming a Terrain space.
Use Action tokens to cover taken Special actions.
8. Passing and new Starting player
On your turn, if you cannot or do not want to take any more Action, you have to pass and stop taking Actions for the remainder of this round.
The first player to pass becomes the Starting player for the next round (and takes the Starting player token).
When passing, immediately return your Bonus card and take one of the three available ones. This may be a card another player has already returned this round.
Exception: Do not take any Bonus cards in the last round of the game - round 6). If there were Coins on the newly taken Bonus card, put them on your Faction board.
You may get Victory points when returning certain Bonus cards.
When passing and returning the Bonus card depicted on the right, get 1 Victory point for each of your Dwellings on the Game board. When passing and returning the Bonus card depicted on the left, get 2 Victory points for each of your Trading houses on the Game board.
When passing and returning the Bonus card depicted on the right, get 4 Victory points if you have already built your Stronghold and/or 4 Victory points if you have already built your Sanctuary.
Hint: Do not forget to get these Victory points. Always pay attention to the current Scoring tile: you may get Victory points for building certain Structures, for using Spades, or founding Towns.
Freely choose which one of the three available Bonus cards you want to take. (You may not immediately take the card that you have just returned).
You may wish to put the newly taken Bonus card face-down in front of you to indicate that you have already passed.
There is no limitation for how many resources you may keep for the next round.
You may take as many Actions as you wish, even if all other players have already passed. As long as there is at least one player left taking Actions, the current Action phase continues.
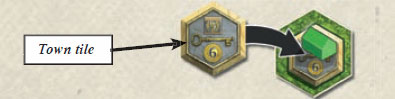
9. Founding a Town
During the course of the game, one or more Towns may be founded. Towns are founded automatically whenever these two conditions are met:
There are at least 4 Structures of one color directly adjacent to one another.
Exception: Only 3 Structures are required if one of them is a Sanctuary.
These Structures have a combined Power value of at least 7.
Indicate a founded Town by choosing and taking a Town tile and placing it under one of the Structures forming that Town.
Benefits of founding a Town
Immediately get a number of Victory points as indicated by the chosen Town tile. Get additional Victory points if the current Scoring tile depicts a key.
Immediately and only once, collect the rewards depicted on the chosen Town tile (either +1 space on each of the Cult tracks, 1 Priest, 2 Workers, 6 Coins, or 8 Power).
Each Town provides a key. Each key allows you to advance to the last space of one Cult track (space 10). (Without a key, you have to stop at space 9).
When founding a Town, all Structures directly adjacent to one another form that Town (Bridges are key here), even if there are more than the required number of Structures.
Indirect adjacency (especially via River spaces) has no relevance when founding a Town. (Exception: The Mermaids may ignore any one River space when founding a Town).
Building new Structures directly adjacent to an existing Town expands that Town rather than forming a new one.
When a Structure is built combining two existing Towns to one larger Town, these Towns do not lose their individual rights or functions (despite the fact that you cannot tell anymore where their borders are).
The total number of Towns for one game is limited to 10.
Phase III Cult Bonuses and Clean-Up Phase
When all players have passed (see Action #8 on the left), the current Action phase is over. In rounds 1 to 5, the Action phase is followed by a Clean-up phase preparing the next round.
There is no Clean-up phase after the last round.
Cult Bonuses

First, the Cult bonuses depicted on the current Scoring tile need to be awarded. Each player with enough progress in the depicted Cults gets the depicted reward, multiple times if need be.
The Cult bonuses are awarded in the play order of the next round. This is relevant for Spades.
You may not acquire additional Spades when getting them as a Cult bonus. Neither may the Fakirs do a Carpet Flight, nor the Dwarves do Tunneling when getting Spades as a Cult bonus. A Carpet Flight and Tunneling have costs that cannot be paid outside the Action phase. Also, if the Giants get only a single Spade as a Cult bonus, this Spade will be forfeit.
You may not save Spades for future turns. You may apply these Spades on different adjacent Terrain spaces.
You may not build a Dwelling in Phase III.
Return Action tokens
If there are any Action tokens on: Power action spaces on the Game board, Special action spaces on Faction boards, or Favor tiles and Bonus cards, remove them from there.
Coins on Bonus cards
Put 1 Coin from the general supply on each of the three leftover Bonus cards. (If a card has not been taken by any player for two rounds, it will now have 2 Coins on it).
Turn the Scoring tile face-down
As the last act of the current round, turn the current Scoring tile facedown so that only the Scoring tiles of the following rounds remain face-up.
End of the game
The game ends after all players have passed in the Action phase of the last round. Afterwards, there is a final scoring. (As indicated by the Game end token, there are no Cult bonuses in the final round).
Cult scoring
Score each of the four Cult tracks individually:
- 8 Victory points for the player highest on a track.
- 4 Victory points for the player second highest on a track.
- 2 Victory points for the player third highest on a track.
These values are also depicted in the top left corner of the Game board. You cannot gain any Victory points when being still on space 0. In case of a tie, evenly divide the Victory points of the respective tiers among the tied players (round down if necessary).
Area scoring
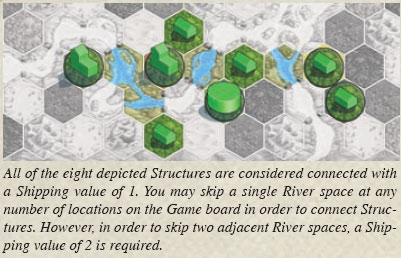
Determine the number of your Structures directly or indirectly adjacent to one another. With the proper Shipping value, scattered areas may be indirectly adjacent to one another (and, thus, considered connected).
The player with the highest number of connected Structures gets 18 Victory points. The player with the second highest number of connected Structures gets 12 Victory points. And the player with the third highest number of connected Structures gets 6 Victory points.
These values are also depicted in the top left corner of the Game board. In case of a tie, evenly divide the Victory points of the respective tiers among the tied players (round down if necessary).
Resource scoring
Finally, get Victory points for left-over resources: get 1 Victory point per 3 Coins. (All other resources may be converted to Coins for this purpose).
The Alchemists get 1 Victory point per 2 Coins.
The winner of the game
The player with the highest number of Victory points wins the game. In case of a tie, there is more than one winner.
Continue Reading