The Defender goal is to keep the Invader from breaching the Stronghold for 7 Turns.
Defender Units
The Defender has the following Units available: Marksman - Strength 1, Soldier - Strength 2, Veteran - Strength 3.
Hourglasses And Actions
Remember: At the start of every Turn the Defender receives 2 Hourglasses to use after the first Invader Action.
The Actions of the Invader take time and as such they provide the Defender with a certain number of Hourglasses. Each of the Defender Actions also takes time and has a certain cost in Hourglasses.
The Defender uses these Hourglasses to move his Units around the Stronghold and perform defensive Actions.
After each Invader Action, the Defender must spend all Hourglasses in his supply. Place the spent Hourglasses in the spaces next to the Action. Placing the Hourglass on the last free space activates the Action. When all the Hourglasses are spent, the Invader takes his next Action. If the Defender receives no Hourglasses, the Invader starts the next Action immediately.
Moving Around The Stronghold
Moving Units And Heroes
Cost: 1 Hourglass per move Effect: Any Unit or Hero can be moved to any free spot in the following ways:
- from a Wall section or Tower to a connected Wall section or Tower
- from a Wall section or Tower to any Building or the Courtyard
- from a Building or the Courtyard to any spot on the board Only Marksmen may move into the Towers. The Defender cannot move Units to the Forge, the Workshop, the Scouts, the Hospital or the Cathedral.
Note: Game components may override these restrictions.
The Heroes may only move on Wall sections and to/from the Courtyard.
Note: The Defender may move any number of Units each turn. Individual Units may move multiple times. Discard the Hourglasses used to pay for Movement actions.
Swap Spaces
Cost: 1 Hourglass per swap Effect: Instead of moving to a free space, a Unit may swap places with another Unit in an adjacent space. Heroes may also swap in this manner.
Note: The Defender may move any number of Units each turn. Discard the Hourglasses used to pay for Movement actions. The Courtyard may hold an unlimited number of Units.
Defense Plans
At any time during the game, the Defender may choose to use the Defense Plans chosen at the start of the game. Once used, all Defense Plans have a negative section that affects the Defender in different ways. Most Defense Plans are retained for the remainder of the game and continue to impact the Defender.
Defender Actions
The Defender spends Hourglasses to perform Actions available in the Buildings. The Defender does not need to have all the Hourglasses necessary to complete a specific Action at one time - they may be built up over a series of Defender Phases or Turns. Each Action available in the Stronghold may only be performed once per turn unless otherwise noted.
After the turn is over, remove all Hourglasses used on completed Actions. Hourglasses placed on Actions that were not fulfilled remain for later Turns.
Saboteurs In A Building

If there is a Saboteur token in a Building, it increases the cost of the actions in that building by 1 Hourglass. The additional Hourglass should be placed on the red Hourglass space on the Building tile. There is a brief summary of each action available below. For a more detailed explanation of each action, see the Defender Actions Explained on the extra sheet.
The Forge
In the Forge, the Defender fashions the armaments required to defend the Stronghold.
Cannon
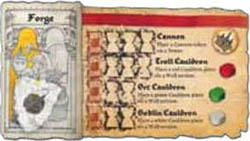
Location: Tower Effect: During Ranged Combat, choose this side's Foreground, or any Rampart opposite or adjacent to the Tower.
Reveal the top card of the Defender Hit deck. Kill one of the indicated Units. If more cannons shoot, resolve all cards and then reshuffle the deck.
Note: Each Tower may only have 1 Cannon, Pole, or Bay Window.
Cauldron
Location: Wall section Effect: During Melee Combat, kill one unit of the corresponding type. Goblin Cauldron kills all Goblins.
The Workshop
In the Workshop, the Defender's craftsmen build the wooden fortifications and tools of defense that are needed in the Towers.
Pole
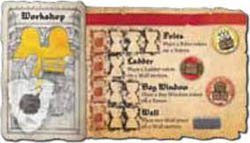
Location: Tower Effect: During Melee combat, choose 1 Wall section adjacent to this Tower. Reveal the top card of the Defender Hit deck for each Pole. Kill the weakest of the indicated Invader Units on the Wall section. If more poles attack, resolve all cards and then reshuffle the deck.
Bay Window
Location: Tower Effect: Gain 1 Strength at both Wall sections adjacent to this Tower during Melee combat if there is at least one Marksman present.
Ladder
Location: Wall section Effect: You may have an extra Defender Unit at this Wall section.
Wall
Location: Wall section Effect: Place 1 Wall component on any Wall section.
The Scouts
Training the scouts is key to protecting the Stronghold. Use your advanced units to sabotage the Invaders best laid plans.
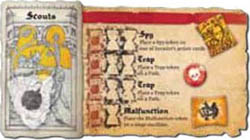
Trap
Location: Path (placed face down) Effect: When the Invader moves over a trap reveal it.
The target units are affected:
Troll - Kill 1 troll, Goblin - Kill all goblins, Siege Tower - The Siege Tower does not move during this maneuver (it may move in subsequent maneuvers).
Malfunction
Location: Ballista, Catapult, or Trebuchet
Effect: This weapon may not fire during the next Assault.
Then discard this token.
Spy
Location: Invader Action Card
Effect: Place the Spy token on an available Invader Action Card.
The Invader must pay +1 Unit when activating this card.
Note: The Spy may not be placed on the Phase 1 or 6 cards.
The Cathedral
The spiring towers of the cathedral are not only good for worship and prayer. Looming high above the walls, they make a perfect location for marksmen and lookouts.
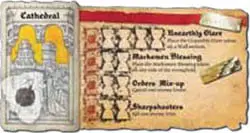
Marksmen Blessing
Location: One side of the Stronghold Effect: During Ranged Combat, Marksmen on this side of the Stronghold fire all together at any single Rampart on this side of the Stronghold.
Unearthly Glare
Location: Wall section Effect: The Assault is not resolved at this Wall section.
Sharpshooters
Location: None Effect: Kill one Invader Unit anywhere on the board.
Orders Mix-up
Location: None Effect: Discard one Invader Order.
The Barracks
While stuck inside the Stronghold's walls, the defending units have plenty of time to train for the inevitable battle.
Note: Training Actions may be used multiple times during a turn. Remove spent Hourglasses after each use.
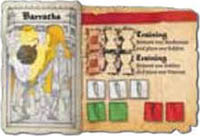
Train Troops
Effect: Replace a Unit in the Barracks: Replace 1 Marksman with 1 Soldier, Replace 1 Soldier with 1 Veteran.
The Guards
The Guards allows the Defender to remove Invader Saboteurs from the Stronghold.
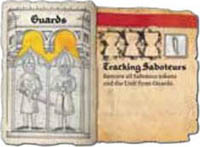
Tracking Saboteurs
Effect: Discard 1 Marksman from the Guards to remove all Saboteur tokens from the Stronghold.
The Hospital
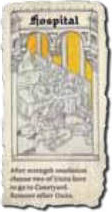
All Defender Units which die this Turn are placed in the Hospital. At the end of each Turn two of these Units (Defender's choice) recover and are moved to the Courtyard. The rest of the Units at the Hospital go back to Supply.
The Courtyard
The Courtyard can hold any number of units and Heroes. There are no special actions on the Courtyard, it is simply a holding place for unassigned Units.
Heroes
Two Heroes assist in defense of the Stronghold: the Officer and the Warrior. Each of them affects their Wall sections differently. Additionally, each may perform one Heroic Order per Turn to aid the defense. These Orders do not cost Hourglasses and may be used during any Defender phase.
The Heroes cannot be killed.
 Warrior = 2 Strength
 Officer = 3 Strength
Action: Each Hero may perform one Heroic Order per turn from the following options. Each Heroic Order may only be used once per turn.
Heroic Orders:
Move 1 Unit from the Courtyard to a Wall section where a Hero is present.
Move any Unit to any Building (except for the Guards and the Barracks) and gain 1 Hourglass to use on the chosen Building.
Move one unit from any Wall section, on the same side of the Stronghold as the Hero, to the Courtyard.
Continue Reading
