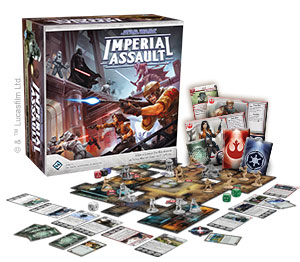
Components
This component list gives the quantities for all components in the core game. It does not include the expansion components found in the Luke Skywalker and Darth Vader figure packs. All cards found in the core game are marked with the icon.
- 1 Threat and Round Dial
- 59 Map Tiles
- 4 Door Tokens with 4 Plastic Stands
- 34 Figures
- 11 Dice
- 1 Rules Reference Guide
- 1 Campaign Guide
- 1 Skirmish Guide
- 6 Hero Sheets
- 39 Deployment Cards
- 10 Story Mission Cards
- 14 Side Mission Cards
- 18 Agenda Cards
- 5 Reference Cards
- 54 Hero Class Cards
- 27 Imperial Class Cards
- 36 Item Cards
- 12 Supply Cards
- 18 Reward Cards
- 42 Command Cards
- 12 Condition Cards
- 1 Initiative Token
- 45 Damage Tokens
- 2 Skirmish Mission Cards
- 8 Terminal Tokens
- 8 Crate Tokens
- 15 Condition Tokens
- 35 Strain Tokens
- 12 Ally and Villain Tokens
- 20 Mission Tokens
- 1 Entrance Token
- 4 Activation Tokens
- 20 ID Tokens with 60 ID Stickers
Campaign Mode Overview
In the Imperial Assault Campaign Mode, two to five players take part in an epic Star Wars adventure. One player controls the forces of the mighty Galactic Empire, commanding everything from squadrons of Stormtroopers to iconic villains, such as Darth Vader.
All other players work together as a team, each controlling a hero of the Rebel Alliance. Throughout the course of the game, these heroes travel the galaxy and take part in daring missions. During each mission, Rebel and Imperial forces clash in tactical ground- based combat.
Players play multiple missions in order, growing in power and experience until facing off in a climactic final mission that determines the fate of the galaxy.
The core action of the Campaign Mode happens during missions. Each mission is a game of tactical combat played on a modular game map. The map setup and special rules for each mission are described in the included Campaign Guide.
This Learn to Play booklet starts with a tutorial that teaches players the basic rules for playing a mission. This includes moving figures on the map, resolving attacks, and winning a mission. It is important for players to understand these concepts before moving on to larger concepts, such as playing consecutive missions in a campaign.
In addition to the campaign, Imperial Assault can be played as a two-player, head-to-head battle called Skirmish Mode or an app- driven Cooperative Mode. Once players have learned the basics of the Imperial Assault Campaign Mode by playing the tutorial, they can learn to play either of these other modes as well.
Tutorial
The easiest way to learn the basics for any of the modes of Imperial Assault is to play a mission. After learning the basics of gameplay, players are ready to learn additional rules and begin playing a campaign.
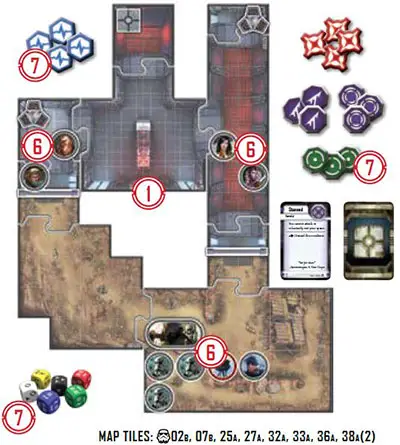
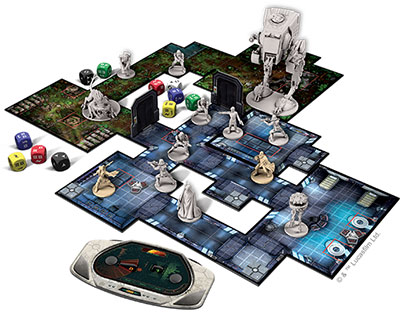
To play the tutorial, first follow the "Tutorial Setup" steps listed below. This diagram shows how to build the map, including where to place tokens, figures, and doors.
Any unchosen hero figures and components are not used. If playing with fewer than four Rebel players the Imperial player does not use the E-Web Engineer's Deployment card and figure.
If playing with fewer than three Rebel players, the Imperial player also does not use the Probe Droid's Deployment card and figure. After performing setup, players are ready to begin playing the game by following the rules for "Playing a Mission" on the right.
Tutorial Setup
1Assemble Map: Assemble the map using the map tiles, doors, crate token, and terminal tokens shown on the right.
Door Icon
2Assign Roles: Players decide who will take on the role of the Imperial player. It is recommended that the most experienced player take on this role. All other players take on the roles of the Rebel heroes.
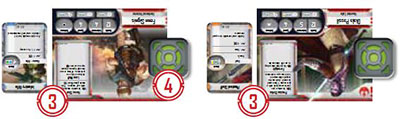
3Prepare Hero Components: Each Rebel player chooses one of the following four heroes: Fenn Signis, Diala Passil, Gaarkhan, or Jyn Odan. If playing with only one Rebel player, that player chooses two heroes.Each hero player takes the Hero sheet, figure, and Class deck matching his hero. Then, he finds the weapon (marked with
) in his Class deck and places it next to his Hero sheet.
Only Components for two heroes shown
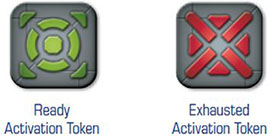
4Activation Tokens: Each hero claims one activation token and places it ready (green side faceup) on his Hero sheet.
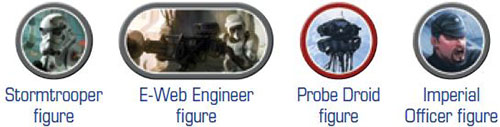
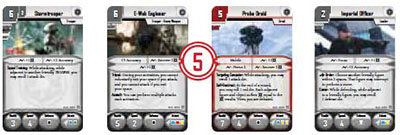
5Prepare Deployment Cards: The Imperial player takes one each of the following four Deployment cards and places them faceup in front of him: Stormtrooper (gray), E-Web Engineer (gray), Probe Droid (red), Imperial Officer (gray). If playing with fewer than 4 heroes, only use some of these cards and figures.
6Deploy Figures: Place all figures on the map on the spaces indicated in the diagram on the right.
7Prepare Dice, Cards, and Other Tokens: Place all dice, the Condition and Supply decks, damage tokens, strain tokens, and condition tokens within easy reach of all players.

Playing a Mission
Missions in Imperial Assault are played over a number of game rounds. Each round consists of two phases that are resolved in the following order:
-
Activation Phase: Play alternates back and forth, starting with the Rebel players activating one of their figures and resolving two actions, such as moving and attacking. Then the Imperial player activates all figures corresponding to one Deployment card.
Players continue activating figures until each figure has resolved an activation.
-
Status Phase: After resolving all activations, players perform a number of cleanup steps.
After resolving the Status Phase, play proceeds to the next round, starting with Activation Phase. These phases are repeated until the mission ends.
I. Activation Phase
When a figure is activated, resolve the following steps:
-
Start of Activation: When activating a hero, ready all of his exhausted Class and Item cards. Readying cards is described in detail later.
-
Perform Actions: The player performs any combination of two actions with the figure. Possible actions include:
- Move: Gain movement points to move on the map.
- Attack: Attack a hostile figure. Only heroes can use more than one action to attack.
- Interact: Open an adjacent door or crate, or interact with another token allowed by the mission's rules.
- Rest: Recover
 (strain) and possibly recover
  (damage).
 - Special: Resolve an
 (action) ability listed on one of his components.
After a Rebel figure resolves two actions, its activation ends and the Imperial player chooses a deployment group to activate. After the Imperial player activates all figures of a deployment group, the heroes choose another Rebel figure to activate.
Players continue activating figures in this way until all figures have been activated.
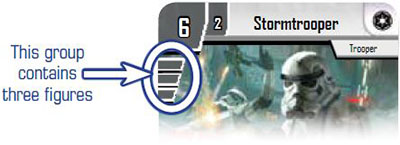
Deployment Groups
Each Deployment card contains one or more bars below its deployment cost. The number of bars indicates the number of figures that form this card's deployment group.
While performing an activation using a Deployment card, the controlling player performs 2 actions with each figure in the group in the order of his choice. He must resolve both actions for one figure before choosing the next figure.
Move
When a figure performs a move, it gains movement points equal to its Speed (printed on its Deployment card or Hero sheet).
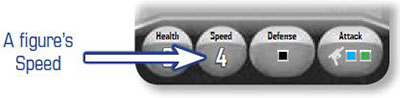
A figure can move to an adjacent space by spending one movement point. Both orthogonal and diagonal movement is allowed. A figure's movement points may be spent at any time during its activation, before or after it performs an action.
Terrain and other figures can restrict figure movement.
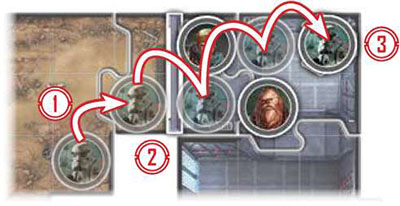
Example of Movement
1A Stormtrooper uses its first action to perform a move. It gains four movement points (equal to its Speed). The Imperial player then spends one movement point to move the figure one space.
2After moving, he chooses to use his second action to interact with the door to open it.
3He has three movement points remaining and spends them to move three more spaces before ending his activation.
Interact
Figures can search, examine, or otherwise interact with objects on the map during a mission. A figure can interact with a token in its space or in an adjacent space as follows:
-
Crates: A hero can interact with a crate to draw one Supply card. He places the Supply card faceup near his Hero sheet and may use the ability as explained on the card.
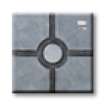
Crate Token
Then, he claims the crate token by removing it from the map and placing it by his Hero sheet. During a campaign, crates are worth credits at the end of the mission.
-
Doors: A figure can interact with a door to open it. He removes the door from the map and returns it to the game box.

Door
-
Special: A figure can interact with other tokens on the map, such as a terminal or mission token, as stated in the mission's rules.
Rest
During campaign missions, heroes can suffer (strain) to resolve powerful abilities. By resting, a hero can recover equal to his Endurance. If a hero recovers in excess of the number of strain tokens he has, the hero recovers (damage) equal to the amount of excess.
Only heroes can rest.
Special Action
Many Class cards, abilities, and mission rules allow figures to perform unique actions. These abilities are denoted with a . Each special action can only be performed once per activation.
Attack
Performing an attack is the main way in which a figure can damage a hostile figure. When a figure has suffered (damage) equal to its Health, it is defeated.
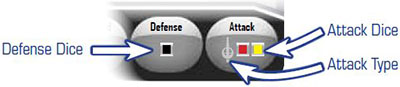
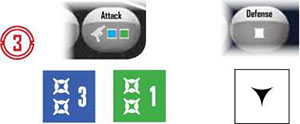
When a figure declares an attack, it first chooses a hostile figure to target. Then he rolls the attack dice listed on his Deployment card (for Imperial figures or allies) or weapon Item card (for heroes). At the same time, the defender rolls the defense dice listed on his Deployment card or Hero sheet.
After dice are rolled, the target of the attack suffers equal to the number of icons rolled minus the number of  (block) icons rolled by the defender.
In addition to and icons, there are four other results that appear on dice:
 (surge): After rolling dice, the attacker can spend these results to trigger certain abilities.
 (evade): Each evade icon cancels one icon.
 (dodge): This icon appears on the white die. This result causes the entire attack to miss (the target suffers zero damage).
Accuracy: The numbers on the dice are used to determine if a ranged attack (
 ) misses (see "Accuracy" on the right).
Important: Heroes are the only figures that can use both of their actions to perform attacks during the same activation. If a special action (
Attack Restrictions
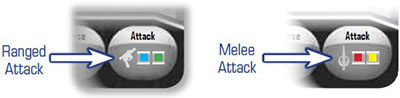
Each attack is either a melee attack ( ) or a ranged attack (), as indicated by the icon before the dice icons. Melee attacks can only target figures adjacent to the attacker. Alternatively, ranged attacks can target any hostile figure that the figure can see (explained in "Line of Sight" below). There is also a chance that any ranged attack can miss the target.
When performing a ranged attack, follow these restrictions:
-
Line of Sight: To declare the attack, the target figure must be in line of sight of the attacking figure.
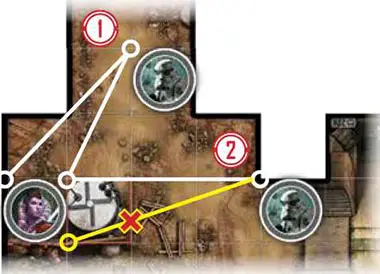
To determine if a target is within line of sight, the attacking player chooses one corner of his figure's space. Then he traces two straight, uninterrupted lines to two different corners of the target's space.
These lines cannot overlap and cannot be traced through walls (thick black lines), blocked terrain (red lines), or spaces containing figures.
-
Accuracy: After rolling dice, the amount of accuracy (the sum of the numbers on the dice) must be equal to or greater than the number of spaces the target is away from the attacker, referred to as distance.
If the accuracy is less than the distance to the target, the attack misses and the target suffers zero damage. The farther the distance to a target, the less likely it is that the attacker will roll enough accuracy for his attack to be successful.
Example of an Attack
1. The first Stormtrooper has line of sight to Diala, because he can draw two non-intersecting lines from one corner of his space to two different corners of Diala's Space.
2. The second Stormtrooper does not have line of sight to Diala because blocking terrain (a red line on the map) intersects the second line drawn from his corner to Diala's space.
3. The Imperial player performs an attack with the first Stormtrooper. He rolls the dice listed for his figure's Attack, while his opponent simultaneously rolls the die listed for Diala's Defense.
4. The attacker rolled a total of 4 Accuracy. Diala is only two spaces away, so the attack does not miss.
5. Then the defender takes the number of
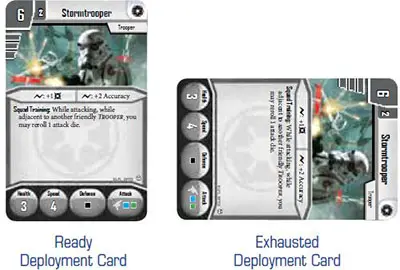
Tracking Activations and Exhausting Cards
When a hero is activated, he flips his activation token red side faceup to mark that he has resolved his activation.
When the last figure from a Deployment card is activated, its card is exhausted (rotated 90 degrees). Figures corresponding to an exhausted Deployment card cannot be activated again during this game round.
The Activation Phase ends when all activation tokens and Deployment cards are exhausted.
II. Status Phase
After all figures have resolved their activations, players resolve a number of steps to prepare for the next round.
For the tutorial, players should simply ready all exhausted Deployment cards (by rotating them upright) and activation tokens (by flipping them green side faceup).
After resolving this phase, players start the next game round beginning with a new Activation Phase.
Ending a Mission
The mission's rules describe when the mission will end.
For the Tutorial, the Rebel players' objective is to defeat all Imperial figures. The Imperial player's objective is to either have his figures interact with both terminals or defeat a hero.
The mission ends as soon as one of these objectives is fulfilled.
Additional Core Rules
Check here the detailed of the additional core game rules.
Advanced Rules
Check here the details of the advanced game rules.
Playing Campaign Mode
After players have learned the core mission rules in the tutorial, they are ready to play a full campaign.
The campaign opens with players resolving the action-packed introductory scenario "Aftermath". This mission lays the groundwork for the main story arc and helps players get comfortable with the complete mission rules.
Check here the full details about playing the campaign mode.
Continue Reading


