To start playing a new campaign, players first perform the steps of "Campaign Mode Setup" below.
Campaign Mode Setup
-
Choose Player Roles: Players decide who will take on the role of the Imperial player. It is recommended that the most experienced player take on this role. All other players take on the roles of the Rebel heroes.
Players retain these roles for the entirety of the campaign.
-
Choose Heroes: Each Rebel player chooses one Hero sheet and takes that hero's matching Class deck and hero figure. Then each Rebel player retrieves the basic Item cards (the cards without an XP cost) from his Class deck and places them faceup on the table in front of him.
-
Choose Imperial Class: The Imperial player chooses one Imperial Class deck. Then he retrieves the basic Class card (the card without an XP cost) from this deck and places it faceup on the table in front of him.
-
Build Agenda Deck: The Imperial player takes all Agenda cards and sorts them by set (listed in the upper-right corner of the card). He chooses six Agenda card sets and shuffles these 18 cards to create the Agenda deck.
-
Build Side Mission Deck: After playing the introductory mission, heroes use Mission cards to choose which mission they will resolve next.
During this step of setup, Rebel players create the Side Mission deck that will be used during this campaign. They first sort the Side Mission cards by the color on the face of the cards. Then they create the Side Mission deck by shuffling together the following cards:
- Each red Side Mission card corresponding to their heroes
- Four green cards of the heroes' choice
- Four random gray cards (do not reveal these cards to any player)
-
Set Up Introductory Mission: Players are ready to play the introductory mission for the core campaign. To prepare this mission, follow the "Mission Setup" steps listed to the right.
To resolve these, the Imperial player will need to reference the "Aftermath" mission.
Less than 4 Heroes?
The Campaign Mode for Imperial Assault provides a balanced experience for 2-5 players. If playing with fewer than four heroes, Rebel players receive special cards from the Reward deck during setup.
These cards help balance the game by increasing the heroes' Health and providing additional activation tokens.
After campaign setup for fewer than four heroes, give heroes the following components:
• 2-Hero Game: Each hero receives a "Legendary" Reward card.
• 3-Hero Game: Each hero receives a "Heroic" Reward card.
If there is only one Rebel player in the game, he plays a two-hero game and controls both of them separately.
A hero who has two activation tokens flips only one token facedown after resolving an activation (meaning he will be able to activate twice each round). A hero cannot perform his second activation until each hero has performed his first activation.
Mission Setup
Before playing a mission, players perform the following steps:
-
Assemble Map: The Imperial player assembles this mission's map using map tiles as shown in the mission's diagram in the Campaign Guide. He places all tokens on the map as indicated in the diagram.
-
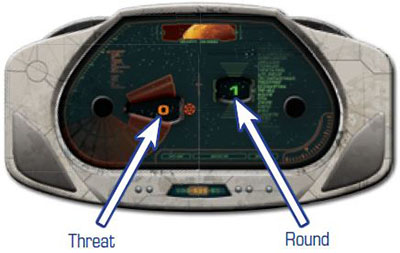
Prepare Threat and Round Dial: The Imperial player sets the threat dial to 0 and the round dial to 1.
-
Deployment and Setup: The Imperial player takes all Deployment cards and sorts them into groups as listed in the "Deployment and Setup" box of the mission rules. This box has up to four different elements:
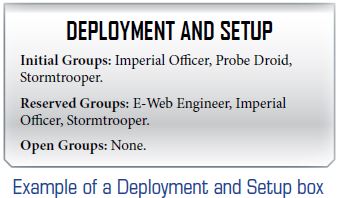
Initial Groups: Take the listed Deployment cards and place them faceup on the table. The corresponding figures are placed on the map during step 4 "Deploy Imperial Figures".
Reserved Groups: The Imperial player secretly takes the listed Deployment cards and places them in a facedown pile out of the way. The figures corresponding to these cards are placed on the map when dictated by the mission rules.
Open Groups: The Imperial player secretly chooses a number of Deployment cards as listed in the "Open Groups" section. These cards form a secret hand of Deployment cards and can be used to deploy figures to the map during the Status Phase (see "Threat and Deployment" on the right).
He may choose any
 or
or  Deployment cards except unique cards (cards with a
  before the name); unique cards must be earned as mission rewards before being used as open groups.
Deployment cards not in initial, reserved, or open groups are returned to the game box and not used during this mission.
Special Setup: Some missions have a "Special Setup" section. Any instructions listed here are performed at this time.
-
Deploy Imperial Figures: The Imperial player deploys figures on the map as indicated in the diagram.
-
Prepare Dice, Cards, and Other Tokens: Place all dice, Condition and Supply decks, damage tokens, strain tokens, and condition tokens within easy reach of all players.
-
Read Mission Briefing: The Imperial player reads the "Mission Briefing" section of the mission rules aloud to the Rebel players.
If there are any map tiles in the diagram that have names, he should also indicate these tiles and names to all players. He keeps the rest of the mission rules to himself until instructed to resolve them.
-
Deploy Rebel Figures: Each Rebel player places his hero figure in an empty space as close to the entrance token as possible. This includes the space containing the entrance token itself.

Entrance Token
If the heroes have earned an Ally, they can choose to deploy it at this time. Allies are not used in the introductory mission and are described later.
-
Prepare Activation Tokens: Each hero receives one activation token and places it ready (green side faceup) on his Hero sheet. If playing with fewer than four heroes, they may receive additional activation tokens as specified on their "Legendary" or "Heroic" Reward cards.
After players have finished setup, they are ready to begin playing the game.
Playing Campaign Missions
Missions in Imperial Assault are played over a number of game rounds. Each round consists of an Activation Phase (see page 5) followed by a Status Phase.
After resolving the Status Phase, players begin a new round starting with the Activation Phase. These phases are repeated until the mission ends.
Campaign Status Phase
After each figure has resolved its activation, players resolve the following steps before the next round begins:
-
Increase Threat: The Imperial player increases the threat dial by the threat level listed on the campaign log, which is found on the back of the Campaign Guide. For the introductory mission, the threat level is two.
-
Ready: The Imperial player readies all of his exhausted Class and Deployment cards. Each hero readies all of his activation tokens, flipping them green side faceup.
-
Deploy and Reinforce: The Imperial player may spend
 (threat) to bring additional figures onto the map.
 -
End of Round Effects: If there are any abilities or mission rules triggered at the end of this game round, players resolve them at this time.
-
Advance Round Dial: Advance the round dial by one. Then begin a new round, starting with the Activation Phase.
Threat and Deployment
During the Status Phase of each round, the Imperial player increases D (threat) which he can spend to deploy additional figures.
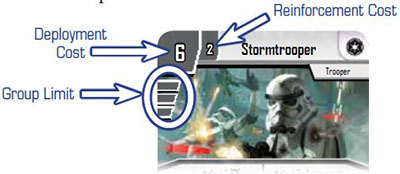
Each Deployment card has a deployment cost, a reinforcement cost, and a group limit. During each Status Phase, the Imperial player may deploy groups of figures and/or reinforce individual figures to the map.
To deploy a group, the Imperial player chooses a Deployment card in his hand and spends equal to the card's deployment cost. Then he places the card faceup on the table and places a number of corresponding figures on the map equal to the card's group limit.
These figures are placed as close as possible to a green deployment point shown in the mission's diagram. This includes the space containing the deployment point itself.
 Deployment Point |
To reinforce a figure, he chooses a Deployment card already on the table and spends equal to the card's reinforcement cost. Then he places one figure from that group as close as possible to a green deployment point. Each time he spends he reduces the threat dial by that amount.
Example of Deployment
At the start of the Status Phase, the Imperial player has 5
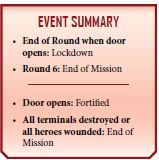
During the Deploy and Reinforce step, he decides to Deploy a group of Stormtroopers. He reduces his threat dial by the Stormtrooper's deployment cost of 6, leaving him with 1
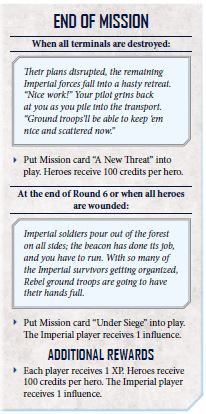
He then looks at the diagram in the Campaign Guide to locate the green deployment point.
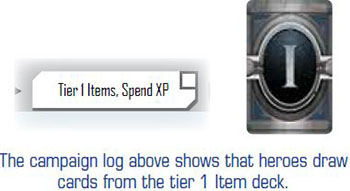
Finally, he places three Stormtrooper figures on the map as close to the green deployment point as possible.
Mission Information
Each mission provides specific rules of play, including objectives for the Rebel and Imperial players to achieve. This information, including how and when tine mission will end, is described in the mission's entry in the Campaign Guide.
Some mission rules are persistent and remain in play for the entire mission. Other rules consist of individual occurrences that trigger only once, such as deploying reserved figures or increasing .
Each mi4sion is full of many surprises that provide a sense of exploration for the Rebel players. For this reason, Rebel players cannot read the Campaign Guide.
Though most rules and mission information will eventually become available to the heroes, this information is presented over time as they play through the mission.
Mission Events
At certain points during a mission, the Imperial player will be required to read information from the Campaign Guide aloud and resolve rules listed there.
These events are often triggered at the end of a certain game round, but may also be triggered when a specific situation occurs (for example, Hhen a certain door is opened by a figure),
If this occurs during a figure's activation, the Imperial player interrupts the activation in progress. He reads the text aloud, resolves any special instructions listed, and then the player continues resolving his figure's activation.
The "Event Summary" box in the Campaign Guide provides the Imperial player a list of when events are triggered during this mission.
Ending a Mission
Each mission's rules list the conditions that cause the mission to end. As soon as an end condition is met, the Imperial player resolves the "End of Mission" section of the mission rules.
He reads the listed story text aloud, and then gives players the rewards listed below.
Then players receive the rewards listed in the "Additional Rewards" section. There is most often not a stated winner to each individual mission, though certain results are more favorable to one side or the other.
The goal within each mission is for players to fulfill their mission objectives, which often will cause the mission to end. By fulfilling objectives, players receive rewards that will help them win the campaign.
Campaign Structure
Playing a campaign is simple. Players first resolve a mission, and then have the opportunity to purchase new Item cards, Class cards, and Agenda cards. Then they resume their narrative by choosing and resolving a new mission. They continue resolving these stages until the campaign ends with a climactic mission known as a finale.
To continue a campaign, players check the campaign log, found on the back of the Campaign guide, and resolve the next available (unmarked) stage.

In the above example, players have just resolved the "Aftermath" mission. The Rebel Upgrade stage is the next available stage.
There are three types of stages: Mission Stages, Rebel Upgrade Stages, and Imperial Upgrade S3ages.
-
Mission Stage
Players perform the following steps:
-
Choose Mission: Rebel players refer to the campaign log to determine their next mission. If the entry reads "Side Mission", heroes choose one of the active Side Mission cards. If it reads "Story Mission", they choose an active Story Mission card.
-
Resolve Mission: Players resolve the chosen mission following the rules for "Playing Campaign Missions"
-
Post-Mission Cleanup: After resolving the mission, players perform the following:
- Heroes recover all
 and
and  . Any wounded heroes flip their Hero sheets to the healthy side.
 - Heroes shuffle all Supply cards back into the Supply deck.
- Heroes gain 50 credits 6or each crate: token in their play areas, and then discard the tokens.
- Heroes return the current mission's card to the game box.
- If players just resolved the introductory mission, shuffle the Side Mission deck, and then draw two cards placing them faceup on the table. These are the active missions that Rebel players can choose to resolve during future Mission Stages.
If players just resolved an active, non-agenda Side Mission card, shuffle the Side Mission deck and draw one card. This card is now an active mission.
- Heroes recover all
Mission Cards
There are three types of Mission cards: Side Missions, Story Missions, and Agenda Missions.
Mission cards represent the different adventures that Rebel players can choose to undertake. Each card provides a brief narrative explaining the mission's story as well as the possible rewards for completing that mission's objectives.
During campaign setup, Rebel players build a Side Mission deck and the Imperial player builds an Agenda deck. Story Mission cards are never randomized and become active as a result of certain mission rewards.
-
-
Rebel Upgrade Stage
Rebel players perform the following steps:
-
Spend Credits: Rebel players draw six cards from the Item deck listed on the campaign log and may purchase these cards by spending credits.
-
Spend Experience Points: Each hero can spend experience points (XP) to purchase cards from his Class deck.
-
-
Imperial Upgrade Stage
The Imperial player performs the following steps:
-
Spend Influence: The Imperial player draws four cards from the Agenda deck and may purchase any of them by spending Influence.
-
Spend Experience Points: The Imperial player can spend XP to purchase cards from his Class deck.
-
After resolving each stage, players mark this stage's box on the campaign log to track their progress.
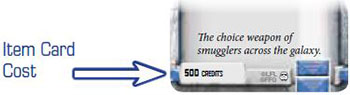
Spending Credits
During the Spend Credits step of the Rebel Upgrade Stage, players draw s ix Item cards from the current tier's Item deck.
Place the drawn Item cards faceup on the table. Rebel players then collectively decide the cards that they wish to purchase by spending credits equal to the cards' costs. They give each purchased Item card to one hero, who may use this card in future missions.
During this step, players can also sell any Item cards that they already own. To sell a card, Rebel players receive an amount of credits equal to half the card's cost. Then shuffle that card back into the appropriate Item deck.
Then shuffle any Item cards not purchased back into their corresponding Item decks.
Credits are not assigned to specific heroes, they are shared by the group.
Campaign Resources
Throughout a campaign, players acquire various resources as rewards for completing missions. These resources are spent to gain a variety of different advantages.
Experience Points: Both heroes and the Imperial player earn experience points (XP). XP can be spent to purchase cards from the player's Class deck.
Credits: Heroes collectively earn credits that can be spent to purchase powerful new weapons, armor, equipment, and modifications.
Influence: The Imperial player collects influence which he spends to resolve powerful Agenda cards.
These resources are not tracked with tokens. Instead, players should use a pencil to write this information on the campaign log, which is found on the back of the Campaign Guide. When a player spends or gains one of these resources, he records the new amount on this log.
Spending Influence
The Imperial player may trigger special events or create active side missions through the use of Agenda cards.
During the Imperial Upgrade Stage, the Imperial player shuffles his Agenda deck and secretly draws four Agenda cards. He may spend influence to purchase one or more of these cards. The cards that he chooses not to purchase are shuffled back into the deck without being revealed to the Rebel players.
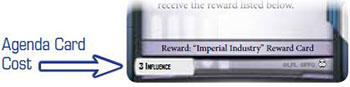
If the card instructs him to keep it secret, he does not show it to the Rebel players after purchasing it, and the only information they will know about the card is its cost.
Because of this, it is recommended that the Imperial player reveal the cost portion of the card before marking the spent influence to help ensure no mistakes are made in record-keeping. After purchasing, he keeps the card and can resolve it later during the campaign as specified on the card.
All other Agenda cards are revealed and resolved immediately after purchasing them. Unless instructed to keep the card in play or shuffle it back into the Agenda deck, the Imperial player returns Agenda cards to the game box after they are resolved.
Some Agenda cards become active side missions when purchased. Heroes can choose to resolve one of these missions anytime they can resolve a side mission. These cards provide an automatic reward to the Imperial player if the heroes decide to resolve another side mission instead of this Agenda's mission.
Agenda missions are returned to the game box when discarded or completed.
Spending Experience Points
When a player is allowed to spend experience, he may look through his deck of unpurchased Class cards and choose to purchase any of these cards by spending XP equal to the card's cost.
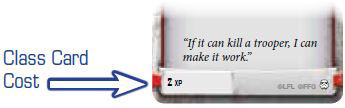
After purchasing a Class card the player places it faceup in his play area. He can use this card's abilities for the rest of the campaign.
Winning The Campaign
Players' ultimate goal is to win the last mission of the campaign, known as the finale.
Throughout the course of the campaign, players receive rewards such as Item cards, Class cards, Agenda cards, and allies that will help them win this finale. Certain mission rewards also steer the direction of the narrative and will dictate which of the finale missions players will resolve.
The players who win the Finale are the ultimate victors and have won the campaign.
Advanced Campaign Rules
There are a number of advanced concepts that players may not encounter for their first few missions. This section describes these advanced rules in detail.
Attribute Tests
Though not used in the introductory mission, many other missions, abilities, and other game effects require heroes to resolve an attribute test.
For example, a mission rule may say: "A hero can interact with a terminal ( ) to open any door". This means that the hero can interact with a terminal to test his attribute. If he passes, he immediately opens the door.
To resolve an attribute test, the player rolls the dice listed for that attribute on his Hero sheet. If he rolls at least 1  , he passes the test. If he does not roll any , he fails the test.
Passing a test can often provide specific benefits or advance a given mission. Failing a test can often result in negative consequences such as delaying progress on mission objectives.

Campaign Record Keeping
When players have finished playing Imperial Assault for the day, they should perform the following steps to save their progress. This will allow them to store the game and quickly resume the campaign at the start of their next session:
-
Record Progress: Make sure the campaign log has up-to- date information about all players' XP, credits, and influence. Players should also mark the current stage of the campaign and list the names of all completed missions.
-
Store Components: Players should use some small plastic bags (not included) to safely store components and keep them separate between sessions:
-
General Bag: Store all active Mission cards and any Agenda cards that are in play.
-
Imperial Bag: Store the purchased Imperial Class cards and the Imperial player's deck of unpurchased Agenda cards. He also stores any of his secret Agenda cards that he has purchased, being careful to keep them separate from his Agenda deck.
-
Hero Bags (2-4): Each hero creates his own bag, consisting of his Hero sheet, Item cards, and purchased Class cards. One player should also store available allies in his bag, if any.
-
All other components do not need to be kept separate and are returned to the game box as players see fit; this includes all Class cards that players have not purchased, so that they are not confused with previously acquired Class cards.
Allies
Some Deployment cards have a bullet () before the figure's name. These allies represent unique personas, such as Luke Skywalker.
Imperial Allies, such as Darth Vader, are called villains but follow all of the same rules as allies. Allies and villains cannot be used unless dictated by the mission or until gained as a mission reward.
During missions, allies function like additional figures on that player's side. If a player wishes to bring an ally to a mission, he must follow the "Allies" rules found in the Rules Reference Guide.
Item Restrictions
Throughout the course of the campaign, players will acquire a large number of Item cards. Heroes can potentially possess an unlimited number of Item cards, but each hero is limited in what he can bring to an individual mission:
1 Armor card (
 )
)2 Weapon cards (any card with an attack type followed by dice icons)
3 Equipment cards (
 )
)
Trading Items
Before deploying to a mission, heroes may freely give any of their Item cards, except for cards from a Class or Reward deck, to other heroes. Item cards cannot be traded during a mission.
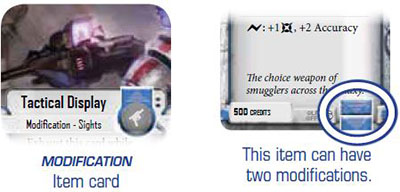
Modifications
Some items are modifications. These cards are placed below a weapon and provide the listed ability to the weapon.
Each weapon is limited in the number of modifications it can have, listed as a number of bars at the bottom right corner of the card.
Continue Reading


