Sekigahara is a 2-player game depicting the campaign in the year 1600 that founded the Tokugawa Shogunate. One player assumes the role of Tokugawa Ieyasu, the most powerful daimyo in Japan.
The other becomes Ishida Mitsunari, champion of a warlord's child heir. Each leader assembled a coalition of daimyo and fought a 7-week contest for control of Japan. The war was decided at a crossroads called Sekigahara, where disloyalty and defections turned the tide of battle from Ishida to Tokugawa.
Components
A complete game of Sekigahara includes:
- 1 22x34 inch map
- 1 and 1/2 sheets of stickers
- 96 rectangular blocks (48 gold and 48 black)
- 2 gold disks
- 1 square block
- 2 decks of cards (one for each coalition)
- 2 draw bags
- 2 reference cards (identical)
- rulebook
Applying The Stickers
Apply the gold-colored Ishida Mitsunari labels to the gold-colored blocks; and apply the black Tokugawa Ieyasu stickers to the black blocks. All blocks and disks receive only one sticker except the square Turn Track block which receives a black and a gold sticker. There are no stickers for the small cubes.
Object of the Game
Instant Victory
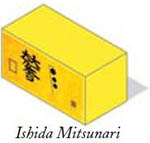
The Tokugawa player wins instantly if Ishida Mitsunari (shown on the right) is killed or Toyotomi Hideyori (the gold-colored disk shown in 3.4) is captured. The Ishida player wins instantly if Tokugawa Iesayu (the black Leader block shown in 3.2) is killed. If both sides win instant victory in the same battle, the Ishida player wins.
Ishida Mitsunari
Victory Points
Victory points are counted if the end of week 7 is reached with no instant winner. Players score two points for each castle and one point for each Resource Location. The higher total wins the game. A tie in victory points is broken in favor of the Ishida player.
Game Pieces
Colors
Tokugawa pieces are black, Ishida pieces are gold. Blocks on the board should be aligned so that only the owner can see each block's identity.
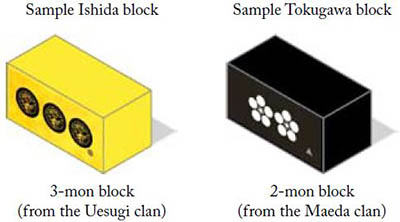
Blocks
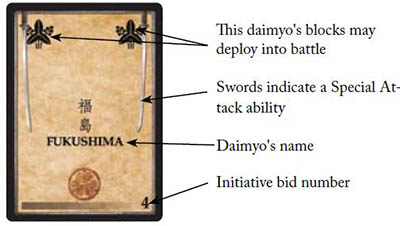
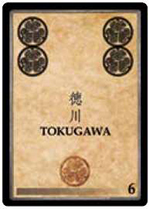
Each block represents roughly 5,000 warriors. Each block corresponds to a single daimyo (leader), whose mon (symbol) appears on the block. The historical name of that daimyo can be found on the cards that have corresponding symbols. The strength of the block is the number (1-4) of mon printed on it.
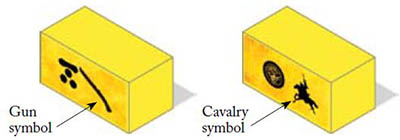
Some blocks also have attached gun or cavalry ability, indicated by a gun or cavalry stencil.
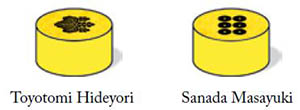
Some blocks represent a daimyo (leader). These are marked with a nobori (banner). Most nobori have a single dot, but the protago- nists of the campaign, Ishida Mitsunari and Tokugawa Ieyasu, are marked with nobori of three dots.

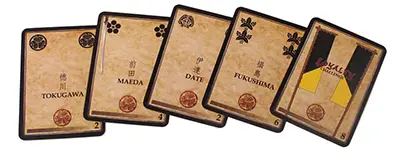
Cards
Cards represent the allegiance of each player's armies. The greater the number of cards in a player's hand, the greater the support of his troops. Cards are used to bid for Initiative, to move, Force March, and deploy units for battle.
Each side has a deck, and will use only that deck for the duration of the game. When the game begins, shuffle both decks and place them face down to form two draw piles.
All discards and card plays are public (played face up) at the time they are played. Discard piles cannot be examined by either player.
When a card draw pile is expended and the player must draw a new card, shuffle the stack of used cards to make a new draw pile.
Other Components
Disks are units that can be destroyed like a block, but cannot move or fight. There are two disks in the game, each attached to a castle.
Turn Marker: A flat square with the Tokugawa mon on one side and the Ishida mon on the other is used to mark the turn, the move, and the player who moves first this week.
Cubes: Black and gold cubes are used to represent control of the resource areas on the board. Cubes are also used to track Impact delivered during a combat, on the Impact chart.

Board: The board represents central Honshu, the largest island of Japan, where the majority of the fighting took place. The board contains the map and the locations in play, the Impact track, the Turn Track, and the Recruitment Boxes.

Locations
A location is a place on the map (typically a city) connected by roads to other locations. It is represented by a circle, and may include a castle. Any number of blocks may occupy a location. Blocks on the map begin and end every turn in a location.
Resource Locations
Resource Locations are wealth-producing zones, popular trade routes, and other important regions. Together they loosely represent the infra- structure of the nation.
Resource Locations are red (regular locations are white). The last player to move a block onto or through a Resource Location controls that location.
Use a cube to indicate control. Until a Resource Location is first claimed, it is owned by neither player. Resource Locations provide one victory point at the end of the game and bonus recruitements during the Reinforcement Step.
Castles
Castles are attached to locations on the board. Each castle has a natural alignment with Ishida or Tokugawa, indicated by its color. Castles are controlled by a player if he has blocks at that location and his opponent doesn't.
If neither player has blocks present, the castle reverts to its natural alignment. During a siege, the castle is controlled by one player and the location attached to it is controlled by the other. Whoever controls the most castles during the Rein- forcement Step receives one additional card.
Recruitment Boxes
Each player has a Recruitment Box. At the beginning of each week, new blocks are placed in these boxes. During the week, players may Muster these forces onto the board. The Ishida player also has a Mori box, from which Mori units can enter Osaka.
Capitals
Two Locations, Kyoto and Edo, are capitals. They begin the game affiliated with Ishida and Tokugawa, respectively, and are framed in corresponding color. Capitals are Resource Locations and supply a Leadership Movement Bonus.

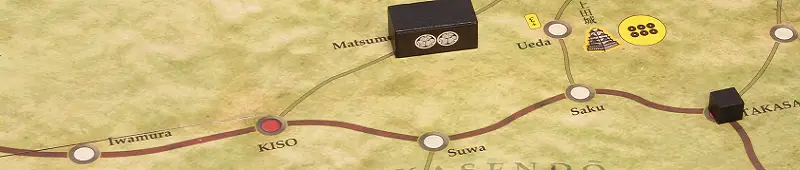
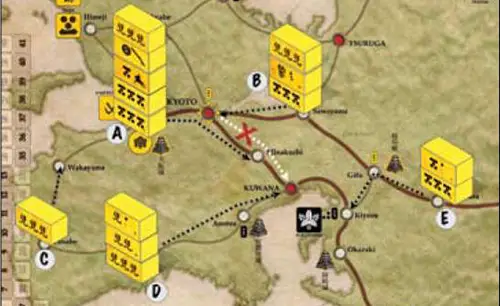
The diagram above shows the starting setup. Randomly drawn blocks are depicted with a question mark.
Setup
- Set the turn counter to Week 1.
- Shuffle the two decks separately.
- Each player draws 5 cards from his deck. (This small starting hand represents the limited organizational capacity of each army in the early stages).
- Separate the blocks with geometric shapes in the lower right corner, and mix the remaining blocks into two draw bags (one for each color).
- Place blocks on the map as described in rule 5.2. All blocks are placed so that only the owner of the block can see its identity. Exception: The 5 blocks in the Mori Box which remain face up.
Place Blocks
Blocks With Specific Locations
Place the blocks which have a geometric shape in the lower right corner on the map in the Locations that have the matching symbol. One block appears on the board for every symbol printed on the map. Note that 5 Ishida blocks have symbols matching the Mori box, where these blocks begin the game.
Randomly Placed Blocks
After placing the designated blocks, mix all the rest into two draw bags, one for each player. Then fill the locations that are indicated for random blocks. These locations are designated on the board with a +1, +2, or +3 symbol.
The number indicates the number of blocks that should be drawn at random from a bag and placed there. Before drawing these blocks from the bag, the player must specify for which location on the board they are being drawn.
Reinforcement Blocks
Add the first wave of reinforcements. Each side draws four blocks from their bags and places them in his Recruitment Box.
Game Turn
The game is played in seven weeks, each of which contains two turns (A and B). Each week of the game includes the following steps, in the order listed below:
- Reinforcement Step
- Turn Order Step
- Turns A and B
A. Reinforcement Step
Each player receives new cards and blocks, as follows:
- Each player discards half of their hand (rounding in the player's favor).
- Each player draws 5 cards. The player who controls the most castles draws a 6th card.
- Each player draws from their bag a number of blocks as written on the reinforcement track on the board. (Two blocks in weeks 2, 3, and 4; one block in weeks 5, 6, and 7). The player who controls more Resource Locations draws an additional block. (In the case of a tie for most Resource Locations, both players draw an extra block).
- Place the blocks drawn in the player's Reinforcement Box.
Skip the Reinforcement step on the first week of the turn, as both players already have their starting cards and blocks.
B. Turn Order Step
Each player bids for turn order by placing a card from their hand face down on the table, and they are simultaneously revealed. The player whose card has the higher number in its bottom corner is the winner.
The winning player chooses who will move first for both turns in the present week. Place the Turn Marker on the Turn Track, on the "A" space with the color of the first player face up.
Both players must discard the card they played.
C. Turns A and B
Each Weekly Cycle consists of two turns-A and B. Each turn consists of the First Player conducting Movement and Combat, fol- lowed by the Second Player conducting Movement and Combat.
When Turn "A" ends, move the Turn Marker to "B" and play the "B" turn. The player who was first in the "A" turn is also first in the "B" turn.
After the "B" turn, advance the Turn Marker to the next week and begin the Weekly Cycle again. After 7 weeks the game is over.
Turn A:
a. First player Movement Phase
b. First player Combat Phase
c. Second player Movement Phase
d. Second player Combat PhaseTurn B:
e. First player Movement Phase
f. First player Combat Phase
g. Second player Movement Phase
h. Second player Combat Phase
Advance Turn Marker to the next week space. If already on Week 7, the game is over.
Movement Phase
During the Movement Phase a player may move none, some, or all of the stacks of blocks they control on the board. A stack is all of the blocks in a single location. The number of stacks that can be moved is determined by the number of cards spent for movement. Mustering and Overruns can also occur in the Movement Phase.
Cards For Movement
At the beginning of the Movement Phase, the active player discards either zero, one or two cards from his hand to permit the following degree of movement:
- 0 cards-No Movement: No stacks may move. Any number of cards may be discarded from the hand and replenished.
- 0 cards-Minimal Movement: One stack may move or the player may conduct a Mustering action (7.2).
- 1 card-Limited Movement: Three stacks may move. In lieu of one of the moves the player may conduct a Mustering action.
- 2 cards-Total Movement: Every friendly stack may move and one Mustering action may be conducted.
The player then proceeds to make the moves allowed by that decision, moving stacks in any desired order.
Mustering
Mustering is the act of placing blocks currently in the Recruitment Box onto the map. A player may Muster at most once per turn. Under Minimal or Limited Movement, Mustering can occur instead of one permitted stack move (i.e., one stack movement must be foregone in order to execute the Mustering). Under Total Movement, Mustering can occur in addition to all stack movement.
Movement Restriction: Mustered blocks may not move in the same turn they are placed.
Where Blocks Arrive: Blocks can be Mustered only to Recruit- ment locations. Recruitment locations are locations labeled with the mon (symbol) of a friendly daimyo. Recruitment locations are color coded, black or gold.
Two Options: A player has two options on how to Muster as described below:
The player may bring any (or all) blocks belonging to the same daimyo from the Recruitment Box to a Recruitment location that has the matching daimyo mon. These blocks must be displayed to your opponent to prove that they match.
Alternatively, a player may Muster to any friendly Recruitment Location a single block of any daimyo. In this case, the block need not be displayed.
Mustering Into Combat: Blocks can be Mustered into a com- bat situation only if the combat was initiated by blocks on the board-an attack cannot come from the Recruitment Box, but it can be supported from there.
Movement
The source of a move is a single location. From that location, all of one player's blocks (that did not Muster that turn) may be moved, up to the limits as set forth below. Blocks move along roads from one location to another. Blocks which begin the phase together need not travel on the same roads, nor finish their move together. Movement must follow these restrictions:
- No block may be part of more than one move per turn.
- A stack must complete its movement before another stack may move.
- No road segment may be traversed by more than one stack per Movement Phase.
Movement And Enemy Units
Moving blocks must stop when they encounter enemy units unless enemy units can be Overrun (7.4).
Movement Distance
The Base Movement Rate is one location per move. This can be increased by one location (+1) for each of the following cases:
- Highways: Blocks that make their entire move on a highway may move +1 location.
- Leadership: Blocks that begin the move in the presence of leader- ship (7.3.4) may move +1 location.
- +Force marching. Blocks that force march may move +1 location. The active player may initiate a force march by discarding one card from their hand. A force march applies to a group of blocks that begin, finish, and move together. Only one force march can be in effect for any given block at a time.
Example: A stack that has Leadership, follows a Highway for its entire move, and does a Force March, can move three extra locations.
Leadership
Leadership increases the Base Movement Rate of a stack by one location. Leadership can be a leader, a castle, or a capital (or any combination of the three).
If a player uses a leader for the increased movement, the leader block must be declared to the opponent. If a castle is used, it must be aligned (matching color) and controlled by the active player. If a Capital is used, it must be a capital (Edo or Kyoto) marked with the matching color.
Movement And Force Sizes
Large forces move more slowly than small ones. For every multiple of four blocks a moving contingent exceeds, its movement capacity is reduced by one location. Thus, movement capacity is decreased (-1) at the 5th, 9th, 13th, and 17th block (see chart below).
To each block's movement capacity, apply a size penalty according to the largest group in which it travelled during its move.
Movement Chart
The following chart summarizes movement and movement modifiers:
| Base move: | 1 location |
|---|---|
| All Highway: | +1 |
| Leadership Present: | +1 |
| Force March: | +1 |
| 1-4 blocks: | 0 |
| 5-8 blocks: | -1 |
| 9-12 blocks: | -2 |
| 13-16 blocks: | -3 |
| 17+ blocks: | -4 (cannot move) |
Overruns
Overruns occur when a large force overwhelms a small force. An Overrun can occur during Movement or after a retreat. Overruns can also be caused by retreating blocks (see battles), Mustering blocks, or bringing units from the Mo-ri Box.
In order to Overrun an enemy force, the Overrunning player must have at least four times as many blocks present as the enemy. The strength of each block has no effect.
Overrun Procedure
Overruns are resolved immediately. (This applies regardless of whether combat has been declared). Overrun units are destroyed and the victorious player suffers no casualties. If an Overrun occurs during a move, the moving blocks may continue their move. Forces already committed to battle in a location offer their strength to any Overruns against their foes.
Example: The defender has one block in a location. The Active Player moves one stack consisting of two blocks into that location. He then moves another stack with two blocks into that location. At that moment the Overrun occurs, the defending block is eliminated and the active stack may continue to move. The first stack contributed to the Overrun, but has already moved and may not move again.
Overruns And Castles
Enemy units who control a castle cannot be Overrun. Furthermore, forces within a castle automatically lend their strength to any Over- runs occurring against a besieging force outside.
EXAMPLE OF MOVEMENT
The Ishida player (gold blocks) plays two cards during his Movement Phase to allow all his stacks to move. This allows him one Muster action which he does first.
He can muster one block of any designation to any friendly recruitment location, or he can muster all blocks that match a mon to the recruitment location marked with that mon. He cannot do both. The blocks mustered may not take part in movement this turns and are not shown in the example.
His other moves are depicted in the diagram above. For this example, no cards will be played for Force Marching.
First he activates the location marked "A" in the diagram. Since this space contains a friendly controlled castle, it qualifies for the Leadership Bonus of +1 to movement. He sends all five blocks down the Highway path. It can move two spaces (1 for the base move, 1 for the Highway, 1 for Leadership and -1 for 5-8 blocks). Note that if one block is left behind the stack could move three spaces and reach Kuwana.
Next he moves stack B. Since stack A has used the highway between Kyoto and Minakuchi he cannot use that road. (No road segment may be used twice in a single Movement Phase). The move has to end in Kyoto or the stack has to use a different route. He decides to end the move in Kyoto.
The single leaderless block at C can move only one space.
The stack at D can move two spaces-a base of one plus one for the Leadership block.
Stack E has the Leadership Bonus but cannot use the Highway Bonus since its entire move is not along the Highway. It can move two spaces.
Combat
Combat occurs after all movement. Combat must be declared in every location on the board where opposing pieces appear together. These declarations are made one at a time, with combat resolved immediately following each declaration.
Combat will be a battle or a siege, the latter if either of the forces is inside a castle. After combat is resolved in a location, a new location is selected, until all such locations are resolved.
Battles
Combat is resolved as a battle if neither force is inside a castle. Deployments produce Impact. The side with the higher Impact is winning the battle. All blocks involved in a battle remain concealed until deployed.
The Active Player (the attacker) starts the battle by making the first deployment. Next the defender can respond (see Initiative 8.5). When the battle stops, the side which has delivered the most Impact will be the winner. A tie in Impact favors the defender.
Cards and Deployment
Cards are used to deploy blocks into battle. Each card can deploy one block. The card used to deploy a block must have the same mon as the block. Cards and blocks with different mon cannot be played together.
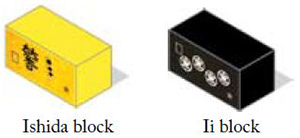
Exception: Cards of all daimyo designations may be matched to the sole Ishida block and the sole Ii block. As a reminder, these blocks both feature a card-shaped rectangle in the corner.
No card may be played, nor block deployed, twice in the same battle.
Deployment Procedure
The active player plays a card face up, and selects a block from among his undeployed forces whose mon matches the card. The block is indicated by placing it face up next to the main stack of blocks.
The card is placed face up on the active player's side of the board. The player counts the Impact of the deployment and adds it to their total Impact on the Impact track
Initial Deployment Of A Leader Block
A leader block deploys without playing a card if no deployments have yet been made with a card by that side in the present combat. Leaders who deploy without a card are immune from Loyalty Challenge (see 8.6).
Impact
Effectiveness in combat is measured in Impact. Impact is recorded on the Impact Track using small cubes. Each side tracks their cu- mulative Impact separately.
Base Impact
The base Impact of a deployment is the number of mon on the block. This can be from one to four.
Impact Bonus
Add one point of Impact for each block of the same daimyo already deployed (on the same side) in the present battle.
Example: A player would score four Impact if he deployed a 2-mon Tokugawa block into a battle in which he had previously deployed two other Tokugawa blocks (the number of mon on the previously deployed blocks has no effect).
Special Attacks
Cavalry And Gun Impact
Cards with a sword in the corner enable a Special Attack. When used to deploy a block with a cavalry or gun symbol, an attack of that type is launched. In a cavalry or gun attack, add two points of Impact for the cavalry or gun, and another two points of Impact for each block featuring that type of attack already deployed on the same side in the present battle.
If a cavalry or gun block is deployed without a Special Attack card, do not count cavalry or gun points towards its Impact
Double Cards
Double cards feature two identical mon in each corner. Double cards allow the deployment of one or two blocks, both of which must match the mon of the card. The blocks are deployed one after the other. (The second block can thus gain a +1 Impact Bonus for matching the daimyo of the first).
Neither of the blocks so deployed can initiate a Special Attack. A double card used to deploy a block that can match to any card (Ishida and Ii blocks) loses its ability to deploy a second block.
Initiative
Initiative rests with whichever side is losing the battle. That player has the opportunity to deploy blocks one after the other in order to take the lead. Once he does take the lead, initiative reverts to the other player.
Initiative is passed back and forth between the players until one player, who holds the initiative at the time, declares that he will deploy no more blocks. When that happens initiative shifts permanently to the other player, who may deploy as many more blocks as he wishes and is able. When that player also declares he is finished, the battle ends.
Once a player declares he is finished deploying, he cannot resume deployments later in the battle. He may still play Loyalty Challenge cards against the other player's deployments.
Loyalty Challenge Cards
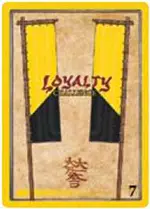
Loyalty Challenge cards are marked with a nobori (banner). They are played out of turn, immediately after a deployment by the opposing player, to challenge the loyalty of the block thus deployed.
If the deploying player can show from their hand another card capable of deploying the block just deployed, the block remains loyal. The card shown to refute a Loyalty Challenge returns to the hand of the player that showed it.
If the deploying player cannot produce such a card, the block turns sides, aligning instead with the player who played the Loyalty Challenge. Move the block to the challenger's side of the battle. Count Impact for the block on the challenger's Impact table. When the battle ends, they revert to the former owner.
Loyalty and Special Attacks
Blocks which switch sides do not execute a Special Attack (8.4) at the moment of their betrayal (even if indicated on the deploying card) but can later contribute to Special Attacks for the side to which they gave their loyalty.
Loyalty and Double Cards
A Loyalty Challenge card may be used to challenge the use of a double card. Only one additional card must be displayed to refute the challenge, even if two blocks deployed. If the challenge is suc- cessful, both blocks defect to the challenging side. The Impact bonus (+1 Impact for matching the mon of the first block) enjoyed by the second such block is still counted.
Losses
After a battle both sides take losses according to the Impact de- livered against them. Both sides lose one block for every 7 Impact delivered by their opponent (always round Impact down). The losing side in a battle loses one additional block.
Example: A player wins the battle and had 5 Impact delivered against him-he would lose no blocks. His opponent, who lost the battle, had 9 Impact delivered against him-he would lose two blocks.
Selecting Losses
The attacker suffers damage first, then the defender. Players select which of their own blocks to lose. First must be selected any blocks which defected to his opponent, then any other blocks which deployed, then any blocks which did not. The identity of the lost blocks is revealed.
Effects Of Losses
Blocks lost in combat are removed from the map and never return to play. Keep defeated blocks on the side of the board, visible to both players.
Retreats
The loser must retreat the remaining force to a single adjacent location contiguous by road to the site of the battle (or castle). There is no limit to the size of a force which can move together in retreat. Overruns do not apply prior to the retreat.
When The Attacker Retreats
The attacker must retreat to a location from which some of their forces entered the battle (potentially a castle, but not an Off Map Box) or if that is impossible to any other location. The attacker can never retreat to the Recruitment Box or the Mo-ri Box.
When The Defender Retreats
The defender retreats, if possible, to a location containing no enemy units, and from which the enemy did not enter the combat location. If there is no such location, the defender may retreat to any other adjacent location contiguous by road-including a location from which the attacker entered the battle and/or a location containing enemy blocks.
Retreats Into A Castle
A castle can harbor retreating units, if the battle took place in a location with a castle. A castle is a valid retreat destination only for that side which controlled the castle prior to combat. If a castle is a valid retreat destination, the retreating player may leave up to two blocks in it. If there are more blocks remaining, these must retreat elsewhere, as a group.
Retreats Into Combat
It is possible for a retreat to cause another battle (or Overrun). If so, execute that battle immediately and resolve its consequences. The retreating blocks are the attacker for this new battle. If the retreating force enters an existing battle, the retreating blocks are added to the forces in conflict.
It is possible for a retreating force to join a besieged force inside a castle and exceed, until the next time combat is declared, the stacking limit of the castle. This would in effect change the siege into a battle.

Siege Combat
Sieges In General
When combat occurs in a location with a castle, it is possible that one side will choose to remain inside the castle. If so, the combat becomes a siege. For a force to remain inside the castle, it must own the castle, and it must be two blocks or fewer. (Disks do not count toward this limit). The side that owns the castle is the side that had unit(s) in the location first (before combat broke out).
Declaring Blocks Inside Or Outside
Blocks can be inside or outside of the castle. The number of blocks that can fit inside a castle is limited to two. When combat is designated, and not before, the side that owns the castle may choose whether to be inside or outside of the castle. If outside-a battle occurs; if inside-a siege.
A force consisting of more than two blocks must always choose to be outside. No blocks can remain inside if some blocks are left outside. A force may elect to fight outside the castle even if in a previous phase it elected to remain inside.
If the active player owns the castle and chooses to remain inside, then no battle or Siege Combat occurs in this location this phase.
Disks
Disks are always considered inside the castle, regardless of the disposition of the blocks. Disks do not count against the two block castle limit. Disks are units that can be destroyed like a block, but cannot move or fight. Only the results of a siege can affect the disk, never a battle.
Siege Combat Procedure
The attacking player holds the Initiative throughout the siege and there is no limit on the number of blocks the attacking player may deploy. The defending player plays no cards during a siege nor does he deploy any blocks. Follow this procedure for each Siege Combat:
- The attacker deploys as many blocks as he wishes.
- When the attacker is finished, damage is inflicted on the de- fending force. No damage is inflicted on the attacking force in a siege. One defending block or disk is lost for every 7 points of Impact (the attacker may deliver less than 7 points of Impact in a siege, but the defender will not be harmed).
- The defender chooses which block(s) or disk to lose. The identity of those is made public.
- If all blocks and disks inside the castle are destroyed, the castle falls and now belongs to the attacking force.
- If all the defender's blocks and disk are not removed, then both sides' blocks co-exist in the location. When this happens, the side that owns the castle is considered besieged. Combat must still be declared in such a location during every Combat Phase the co-existence continues.
- The defending player then draws one card for every block lost.
Siege Combat Restrictions
Siege Combat has the following restrictions:
No gun or cavalry Special Attacks may be counted.
Loyalty Challenge cards cannot be played by either side.
Besieged Blocks
Besieged blocks may not be moved out of the location containing the castle. Blocks that are part of a besieging force may freely move away from the site of the siege during their Movement Phase.
If other blocks enter the location containing friendly besieged blocks then all blocks are counted in the battle. Any battle that occurs in any location automatically includes all blocks in that location, regardless of the presence of a castle.
Card Replenishment
Card replenishment occurs immediately after a battle, siege or Over- run is resolved (after losses and retreats but before any follow-on battles generated by those retreats). After each battle or siege both sides discard all cards they played during the combat and draw back an equal number from their draw pile.
Both sides also draw after a battle, an additional card for every two blocks lost (round fractions down). After a siege, the defending player draws one card for every block lost. A card is not drawn for losing a disk.
Example Of Combat
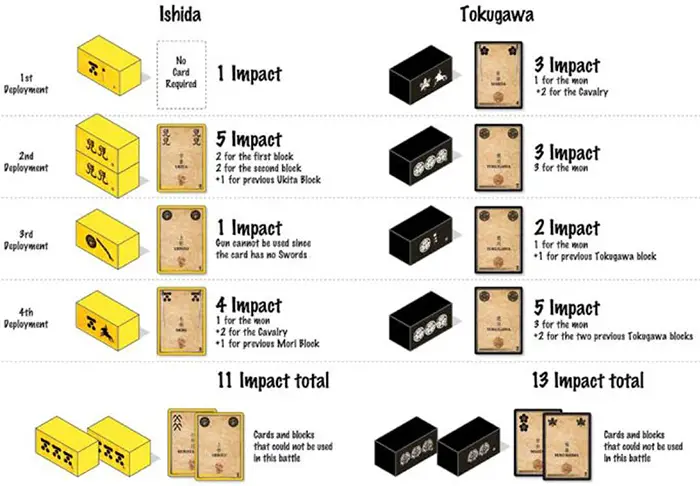
In this example seven Ishida blocks attack six Tokugawa blocks. At this point neither player knows the identity of the other's blocks-blocks are only revealed when deployed.
Since Ishida is the attacker he must deploy the first block. His first deployment is the Mori Leader block, which can be deployed without the need to play a card (rule 8.2.4). The single mon on the block gives him an Impact of 1.
Since Ishida now leads in Impact the initiative changes to Tokugawa who may deploy a block. He plays his Maeda cavalry block with a Maeda Special Attack card (indicated with Swords on the card) giv- ing him an Impact of 3 (1 for the mon and +2 for the cavalry).
Initiative now changes to Ishida. The total Impact count is currently 1 to 3 which the players should record on the Impact Track.
Ishida plays a double Ukita card that allows two of his Ukita blocks to deploy. The first block earns 2 Impact and the second block earns 3 impact (2 for the mons and +1 for a previous Ukita block deployed). Ishida's total Impact is now 6.
Tokogawa counters by deploying a 3-mon Tokugawa block with a Tokugawa card. His Impact is now 6 which ties Ishida's Impact. Since defenders win ties, 6 is enough to put him in the lead. The initiative now changes to Ishida.
Ishida deploys a Uesugi block with a Uesugi card for 1 Impact. The gun on the block cannot be used since the card has no Swords (which indicate a Special Attack).
Tokogawa plays a 1-mon Tokugawa block with a Tokugawa card. He earns an additional point for the previous Tokugawa block deployed. The Impact score is now 7 to 8.
Ishida now deploys his Mori cavalry block with a Mori Special Attack card. The Impact of this card is 4 (1 for the mon, +2 for cavalry, and +1 for the previous Mori block deployed). The score is now 11 to 8.
Tokugawa deploys a 3-mon Tokugawa block with a Tokugawa card. The Impact is 5 (3 for the mon and +2 for previous Tokugawa blocks deployed). The current score is 11 to 13 in Tokugawa's favor.
Ishida has two blocks and two cards remaining but the mons do not match so they cannot be used. Ishida declares that he is finished with deployments.
Tokugawa similarly declines to deploy, because he has no more legal deployments.
Since neither player can deploy any more blocks the battle is over with a Tokugawa victory. Each side loses one block for Impact and the losing side (Ishida) loses another block for the defeat. Ishida must retreat from the location.
Continue Reading

