Components
- 2 Game boards
- 110 Crop tiles
- 8 Barns
- 8 Wells
- 25 Coins
- 40 Cultivation cards
- 3 Crop Distribution cards
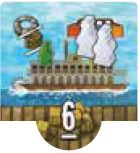
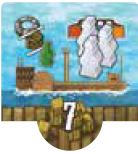
- 45 Riverboats
- 8 Score markers
- 56 Workers
- 4 Player mats
- 5 Phase tiles
- 1 First Player marker
- 17 Opportunity cards
- 28 Surveyors
- 4 Harbor Masters
- Instructions
Setup
Central Display
Place the two game boards in the center of the playing area.
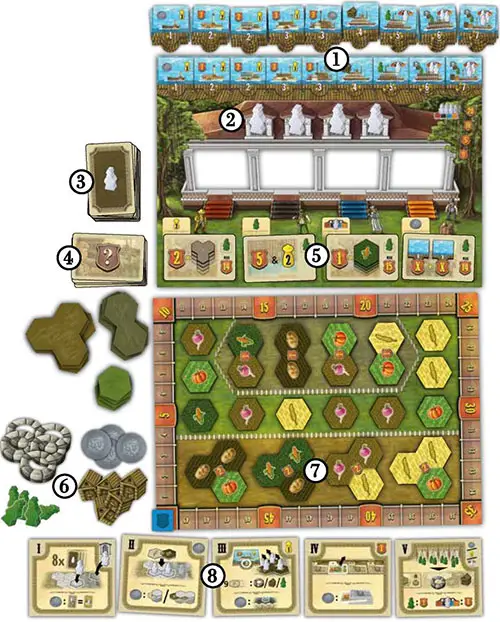
1 Sort the Riverboats by their capacities (numbers at the bottom) and effects (note that there are two versions of the 2 and 3 tiles) and set each pile face up alongside the matching boat art above the "New Orleans" board. Move the top tile of each pile onto the game board, placing it on the matching boat art.
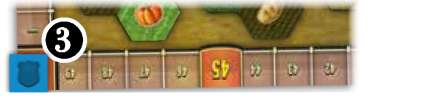
2 Place one Worker on each of the four spaces of the Round track.
3 Shuffle the Cultivation cards and place them face down near the game boards.
4 Shuffle the Opportunity cards and place them face down next to the "New Orleans" board.
5 Draw four Opportunity cards from the pile and place them face up on the four designated card spaces on the game board.
6 Place the Barns, Wells, Surveyors, and Coins near the game boards as a general supply.
Note: The number of items in the general supply is limited.
7 Shuffle the 1-hex, 2-hex, and 3-hex Crop tiles into separate, face-down piles. Fill the designated spaces of the "Scoring and Crop Supply" board with face-up Crop tiles drawn from the appropriate piles.
8 Place the five Phase tiles near the game boards, in reach of all players.
Personal Display
Take a random player mat and place it in front of you. The four player mats differ in the Field layout (colored hexes) and the player color shown on the shed at the bottom of a mat. Leave some space at the top and beside your mat for other components to be placed.
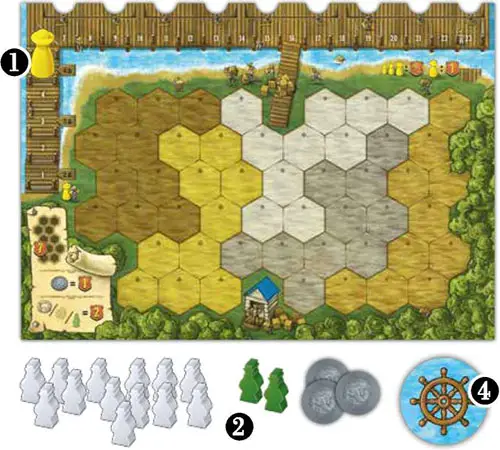
1 Take a Harbor Master token and place it on the appropriate space (for the number of players) on your mat's Harbor track.
2 Take the following items and place them in a personal supply near your mat:
- 13 Workers
- 2 Surveyors
- 3 Coins
3 Take the two Score markers in your player color (showing "-/50" and "100/150") and place the "-/50" one with the blank side facing up on the "0" of the Score track (on the appropriate game board).
4 Randomly determine a player to go first and hand them the First Player marker.
Game Play
The game lasts four Rounds. Each Round, you will start by choosing one or more Phase tiles to give you a small advantage as the Round progresses. Then, each of the five Phases is resolved in the following order:
- Cultivation
- Planting
- Harvesting and Shipping
- Opportunity
- Scoring
At the end of four Rounds, Victory Points (VP) will be awarded for remaining Coins, completed Fields, for the distance downstream that your Harbor Master allowed you to conduct business, and for having more Agents in New Orleans than your opponents.
Start of a Round
Set up the game board for the upcoming Round:
- Place face-up Crop tiles on the empty spaces of the "Scoring and Crop Supply" board, of the appropriate size (1, 2, or 3 hexes).
- Make sure there is a Riverboat tile of each type on the "New Orleans" board (if tiles remain).
- Place a face-up Opportunity card on each of the four card spaces on the "New Orleans" board.
Note: For Round 1, you already completed these steps during setup.
The player with the First Player marker chooses one of the five Phase tiles. Choosing a tile means that you will go first during that Phase and that you will receive a bonus at the start of that Phase.
Then the player to the left chooses one of the remaining Phase tiles. Continue selecting Phase tiles in clockwise order until all Phase tiles have been selected. One or two players will have multiple Phase tiles.
Tip: If you like, let the First Player take all Phase tiles into their hand, choose and keep one, and pass the rest to the player to their left, and so on.
Five Phases of a Round
After selecting, resolve each of the five Phases of the Round one by one. At the start of each Phase, the player who selected the corresponding Phase tile receives their bonus (shown on the tile).
During each Phase, play proceeds clockwise around the table, beginning with the player who selected the Phase tile. The Phases will be explained in detail on the following pages.
Coins

Coins are very valuable! They are worth 1 Victory Point each at the end of the game, and they also let you break the rules during a Phase in different ways.
There is no limit to the number of Coins that you may spend during a Round (although you will only spend one Coin at a time to modify an action). If Coins run out in the general supply, you cannot get any more until someone spends some.
End of the Round
The Round ends after the five Phases are complete.
-
At the end of Rounds 1, 2, and 3, return your Phase tiles, pass the First Player marker to the player to the left of the current holder, and proceed with the next Round.

Note: In a three-player game, at the end of Round 3, pass the First Player marker to the player who is farthest behind on the Victory Point track. In case of a tie, the owner of the Score marker on top of the pile of tied markers becomes the First Player.
-
The game ends at the end of Round 4. Proceed with the Final Scoring (see page 12), but keep your Phase tiles (they may serve as a tie-breaker).
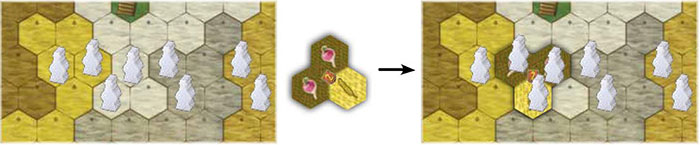
1. Cultivation Phase
Phase Tile Bonus: Take 1 Worker from the Round track and place it on your mat.
Phase Action: Place up to 8 Workers.
Coin Ability: Ignore 1 revealed Cultivation card when placing Workers.
During this Phase, you will prepare your Fields for planting by placing Workers based on the Cultivation cards revealed.
If you have the Cultivation Phase tile, as the bonus, take the leftmost Worker from the Round track (thus counting down a Round) and immediately place it on your player mat, in an empty Field of your choice. This Worker does not count towards the (up to) 8 Workers you are about to place.
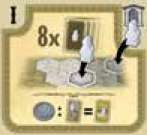
Then draw 8 Cultivation cards from the pile and place them face down in front of you. Reveal the top card from those drawn and read its color aloud.
This card's color will match one of the five colors of Fields on your player mat, or will be a "wild" card. (The little symbols on the cards and Fields correspond to the colors).
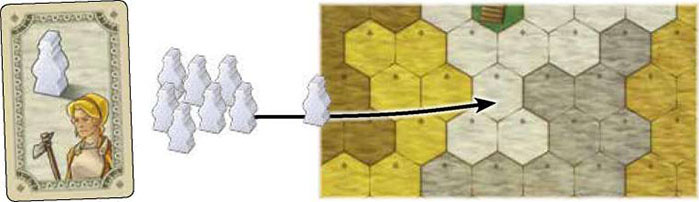
Each player who has a Worker remaining in their personal supply must now place a Worker into an empty Field of matching color on their player mat (that does not contain a Worker yet).
If a wild card is revealed, you may place the Worker on a color of your choice. You cannot choose to skip a placement-if you have a Worker, you must place one.
If you spend a Coin, you may ignore the revealed card and instead place a Worker into an empty Field of your choice.

Once Workers are placed, reveal the next Cultivation card from those drawn and resolve it the same way as above. Continue until all eight Cultivation cards have been revealed.
Note: If you have no empty Fields in the revealed color left, place a Worker on any empty Field on your mat. If you are out of Workers, you do not participate in the rest of this Phase.
Tip: Consider grouping your Workers together! Where you place Workers this Phase will determine where you may place Crop tiles next Phase. If your Workers are all separated, you will only be able to place 1-hex Crop tiles in the next Phase.
Tip: You will receive bonus points at the end of the game for completely covering all Fields of a color on your player mat. Use wild cards and Coins to help fill in those last spaces!
2. Planting Phase
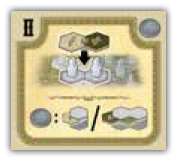
Phase Tile Bonus: Receive 1 Coin from the general supply.
Phase Action: Place Crop tiles under your Workers.
Coin Ability: Choose a 1-hex or 2-hex Crop tile from the draw pile.
During this Phase, you will plant Crops in the Fields that you prepared during the Cultivation Phase.
If you have the Planting Phase tile, as the bonus, take 1 Coin from the general supply (if any remain) and place it in your personal supply.
Then take one of the Crop tiles on the "Scoring and Crop Supply" board and place it on your player mat. Crop tiles are made up of 1, 2, or 3 hexes showing one or two of the five different Crops.
The tile shape you select must fit under one, two, or three of the Workers currently standing in empty Fields (without a Crop tile currently under them). Place the tile underneath the Workers, so that the Workers are now standing on the chosen tile.
If you spend a Coin, you may instead select either a 1-hex or 2-hex (not 3-hex!) Crop tile from the respective face-down draw pile. Shuffle the remaining tiles once selected.
If you choose to spend a Coin, you must take a tile from the draw pile instead of the game board, even if you do not like what you see in the pile.
Tip: For each Crop type, there is exactly one 2-hex tile showing two of the same Crop.
Details on placing a Crop Tile:
- Your chosen tile must be fully covered by Workers.
- The color of Field(s) that you play onto does not matter, and your tile may be part of multiple Field colors.
- Once a Crop tile is placed, it may not be moved again.
- You do not have to match the type of Crops shown to other Crop tiles you have played (but there are several reasons to try and group similar Crops together).
- If you place a 2- or 3-hex Crop tile, you immediately score 1 and 2 Victory Points, respectively, as printed on the Crop tile.
The spaces on the game board are not refilled during this Phase, with one exception: at the start of your turn, if you have remaining Workers in empty Fields and the existing face-up tiles are unable to fill them, immediately refill the entire game board with Crop tiles and then take a tile.
Example: It is Annabelle's turn. She has one Worker in an empty Field remaining on her mat, but there are only 2-hex tiles remaining on the game board. Annabelle refills all of the empty 1-, 2-, and 3-hex spaces on the board, and then selects a 1-hex tile.
The next player clockwise now chooses one Crop tile and places it on their mat. Continue selecting Crop tiles until all Workers placed during the previous Phase have a Crop tile underneath them (no Workers should remain in empty Fields at the end of the Planting Phase).
Players with no Workers remaining in empty Fields are skipped. It is possible (and usual) that some players participate in this Phase longer than others.
Note: In the rather unlikely case that all of the 1-hex Crop tiles in the game have been taken while you have individual Workers remaining in empty Fields, return these Workers to your personal supply and skip the rest of this Phase, once you cannot place any more Crop tiles.
3. Harvesting and Shipping Phase
Phase Tile Bonus: Your Harbor Master takes 1 step on the Harbor track.
Phase Action: Claim up to 2 Riverboats (Round 4: 3 Riverboats).
Coin Ability:Take 1 Riverboat from a draw pile.
During this Phase, you will harvest Crops and claim Riverboats for shipping your Crops
If you have the Harvesting and Shipping Phase tile, as the bonus, advance your Harbor Master one step on the Harbor track.
Then claim one of the Riverboat tiles from the "New Orleans" board.
To claim a Riverboat, you must fill it by removing the exact number of Workers from anywhere on your mat corresponding to the capacity shown on the tile (see box), and all from a single Crop type.
The removed Workers go back to your personal supply, to once again be placed into Fields next Round or used as Agents later.
Riverboats
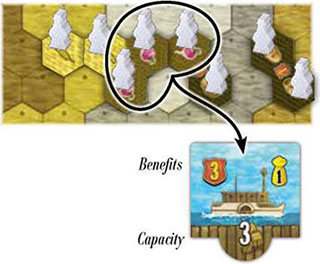
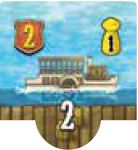
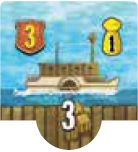
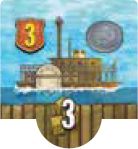
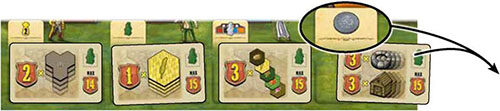
Riverboat tiles have two features: a capacity (also the number of Victory Points that the boat will potentially score at the end of the game) and an immediate benefit of Coins, Victory Points, Harbor Master movement, Estate Features, or the ability to place Agents in New Orleans (see below).
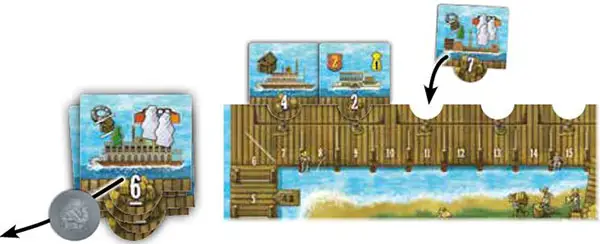
Place the Riverboat tile in the leftmost indentation available at the top of your player mat. You may pass and not take a Riverboat tile. If you do, you will not get any more Riverboat tiles this Round.
If you spend a Coin, you may take a Riverboat tile of your choice from the respective draw pile (only one of each Riverboat is available each Round without the use of a Coin).
If a Riverboat type is exhausted, you may not choose that type, and it will not be available for the rest of the game.
Once a Riverboat is placed, you may claim the benefits shown on the tile. Note that there are two different types of 2- and 3-capacity Riverboats, each with different benefits (see below). Occasionally, you may score a Harvesting Bonus (see next page).
The next player clockwise may now take one Riverboat tile. Continue until each player has had 2 actions to take Riverboats, or has passed.
Note: During Round 4, you may take up to 3 Riverboat tiles.
Riverboats and Benefits
-
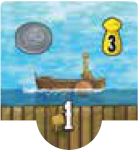
Take 1 Coin from the general supply (if any remain) and move your Harbor Master 3 steps on the Harbor track.
-
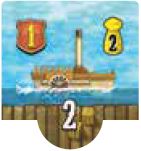
Receive 1 VP and move your Harbor Master 2 steps on the Harbor track.
-
Receive 2 VP and move your Harbor Master 1 step on the Harbor track.
-
Receive 3 VP and move your Harbor Master 1 step on the Harbor track.
-
Receive 3 VP and take 1 Coin from the general supply (if any remain).
-
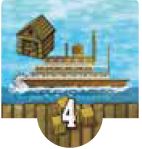
You get 1 Barn
-

You get 1 Surveyor and you may send 1 Worker to New Orleans.
-
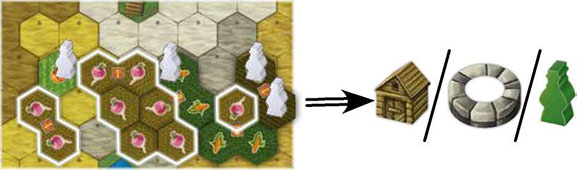
You get 1 Estate Feature and you may send up to 2 Workers to New Orleans.
-
You get 1 Estate Feature and you may send up to 3 Workers to New Orleans.
Harbor Track
The Harbor track on your player mat is where your Harbor Master will take steps, always traveling in the direction of New Orleans (the right side of the track).
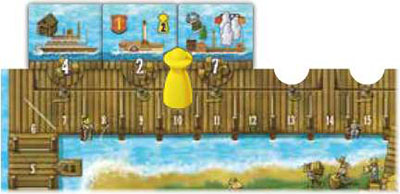
There are indentations for your Riverboat tiles to be placed when you take them, filling from left to right along the top of your player mat. Only the Riverboats that your Harbor Master arrives at or passes will score Victory Points at the end of the game.
However: unless your Harbor Master has traveled farthest down the track, you will only receive half value for your Riverboat tiles!
Estate Features
This is the collective term for Barns, Wells, and Surveyors. If you receive a Barn or Well, you must immediately place it onto your mat. Surveyors are only placed during the Scoring Phase.
If a particular Estate Feature is exhausted in the general supply, you may take a different Estate Feature of your choice from the remaining Features. If all are exhausted, which is highly unlikely, you get nothing.

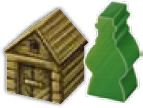
Barns: Place a Barn on an empty Field space on your player mat. Barns score for the most Crop hexes of a single type surrounding it. You may place Barns next to each other, although this is not recommended.

Wells: Place a Well onto a Crop hex (with or without a Worker on it) of a type on which you have not placed a Well yet.
Wells score for the contiguous group of the same Crop including the Crop hex with the Well. You may have at most one Well per Crop type.
Surveyors: Place a Surveyor in your personal supply. You may use them during the Scoring Phase to score Barns, Wells, and Opportunity cards.
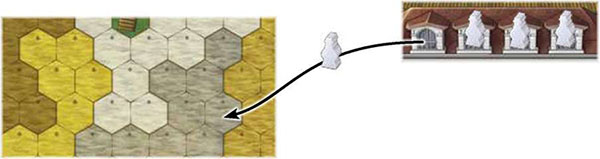
Agents
Workers placed in New Orleans become Agents, working to find business for you. Only Workers in your personal supply may become Agents. Make sure to place your Workers into your part of the mansion (indicated by the stairs in player colors)!

Once placed, Agents remain in New Orleans for the rest of the game, reducing your available Workers for your Fields.
You will receive 1 Victory Point during the Scoring Phase of each Round for every Agent you have in New Orleans, and more points at the end of the game if you have more Agents than other players.
Harvesting Bonus
As soon as you have harvested a total of at least 9 Crops of one type during the game (from anywhere on your mat and not necessarily all during the same Round), you may take an Estate Feature of your choice (placing a Barn or Well immediately).
You may not score this bonus for the same Crop twice, but you may score it for different Crops.
4. Opportunity Phase
Phase Tile Bonus: Receive 1 Victory Point.
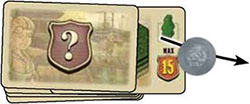
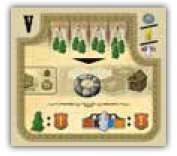
Phase Action: Claim 1 face-up Opportunity card and receive a bonus.
Coin Ability: Choose 1 Opportunity card from the draw pile (no bonus).
During this Phase, you will get the chance to take an Opportunity card from the game board. Each card space has an additional benefit associated with it.
If you have the Opportunity Phase tile, as the bonus, you immediately get 1 Victory Point.
Then select one face-up Opportunity card from a card space on the "New Orleans" board and place it face up next to your player mat. Also, you immediately get the bonus printed above that card space.
Note: You do not score these cards immediately! You will have the opportunity to score them during the Scoring Phase.
If you spend a Coin, you may instead choose an Opportunity card from the face-down draw pile instead of the face-up ones on the game board.
You do not get any bonus, and you must choose a card from the draw pile if you spend a Coin. Place the chosen card face up next to your player mat.
The next player clockwise may now take one of the remaining Opportunity cards or pay a Coin to select one from the draw pile. Continue until each player has taken one card. Finally, move the remaining Opportunity cards on the game board (if any) face down to the bottom of the draw pile in any order.
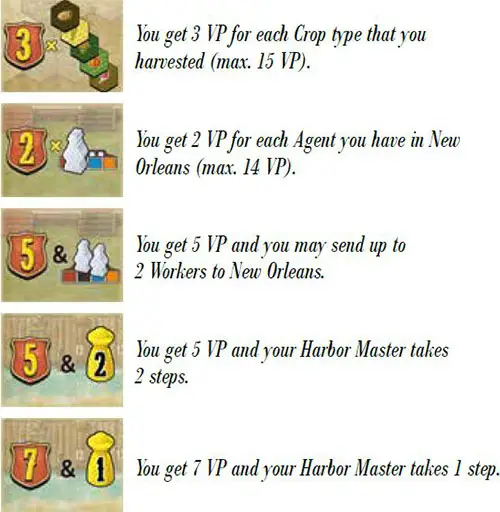
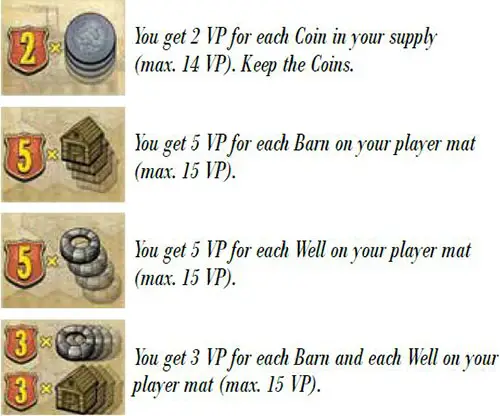
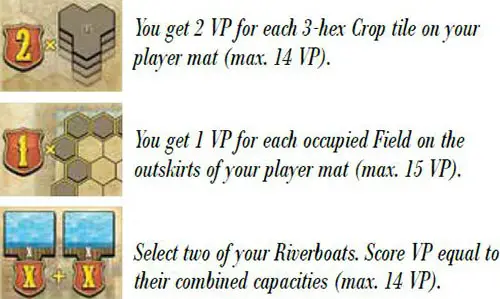
The following briefly explains what each Opportunity card scores Victory Points for:

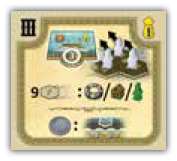
5. Scoring Phase
Phase Tile Bonus: Choose one: receive 1 Coin, or take 1 step with your Harbor Master, or send 1 Worker to New Orleans.
Phase Action: Place up to 2 Surveyors (Round 4: 3 Surveyors)
Coin Ability: -
During this Phase, you will use Surveyors to score Barns, Wells, and Opportunity cards, and you will receive Victory Points for your active Surveyors and Agents in New Orleans.
If you have the Scoring Phase tile, as the bonus, you may either take 1 Coin from the general supply (if any remain), or send 1 Worker from your personal supply to New Orleans, or advance your Harbor Master 1 step on your Harbor track.
Then use up to two Surveyors from your personal supply to score your Barns, Wells, and Opportunity cards. To score a Barn, Well, or Opportunity card, place a Surveyor with it.
You may not place a second Surveyor at a location (no Barn, Well, or Opportunity card will score twice). You may also pass and not place any Surveyors this Round. Once placed, a Surveyor remains at his location until the end of the game.
If you place a Surveyor with a Barn, immediately score 2 Victory Points for adjacent Crops of a single type (up to 12 Victory Points if all six surrounding hexes were of the same Crop type).
If you add Crops of the scored type later, you will not get any additional points.

If you place a Surveyor with a Well, score 1 Victory Point for the contiguous group of Crop hexes matching and including the Crop hex that the Well sits on. If you expand an area with an already-scored Well later, you will not get any additional points.
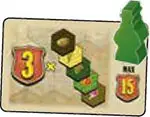
If you place a Surveyor with an Opportunity card, score the card based on the requirements shown on it.
Note: You start the game with only two Surveyors and there are only three ways to get new ones: from Riverboats (capacities 5, 6, and 7), from scoring the Harvesting Bonus, and from taking an Opportunity card from the card space with the Surveyor.
After scoring or passing, the next player clockwise may place up to two Surveyors, and so on until each player has placed up to two Surveyors or passed.
Note: During Round 4, you may place up to 3 Surveyors.
After placing Surveyors, you now score 1 Victory Point for each active Surveyor (those that have triggered a Scoring on a Barn, Well, or Opportunity card in this or a previous Round), and 1 Victory Point for each Agent you have in New Orleans.
Opportunity cards continued:
Score Track
Whenever you get Victory Points, advance your Score marker on the Score track accordingly. If there are Score markers of other players on the space, place your Score marker on top.
Turn your Score marker to the other side or replace it with the "100/150 Victory Points" marker as soon as you achieve that many Victory Points.
 Example: This player currently has 64 points. |
End of the Game
After completing Round 4, the game is over. Award additional Victory Points for the following items:
- 1 Victory Point for each remaining Coin
- 7 Victory Points for each color of Field spaces on a player mat completely covered with Crop hexes and/or Barns
- 2 Victory Points for each unscored Estate Feature (Barn, Well, or Surveyor)
- Harbor Scoring
- Agents Bonus Scoring
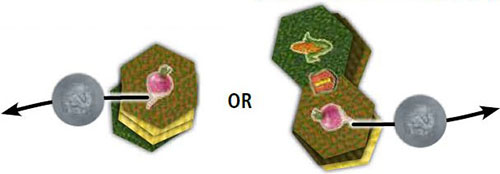
Harbor Scoring
Determine the player whose Harbor Master has traveled the farthest on their Harbor track. If tied, the tied player with the earlier Phase tile (from Round 4) is considered to be farthest (e.g, the Cultivation Phase tile would beat the Opportunity Phase tile).
That player receives full value for each Riverboat tile that their Harbor Master has passed or arrived at. The number of Victory Points a Riverboat is worth is equal to its capacity.
All other players receive half value for the total of Riverboat tiles that their Harbor Masters have passed or arrived at (rounded up). All tiles in front of the Harbor Master's position score nothing.
Example: Annabelle would score 4+2+7+1+5=19 VP if her Harbor Master was farthest on the track; otherwise, she would score 19/2=10 VP (rounded up).
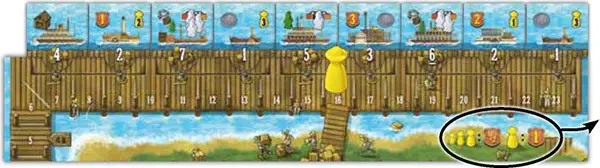
The illustration at the top right of your player mat reminds you of how the Harbor Scoring works.
Agents Bonus Scoring
Count the number of Agents that you have in New Orleans.
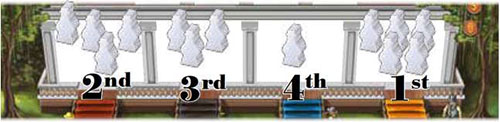
- 1st place receives 20 Victory Points;
- 2nd place receives 10 Victory Points;
- 3rd place receives 5 Victory Points;
- 4th place does not receive any Victory Points.
This is true for any number of players. Again, the tied player with the earlier Phase tile (from Round4) breaks ties. You must have at least 1 Agent in New Orleans to earn Victory Points from this scoring.
The winner is the player with the most Victory Points. In case of a tie, the tied players are equally masterful!
Continue Reading


