You command a Greek city's hoplite soldiers who must force their way through enemy lines. Your troops can push or rout those who would block their way across the narrow battlefield.
Coordinate attacks with your ally to secure victory, but make sure to watch your flanks!
Components

- 1 board
- 6 white pieces
- 6 red pieces
- 6 blue pieces
- 6 black pieces
- Rulebook
Object of the Game
The object of the game is to move at least 1 of your city's pieces into your victory area, marked in your color on the opposite side of the board.
If either you or your ally does this, you both win immediately. Your ally starts the game across the board from you.
Players, Teams, and Turn Order
2-4 players can play Nika. Regardless of the number of players, Athens and Messene (meh-SEE-nee) (White and Blue) are always allied against Sparta and Thebes (Red and Black).
- With 2 players: Each player controls one pair of allied cities.
- With 3 players: One player controls one pair of allied cities (it doesn't matter which), while the other two players control one city each.
- With 4 players: Each player controls one city.
Cities take their turns in clockwise order, starting with Athens (White). This order is followed even when a player controls a pair of allied cities.
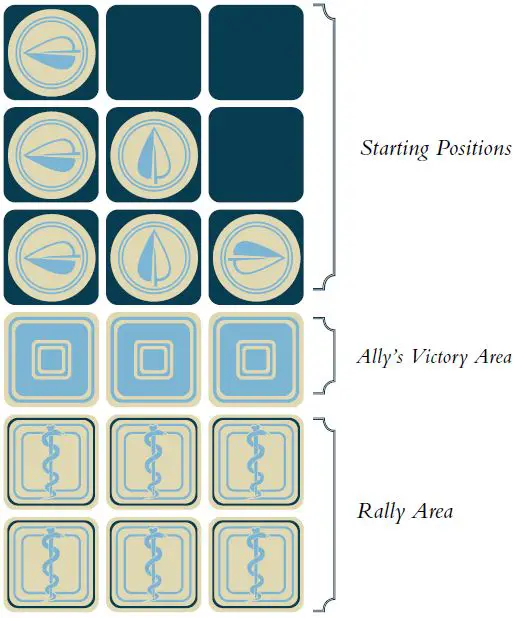
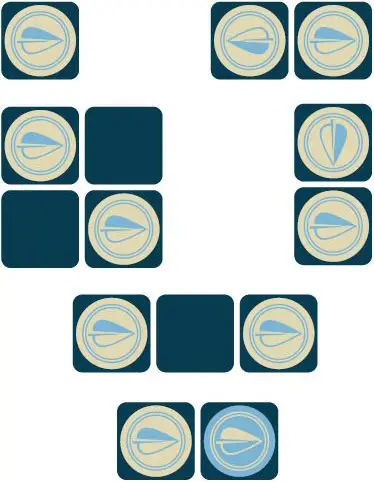
Setup
After choosing teams, place each city's pieces in the orientation shown here, on the sides marked in their color. Facing is important, so make sure all pieces face in the proper direction.
Actions
You take 2 actions each turn. Types of action include rotate, move, rally and pass (i.e. do nothing).
Note on diagonals: pieces can never move or face diagonally, and diagonals are not adjacent.
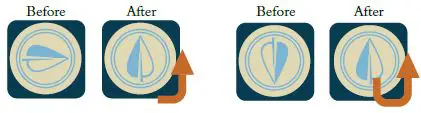
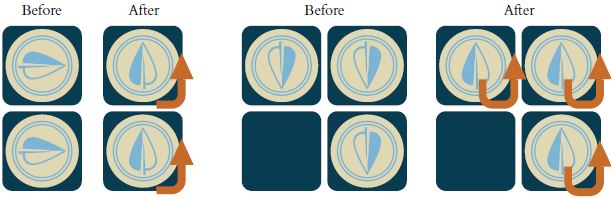
Rotate
Rotate a single piece to face any direction without moving it.
Move
Move a single piece 1 space in any direction. Pieces may not move into or through an occupied space unless pushing or routing an enemy.
(Pushing and routing will be explained later).
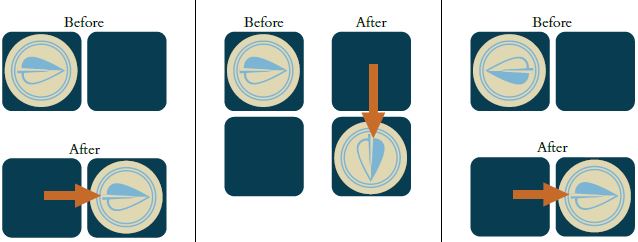
Important: Before moving a single piece, first rotate it to face the direction it is moving. This rotation happens as part of the move action; it is not a separate action.
Stated another way: A single piece may move forward, left, right, or back, and it ends up facing the direction it moved.
This is critical. Do not play until everyone understands this rule.
However, rotating a piece after it moves requires 2 separate actions: 1 to move and 1 to rotate.

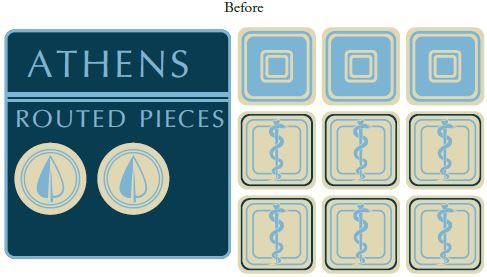
Rally
Place a single piece from your city's routed pieces area into any empty space in your rally area, facing any direction. Rally areas are marked with a | rod-and-snake symbol.
Your pieces move through your rally area and your ally's victory area, which are adjacent, as normal spaces. Pieces cannot move into an enemy's victory area.
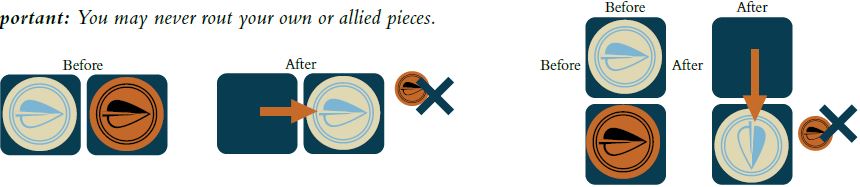
Routing Enemies
A piece may move into a space occupied by an enemy piece that is not facing it. This routs the enemy piece. Note that routs always happen as the result of a move action. Routed pieces are removed from the board and placed into their city's routed pieces area. They may be rallied later.
Important: You may never rout your own or allied pieces.
Phalanxes
Phalanxes are powerful formations which can move or rotate as a unit, and may be able to push enemies backward. However, they are less agile than single pieces.
Forming Phalanxes
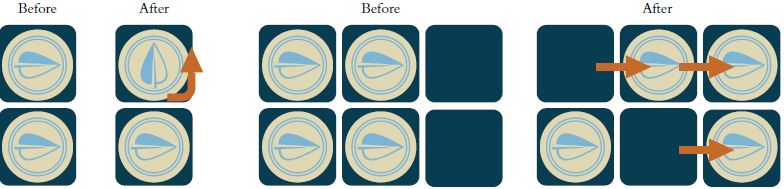
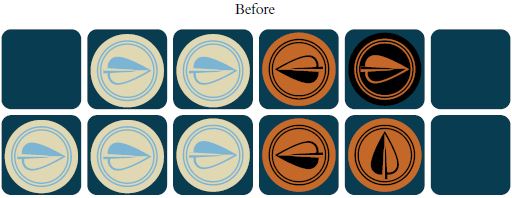
A phalanx consists of 2 or more adjacent pieces belonging to the same city that face the same direction. They may be any shape or size (from 2-6 pieces).
These are all examples of phalanx formations.
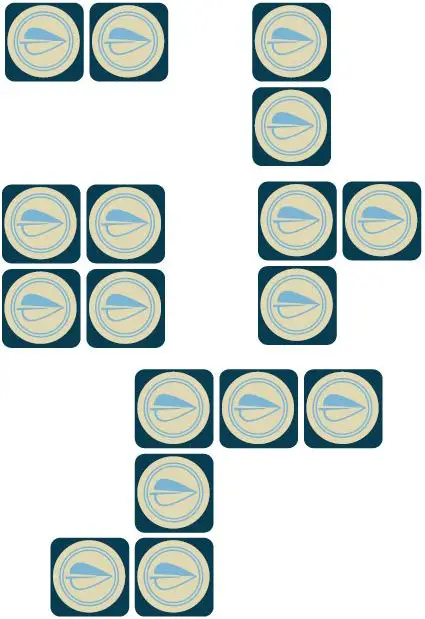
These are not phalanx formations, as they do not meet all of the requirements.
Phalanx Actions
When rotating a phalanx, each piece being rotated stays in place and rotates.
You may move a phalanx 1 space forward only in the direction it faces. Unlike single pieces, phalanxes do not get a free rotation before they move.

This means that if you want to move a phalanx in a direction other than the way it currently faces, you must spend a separate action to rotate it first.

Pieces are not locked into their phalanx. You may choose to rotate or move a single piece that is in a phalanx, or a smaller phalanx that is part of a larger phalanx.
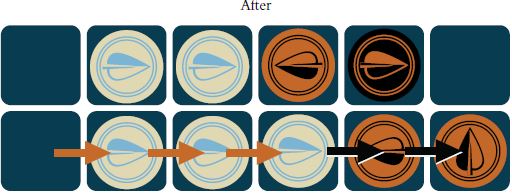
Pushing Enemies
You may move a phalanx forward to push enemy pieces back 1 space, if your phalanx has greater weight in a given line and the adjacent enemy piece in that line faces the phalanx. Like routs, pushes always happen as the result of a move action.
Important: As with routing, you may never push your own or allied pieces.

Weight and Lines:
Lines exist along the axis of movement for the pushing phalanx.
Weight is determined line by line. Weight is relevant to pushing, but NOT to routing. For a pushing phalanx, the weight in a given line is the number of moving pieces in that line.
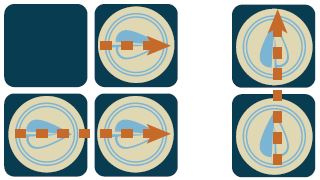
For pieces being pushed, the weight in a given line is the number of contiguous pieces in that line belonging to the same player OR that player's ally. Pieces being pushed that are not adjacent to the pushing phalanx always add weight, regardless of their facing.
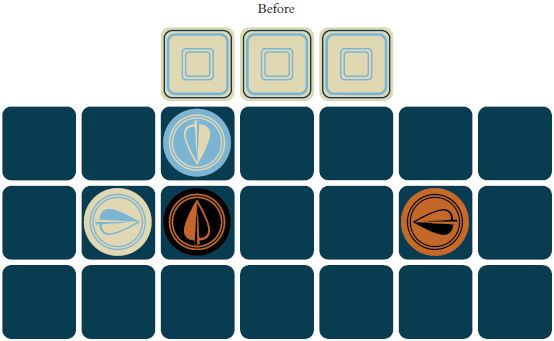
The Athenian (White) player wants to push with this phalanx. The top line is tied 2 to 2, but the Athenian phalanx outweighs its enemies in the bottom line 3 to 2. Therefore, the bottom line can push, but the top line cannot.
Pushing and Routing
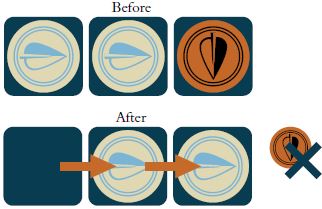
A pushed piece is routed if it is pushed into any of the following:
- An enemy piece, regardless of that piece's facing.
- An enemy's victory area.
- Anywhere off the board, including the central area. Before
Important: If a phalanx moves into an enemy piece that is not facing the phalanx, the enemy piece is always routed, never pushed.
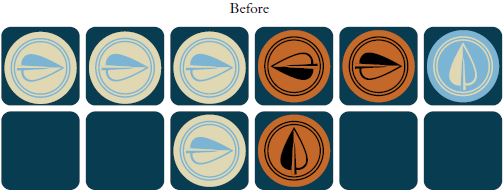
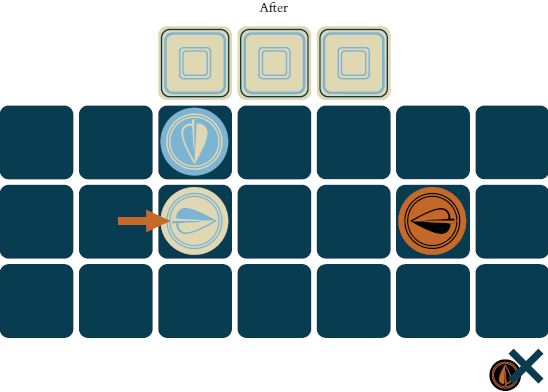
Since routs and pushes result from move actions, it is possible for a phalanx to push some pieces and rout others in a single move, as in the example shown below.
Nika
If you think you have secured victory and your opponent(s) cannot possibly stop you, declare "Nika" aloud. Assume reasonable play on behalf of all players, including your ally.
Your opponent(s) may then: 1) Concede the defeat, which ends the game; or 2) Challenge you, which causes the game to continue. You may try to convince them, but they may refuse to concede as long as you haven't actually moved a piece into your victory area yet.
You may declare "Nika" on behalf of your ally or an opponent. It is simply a means of ending the game as soon as its outcome is obvious, and does not otherwise affect play.
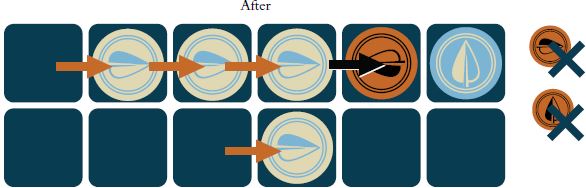
After routing the Theban (Black) piece, the Athenian (White) player can assume the Messenian (Blue) piece will move out of the way.
This guarantees the victory, as the Spartan (Red) piece is too far away to stop the Athenian piece from reaching its victory area. Unless Sparta/Thebes are threatening to win next turn, declare "Nika" now.
Remember: Your objective is to get 1 of your pieces into your victory area, which is on the opposite side of the board from where you start. This area is marked in your color and is located near your ally's starting position. If your ally wins, you win too.
You are not trying to reach your enemies' victory areas!
Draws
The game ends in a draw under any of the following conditions:
- All 4 cities consecutively pass both actions
- The same game state is repeated three times
- All players agree the game cannot progress from its current state
Continue Reading

