Letters from Whitechapel is a game of deduction and bluffing set in 1888, in the London of Jack the Ripper. It is a game for two to six players, age 14 or older.
Object of the Game
Five important detectives are on the trail of Jack the Ripper, the most infamous serial killer of all time. They must chase the mysterious murderer through the tangled streets and alleys of the Whitechapel district.
One player plays Jack the Ripper, and his goal is to take five victims before being caught. The rest of the players are police detectives who must cooperate to catch Jack the Ripper before the end of the game.
Components
This box contains:
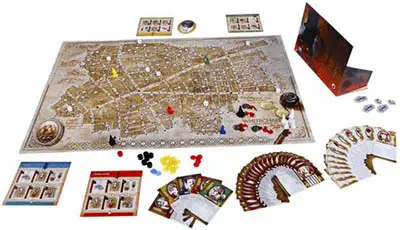
- 1 Game board
- 6 reference sheets
- 4 Jack's Letter sheets
- 1 die-cut punchboard
- 5 Head of the investigation tiles
- 5 special Movement tokens
- 7 Black wooden Police Patrol tokens
- 8 white wooden Woman tokens
- 1 Red wooden time of the Crime token;
- 5 white wooden Wretched pawns;
- 5 wooden Policeman pawns (1 each of blue, yellow, brown, red, and green);
- 2 Black wooden Jack pawns;
- 1 Jack the ripper screen;
- 1 pad of Jack the ripper move track sheets;
- 3 transparent blue plastic False Clue markers;
- 19 transparent yellow plastic Clue markers; and
- 5 transparent red plastic Crime scene markers.
New Components
in the revised edition of Letters from Whitechapel, many components have been improved from the previous edition based on the comments and reviews of players from all over the world.
Jack the ripper screen: its usability is improved. The map is bigger, and the chart of the special movement tokens is now shown on it, so players don't have to look at the rulebook during the game. The new physical design allows the screen to stand up by itself and better protect the secret information of Jack from the other players.
Wooden tokens: through repeated use of the women, patrol, and time of the crime tokens, these components can become marked. Now they are made of wood to make it harder for them to become damaged and marked.
Markers: some of the plastic discs now are different colors to help them stand out more on the game board. The clue markers are now yellow and the False clue markers are blue.
Letters: the letters' effects are now described in detail on the letters, so players don't have to refer to the rulebook during the game to use them.
Setup
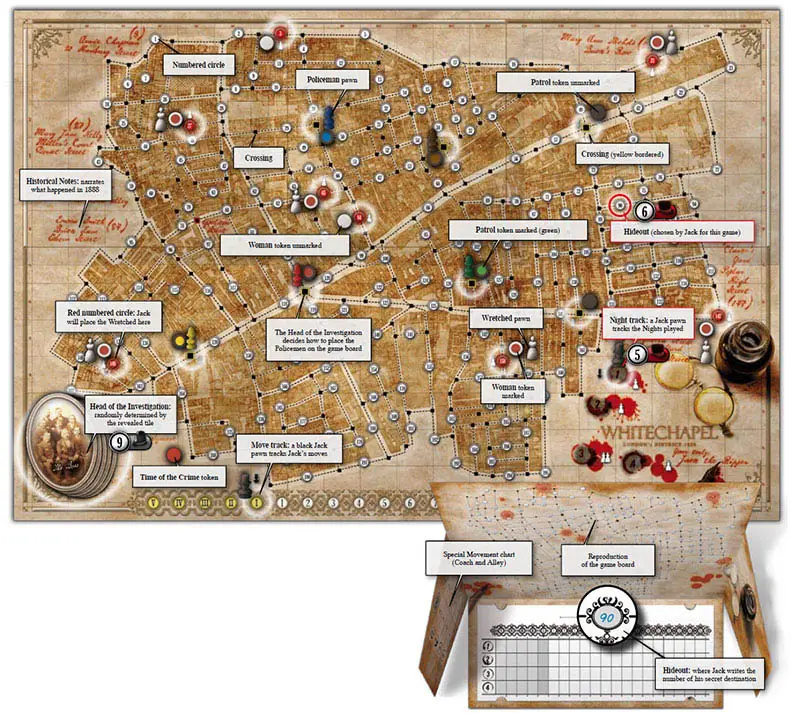
1. Place the game board representing whitechapel at the time of Jack the Ripper at the center of the table. It is marked with 195 numbered circles linked together by dotted lines.
2. During play, Jack the Ripper, the Policemen, and the wretched are moved along the dotted lines that represent Whitechapel streets.
Jack the ripper moves stealthily between numbered circles.

Policemen move on their patrols between Crossings (without worrying about whether the Crossings have colored borders or not).

The Wretched wander alone between numbered circles.
3. One player becomes Jack the Ripper (the most experienced player is a good choice). the other players become the detectives. The detectives always work together. They distribute the five policeman pawns among themselves in any way they agree on.
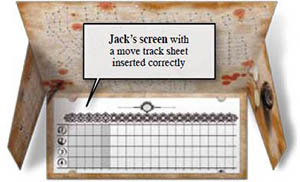
4. Jack takes a fresh move track sheet from the pad and places it in his Jack the Ripper screen. He will also need a pencil (not included).
5. Jack places a black Jack pawn on the first night space of the game board's night track.
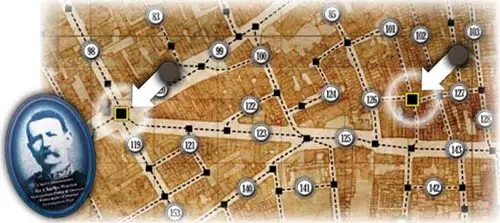
Jack chooses numbered circle 90 as his Hideout.
6. Jack secretly chooses his hideout. he may chose any numbered circle on the game board except a red numbered circle. When he has chosen his hideout, Jack writes its number on his move track sheet in the prominent oval at the top. Jack's goal will be to return to his hideout after each murder without being arrested by the police detectives.
7. Jack collects the Crime Scene markers, the Clue markers, the Woman tokens, the Coach and Alley Special Movement tokens, and the Time of the Crime token. If the optional rules are being used, Jack also collects the Jack's Letter sheets and the False Clue markers.

8. The six Reference sheets are distributed to the police detective players in the same way the pawns were divided, and one is given to the Jack player as well.
9. One of the police detective players shuffles the Head of the Investigation tiles and piles them facedown, in a random order, on the provided space of the game board.
10. The police detective players collect the Wretched pawns and the Police Patrol tokens. The game begins!
Game Play
A game of Letters from Whitechapel is divided into four nights:
- First Night (august 31st, 1888)
- Second Night (September 8th, 1888)
- Third Night (September 30th, 1888) the "double event"
- Fourth Night (november 9th, 1888)
Each night is divided into two parts. each part is composed of a number of different phases. each phase names either Jack the Ripper or the police as responsible for carrying out its particular activities.
First Part: Hell
1. Jack The Ripper: Preparing The Scene
Jack collects Special Movement tokens (Coach and Alley):
| Night Special | Movement tokens |
|---|---|
| 1 August 31st, 1888 | 3 Coach tokens and 2 Alley tokens |
| 2 September 8th, 1888 | 2 Coach tokens and 2 Alley tokens |
| 3 September 30th, 1888 | 2 Coach tokens and 1 Alley token |
| 4 November 9th, 1888 | 1 Coach token and 1 Alley token |
2. Jack The Ripper: The Targets Are Identified
Jack collects Woman tokens according to which night it is:
| Night | Woman tokens |
|---|---|
| 1 August 31st, 1888 | 8 Women, 5 of which are marked |
| 2 September 8th, 1888 | 7 Women, 4 of which are marked |
| 3 September 30th, 1888 | 6 Women, 3 of which are marked |
| 4 November 9th, 1888 | 4 Women, 1 of which is marked |
Jack places the woman tokens facedown on red numbered circles of the game board. He may arrange them any way he wishes.
The Woman tokens marked with red on their faces represent Jack the Ripper's possible targets. The Woman tokens with only white on their faces are fake targets, used to confuse the police detectives, according to Jack's strategy.
Remember, the red-marked faces remain hidden as Jack places them. Jack is the only one who knows the actual targets!
Note: on the second and subsequent Nights of the game, Jack cannot place woman tokens on the red numbered circles occupied by red crime scene markers.
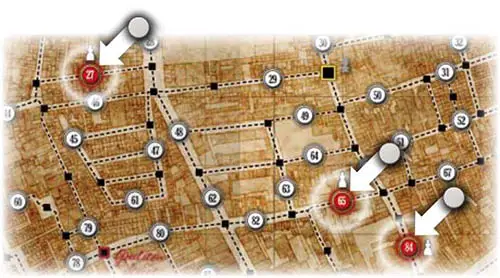
Jack places Woman tokens facedown on red numbered circles. He is the only one who knows which ones are marked. His next victim is among them!
3. Police: Patrolling the Streets
The detectives turn over the top tile of the Head of the Investigation pile. The player controlling the policeman of the corresponding color is the Head of the Investigation for the current Night.
The Head of the Investigation leads the investigation. On the first night, he places the seven police patrol tokens on the yellow-bordered crossings in any arrangement he wishes.
Some of the tokens have faces marked with the five colors of the policeman pawns. Two tokens (the completely black ones) are fake patrols, used to confuse Jack, according to the Head of the Investigation's strategy.
Remember, the marked faces of the police patrol tokens remain hidden as they are placed. The Head of the Investigation is the only one who knows the actual positions of the policemen!
The Head of the Investigation places the Police Patrol tokens on the game board. Jack must guess where the Policemen are and try not to get caught!
From the second night on, the head of the investigation places the police patrol tokens as he wishes among seven locations according to the following restrictions:
Five of the tokens must be placed on the positions that were occupied by the Policeman pawns at the end of the previous night. The tokens do not need to match the colors of the pawns that previously occupied the positions, and they can also be fake patrols.
Two tokens must be placed on yellow-bordered Crossings that were not occupied by Policeman pawns at the end of the previous night.
On the second Night, the new Head of the Investigation places the Police Patrol tokens. He must place a token where each Policeman pawn was left from the Night before, but he may also place tokens on two yellow-bordered Crossings, and may mix up the placement of real and fake Patrols to improve the detective's strategy, hoping to confuse Jack and control the game board. The Police are getting ready to hunt Jack once again!
Optional rule: From the second Night onward, after the police patrol tokens have been placed, Jack can use one Jack's letter each night.
4. Jack the Ripper: The Victims are Chosen
All of the Woman tokens are turned faceup. Those marked with red are replaced with wretched pawns. Those not marked are simply removed from the game board. The time of the crime token is placed on the yellow Roman numeral i of the move track.
As the tokens are revealed, Jack's strategy becomes clear.
5. Jack the Ripper: Blood on the Streets
Now, Jack must decide whether to kill a target or wait a little bit longer.
Waiting gives Jack more time to escape, but also gives the Head of the Investigation the opportunity to move the wretched pawns in ways that might inconvenience Jack. (But if the time of the crime token is on the Roman numeral "V", Jack can no longer wait and must choose to kill).
If Jack decides to kill, he chooses one of the wretched pawns on the game board and replaces it with a crime scene marker. Return the wretched pawn and one red-marked woman token to the game box.
If Jack decides to wait, the night continues with phase 6, "Police: Suspense Grows".
Jack chooses his victim and converts the Wretched pawn into a Crime Scene marker. A corpse lies butchered on the street!
Note: on the third Night, September 30th, there are two murders.
If Jack decides to kill, the Night then continues with phase 8, "Jack the Ripper: A Corpse on the Sidewalk".
6. Police: Suspense Grows
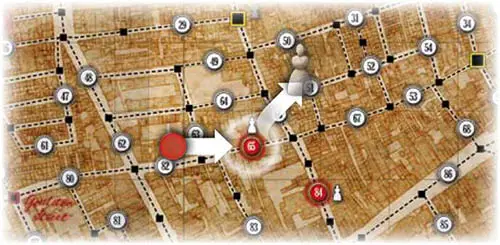
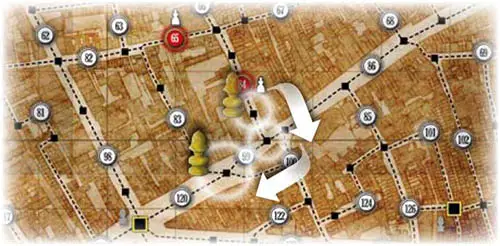
First, the Time of the Crime token is moved on to the next yellow Roman numeral in ascending order. Then, the Head of the Investigation must move each of the wretched pawns on the game board. Each one must move along dotted lines to an adjacent, unoccupied numbered circle.
The Time of the Crime token is advanced to the next ascending Roman numeral, and the Wretched pawns are moved by the Head of the Investigation.
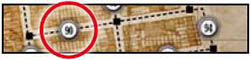
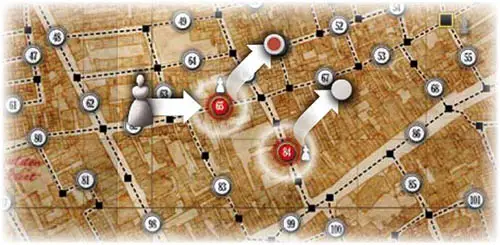
The Wretched pawn on numbered circle 65 must move. The Head of the Investigation must chose a destination from among numbered circles 63, 66, 51, 67, 84, 83, and 82. He chooses 82 and moves the Wretched pawn there.
A wretched pawn must obey the following movement restrictions. it cannot:
- end its movement adjacent to a Police Patrol token;
- cross a Police Patrol token during the Wretched's movement; or
- end its movement in a circle containing a Crime scene marker.
If a wretched has no legal moves it remains in its current circle.
7. Jack the Ripper: Ready to Kill
Jack chooses a Police Patrol token and reveals it. If it is a fake Patrol (with a black face), it is removed from the game board. Otherwise, it remains on the game board, faceup. Then, the game continues with another iteration of hell phase 5, "Jack the Ripper: Blood on the streets".
8. Jack The Ripper: A Corpse On The Sidewalk
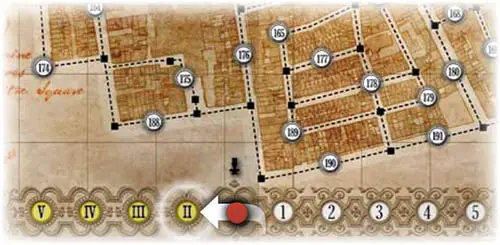
Using his pencil, Jack records on his sheet, in the space corresponding to the Roman numeral currently marked by the time of the crime token, and on the row corresponding to the current Night, the number from the numbered circle that's marked by the crime scene token he just placed on the game board.
Jack is now located at that numbered circle. For the rest of the night he will be moving between circles, trying to get back to his hideout without being caught.
To prepare for the hunting, Jack places the second Jack pawn on the game board's move track, on the space marked by the time of the Crime token. That Jack pawn is used to keep track of Jack's moves while he tries to escape.
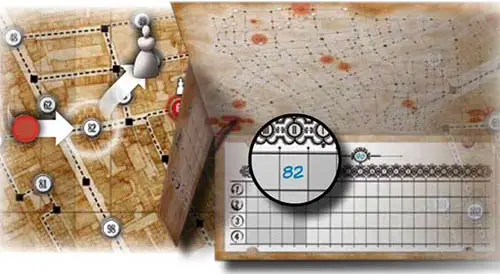
Jack's victim is on numbered circle 82. Jack notes "82" on his sheet in the space corresponding to the Roman numeral "II", as marked by the Time of the Crime token. He does this on the first line of his sheet because this is the first night of the game.
9. Police: Alarm Whistles
The detectives reveal all the Police Patrol tokens that have not yet been revealed. They replace the color-marked tokens with the corresponding Policeman pawns and remove the fake tokens from the game board. They also remove from the game board any wretched pawns still in play.
The Policeman pawns enter the game, replacing the color-coded Police Patrol tokens. Unmarked Police Patrol tokens are simply removed from the game board. Now the police must be quick to stop the monster!
The Hunting begins!
Second Part: Hunting
Jack the Ripper is somewhere on the streets, and must be caught before he disappears again!
1. Jack the ripper: Escape in the night
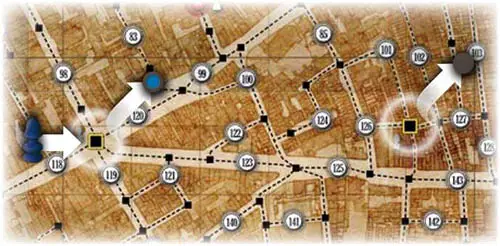
Jack moves from his current numbered circle to an adjacent numbered circle, following the dotted lines. He may not move over a crossing occupied by a policeman pawn. Jack plots his move secretly, noting his destination circle on his sheet in the next available space to the right of his current location, in the row representing the current Night.
Once his destination has been secretly noted, Jack moves his Jack pawn one space rightward on the game board's move track. His pawn's location should always correspond on the track to the Roman or Arabic numeral of the move he just made.
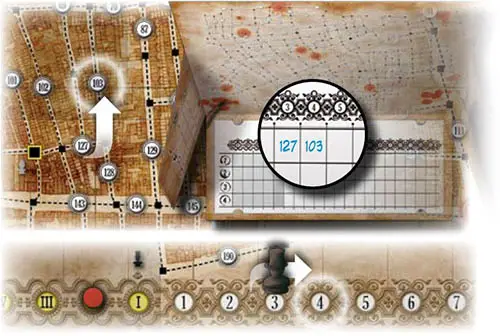
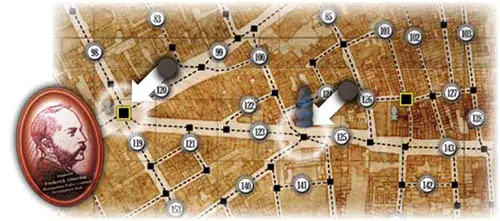
Jack makes his move from numbered circle 127 (his previous location) to numbered circle 103. He writes the new number on his sheet in the next available space. Then he moves the Jack pawn one space rightward on the track on the game board. Jack skulks down Whitechapel streets, hidden in the shadows...
Note: Jack cannot choose a destination that would force him to move over a crossing occupied by a policeman pawn. If, for this reason, Jack cannot make a legal move, he loses the game!
If he wishes, Jack can replace his normal movement with a special movement. To do so, he must expend a coach or alley token. If Jack moves onto his hideout, he may declare that his escape was successful, and the current night's hunting ends.
If Jack runs out of moves (that is, if he fills in the "15" square on his sheet) without reaching his hideout and declaring his escape, he loses the game.
2. Police: Hunting the Monster
After consulting together, the detectives move their Policeman pawns. Each player moves the pawn(s) whose policemen he controls, starting with the Head of the Investigation and proceeding clockwise around the table. If a player controls multiple pawns, he chooses the order in which he moves them.
The policeman pawns are moved along the dotted lines. When moving, a policeman can move up to a distance of two (0, 1, or 2) crossings. Policeman pawns ignore numbered circles when moving.
The yellow Policeman pawn moves two Crossings. If Jack traveled down that street, he surely left a clue!
When moving, a policeman pawn can move over other Policeman pawns, but cannot end its move in the same crossing as another Policeman pawn.
3. Police: Clues And Suspicion
Optional rule: if the False clue optional rule is being used, Jack can collect and use False clue markers in this phase.
Starting with the head of the investigation and proceeding clockwise around the table, each detective states, for each policeman pawn he controls, that the policeman is either looking for clues or executing an arrest.
Both types of actions can be undertaken in the numbered circles adjacent to that policeman pawn (i.e., in the numbered circles directly connected by dotted lines to the crossing where the policeman pawn is located). There cannot be an intervening crossing on the dotted line connecting the crossing the policeman pawn is on and the circle he wants to search for clues or make an arrest in.

Numbered circles 99, 100, and 120 are adjacent to the yellow Policeman pawn. Circle 83 is not adjacent, because the route to 83 is interrupted by a Crossing.
Each Policeman pawn can execute only one action. That is, it can either look for clues or execute an arrest, but not both. (However, if a player controls several policeman pawns, he can choose a different action for each one).
Looking For Clues

To look for clues, the detective announces the number of an adjacent numbered circle he wishes to inspect. Jack checks to see if that number appears anywhere on his sheet in the current night's row.
If it does, he places a Clue marker on that numbered circle, and that policeman's action ends. If it does not appear, the detective announces the number of another adjacent numbered circle. This process repeats until either a clue marker is placed or no more adjacent numbered circles remain to be inspected.
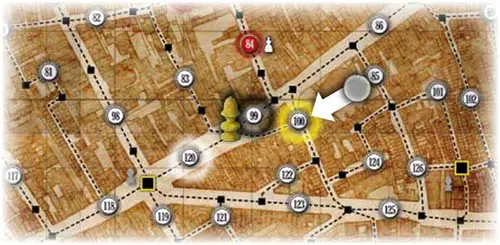
The yellow Policeman decides to look for clues. He announces "99!" That number does not appear in the current Night's row, so Jack replies negatively. The yellow Policeman calls "100!" That number does appear in the current Night's row, so Jack places a Clue token on the corresponding numbered circle. Jack's been there tonight... but how long ago? Even through numbered circle 120 is also adjacent to the yellow Policeman's location, the yellow Policeman cannot investigate it now because finding a clue ends his action.
Optional rules: if the False clue rule is being used, Jack receives a False clue marker every time he reveals five clue markers in the same night.
Executing An Arrest

To execute an arrest, the detective announces the number of one (and only one!) numbered circle that is adjacent to his policeman pawn.
If the announced number is Jack's current location (that is, the most recent number Jack recorded on his sheet), Jack is arrested and loses the game. If the announced number is not Jack's current location, no further information is given and that policeman's action ends.
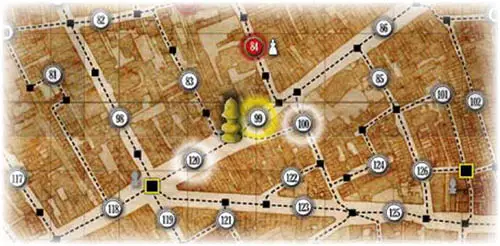
The yellow Policeman decides to execute an arrest. He chooses circle 99 which is adjacent. Jack checks his current location and replies negatively. If Jack isn't there, where is he?
If Jack has neither been caught nor reached his hideout after all Policemen have taken actions, play proceeds with another iteration of Hunting phase 1, "Jack the Ripper: Escape in the Night".
The End of the Hunting
If Jack is on the numbered circle he chose as his hideout, he may declare his escape, and the hunting - and with it, the Night - ends.
Remove all Clue markers from the game board. Leave the policeman pawns and crime scene markers in place. Remove the special movement tokens and the Jack pawn from the move track. If the False clue optional rules are being used, discard any unused False clue markers.
The next night then begins with hell phase 1, "Jack the Ripper: Preparing the Scene". Jack moves his Jack pawn to the next Night on the Night Track.
Remember: if Jack fails to reach his hideout and declare his escape by the end of the last possible move on his move track sheet (square "15"), he loses the game.
Special Movements
Instead of carrying out a normal movement, Jack can decide to use one of his special movement tokens. When used, a special movement token is placed on the space(s) of the move track corresponding to the turn that move was made.
That token cannot be used again that night. If Jack uses a special movement token, he must apply its effects. He cannot use a special movement token and then make a normal movement, instead.
Important: Jack cannot declare his escape if he just used a special movement to move onto his hideout. The last move that takes Jack into his hideout must always be a normal move.
There are two kinds of special movements:
I. Coach

Jack can use a Coach to move to two adjacent numbered circles in succession on the game board at once like a double move. moreover, with the Coach, Jack can move through Crossings containing policeman pawns.
The two numbered circles involved in a Coach move must be different from each other and from the circle he started the move from. Both of the circles he moved to must be recorded in separate places on Jack's sheet in the proper order.
Jack's pawn on the move track is moved twice, and the Coach token is placed so it covers both of those spaces on the move track. Jack can use three Coaches on the first night, two on each of the second and third Nights, and one on the fourth Night.
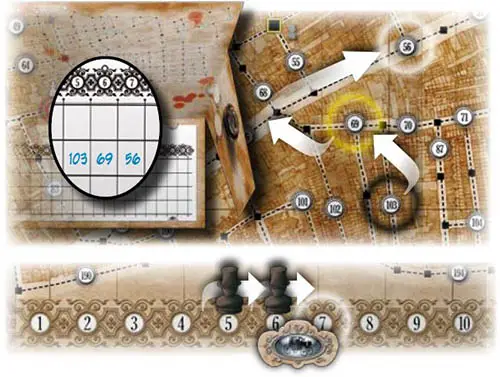
Jack is on numbered circle 103 and decides to use a Coach. Jack secretly chooses and records the two numbered circles involved in the movement: first 69, then 56. Now Jack is on numbered circle 56, but one of his Special Movements for the Night has been expended. He places a Coach token to cover two spaces on the move track, as a reminder for the detectives. He moves his Jack pawn two spaces on the move track. Hooves clatter on the cobblestones: few people can afford a coach in London..
II. Alley:

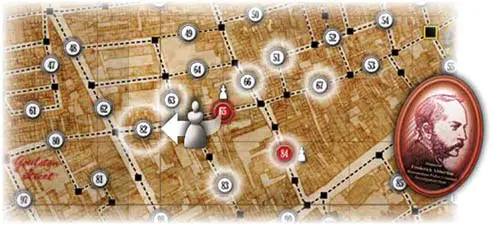
Jack can use an alley to cross a block of houses, moving from one numbered circle on that block's perimeter to any other numbered circle on that perimeter. A block of houses is an area of the game board that's completely bounded, but not interrupted, by dotted lines.
When Jack uses an alley, he places that token on the corresponding space of the move track. Jack can use two alleys on each of the first and second Nights and one alley on each of the third and fourth Nights.
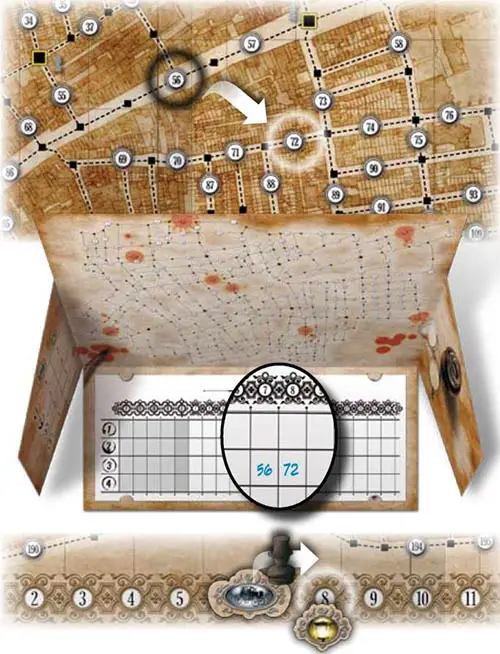
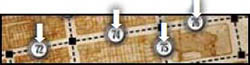
Jack is on numbered circle 56 and decides to use an Alley. His legal destinations on the block of houses to his south are 57, 73, 72, 71, 70, and 69. He chooses numbered circle 72 as his destination, and he records that number in the next square of his sheet. He places the Alley token on the move track as a reminder for the detectives, then he moves his Jack pawn one space forward, as usual. The labyrinthine back alleys of Whitechapel can greatly complicate matters for the police detectives...
The Third Night: The Double Event
On the third night, September 30th, Jack the Ripper must kill two of the wretched.
Normal procedures are followed with the exception that Jack chooses two victims instead of one during phase 5, "Jack the Ripper: Blood on the streets".
Jack chooses two wretched pawns and replaces each one with a crime scene marker. Then he notes the number of those two numbered circles on his sheet in two consecutive cells: the one indicated by the time of the crime token and the one to its right. He may record them in either order, as he prefers.
Note: Because the second crime scene of the third night counts as Jack's first move that night, the detectives act first, with play starting from hunting phase 2, "Police: Hunting the Monster". The hunting then proceeds as normal.
Jack starts his escape from the location corresponding to the second (rightmost) number he recorded. Jack places his Jack pawn on the space to the right of the time of the crime token on the move track, as Jack's "movement" from the first crime scene to the second uses up his first move of the night.
The detectives know both crime scenes, but not their order, so they cannot be sure exactly where Jack is at the beginning of the third Night's hunting.
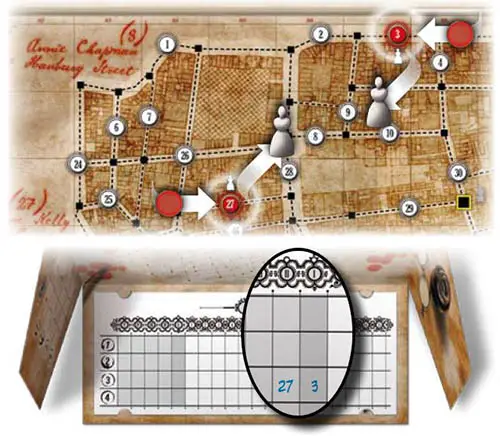
On the third Night, Jack chooses two victims, placing Crime Scene markers on each of the numbered circles 3 and 27. He secretly records on his sheet "27" and then "3". His second (rightmost) victim is the one on numbered circle 3, the location from which he'll begin his escape... But the detectives don't know which one is the correct one!
End of the Game
Jack the Ripper wins the game if he kills five victims without being caught, returning safely to his hideout at the end of all four nights.
The police detectives win the game if they catch Jack, or prevent him from reaching his hideout within the permitted number of moves.
Suggestions And Tips
- Choose the most expert player of the group for the role of Jack.
- Jack the Ripper should use the coach and alley tokens wisely, in order to have them when he really needs them.
- Jack the Ripper should not overestimate the number of moves he has left for the night. The detectives might force him into a fatal detour with an unexpected move at any time.
- The detectives should not necessarily focus on catching Jack on the first night at all costs. Early in the game, it is much more important to narrow down the areas where Jack's hideout might be.
- The detectives will have to discuss their tactics in front of Jack, but they should wait for Jack to move before they start to talk to avoid giving away too much about their plans.
- Jack the Ripper should try to avoid giving away his location by the way he looks at the game board.
Continue Reading