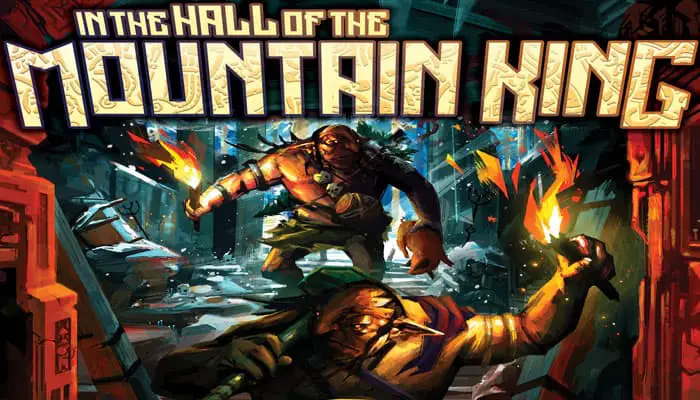
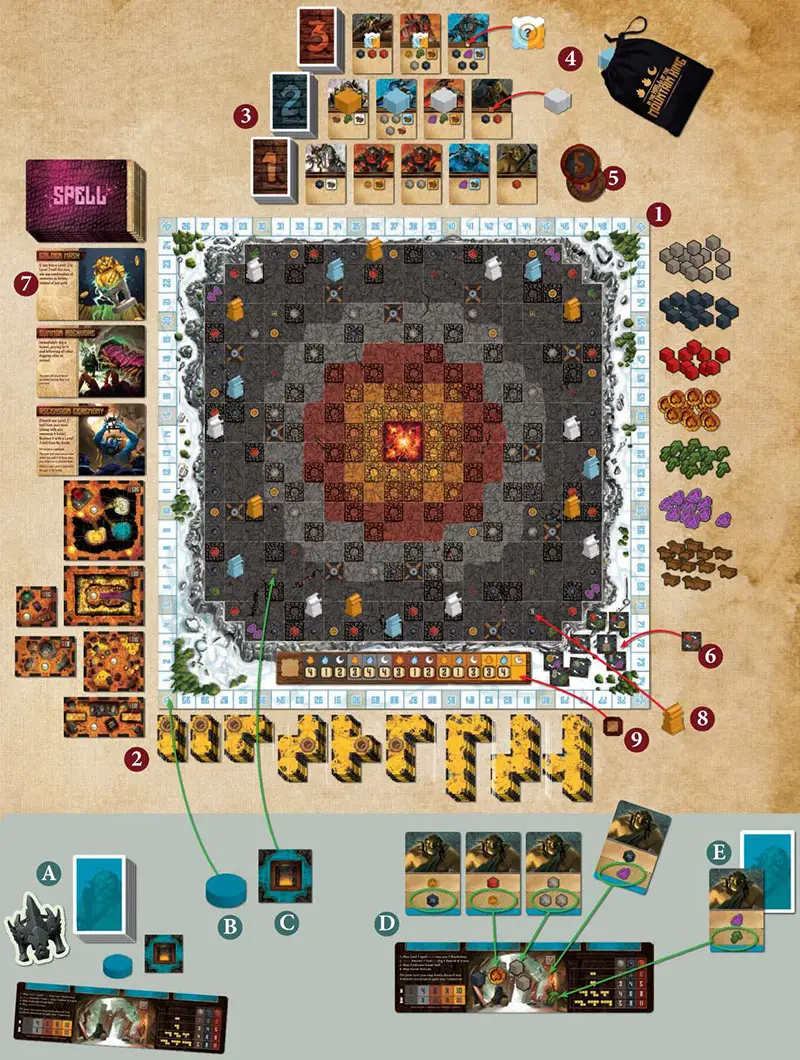
Components
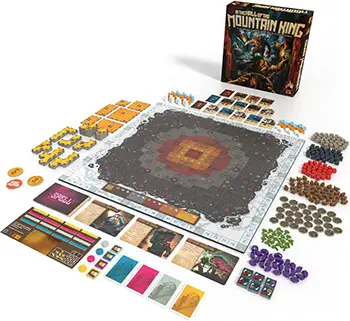
- 1 Double-sided Game board
- 52 Tunnel tiles
- 5 Player Mats
- 6 Great Hall tiles
- 17 Spell cards
- 5 Gate tiles
- 5 Score markers
- 3 Pedestal reminder tokens
- 21 Statues
- 22 Workshop tiles
- 18 Pedestals
- 15 Pedestal Point tokens
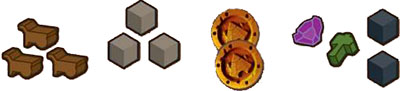
- 225 Resource tokens
- 2 Coronation tokens
- 1 Crown
- 2 Team Storage cards
- 1 Draw bag
- Instructions
Object of the Game
Recruit trolls from the horde to create a cascading, customized source of the resources to fit your strategy.
Establish workshops to gain versatility and cast spells to bend fate to your will.
Earn honor to win the crown by excavating tunnels from increasingly valuable minerals, carting statues through your tunnels as close to the mountain's heart as you can (ideally onto matching clan pedestals ), and dedicating vast great halls.
When the coronation arrives, the leader with the most honor wins, and is named the Mountain King to rule over the unified clans!
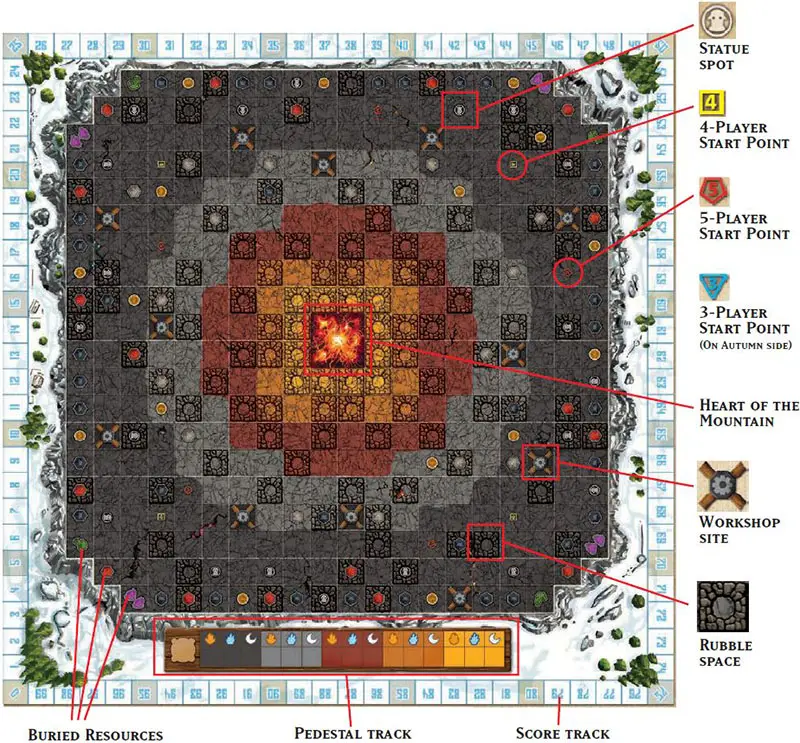
Gameboard
Playermat
Setup
General Setup
1 Place the game board in the center of the table, with the side up depending on player count. The winter side is for 4 or 5 players. The autumn side is for 3 players. 2 players may play on either side of the board. Create supply piles of all of the resources (stone, iron, heartstone, coins, carts, hammers, and runes) beside the board.
2 Create the tunnel supply; stack the tunnels by shape next to the board. Display the great halls nearby as well.
3 Create the horde; Shuffle the troll cards separately by level. You will be creating a 3-level array (5/4/3 trolls in each row from the bottom up, arranged in a "pyramid" formation).
- For the bottom row, deal out five Level-1 trolls; keep the deck facedown nearby.
- For the middle row, deal out four Level-2 trolls; keep the deck facedown nearby.
- For the top row, deal out three Level-3 trolls; keep the deck facedown nearby.
4 Place the pedestals in the bag and mix. Randomly draw 4 pedestals and place one on each Level-2 troll in the horde (on its pedestal icon). Keep the bag near the horde. Take the 3 pedestal reminder tokens and place one on each Level-3 troll in the horde (on its pedestal icon).
5 Stack the 2 coronation tokens near the horde, with the 5 on top of the 3.
In a 2-player game, return the 5 to the box and play only with the 3.
6 Shuffle the workshop tiles face down, then reveal 2 per player plus 1 more. Keep the revealed workshops in a supply on an unused corner of the game board. Return the unrevealed workshops to the box.
You might prefer to choose the workshops in your game instead of picking randomly or to include no duplicates in the random draw.
7 Create a shuffled facedown deck of spell cards, and reveal 3 face up to form the spellbook, keeping the deck nearby.
8 Place statues onto the statue spots on the board in this fashion: randomly pick any clan's statue (for example Moon) and place it in any random statue spot.
Then place a different clan's statue (for example Fire) in the next statue spot clockwise. Then a statue from the remaining clan (Ice in this example) in the next statue spot clockwise. Repeat this pattern clockwise around the board until all spots are filled. Return any leftover statues to the box.
9 Mix the pedestal point tokens face down, and randomly distribute them face-up onto the Pedestal track, 1 token per space.
Player Setup
A Choose a starting player, and give them the crown as a reminder. Each player chooses a player color, and takes the player mat, 6 starting troll cards, gate tile, and score marker of their color. All components from unused player colors are returned to the box.
B All players place their score markers on 0 of the score track.
C Beginning with the starting player and proceeding clockwise, each player places their gate tile on a start point of their choice marked with the player count. (For example if there are 4 players, any point marked "4").
In a 2-player game, use any two matching-numbered start points you want. The closer your gates are, the more conflict you'll have.
It is simplest and most intuitive to just place on the entrance closest to your seat, but you aren't required to.
All of the entrances have slightly different advantages and disadvantages, but they have all been carefully balanced to be evenly competitive.
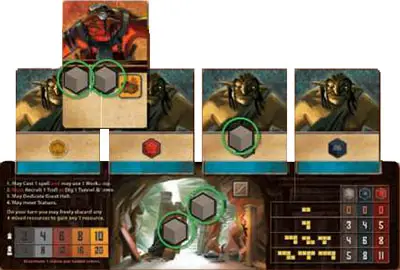
D Each player assembles the starting trolls in their own trollsmoot. Your trollsmoot is the pyramid of troll cards you will build over the course of the game that generates your supply of resources. Begin yours by shuffling your starting troll deck and following these steps:
-
Draw the top two trolls from your deck, choose one of those two to keep, and place it face up above one of the 4 empty slots on your player mat; keep the other one in your hand.
Draw the next troll from your deck, and again choose one of them to place in a slot. Repeat this process until you have a starting row of 4 trolls in your trollsmoot, 1 troll in your hand, and 1 troll remaining in your deck that you didn't see.
Notice that there are two rows of resources on each starting troll; the top row indicates what that troll will generate repeatedly over the course of the game.
The bottom row indicates a one-time resource gain that you get for choosing that troll. Be aware that the two inside trolls in your starting row will generate their resources more times during the game than the two outside trolls will.
-
Take from the supply all of the starting resources shown on your chosen starting trolls; place these resources in your storage. Then slide your player mat up to hide the starting resources on your trolls.
Depending on your turn order position, you will gain some bonus starting resources. The start player gets no extra resources. The second and third players gain the starting resources from the troll in their hand into their storage.
The fourth and fifth players gain the starting resources from the troll in their hand and from the unseen troll left in their deck into their storage. All starting troll cards except for the four in each player's trollsmoot are returned to the box.
Now you are ready to begin!
Game Play
Gameplay begins with the Start player and plays in turns, proceeding clockwise until the game ends. Final scoring is then added to in-game scoring to determine the winner. Here are a few general rules to know before you begin:
-
Your Network
Each player will be building a network on the board, beginning with their gate and growing to include tunnels and Great Halls. Your gate is the source of your network.
-
Adjacency
For all game purposes, spaces on the board only count as "adjacent" if they share a flat side. Diagonally-touching squares are not adjacent to each other.
-
Spending Resources
During the game you will be spending resources to accomplish various things. Spent resources return to their supply piles unless otherwise specified. All resources owned by you (whether they are in your storage area or held by trolls in your trollsmoot) are free to be spent by you.
It's almost always best to prioritize spending resources held by your trolls over those held in your storage; this frees up the trolls to generate their resources again.
Spending Example: You want to spend four stone on digging a tunnel; you have two stone in your storage and three stone held by trolls. You could spend any four of those five stone by returning them to the supply.
On your turn:
On your turn perform these steps in this order:
-
Spells & Workshops
You may Cast 1 spell and you may activate 1 of your workshops. You may do both (in either order), or just one, or neither.
-
Recruit or Dig
You must either recruit 1 troll from the horde, or spend minerals to dig 1 tunnel and score honor.
-
Great Hall
You may dedicate 1 great hall.
-
Move Statues
You may move as many statues in your network as you wish, by spending carts.
Trading with the Supply
At any point on your turn, you may spend 4 resources (in any combination) to gain 1 specific resource of your choice from the supply to your storage. You may do this multiple times per turn if you wish.
1. Spells & Workshops
You may Cast one spell and you may activate one workshop that your network touches. You may do both (in either order), or just one, or neither.
Cast One Spell
To cast a spell you must spend 1 rune onto the spell (currently face up in the spellbook) that you wish to use. Then carry out the spell's effects as instructed on the spell card.
If your rune is the third rune on the spell, the spell disintegrates after you have finished carrying it out; return the 3 runes to the supply, then move the disintegrated spell card to the bottom of the deck and draw a new one to replace it.
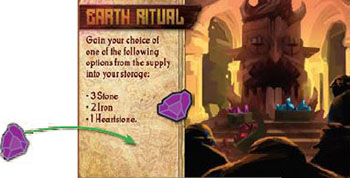
Example: To cast the spell Earth Ritual from the spellbook, you spend 1 rune (from your storage or from one of your trolls) onto that card. Then you carry out the spell effect. Your rune is only the second one there, so the spell remains in the spellbook for now.
Activate One Workshop
At the start of the game, you won't have access to any workshops yet; the Dig a Tunnel section explains how you can begin adding them to the board.
Each workshop on the board has up to 4 entrances, one per side. An entrance is open if it is touching any player's network.
As long as your network touches at least one of its entrances, you may activate a workshop (up to) once for each open entrance it has, regardless of how many of them your network touches.
-
All resources gained through a workshop come from the supply and go into your storage.
This process means that workshops provide a provide a pathway to "clear" resources off of your trolls so that they are free to generate more later.
-
When using a workshop multiple times, each usage is a distinct operation, conducted in whatever order you wish.
-
Multiple players may have entrances to the same workshop; a workshop itself is not considered to be part of any player's network.
Example: You are magenta. Your network connects to this Toolforge; it has one open entrance from your network and two more from another network. Since it has 3 open entrances, you could use it up to 3 times.
With each usage, you could spend a heartstone to gain a hammer into your storage, or spend a hammer to gain a heartstone into your storage.
The Workshops
-

Cartwright
Spend 1 heartstone to gain 1 wild cart, or vice-versa. You may not spend clan carts here, only wild carts.
-

Charmcrafter
Spend 1 coin to gain 1 rune, or vice-versa.
-

Coinpress
Spend 1 iron or 1 heartstone to gain 1 coin, or vice-versa.
-

Metalworks
Spend 1 heartstone to gain 1 iron, or vice-versa.
-

Pickforge
Spend any 2 resources (they do not need to match) to gain 1 hammer.
-

Quartermaster
Move any 1 resource from one of your trolls into your storage. Clan carts become wild once moved to storage.
-

Runesmithy
Spend 1 stone or 1 iron to gain 1 rune, or vice-versa.
-

Stonegrinder
Spend 1 heartstone to gain 2 stone, or vice-versa.
-

Stonemill
Spend 1 stone to gain 1 iron, or vice-versa.
-

Toolforge
Spend 1 heartstone to gain 1 hammer, or vice-versa.
-

Wheeljack
Spend any 2 resources (they do not need to match) to gain 1 wild cart.
2. Recruit or Dig
You must choose one of the two options to carry out. If you already have 10 trolls in your (complete) trollsmoot, you may not recruit a troll and must dig a tunnel.
If you don't have enough minerals to dig a tunnel, you must recruit a troll. If you can neither recruit a troll nor dig a tunnel, ignore this step of your turn.
Recruit a Troll
To recruit a troll from the horde, follow these 3 steps:
Step One: Choose a Troll to Recruit
A Level-1 troll from the bottom row may be recruited for free.
To recruit a Level-2 troll from the middle row, you must bribe the two Level-1 trolls beneath it by spending 1 coin onto both of them (for a total of 2 coins in bribes).
To recruit a Level-3 troll from the top row, you must bribe the two Level-2 trolls beneath it and the three Level-1 trolls beneath them by spending 1 coin onto each of them (for a total of 5 coins in bribes).
You can't recruit a particular troll if you cant afford to bribe all of the trolls beneath it. Remember, Level-1 trolls are always free! It's a good idea to place bribes on the troll portrait, so that the resource symbols on the cards aren't obscured.
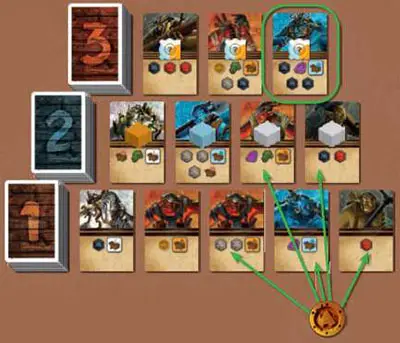
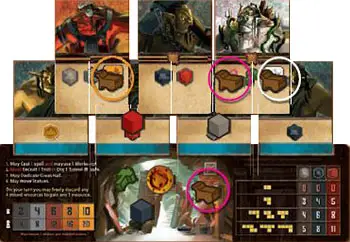
Example: If you wanted to recruit the Level-3 Ice troll in the top right of the horde, you'd have to spend coins to bribe all five trolls beneath it.
Place 1 coin on each of those trolls.
Step Two: Take the Troll
Take your chosen troll card from the horde, and replenish the empty space in the horde with a fresh troll drawn from the same level deck (add a pedestal from the draw bag if it is a fresh Level-2 troll).
Collect any bribes your chosen troll was holding (usually coins but sometimes other resources due to spell effects) into your storage.
If it was a Level-2 troll it will have a pedestal on it (unless they have run out in this game). Collect it into your storage.
If it was a Level-3 troll you may look through the draw bag and take a remaining pedestal of your choice (if there are any) into your storage. The pedestal reminder token on the Level-3 troll will remind you to do so; return the token to the newly-drawn troll in the horde.
Running out of Trolls
If you ever run out of trolls for a particular level, draw a troll from the next-higher level deck (or next-lower if that's impossible) instead.
Running out of Pedestals
Pedestals are limited. Once they run out, no new ones enter the game.
Retiring Trolls
After you are done recruiting your troll, any troll in the horde that is currently holding 4 bribes (usually coins) retires happily. Discard the troll to the bottom of its deck and return the 4 bribes to the supply. Reveal a new troll from the appropriate deck to replace it.
Example: Having placed your five bribes, you take the Ice troll you wanted, then deal a new Level-3 troll from the deck into the empty spot.
Your new troll had a Pedestal reminder token on it, which reminds you to take a pedestal of your choice from the draw bag. You choose the one you want and place it in your storage, then place the reminder token back onto the new troll in the horde.
Step Three: Add it to your Trollsmoot and trigger a Cascade
Add the newly recruited troll to your trollsmoot, placing it above and between two other existing trolls there (your choice where if there are multiple options).
In this way you will be forming a "pyramid" of trolls as the game goes on, which will result in 10 trolls total (including your starting trolls) if you manage to complete it.
Activate your new troll, and also activate the two trolls directly beneath it, and also the two trolls directly beneath each of those trolls, and so on in a downward cascade. When a troll is activated, it gains (from the supply) any resource shown on its card that it is not already holding.
Place each gained resource directly onto the activated troll, covering the corresponding symbol. If there is already a resource on a symbol, then you do not gain another one.
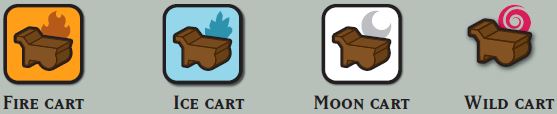
Carts
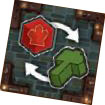
Cart symbols on Fire, Ice, and Moon trolls most often display markings that mark them as specifically Fire, Ice, or Moon carts. Cart tokens gained onto such symbols become clan carts that may only be spent to move a statue belonging to that clan.
Cart symbols with a spiral (and also all carts in your storage) are wild and may be used to move any clan's statue.
Put another way, even though the physical cart token is always the same, the symbol that the token is sitting on determines which clan's statues it is permitted to move.
Dig a Tunnel and Score Honor
To dig a tunnel, choose a tunnel from the supply, spend the appropriate minerals, then place the tunnel onto the mountain, extending your own tunnel network and scoring honor.
The cost of the tunnel is equal to the number of squares in the tunnel tile. For example, a tunnel with 4 squares costs 4 minerals. All of the minerals spent must be the same (for example all iron).
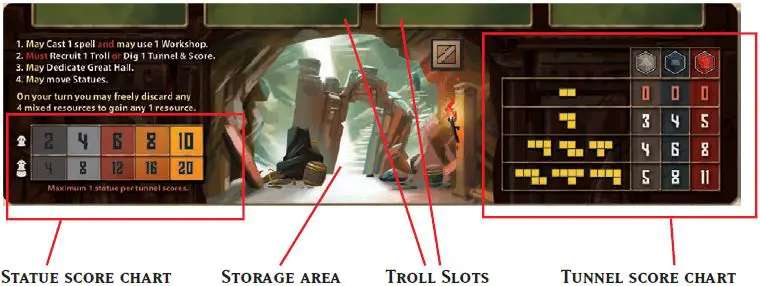
The score of the tunnel depends on its size and the mineral type you spent on it. There is a chart on your player mat that shows the scores; move your scoring marker on the score track to reflect the honor you have gained.
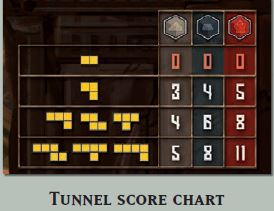
Don't forget to score; digging tunnels is exciting! Score your tunnel as soon as you have paid for it.
Get into the habit of calling out the mineral and size of your tunnel to make sure that the scoring doesn't get forgotten in the excitement.
Notice that the size-2 tunnels do not score anything.
You may flip and rotate the tunnel tile to whatever orientation you like before placing it.
You may never place a tunnel so that it extends off the edge of the board, or to overlap any other tile, any workshop site, or the heart of the mountain.
The new tunnel must be placed so that at least one edge of it is adja- cent to your own network, extending it. At the start of the game, your network consists only of your own gate. As you add tunnels and great halls, they become part of your network. Workshops (even if you have entrances to them) are not considered part of your network.
You may never place a tunnel so that it is adjacent to any part of an opponent's network. The closest you may place a tile to an opponent's network is diagonal. This means that there will never be any confusion about which tunnels belong to whom.
In the rare event that a tile or group of tiles becomes isolated (meaning that a path could not be traced from it through adjacent squares to a gate), the isolated portion is no longer part of any player's network. Any player could later connect to the isolated portion, at which point it becomes part of that player's network.
Rubble Spaces

The spaces with rocky rings in them are rubble spaces. For each rubble space the new tunnel covers, you must spend 1 hammer.
If you don't have enough hammers to spend, you may not place your tunnel there. Sometimes buried statues or buried resources (see below) are in rubble spaces, making them harder to get to.
Buried Statues

Any statue not in a network is a buried statue. If the new tunnel covers one, that statue is now unearthed and available to be moved by you later. Place it in the same space of the new tunnel that it was in on the board below.
Buried Resources
If the new tunnel covers any buried resources, immediately gain those resources from the supply to your storage.
Add a Pedestal?
If the tunnel you just dug has an anchor on it, and you have a pedestal in your storage, you may now add the pedestal to the tunnel. Anchors are the holes found in most tunnel tiles.
Notice that size-5 tunnels don't have anchors on them.
Important limitation: The mountain is divided into 5 tiers. From the outside inward they are: dark gray, gray, brown, orange, and yellow. There may only ever be 1 pedestal of each clan (Fire, Ice, and Moon) placed on each tier of the mountain.
For example, if any player has already built an Ice pedestal anywhere in the gray tier, another Ice pedestal may not be added to that tier... but a Fire or Moon pedestal could be.
The Pedestal track will help you keep track of this limitation.

The tiers on the mountain (counting from the outermost to the innermost) match the sections on the Pedestal track from left to right.
The colors on the Pedestal track correspond to the tiers; there is a Fire, Ice, and Moon space in each tier section.
When you place a pedestal, you immediately gain the pedestal point token matching the clan and tier that you placed it on. Keep the token face down in your storage; it will be worth the displayed amount of honor at the end of the game.
If the token is already gone when you go to take it, it means your placement was illegal and someone had earlier placed a pedestal from that clan on that tier; you must reclaim your illegal pedestal.
A pedestal will double the honor value of a statue of the same clan if you move one onto it and it's still there at the end of the game (see Final Scoring).
It's now or never; a pedestal may only be added to an anchor at the moment you dig that tunnel. You may not add a pedestal to it later. Pedestals may not be moved once they are placed. You may always lif up a pedestal later to peek through the anchor hole and confirm which tier it is on.
Establish a Workshop?
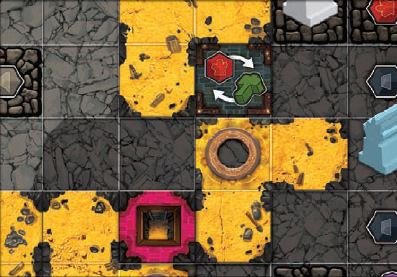
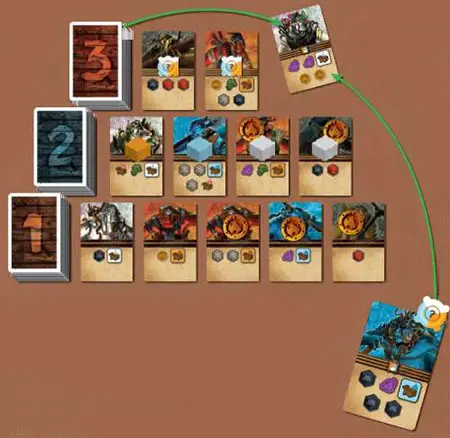
If the tunnel you just dug is adjacent to an empty workshop site, you may choose any remaining workshop from the supply and add it to that site.
There are more sites on the mountain than available workshops, so it is possible to run out. It is possible to connect to and establish more than one site with a single tunnel-digging.
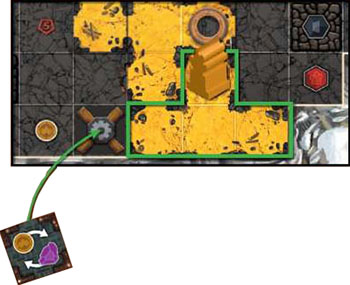
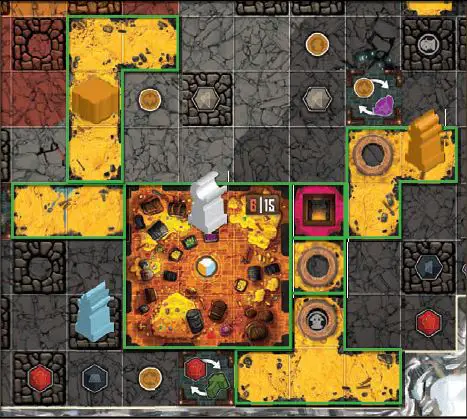
Example: The tunnel you placed in the indicated space is next to a workshop site.
You are interested in the Charmcrafter, so you take it from the supply and add it to the site.
On future turns, you'll be able to use that workshop!
3. Great Hall
You may dedicate one great hall (per turn) by taking it from the supply and laying it over your tunnel network.
The tunnels it overlays must create a region without any gaps that matches the exact size and shape of the great hall itself. (The covered tunnels may be completely or partially covered by the great hall).
There is no extra cost to dedicating great halls. Any pedestals covered by the great hall are removed from the game (players do not lose pedestal point tokens they gained for placing those pedestals, and those clan/tier combinations remain illegal to repeat).
Any statues covered by the great hall are placed in the exact same spot that they were in on the tunnel below.
Great halls may be placed to cover tunnels only. Never over Gates, workshops, or other great halls.
Once in place, treat a great hall for all adjacency purposes (including statue movement) as if it was a large tunnel.
Portions of tunnels protruding from under great halls become distinct tunnels themselves.
Each great hall comes with an altar space. Altars are similar to pedestals in that they are scoring spots for statues, but they are not technically pedestals. Each altar can hold one statue from any clan.
At the end of the game, the great hall will earn you honor equal to the smaller number printed on it. However, if there is any statue on the great hall's altar during final scoring, the hall will earn honor equal to the larger number printed on it instead.
This is the only score value of that statue (it does not score the usual tier-based statue scoring), and any statue in a great hall that is not on the altar does not score.
Example: There's a spot in your network big enough to hold The Trove great hall You decide to dedicate it, so you take it from the supply and lay it in that position; it will affect the pedestal and statue that it covers.
The Ice pedestal you placed earlier is removed from the game (though you do get to keep the pedestal point token you earned for placing it). The Moon statue remains on the board in the exact same space it occupied in the tunnel below.

Without doing anything else, The Trove will be worth 6 honor at the end of the game... but if you can move that Moon statue (or any other statue) onto the altar in time for the end of the game, The Trove will be worth a hefty 15 honor!
4. Move Statues
You may spend carts (as many as you wish from among the ones you own) to move statues through your network, trying to get them closer to the heart of the mountain where they will be worth more honor. Each cart spent permits you to move one unearthed statue in your own network either:
- To another space in the tunnel it is already in, or
- To any space in an adjacent tunnel.
What counts as a Tunnel?
- A tunnel tile.
- A great hall tile.
- Any portion of a tunnel tile sticking out from under a great hall.
- Your gate.
Workshops are not part of your tunnel network, therefore statues may not be moved through them.

A clan cart from a colored symbol on a troll may only be used to move a statue of that clan. A wild cart (from your storage, or more rarely from a wild cart symbol on a troll) may be spent to move any statue.
Only 1 statue may occupy a single square at a time, but they may pass through each other while moving.
Multiple statues may occupy different spaces in the same tunnel, but only 1 statue per tunnel will earn honor at the end of the game.
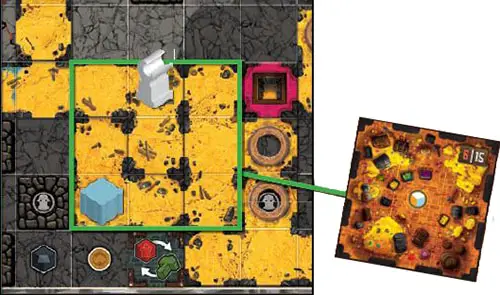
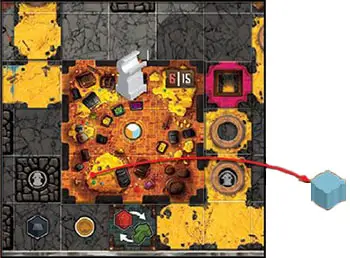
Movement example: You want to move your Fire statue to the Fire pedestal, and the Moon statue onto the altar in the great hall. You can't move the Ice statue since it is still buried. We have outlined the regions that count as tunnels so that they can be clearly seen.
Your trolls are holding a Fire cart, a wild cart, and a Moon cart. You have another cart in your storage, which is wild, and a variety of other resources in your possession.

You spend the Moon cart to move the Moon statue onto the altar. You spend the Fire cart and your two wild carts to move the Fire statue three times as shown.
You could wait for a later turn when you've generated more carts to make that last move onto the Fire pedestal, but there's another way you might do it: If you trade 4 of your other resources to the supply for a cart (which would be wild by default), you could make one last move and get the Fire statue onto that pedestal right now!
End of the Game
The first player to recruit the 10th troll in their trollsmoot ("capping" their pyramid) earns the first Coronation token, which is worth 5 honor at the end of the game.
When the next player recruits their 10th troll, that player earns the second Coronation token, which will be worth 3 honor at the end of the game and triggers the endgame.
In a 2-player game there will only be the second Coronation token with 3 honor; it triggers the endgame.
After the second Coronation token is claimed, the current round is finished (the last player in the round is the player sitting to the right of the start player.
If that player is the one who earned the second Coronation token, the round is over as soon as they've wrapped up this turn), and then each player gets exactly 2 more turns in normal turn order. Then the game ends.
Think a moment! Take a breath. Plan out how you can best spend your final two turns. Remember, importantly, that you can always trade 4 resources for 1 resource from the supply during your turn.
This isn't super efficient but will help you maximize the little time you have left. Remind yourself of the five different ways to score honor, so that you can be sure to earn the most possible!
Capping your pyramid first will earn you that valuable 5-honor token and triggers a massive cascade of riches!
Timing is critical... you don't want to achieve this too early or too late.
Keep an eye on other players' progress to make the most of your cascades!
Final Scoring
Track your scores using the markers on the score track. You will have earned honor during the game for digging tunnels; now you will add to those scores in five possible ways. Move your score markers on the track to reflect your increased score.
If you lap the score track and go above 100, place a coin from the supply under your score marker as a reminder.
-
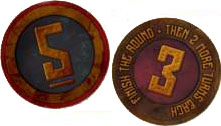
Coronation Tokens
The players holding the first and second Coronation tokens earn 5 honor and 3 honor for them, respectively.
-
Pedestal Points
Reveal the Pedestal Point tokens you have collected for placing pedestals. They are worth the honor displayed on them.
-
Leftover Resource Sets
Move all of your resources from your trolls into your storage (clan carts become wild as usual) and form them into sets. Every set of three identical resources (for example three runes or three iron or three carts) earns you 1 honor.
You may also at this point make as many trades with the supply you need to in order to assemble sets of 3 matching resources. These trades are at the usual rate of any 4 mixed resources for any 1 resource of your choice from the supply.
For example, if you had these leftover resources, you would score 1 honor for the carts and 1 honor for the stone. You don't have any other sets of 3, but if you traded four mixed resources (1 rune, 1 hammer, 2 iron) for a coin, you could assemble one more set of 3 to score an additional honor.
-
Great Halls
For each great hall in your network, you will earn the lesser value displayed on its scoring plank if there is not a statue on the hall's altar and the greater value if there is a statue (from any clan) on the altar.
Statues in great halls (whether they are on the altar or not) do not score the normal tier-based statue scoring described below.
-
Statues
Each unearthed statue in your tunnels (or gate) will earn honor depending on the tier of the mountain it is on. Statues do not need to be on pedestals or even on anchors to score, but statues on matching pedestals earn double their normal score. The values are as follows:
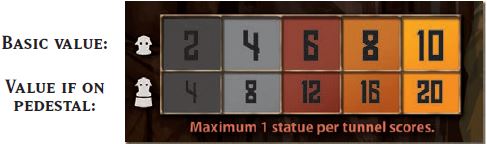
Important: Only 1 statue per tunnel tile may be scored.
When all scores have been totaled, the player with the highest score is crowned the Mountain King and wins the game!
(In the event of a tie, tied players add up the Levels of the trolls they've recruited. The tied player with the lower total wins the tie).
Continue Reading