All site boards have an A side and a B side. You should always start playing with just the A sides. Later on, you can try the B sides. You can also play with a mix of A and B sides. Why not try various combinations?
B) Market

The B side works just like the A side, except for the following difference:
At the start of the round, place 2 cards face down on the card space at bottom right (instead of 1 face-up card). For a stone delivered to the market, you can pick up both cards and look at them. Then, select 1 card to keep. Place the other card on the discard pile.

B) Pyramids
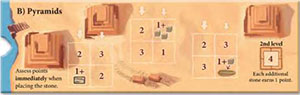
The B side works just like the A side, except for the following differences:
For a stone delivered to the pyramids, the owner of the stone gets to decide which of the 3 pyramids the stone is to be delivered to.
Some of the pyramids yield special bonuses:

You get 1 point and can take the top market card from the draw pile.

You get 1 point and can immediately take 3 stones from the quarry and place them on the supply sled token.

You get 1 point and can place 1 stone from your supply sled token on any empty space of a ship that has not yet sailed to a site.
Each pyramid is started from the top left. Stones are placed column by column.
Each stone in the second level of a pyramid is worth4 points. Once the pyramids are completed, each additional stone delivered to the pyramids yields 1 point. Place these stones at the right edge of the pyramid board.
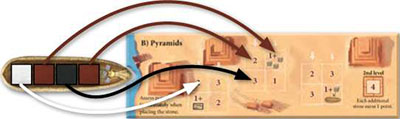
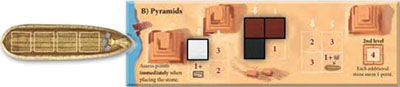
Example: This 4-stone ship was sailed to the pyramids. The brown player places her first stone on the first space of the middle pyramid. Then, the black player places his stone on the second space of the middle pyramid. Then, the brown player places her second stone on the third space of the middle pyramid. Finally, the white player places his stone on the first space of the left pyramid.
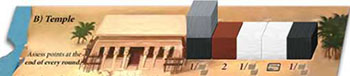
B) Temple
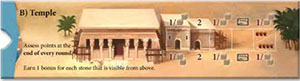
The B side works just like the A side, except for the following difference:
At the end of each round, there are various bonuses for each stone visible from above - depending on the temple space on which the stone is placed:

You get 1 point or, if you prefer, you can take 2 stones from the quarry and place them on your supply sled token.

You get 2 points.

You get the top market card from the draw pile.
Example: The point assessment for the temple is performed at the end of the round. The gray player can decide whether to take 1 point or 2 stones from the quarry. The brown player gets 2 points. The white player gets to decide whether to take 1 point or 2 stones from the quarry. In addition, the white player gets to take the top market card from the draw pile. The black player gets to decide whether to take 1 point or 2 stones from the quarry.
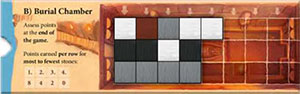
B) Burial Chamber
The B side works just like the A side, except for the following differences: At the end of the game, the players earn points for having the greatest number of stones in the 3 rows of the burial chamber.
Each row is assessed individually.
Important:
- You must have at least 1 stone in a row in order to be involved in the point assessment for that row.
- The stones of any one color do not have to be adjacent.
- In case of a tie, add up the placement points and divide them among the number of tied players. Every player involved in the tie shares in the divided-up point total rounded down to the nearest whole number.
Example: The burial chamber point assessment is performed at the end of the game.

In the top row, the white player has the greatest number of stones (3). For that, she gets 8 points. With 1 stone each, the brown and gray players share second and third places. For that, they each get (4 + 2) / 2 = 3 points.

In the middle row, the black player has the greatest number of stones (3), and gets 8 points. White is in second place with 1 stone, and gets 4 points. Brown and gray have no stones in this row, so they get no points.

In the bottom row, gray has the greatest number (4), and gets 8 points. None of the other players are in the row, so they get no points.
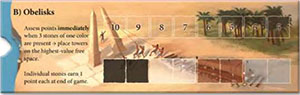
B) Obelisks
The B side works just like the A side, except for the following differences:
Each stone delivered here is first placed on a space with the corresponding color.
When the third stone of any given color is delivered, these stones immediately have their value assessed. The 3 stones are stacked in a single tower on the free space with the highest point value. The owner of the stones immediately receives these points.
Individual stones that do not make it into an obelisk earn 1 point each at the end of the game.

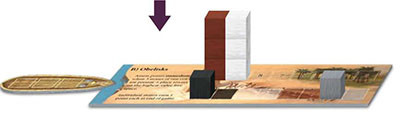
Example: This 3-stone ship was sailed to the obelisks. The black player places his stone on one of the empty spaces on the board. The white player adds her stone to the other two white stones. Since there are now 3 white stones at the obelisks, these stones are stacked into a tower on the next free space (with a point value of 9).
The white player immediately gets 9 points. Then, gray places his stone on one of the board's empty gray spaces.
Continue Reading