Gloomhaven is a cooperative game of battling monsters and advancing a player's own individual goals. The game is meant to be played as part of a campaign, where a group of players will use the accompanying Scenario Book to string together a series of adventures, unlocking new content for the game as they progress. Any revealed scenario, however, can also function as a highly variable stand-alone experience.
Components
- 1 Rule Book
- 18 Character Miniatures
- 47 Monster Stat Sheets
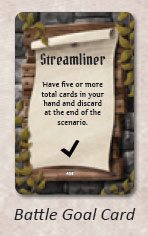
- 24 Battle Goal Cards
- 50 Money Tokens
- 1 Scenario Book
- 17 Character Boards
- 6 Monster Stat Sleeves
- 24 Personal Quest Cards 46 Damage Tokens
- 1 Town Records Book
- 504 Character Ability Cards
- 150 Event Cards
- 9 Random Scenario Cards 10 Scenario Aid Tokens
- 1 Map Board
- 457 Attack Modifier Cards
- 253 Item Cards
- 40 Random Dungeon Cards
- 4 hp/xp Dials
- 12 Objective Tokens
- 4 Player Reference Cards
- 30 2-Sided Map Tiles
- 240 Monster Standees
- 6 Wood Element Discs
- 32 Summon Tokens
- 17 Character Pads
- 1 Party Pad
- 3 Sealed Envelopes
- 155 2-Sided Overlay Tiles
- 232 Monster Ability Cards
- 35 Character Tuck Boxes
- 24 Plastic Stands
- 1 Element Infusion Board
- 1 Round Tracker
- 60 Status Tokens
- 85 Character Tokens
- 4 Sticker Sheets
Play Overview
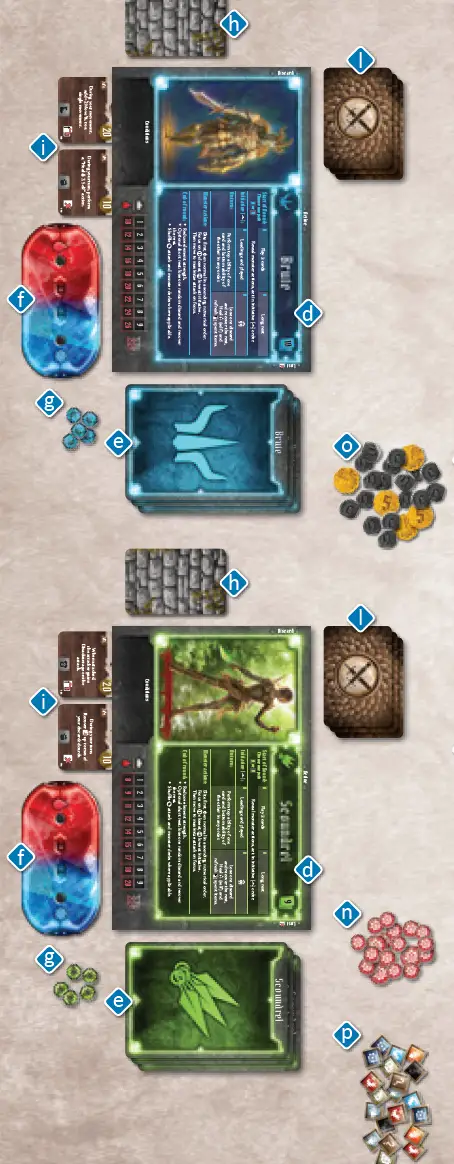
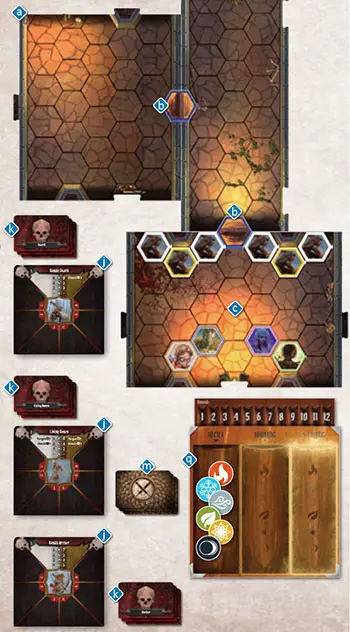
A modular board of map tiles a, constructed in a specific configuration using the Scenario Book as a reference. The map tiles should be laid out with doors b connecting them. The configuration of overlay tiles and monsters for the first room c should also be set up along with the character figures.
A character mat for each player d and the corresponding hand of ability cards for that character's class e, health and experience trackers f, character tokens g, a facedown battle goal card h, and any equipped item cards i.
All monster statistic cards j, with their corresponding standees, and monster ability cards k set to one side in individual shuffled decks.
Shuffled decks of attack modifier cards for each player i and one for the monsters m. A standard attack modifier deck consists of twenty cards as shown at the top of the page, not the characterspecific modifier cards found in the character boxes. A deck, however, may be modified by level-up bonuses, items, scenario effects, and the effects of the curse and bless conditions.
Piles of damage tokens n, money tokens o, and condition tokens p.
The elemental infusion table q with all six elements set in the "Inert" column.
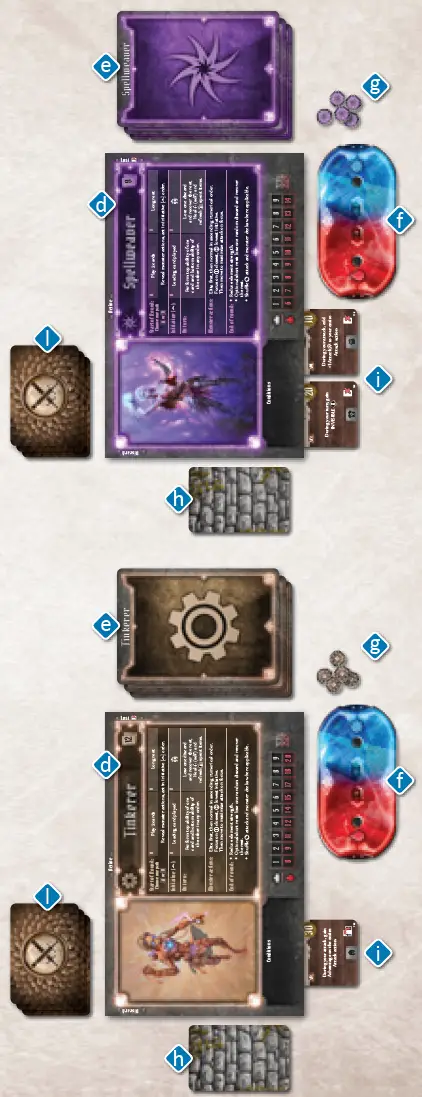
Character Mats
When a player begins their journey with the game, he or she will select one of the available character classes to play. Only one copy of each character class can be played in any given scenario. Each class has a unique set of abilities, so this is an important decision to make. When the box is first opened, the Brute  , Tinkerer
  , Spellweaver
  , Scoundrel
  , Cragheart
  , and Mindthief
  are available.
Once a character class has been chosen, the player takes the corresponding character mat, character tokens, and that character's starting hand of Level 1 ability cards from the larger tuck box containing the character's symbol, as well as the miniature contained in the smaller character tuck box.
A Character mat includes:
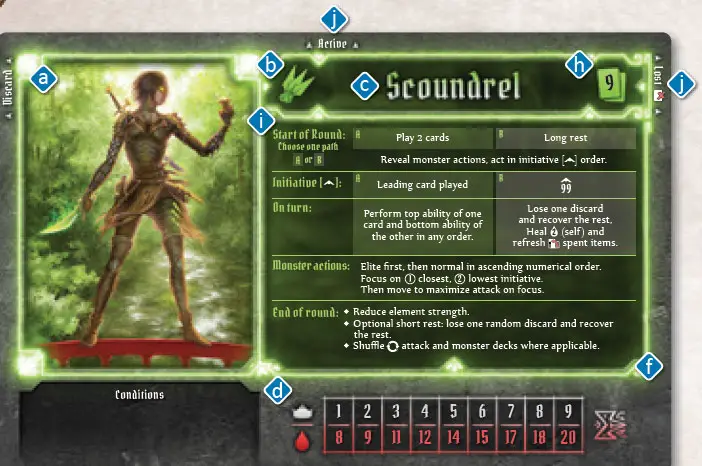
A portrait a, icon b, and name c of the class.
Indicators of the maximum hit points at each level d of the class. Players should use tracking dials e to track their hit points f and experience g during a scenario.
The maximum number of ability cards the class can take into battle h.
A short reference i for the round structure.
Designations along the border j for where to place discarded, lost, and active cards.
The reference number of the event cards k added to each deck when the character class is unlocked (not present on the six starting classes) and of event cards l added the first time the character class retires
These reference numbers apply to both city and road event decks.
Cards
In Gloomhaven, there are Character Ability Cards, Item Cards, Monster Statistic Cards, Monster Ability Cards, Battle Goal Cards, Attack Modifier Cards.
Check here the detailed information of all these cards.
Scenario Setup
When setting up a new scenario, the first step is to look in the scenario book to set up the map tiles and prepare all the monster types you will be fighting. Then read the introduction text and apply any negative scenario effects from the "Special Rules" section. Next, two battle goals should be dealt to each player, one of which will be discarded. Players can then decide which items they would like to equip from the collection of items they own (adding in -1 cards to their attack modifier decks when applicable). Next, players should decide which ability cards they would like to put in their hand, choosing from the pool of those available to them.
A player must select a number of cards equal to his or her character's hand size. When first starting the game, a player's hand should only consist of the set of Level 1  ability cards for the character's class. Once a player has become familiar with the class, he or she can begin substituting out Level 1 cards for the more complex cards with x as the level. Once the character begins to level up, he or she will also get access to higher level cards to add to his or her hand by pulling others out. After players select their hand, any effects of a preceding road event or city event are applied.
A scenario page includes:
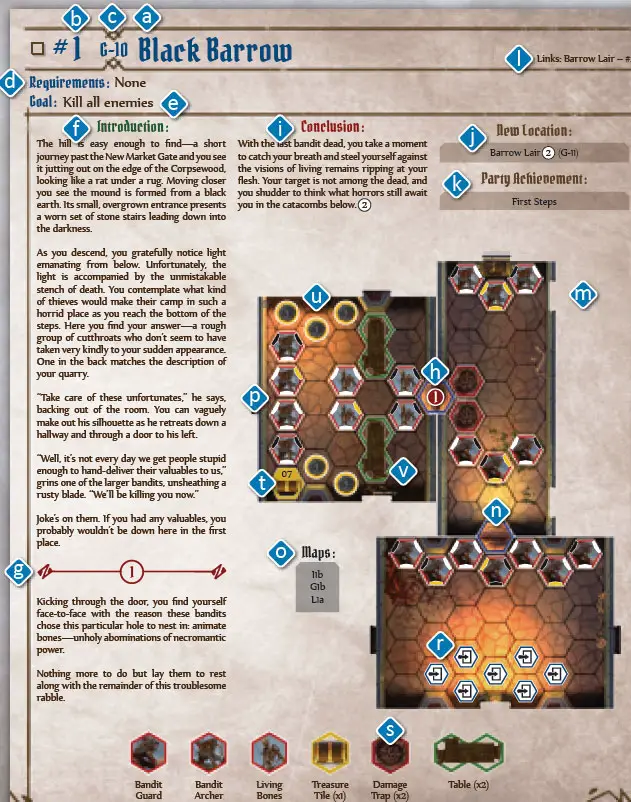
The name a, reference number b, and grid location c of the scenario with completion check box.
Any achievements d required to play the scenario in a campaign.
The victory conditions e.
When playing the scenario as part of a campaign, the page provides introductory text f, additional story points g that are read when entering the corresponding hex on the board h, and concluding text i to be read when the victory condition is met.
The name, reference number, and grid location of any new scenario locations j unlocked by completing the scenario within a campaign.
Any other rewards k earned by completing the scenario when in a campaign.
Any locations the scenario links to ((l).
The configuration of map tiles m and door tiles n to be placed during setup. The specific map tiles needed for each scenario are also given o. Each scenario map is broken up into separate rooms by door overlay tiles. A room may contain more than one map tile if those tiles are connected by other overlay tiles.
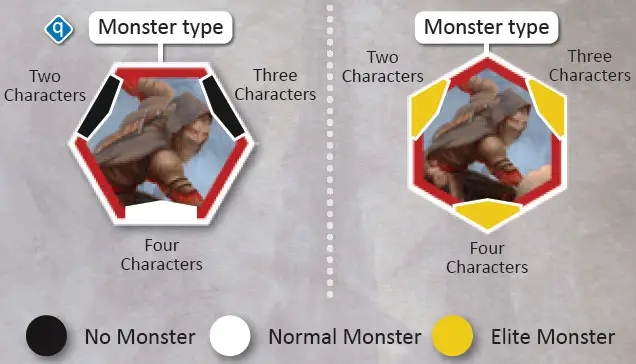
Indications used to populate the scenario map p based on the monster key q. These indications may be in one of two different orientations depending on the overall orientation of the map.
Monster placement is indicated in a symbol's upper left for two characters, upper right for three characters and bottom for four characters. black means the monster is not present, white means a normal monster is present, and GOLD means an elite monster is present. Normal monsters should be placed on the map with their corresponding standees in white bases, and elite monsters should be placed in gold bases.
Example: / indicates which type of monster is placed on this hex, and in this case no monster is placed in for two characters, a normal monster is placed for three characters, and an elite monster is placed for four characters.
Note that only monsters in the starting room are placed at the beginning of a scenario. Monster standees each have a number to determine the order in which they act during the turn. The standee numbers should be randomized when placed.
The available starting character locations, depicted by 
r. Players can choose to place their figures on any empty hex at the start of the scenario.
The type of traps used in this scenario (s) and the reward for looting any treasure tiles on the board t.
The numbers for the treasures are referenced in the back of the Scenario Book, so that rewards are kept secret.
Locations of money tokens u and overlay tiles v to be placed on the map when the room tile is revealed.
Overlay Tiles
A scenario is constructed from a set of map tiles as instructed in the Scenario Book. Additionally, there will be special overlay tiles to fill out the encounter.
Types of overlay tiles:
Doors 
A door acts as a separation between two rooms. When a character moves onto a closed door tile, they immediately flip over the door tile to the open side, revealing the adjacent room tile. Immediately place overlay tiles, monsters, and money tokens as indicated in the scenario description for the revealed room.
While closed doors do not hinder character movement at all, they act as a wall for any monsters or character-summoned figures, and figures cannot be forced through a closed door. Open doors do not hinder any movement and cannot be closed. Door art varies by environment type, but they all function exactly the same.
Corridors 
A corridor is placed on the connection of two map tiles to cover the walls and create a single room out of multiple map tiles. Corridors act like normal empty hexes.
Traps 
A trap is sprung when a figure enters its hex with normal or forced movement. Flying  and Jump
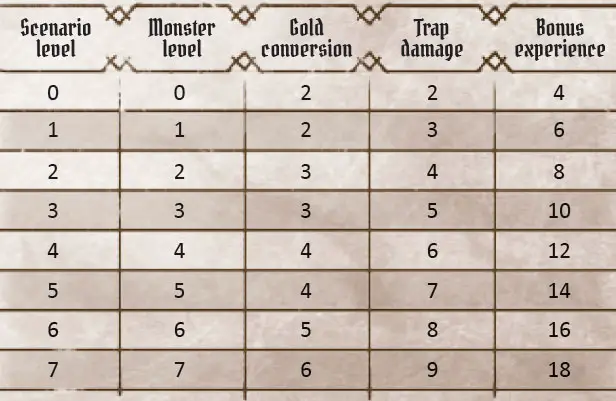
  movements are unaffected by traps. When a trap is sprung, it inflicts some negative effect on the figure who sprung it and then it is removed from the board. A trap can also be disarmed through specific actions to remove it from the board without suffering its negative effects. Trap effects are varied and are specified in the Scenario Book. If part of a trap's effect is listed as "damage", the trap will inflict 2+L damage on the affected figure, where L is the scenario level.
Characters and monsters can also create traps on the board, with the effects specified by the ability that creates the trap. Whenever a trap is placed on the board, tokens for the damage and effects the trap applies should be placed on top of the trap tile for easy reference.
Hazardous Terrain 
If a figure enters a hex with hazardous terrain via normal or forced movement, each hex will inflict half the damage of a trap (rounded down). Flying and Jump movements are unaffected by hazardous terrain.
Unlike traps, hazardous terrain does not get removed after its effect is applied, but instead remains on the board indefinitely. Starting a turn on or exiting these hexes does not cause additional damage.
Difficult Terrain 
It takes a figure two normal movement points to enter a hex with difficult terrain. Flying , Jump , and forced movements are unaffected by difficult terrain.
Obstacles
Obstacles have varying artwork, but they all have the same function: figures cannot move through obstacles with a normal movement, but can move through them with a Flying or Jump movement. Obstacles do not hinder ranged attacks. It is possible for certain character abilities to create or move obstacles. When doing so, players can never completely cut off one area of the scenario map from another, such that the area cannot be moved into without going through the obstacles.
Treasure 
Treasure tiles can be looted by a player for a variety of effects. There are two types of treasure tiles: "goal" tiles and numbered tiles. Goal tiles are important for the completion of a scenario, and the rules for looting them will be specified by the scenario. "Goal" tiles are reset every time a scenario is played. Numbered tiles can provide a number of different benefits.
When one is looted, the looting player should immediately reference the number of the tile with the treasure index in the back of the scenario book to discover what was looted. If a specific item name is listed, find this item in the deck of unique items and immediately add it to your pool of items. If an item design is listed, find all copies of that item and add them to the city's available supply. Numbered treasure tiles can only be looted once. After they have been looted, they should be crossed off in the Scenario Book as a reminder.
Scenario Level
Monster base statistics, trap damage, the amount of gold received from money tokens, and the amount of bonus experience for completing a scenario are all dependent on the level of the scenario being played. The scenario level is chosen by the players before the scenario begins and is based on the average level of the party and how difficult the players want the scenario to be.
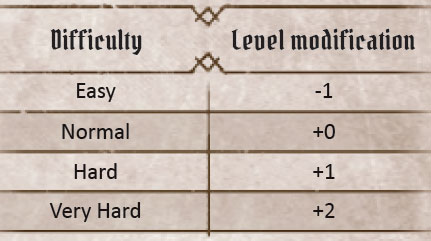
A scenario's level can be set to any number from 0 to 7, but cannot be changed once the scenario begins.
The recommended scenario level is equal to the average level of the characters in the party, divided by 2 and rounded up; this would be considered "Normal" difficulty. If players desire an "Easy" experience, they can reduce the recommended scenario level by 1. If a more difficult experience is desired, the scenario level can be raised by 1 for "Hard" or 2 for "Very Hard".
Example: If a party contains a Level 6 character, two Level 4 characters, and a Level 3 character, the average would be 4.25; divided by 2 and rounded up is 3, so a normal scenario difficulty level would be 3. The choice of scenario level is completely up to the players. Higher scenario levels will result in more difficult monsters, but will also yield more gold and experience.
Round Overview
A scenario consists of a series of rounds that are played until players either meet the victory conditions of the scenario or fail the scenario. A round consists of the following steps:
- Card selection: Each player will either select two cards from his or her hand to play or declare he or she is performing a long rest action for the round.
- Determining initiative: Players reveal their cards for the round, and an ability card for each monster type currently in play is also revealed. An initiative order is then determined based on the initiative values of these revealed cards.
- Character and monster turns: Starting with the lowest initiative, players and monsters will act out their turns, performing the actions on their cards, possibly modified by character item cards.
- End of Round: Some cleanup may be required at the end of the round.
I. Card Selection
At the beginning of a round, each player will secretly select two cards from his or her hand to play facedown in front of them. Of the two cards, one should be selected as the leading card, which will determine the player's order in the initiative for the round.
Players should not show other players the cards in their hands nor give specific information about any numerical value or title on any of their cards. They are, however, allowed to make general statements about their actions for the round and discuss strategy.
Examples of appropriate communication: "I'm attacking this guard near the middle of the round".; "I'm planning on moving here and healing you pretty early in the round, hopefully before the monsters attack".
Examples of inappropriate communication: "You'll need lower than an initiative 17 to go before me".; "I should be doing 4 points of damage to the bandit, so you don't have to worry about him".; "I'm going to use Impaling Eruption and wipe out everyone".
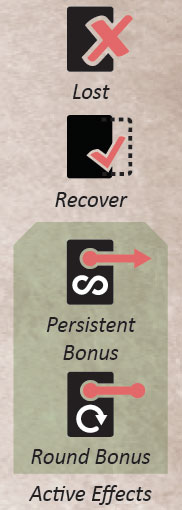
During a player's turn, the two played cards will be used to perform actions and then are either discarded, lost, or activated, depending on the actions that were taken. Played cards are normally placed in a player's discard pile unless otherwise noted. Discarded cards can be returned to a player's hand through resting. If the performed action from a card contains a  symbol in the lower right of the action field, the card is instead placed in a player's lost pile. Lost cards can only be returned to a player's hand during a scenario by using a special recover action.
Whether the corresponding card is lost or discarded, some actions may contain an active effect (denoted by the symbols at right). Instead of being placed in the discard or lost pile, the card is placed in the active area in front of the player to keep track of the effect. Once the effect wears off, the card is then transferred to the appropriate pile.
Players must either play two cards from their hand or declare a long rest action at the beginning of every round. If a player only has one card or no cards in their hand, the long rest action is their only option. If this option is also not available at the beginning of a round because a player has only one card or no cards in their discard pile as well, that player is considered exhausted and can no longer participate in the scenario.
Resting
Resting is the main way players can return discarded cards back into their hand of available cards. A player has two options when resting: a short rest or a long rest. In both cases, the rest action can only be taken if a player has two or more cards in his or her discard pile, and a rest action always results in losing one of the discarded cards.
Short rest: During the cleanup step of a round, a player can perform a short rest. This allows that player to immediately shuffle his or her discard pile and randomly place one of the cards in the lost pile, then return the rest of the discarded cards to his or her hand. If the player would like to instead keep the card that was randomly lost, he or she can choose to suffer 1 damage and randomly lose a different discarded card, but this can only be done once per rest.
Long rest: A long rest is declared during the card selection step of a round and constitutes the player's entire turn for the round. Resting players are considered to have an initiative value of 99. On the player's turn, at the end of the initiative order, he or she must choose to lose one of his or her discarded cards, then return the rest of the discarded cards to his or her hand. The resting character also performs a "Heal  2, Self" action and refreshes all of his or her spent item cards.
II. Determining Initiative
After players have either selected their two action cards or declared a long rest, the players reveal a monster ability card for each type of monster that has at least one figure currently on the map. In addition, each player not taking a long rest reveals his or her selected cards for the round, placing their leading card on top so that its initiative value is visible.
Initiative order is determined by comparing the initiative values on all played monster ability cards and all of the players' leading cards. Whoever has the lowest initiative value takes their turn first, then the next highest, and so on until every figure on the board has acted. When a monster type takes an action, each monster of that type will perform the actions listed on their played ability card, starting with elites and then normal monsters in ascending standee order.
If there is ever a tie in initiative between players, consult the non-leading card of each player to break the tie.
(If there is still a tie, players should decide among themselves who goes first). If there is a tie between a player and a monster type, the player goes first. If there is a tie between two monster types, the players decide which goes first.
Example: At the start of the round, the Brute decides that he wishes to play the two cards shown. He also decides he wants to go late in the round, so he chooses the "61" as his leading card. If he had wanted to go early, he could have chosen the "15" as the leading card. The Scoundrel reveals a leading card with "86" initiative, and the played Living Bones and Bandit Archer monster ability cards have "45" and "32" initiative respectively.
The Bandit Archers activate first, then all of the Living Bones, then the Brute, and finally the Scoundrel.
III.a Character Turn
On a character's turn, he or she will perform the top action of one of the two ability cards played and the bottom action of the other. The leading card designation used to determine initiative is no longer significant.
Either card can be played first for its top or bottom action. When playing a card's action, the abilities of the action must be done in the order written and can't be interrupted by the action on the other card. As soon as the action of a card is completed, it is immediately placed in the appropriate area (discard pile, lost pile, or active area) before anything else happens. Players are typically free to choose not to perform any part of the action on their card, however, they must perform any part that will cause a negative effect (e.g., reduce hit points, lose cards, or cause a negative condition) on themselves or their allies.
An ally is any figure that fights with a character. This term includes summoned figures, but does not include the character itself. Abilities cannot affect allies unless the card or rules specify otherwise.
Players can also use any card they play as an "Attack 2" action on the top half or a "Move 2" action on the bottom. If a card is used this way, it is always discarded, regardless of what is printed on the card. On their turn, before, during, or after performing their two actions, players can use any number of items they have equipped.
Move

A "Move X" ability allows a character to move up to X number of hexes on the map. Figures (characters and monsters) can move through allies, but cannot move through enemies or obstacles. Traps and other terrain effects of hexes must be resolved when a figure enters them with normal movement. A figure cannot end its movement in the same hex as another figure.
Figures can never move through walls.

Some Move abilities are specified as a "Jump". Move X (Jump) allows the character to ignore all figures and terrain effects during their movement. However, the last hex of a jump is still considered a normal movement, and so must obey the normal movement rules above.

Some figures may also have the "Flying" special trait. This allows figures to completely ignore any figures and terrain tiles during any part of their movement, including the last hex, except that they still must end their movement in an unoccupied hex (no figures present). This includes forced movement like PUSH or pull. If a figure loses its Flying trait while occupying an obstacle hex, it takes damage as if it had sprung a damage trap and then moves immediately to the nearest empty hex (no figures, tokens, or overlay tiles of any kind present except corridors, pressure plates, and open doors).
Revealing A Room
During any part of a character's movement, if they enter a tile with a closed door, flip the door tile to the opened side and immediately reveal the adjacent room on the other side of the door. The Scenario Book will then specify what monsters, money tokens, and special overlay tiles should be placed in the revealed room, based on the number of characters (including exhausted characters). Note that, as in scenario setup, the standee numbers of the monsters in the new room should be randomized when placed. It is possible to run out of specific types of monster standees when revealing a room. If this happens, place only the standees that are available, starting with the monsters closest to the revealing character.
Once everything is placed in the new room, any present monster types without an action card should have one drawn for them now. Once the revealing character's turn ends, the initiative values of all monsters in the new room are reviewed, and any monster type that has a lower initiative value than the revealing character (i.e., they should have acted earlier in the round) must immediately act out their turn (in normal initiative order in case of multiple monster types in this situation). This ensures that all monsters revealed in the new room will always take a turn in the round in which they are revealed.
Attack

An "Attack X" ability allows a character to do a base X amount of damage to an enemy within their range. Figures cannot attack their allies. There are two types of attacks: ranged and melee.

Ranged attacks are accompanied by a "Range Y" value, which means any enemy within Y hexes can be targeted by the attack. Any ranged attack targeting an adjacent enemy gains Disadvantage against that target.
Melee attacks have no accompanying range value and are considered to have a default range of 1 hex, which means they typically target adjacent enemies.
Line-of-sight: All ranged and melee attacks can only be performed against enemies within line-of-sight, which means that a line can be drawn from any corner of the attacker's hex to any corner of the defender's hex without touching any part of a wall (the line edge of a map tile or the entire area of any partial hex along the edge of a map tile, unless covered by an overlay tile). Only walls block line-of-sight. In addition, any ability which specifies a range can only be performed on a figure within line-of-sight. If a non-attack ability does not specify a range, then line-of-sight is not required. Also note that two hexes separated by a wall line are not considered adjacent, and range cannot be counted through walls.
When attacking, the base attack value written on the card can be modified by three types of values in the following order. Repeat these steps for each individual enemy targeted by the attack:
An attacker's attack modifiers are applied first. These modifiers include bonuses and penalties from active ability cards, items, and other sources (e.g., +1 Attack from poison).
Next, an attack modifier card is drawn from the attacker's attack modifier deck and applied.
Lastly, the defender's defensive bonuses are applied. This reduces the incoming attack value for each individual enemy targeted based on each defender's own shield modifier or other defensive bonuses.
If there are multiple modifiers in any single step of this process, the player chooses the order in which they are applied. Also note that because the bonuses are applied per target, it is possible for the same attack action to ultimately deal different damage to each enemy it targets.
Example: The Scoundrel performs an "Attack 3" ability on an adjacent elite Bandit Guard. The Scoundrel adds a +2 attack modifier because of specific conditions set by the card and also is allowed to double the attack because of an active card in front of her. She chooses to add the +2, then doubles the result, resulting in an "Attack 10".
She then plays an attack modifier card to reveal a "-1", so the attack is reduced to 9. Finally, the Bandit Guard has a shield value of 1, so the attack value is reduced to 8 and the bandit suffers 8 damage.
Any damage suffered by a monster should be tracked on the stat sleeve in the section corresponding to the number on the specific monster's standee. When a monster is brought to zero or fewer hit points by an attack or any source of damage, that monster immediately dies and is removed from the board. Any additional effects of an attack are not applied once a monster dies.
When a monster dies, a money token is also placed on the hex where it died if the monster was not summoned or spawned.
Advantage And Disadvantage
Some attacks may have either Advantage or Disadvantage.
An attacker with Advantage will draw two modifier cards from their deck and use whichever one is better a. If one rolling modifier card was drawn, its effect is added to the other card played b. If two rolling modifier cards were drawn, continue to draw cards until a rolling modifier is not drawn and then add together all drawn effects c.

An attacker with Disadvantage will draw two modifier cards from their deck and use whichever one is worse d. Rolling modifiers are disregarded in the case of Disadvantage e. If two rolling modifier cards were drawn, continue to draw cards until a rolling modifier is not played and then only apply the effect of the last card drawn f.

If there is ambiguity about which card drawn is better or worse, use whichever card was drawn first. Ambiguity can occur when comparing one or more added effects provided by attack modifier cards (e.g., elemental infusions, negative conditions, etc). All added effects should be considered to have a positive but undefined numerical value.
Instances of Advantage and Disadvantage are mostly gained by specific character or monster abilities. However, any ranged attack targeting an adjacent enemy also gains Disadvantage for that target. Instances of Advantage or Disadvantage don't stack, and if an attack has instances of both Advantage and Disadvantage, they cancel out each other and the attack is performed normally.
Area Effects
Some attacks and other abilities allow figures to target multiple hexes or multiple targets at the same time. In these cases, the area of effect for the ability is shown on the ability card. Note that any rotational orientation of the depicted diagram is valid. Also note that each target constitutes a separate attack (drawing its own attack modifier card), but all attacks together make up a single attack action.
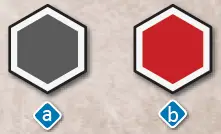
a Grey indicates the hex on which the figure is currently located. An area attack which includes a grey hex is always considered a melee attack.
b Red indicates the hexes with enemies affected by the ability.
For a ranged area attack, only one of the red hexes needs to be within the range specified, and it does not need to contain an enemy. However, for both ranged and melee area attacks, you can only attack enemies in hexes you have line of sight to.
Some attacks are accompanied by a "Target X" value, which means the character can target X number of different enemies within the attack's range with the attack.
For any attack that targets multiple enemies, an attack modifier card is drawn for each target. It is not possible to target the same enemy with multiple attacks from the same ability. Note: Abilities can never target allies (positive abilities meant for allies will use the term "affect" instead of "target"). An ally can be within the affected area of an attack, but they will not be targeted by it.
Note also that as long as an attack does not specify range, it is considered melee, such that it is possible to attack a non-adjacent target with a melee attack if hex configuration allows.
Attack Effects
Attack abilities will often have effects that increase their power. If an attack effect is listed on an ability card after an attack, the target (or targets) of the attack is subject to the additional effect as well, after damage from the attack is resolved. Attack effects are applied regardless of whether the corresponding attack does damage. These effects (except experience gains) are optional and can be skipped. Some character actions can also apply these effects without an attack, and in such cases the target of the effect is written on the ability card.
Push X

The target is forced to move X hexes in a direction specified by the attacker, but each hex moved must place the target farther away from the attacker than it was previously. If there are no viable hexes into which to push the target, the push ends. The target can be pushed through its allies, but not its enemies.
Pull X

The target is forced to move X hexes in a direction specified by the attacker, but each hex moved must place the target closer to the attacker than it was previously. If there are no viable hexes into which to pull the target, the pull ends. The target can be pulled through its allies, but not its enemies. Both push and pull effects are considered movements, however, they are not affected by difficult terrain.
Pierce X

Up to X points of the target's Shield are ignored for the attack. Unlike other effects, pierce is applied while calculating the accompanying attack damage instead of afterwards.
Example: an Attack 3 pierce 2 ability used on a monster with Shield 3 would ignore two of the monster's Shield points and inflict 2 damage (modified by an attack modifier card).
Add Target

If a figure triggers this effect with an attack action, the figure may add an additional target within range to their attack. All added effects and conditions of the attack action are applied to the target, as well, except for effects that would result in additional targets outside of the original added target (e.g., area attacks).
Conditions
Certain abilities may apply conditions to their targets. When a condition is applied to a figure (except curse and bless), the respective token is placed on the stat sleeve in the section corresponding the number on the specific monster's standee to signify the effect. The condition remains on the figure until the requirements for removing the specific effect are met. Only one of each condition type may be applied to any single figure at a time, however conditions can be reapplied to refresh their duration.
The following are negative conditions. If an ability has the name of one of these conditions contained within it, then the condition is applied to all targets of the ability, after the main effect of the ability is applied. Conditions are applied regardless of whether the corresponding attack does damage.
Poison

If a figure is poisoned, all enemies add +1 Attack to all of their attacks targeting the figure. If a Heal ability is used on a poisoned figure, the poison token is removed, and the Heal has no other effect.
Wound

If a figure is wounded, it suffers one point of damage at the start of each of its turns. If a Heal ability is used on a wounded figure, the wound token is removed and the Heal continues normally. If a figure is both poisoned and wounded, a Heal ability would remove both conditions but have no other effect.
Immobilize

If a figure is immobilized, it cannot perform any move abilities on its turn. At the end of its next turn, the immobilize token is removed.
Disarm

If a figure is disarmed, it cannot perform any attack abilities on its turn. At the end of its next turn, the disarm token is removed.
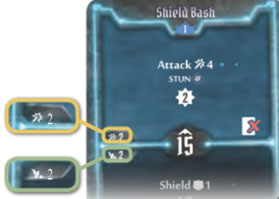
Stun

If a figure is stunned, it cannot perform any abilities or use items on its turn except to perform a long rest (in the case of characters). At the end of its next turn, the stun token is removed. Players must still play two cards or rest on their turn, and if a player plays two cards while stunned, the actions played are not used, and the cards are simply discarded.
Muddle

If a figure is muddled, it gains Disadvantage on all of its attacks. At the end of its next turn, the muddle token is removed.
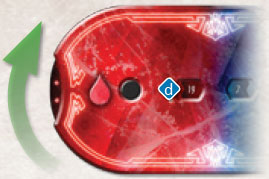
Curse

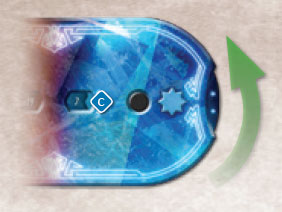
If a figure is cursed, it must shuffle a curse card into its remaining attack modifier deck. When this card is revealed through one of the figure's attacks, it is removed from the deck instead of being placed into the attack modifier discard pile. Note that there are two separate curse decks: 10 cards with a  in the lower left corner and 10 cards with an
  . cards can only be placed in the monster attack deck (when a monster is cursed), and cards can only be placed in a character's attack deck (when a character or character summon is cursed). Thus, a maximum of only 10 curse cards can be placed into any one deck.
The following are positive conditions. Figures can apply positive conditions to themselves or allies through specific actions. Positive conditions cannot be prematurely removed.
Invisible

If a figure is invisible, it cannot be focused on or targeted by an enemy. Invisibility does not affect a figure's interactions with his or her allies. At the end of its next turn, the invisible token is removed. Monsters treat invisible characters exactly as if they were obstacles.
Strengthen

If a figure is strengthened, it gains Advantage on all of its attacks. At the end of its next turn, the strengthen token is removed.
Bless

If a figure is blessed, it must shuffle a bless card into its remaining attack modifier deck. When this card is revealed through one of the figure's attacks, it is removed from the deck instead of being placed into the attack modifier discard pile.
Elemental Infusions
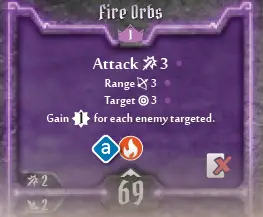
Some abilities have an elemental affinity associated with them (either Fire, Ice, Air, Earth, Light, or Dark). If any of these symbols is visible by itself in an action's description a, it means that by performing any part of the action, the figure must infuse the battlefield with that element. This is represented by moving the corresponding element's token to the "Strong" column of the elemental infusion table at the end of the turn in which the ability was used.
At the end of every round, however, all elemental infusions will wane, moving one step to the left in the table, from "Strong" to "Waning" or from "Waning" to "Inert".
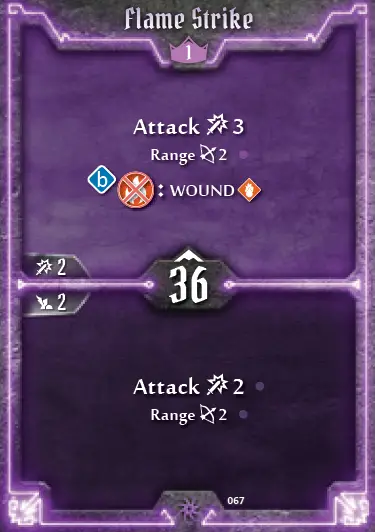
Elemental infusions can be used to augment the effects of certain abilities. This augment is represented by an elemental symbol covered with a red cross b, followed by a colon and how the ability is augmented if the element is consumed. If an ability is used that consumes an element and the corresponding element token is in the Strong or Waning column, that element token may be used to augment the ability by moving the token to the Inert column. A single icon cannot be used to consume more than one infusion, and it is not possible to create an element and consume it on the same turn, but it may be consumed by anyone with a later turn in the initiative order of the same round.
If an ability contains multiple separate augments, the player may choose which augments to use in any order. If a single augment lists multiple element uses, all elements must be used to activate the augment.
Just like characters, monsters also have the ability to create and consume elements. Monsters always consume elements if they can, and every activated monster of that type will gain the benefit of the consumed element, not just the first monster to consume it.

This multi-colored circle represents any single one of the six elements. If this symbol is present on a monster's ability card, the players choose which element is created or consumed.

Active Bonuses
Some abilities can give a character, or his or her allies, bonuses on other abilities, either persistently until certain conditions are fulfilled or for the rest of the round. These abilities are denoted with symbols, and the cards with these effects are played into the active area in front of the player to keep track of these bonuses.
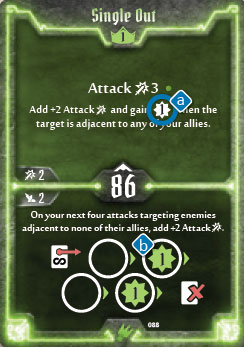
Persistent Bonus
Persistent bonuses can be identified by the symbol  displayed on the card. These ability effects will be active from the time the card is played until the conditions specified on the card are met. These conditions usually track the number of times a particular game event has occurred, such as making or defending against an attack. Place a token on the first marked position of the card's action and advance it one space each time the effect is triggered, left to right, top to bottom. When the ability has been used once for each space on the card, remove the card from play by placing it in the lost pile. Players must use the benefits of a persistent bonus when possible, even if no benefit is gained. If there are no conditions specified or positions marked, the card may remain in the player's active area for the rest of the scenario and can be removed from play at any time by placing it in the lost pile.
@activebonus.png" class="floatr" width="200">
Example: The Spellweaver plays her Frost Armor ability, which negates the next two sources of damage against her. She places a character token on the first circle of the card a.
Then each time afterward that she normally would suffer 1 or more points of damage, the bonus is applied, the damage is negated, and the token is moved forward one space. Once the token moves twice, the card is moved to the player's lost pile and the bonus is no longer active.
Round Bonus
Round bonuses will have this symbol  on the card. The effect of the ability will be active from the time the card is played until the end of the round, at which point the card will be placed in the player's discard or lost pile (depending on whether the action also contains an symbol).
Even though a bonus card is placed in the active area, it is still considered discarded or lost, depending on whether the action also contains an symbol. At any time, these cards can be moved to the appropriate pile, however, doing so immediately removes any bonuses that were being applied by the card.
Shield

A "Shield X" bonus ability gives the recipient a defender's bonus that reduces any incoming attack value by X. Multiple shield bonuses stack with one another and can be applied in any order. A shield bonus only applies to damage caused by an attack.
Retaliate

A "Retaliate X" bonus ability causes the recipient to inflict X points of damage on figures who attack it from an adjacent hex for each attack made. A retaliate bonus can also be accompanied by a "Range Y" value, which means that the retaliate damage is applied to any attacker within Y hexes. A retaliate takes effect after the attack that initiated it. If the retaliating figure is killed or exhausted by the attack, then the retaliate does not activate. Multiple retaliate bonuses stack with one another, and retaliate itself is not an attack or even a targeted effect.
Heal

A "Heal X" ability allows a figure to return X hit points to either themselves or one ally within the ability's range. Heals are always accompanied by one of two labels:
- "Range Y" means that any ally within Y hexes, or the figure performing the heal, can be affected by the heal. Like all ranged abilities, the recipient must be in line-of-sight.
- "Self" mean the figure can only affect him or herself with the heal.
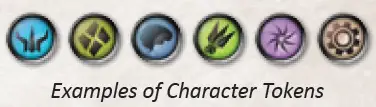
Summon
Some abilities summon other ally figures to the board. Summoned figures (summons) are placed in an empty hex adjacent to the figure performing the summon. If there are no available hexes, the summon ability cannot be used. Summons are represented by a colored summon token. There are eight different colors of summon tokens so that multiple summons can be tracked at the same time, and players can assign any color they like to a specific summon, placing tracker tokens on their summon ability cards for easy reference.
Summons have basic statistics for hit points, attack value, move value, and range value along with any special traits written on the ability card. A summon is considered a persistent bonus (the card is placed in the active area) until either the summon loses all its hit points, its corresponding ability card is removed from the active area, or the summoner becomes exhausted, at which point the summon is removed from the board.
A summon's turn in the initiative order is always directly before the character who summoned it, and is separate from that character's turn. Summons are not controlled by the summoning player, but instead obey automated monster rules, permanently following the ability card "Move+0, Attack+0" (see Monster Turn on pp. 29-32 for details) and using the player's attack modifier deck to perform its attacks.
A player can have multiple different summon abilities in play at once, in which case they act in the order in which they were summoned. Summoned figures never take a turn in the round they are summoned. Summon kills are credited to the owner of the summon.
Recover And Refresh
Certain abilities allow a player to recover discarded or lost ability cards. This means that the player can look through his or her discard or lost pile (or discarded or lost cards in his or her active area), select up to a number of cards specified in the ability, and immediately return them to his or her hand. Some cards, however, cannot be recovered or refreshed once lost. This is denoted by the @recover.png" width="30"> symbol. This symbol applies to the card no matter how the card was lost or consumed.
Refresh abilities allow players to regain the use of spent or consumed item cards.
In the case of both recover and refresh, the type of card gained (discarded or lost for ability cards, spent or consumed for item cards) is specified in the ability.
Loot

A "Loot X" ability allows a character to pick up every money token and treasure tile within range X. This action is unaffected by the positions of monsters or obstacles, but note this is considered a ranged ability for the purposes of line-of-sight. Money tokens are kept in a player's personal supply and are not shared with the other players. If a treasure tile is looted, immediately refer to the reference number in the treasure index in the back of the scenario book to determine what is found. If a character loots an item he or she already owns a copy of, the new item is immediately sold to the city's available supply.
End-of-turn Looting
In addition to specific loot abilities, a character must also loot any money tokens or treasure tiles present in the hex he or she occupies at the end of the character's turn. Character summons do not perform end-of-turn looting.
Gaining Experience
Some actions also have an experience value attached to them, denoted by  . When that action is taken, the character gains the number of experience specified. An ability card cannot be played for the experience alone-a character must use one or more of the accompanying abilities to earn the experience.
In addition, sometimes the action specifies that experience is only earned under certain conditions, such as consuming an elemental infusion or if the attacked target is adjacent to an attacker's allies a. Some persistent bonuses will also give a character experience, denoted by  , when that charge of the bonus is expended
 b (i.e., when the character token moves off that slot). Characters do not automatically gain experience from killing monsters. Only using specific actions awards experience.
Experience is tracked on the right side of a player's tracking dial by rotating the wheel to the appropriate number c.
Character Damage
Whenever any damage is dealt to a character, the player has two options:
Suffer the damage and move his or her hit point total on the tracking wheel down the appropriate number, or…
 Choose one card to lose from his or her hand or two cards to lose from his or her discard pile to negate the damage (any additional effects of the attack are still applied). Note that before a character acts in a round, the two cards chosen at the beginning of the round are neither in the player's hand or lost or discard pile, and so cannot be lost to negate damage.
Whenever a character is healed, move his or her hit point total on the tracking wheel up the appropriate number d. The tracking wheel cannot go above the character's maximum hit point value indicated on the player's character mat e.

Exhaustion
A character can become exhausted in one of two ways:
If a character ever drops below one hit point on the hit point tracker, or…
If, at the beginning of a round, a player cannot play two cards from his or her hand (because they have one card or no cards in his or her hand) and also cannot rest (because they have one card or no cards in their discard pile). Exhaustion due to insufficient cards does not affect a character's current hit point total.
In either case, all ability cards are placed in the characters lost pile, the character's figure is removed from the map, and the character can no longer participate in the scenario in any way. There is no coming back from being exhausted during a scenario, and thus it should be avoided at all costs. If all characters become exhausted during a scenario, the scenario is lost.
Items
Characters can use items at any time, within the constraints of what is written on the item card, including in the middle of a card ability. However, if an item affects an attack (e.g. adds a bonus, an effect, advantage, or disadvantage), it has to be used before an attack modifier is drawn. If an effect is added to an attack, it functions exactly as if it had been written on the action card being used for the attack. There is no limit to the number of items a character can use on their turn or even during a specific ability. Any instance of applying the effects of an item card to a situation is considered a use. Like persistent abilities, an item with multiple use circles must be used when the situation applies.
III.b Monster Turn
Monsters' decisions are controlled by a system of action cards that automate what the monsters will do on their turn in the initiative order. They are not controlled by a separate player. All monsters will perform the actions listed on their ability card for the round in the order written. They will not move or attack unless these actions are listed on their card.
Note that each type of monster can come in two ranks: normal and elite. Normal monsters are designated with a white stand and elite monsters are designated with a gold stand. When an elite monster acts, use the statistics in the "Elite" section of the monster statistic card.
Order Of Action
All monsters of the same type take individual turns at the same initiative value listed on their monster ability card. All elites of a type activate first, then the normal monsters of that type activate. If more than one elite or normal monster of a given type is present on the board, then the monsters activate in ascending numerical order according to the numbers on their tokens a.
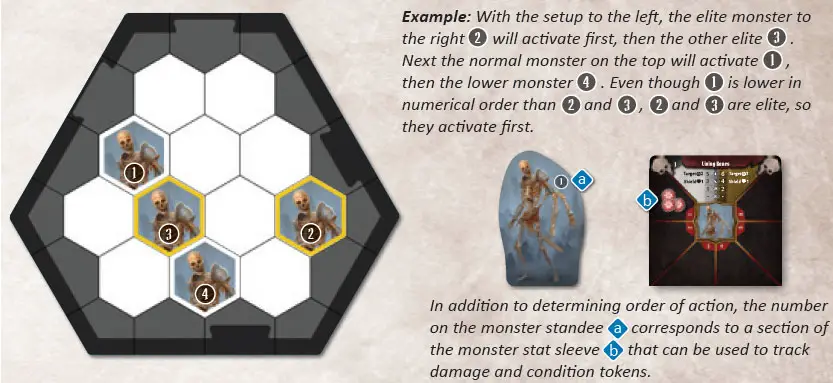
In addition to determining order of action, the number on the monster standee a corresponds to a section of the monster stat sleeve b that can be used to track damage and condition tokens.
Monster Focus
Before performing any action on their ability card, each individual monster will focus on a specific enemy- either a character or character summon.
A monster will focus on the enemy figure it can perform its current attack against using the least amount of movement. It finds the shortest possible path to get in range and line-of-sight to use its attack, and the figure that can be attacked at the end of that path is the focus. This enemy figure is considered the "closest". It doesn't matter if the monster can't get within range to attack with its current movement, as long as there is a path to eventually get within range.
If a monster does not have an attack listed on its ability card for the round, it finds a focus as if it had a melee attack. In the case where the monster can move the same number of spaces to get within range (and line-of-sight) of multiple enemy figures (e.g., because it starts its turn within range of multiple enemies), proximity from the monster's current position (i.e. number of hexes they are away, not counting through walls) is then checked as a tie-breaker for determining "closest".
If more than one enemy ties for being the closest, the second priority is to focus on the enemy who is earlier in the initiative order (summons are focused on before the character who summoned them in this regard, even on the round they are summoned, and a character who is performing a long rest would be focused on last).
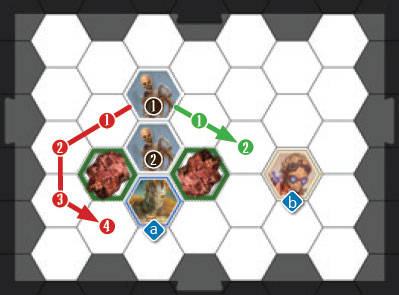
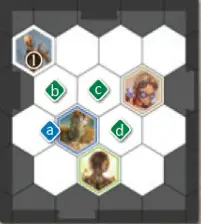
Example: Even though the Brute a is physically closer to Monster 1, the monster is performing a melee attack and can get in range of the Tinkerer in fewer steps (2 instead of 4), so the monster focuses on the Tinkerer b.
In the case where there are no valid targets on which to focus, because there are no valid hexes a monster can attack from (i.e., they are all blocked, occupied, or there is no open path to reach them), regardless of the number of hexes it could move, a monster will not move or attack on its turn, but it will perform any of the other actions on its ability card that it is able.
Monster Movement
A monster can move on its turn if "Move±X" is part of its ability card. It can move up to a number of hexes equal to its base move value (found on its monster statistic card) modified by X (either positive or negative).
If a monster has a move but no attack afterward as part of its ability card, it will use its movement to get as close as possible to its focused target (determined as if it had a melee attack), moving along the shortest possible path to enter a hex adjacent to its focused enemy.
If a monster has an attack ability after its movement, it will move the least number of hexes possible in such a way as to attack its focused enemy with maximum effect. If it is a single-target melee attack, it will simply move toward the nearest hex adjacent to its focus to attack. If it is a multi-target attack, it will move toward a position where its attack will hit its focused enemy and as many other enemies as possible.
If the monster is performing a ranged attack, it will only move toward a hex where it is within range to perform its best possible attack. A monster will also move away from its focused enemy until it can perform the ranged attack without Disadvantage. When forced to choose, a monster will prioritize losing Disadvantage on its focused enemy over maximizing its attack on secondary targets. Even if a monster cannot move into attack range, it will still use its movement to get as close as possible to its focus.
Having abilities other than "Attack" on its ability card does not affect a monster's movement in any way. It will simply move according to the above rules and then use its other abilities as best as it can.
Example: Monster 1 can perform a "Move 3" ability. It first focuses on the Brute a, since he is the closest enemy. If the monster had a ranged attack, it would remain in its current hex and attack the Brute. If it had a single-target melee attack, it would move 1 hex b to be adjacent to the Brute and attack.
If it could attack two targets with a melee attack, it would move 2 hexes c to be adjacent to both the Brute and the Tinkerer. If it could melee attack three or more targets, it would move 3 hexes d to be adjacent to all three characters.
Monster Interaction With Traps And Hazardous Terrain
Monsters without the Flying trait consider negative hexes (traps or hazardous terrain) to be obstacles when determining focus and movement unless movement through one of these hexes is the only way they can focus on a target. In this case, they will use the path moving through the smallest number of negative hexes possible to find a focus and suffer any consequences.
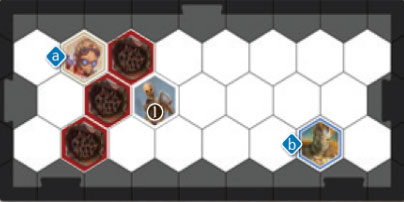
Example: Even though the Tinkerer a is closer, Monster 1 will focus on the Brute b with its melee attack because it considers traps to be obstacles.
Only if the Brute were not there and the only enemy the monster could focus on was the Tinkerer would it do so and cross the traps to get to him.

Example: Archer 1 will focus on the Brute a, since she can get in range to attack him with the least number of moves. If the archer has a Range 3 attack and Move 2, she will move to hex b and attack her focus. If she only has Move 1, however, she will stay where she is and not attack.
She will not move into the trap c, even though it would put her in range to attack the Brute, because there is still another viable path to get within range of the Brute, even if she can't use it this turn. She also will not move to hex d, as it would get her no closer to being in range of the Brute.
Monster Attacks
A monster will attack on its turn if "Attack±X" is part of its ability card. Any damage dealt is calculated from its base attack value (found on its monster statistic card) modified by X (either positive or negative). Monsters will always attack their focused enemies (see Monster Focus on pp. 29-30 for details) but if the monster can attack multiple targets, it will attack its focused enemy and as many other enemies as possible to maximum effect. If a monster has multiple attacks, it will choose the focus of its other attacks following normal focus rules, excluding figures it is already attacking. Any attack that does not specify a range on the monster ability card should use the base range of the monster written on its stat card.
Monster attacks function exactly like character attacks, and are modified by the attacker's attack bonuses, then attack modifier cards, then the defense bonuses of their target.
Other Monster Abilities
Healing: Monster healing functions exactly like character healing as discussed on p. 26. With a "Heal X" ability, the monster will heal themselves or an ally within the specified range, whichever has lost the most hit points.
Summons: Monster summon abilities place new monsters on the board that behave exactly like the normal monsters, acting according to played monster ability cards of their type. Summoned monsters are placed in an empty hex adjacent to the summoning monster and also as close to an enemy as possible. If there are no empty adjacent hexes or there are no available standees of the summoned monster type, the summon fails. Summoned monsters never act on the round they are summoned, nor do they drop money tokens when killed.
Bonus abilities: Ability card bonuses are activated through actions only when the monster activates and are only active until the end of the round in which the card was drawn.
Looting: Monsters do not perform end-of-turn looting, but some monsters do have loot actions. In these cases, a monster will pick up all money tokens within the specified range. These money tokens are lost and are not dropped again when the looting monster is killed. Monsters are unable to loot treasure tiles.
Ambiguity
If the rules ever make any monster action ambiguous because there are multiple viable hexes to which the monster could move, multiple equally viable targets to heal or attack, or multiple hexes a monster could push or pull a character into, the players must decide which option the monster will take.
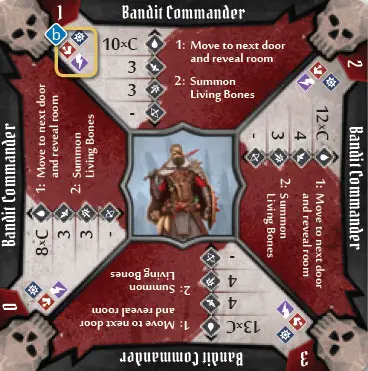
Bosses
Players will occasionally encounter bosses in their adventures. All bosses have their own stat card but act using a universal "Boss" ability card deck a. Note that bosses are not considered normal or elite monsters.
Bosses perform special actions on their turn that are summarized on their stat card. Explanations for more complicated abilities can be found in the Scenario Book.
Bosses' stats are often based on the number of characters, which is signified by the letter "C" on the boss stat card.
Lastly, bosses are immune to certain negative conditions.
The conditions to which they are immune are listed on their stat card a.
IV. End Of Round
Once all figures have taken a turn, the round ends and some cleanup steps may be necessary:
If a standard "2x" or "Null" attack modifier card was drawn from a specific modifier deck during the round, shuffle all the discards of that deck back into its draw deck.
If a monster ability card with a shuffle symbol was drawn at the start of the round, shuffle all discards for the corresponding monster type back into its deck.
If there are any elemental infusion tokens in the Strong column, move them to the Waning column. If there are any elemental infusion tokens in the Waning column, move them to Inert.
Place all active round bonus ability cards in the appropriate discard or lost pile (depending on whether an action with a [lost card] symbol was used).
Players may also perform a short rest if they are able.
Round Tracker
Some scenarios may require players to keep track of what round it is. A round track can be found at the top of the elemental infusion table for this purpose. At the end of every round, simply move the tracker token a forward one space. Note that it is not necessary to keep track of the rounds for most scenarios.
Finishing A Scenario
A scenario can end in one of two ways: success or failure. Once a scenario's success or failure conditions are triggered, the remainder of the round is played out, and then the scenario ends.
Success or failure, players tally the experience their individual characters earned during the scenario and tally the money tokens their characters looted during the scenario and convert them into gold. Each money token looted is worth an amount of gold based on the scenario level.
Anything not looted during the scenario is not collected. Players also recover all lost and discarded ability cards, refresh all spent and exhausted item cards, and return their hit point dials to their maximum hit point value so that they can start fresh in a future scenario. Players should also go through their attack modifier deck and remove any bless cards, curse cards, and any other negative cards added through scenario and item effects. This should also be done with the monster attack modifier deck. All battle goals are shuffled back into the battle goal deck, regardless of whether they were completed.
If players successfully complete the scenario, they receive checkmarks for their characters' completed battle goal cards at this time. Checkmarks are recorded on the player's character sheet and completing a set of three immediately earns a character an additional perk. Even if a character is exhausted, as long as the scenario was successfully completed, that character can still complete his or her battle goal, earn scenario rewards, and keep all the money and experience he or she collected before becoming exhausted. There is no penalty for becoming exhausted. Players also receive bonus experience for successfully completing the scenario. This bonus is equal to four plus twice the scenario level.
If players are playing in a campaign, successfully completing a scenario will also allow them to read the conclusion flavor text of the scenario and gain the benefits listed at the end. In a campaign the money and experience collected during a scenario will be very important to improve a character's skills and abilities and should be tracked on the player's character sheet b.
If the scenario was not part of a campaign, money and experience can be used as metric for gauging how well each character did.
Learn here more about special scenario rules.
The rules on the next page will learn us more about Campaigns.
Continue Reading