In Glen More II: Chronicles, each player is the clan leader of a Scottish clan from the early medieval ages until the 19th century, looking to expand their territory and wealth.
The success of your clan depends on your ability to make the right decision at the right time - by growing barley for whisky production, by selling your goods on the various markets, by befriending clans in the scottish Highlands, or by gaining control of special landmarks such as lochs and castles.
Does your clan leave the biggest impact on Scottish history?
The basic game can be expanded and the gameplay changed in many ways by adding one or more of the Chronicles included in the box. For your first few games we recommend playing the basic game.
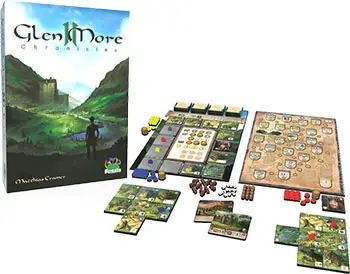
Components
- 1 Clan Board
- 1 Rondel
- 8 Chronicles to expand the base game
- 40 Scotsmen
- 40 Clan Markers
- 40 Coins
- 1 Six-sided Die
- 70 Victory Point Tokens
- 90 Resource Tokens
- 11 Landmark Cards
- 25x Whisky Casks
- 80 Tiles
- Instructions
Object of the Game
If you collected the most Victory Points (VP), then you've made it! You win the game and your clan stands above all others.
Setup
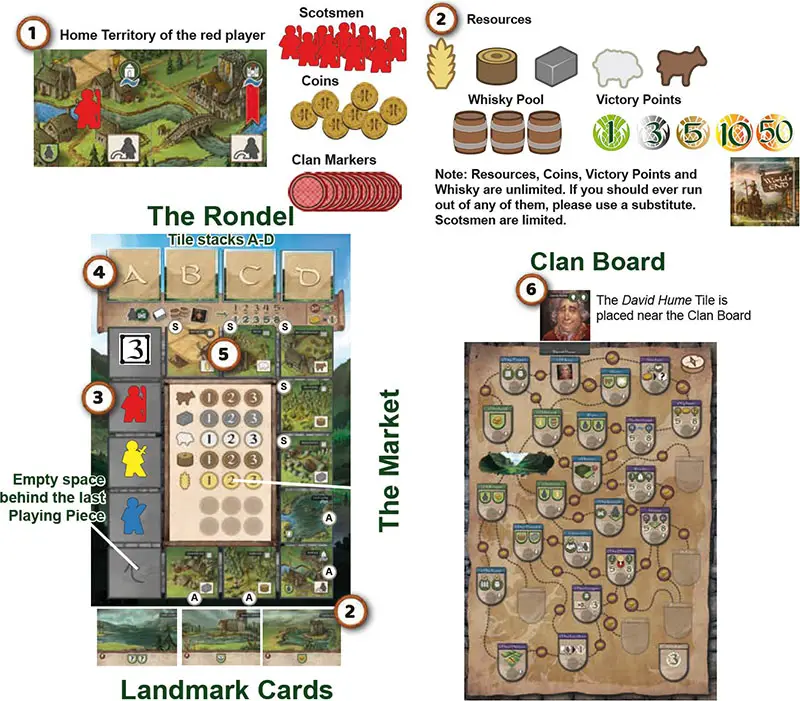
1 Basic Setup
Each player chooses 1 of the available colors and receives:
- The Home Territory Tile in his color (a double Tile piece consisting of the Home Castle and Village along the River)
- All Scotsmen in his color
- All Clan Markers in his color
Place 1 Scotsman on your Starting Village Tile.
2 Setting up the table
Place both the Clan Board and the Rondel in the middle of the table.
Place the following materials next to the board as a general pool: the Whisky Casks, the Resource Tokens (Wood, Stone, Barley, Sheep, Cattle), the Coins and all Victory Point chips.
Place the Landmark Cards next to the board. We recommend to place only the A Landmark Cards at the start of the game face up and add the B, C & D Landmark Cards when the respective Tile stacks come into play.
3 Determining the initial player order
- Take 1 of each player's Scotsmen as a Playing Piece and shuffle them in your closed hand.
- Set the Playing Pieces in a random order in consecutive spaces on the Rondel, starting at any space.
- The player in last position will be the starting player and receives 5 Coins, the next players in player order receive 6, 7 and 8 Coins.
-
2 players: Place the Die in the space clockwise ahead of the first Playing Piece.
-
3 or 4 players: The Die is optional for 3-player and 4-player games (it shortens play time). Place the Die in the space clockwise ahead of the first Playing Piece, if you decide to use the Die.
What are the Chronicles?
Each Chronicle is an expansion to Glen More II: Chronicles and adds a new gameplay element to the base game. If you are new to Glen More II: Chronicles, you may want to play your first few games without any Chronicle.
For the best experience we recommend adding only one Chronicle to start with and later try combinations of two or more Chronicles. Chronicles can be freely combined.
Start adding the 1st Chronicle "Highland Boat Race" when you feel comfortable with the base game mechanics.
4 Sorting the Tile Stacks
- Assemble and shuffle the 4 Tile stacks (A to D on the back sides) and place them separately on the marked areas on the board face down.
- Put the "The End" Tile roughly in the middle of the D-Stack.
Introductory Game Setup
For your first game, or if you prefer a shorter game, we recommend placing the "The End" Tile on top of the D-Stack (instead of placing it in the middle).
5 Setting up the Rondel
- Take the 5 Starting Tiles (with S on the back) and place them face up in front of the Playing Pieces (or the Die, if used) as shown in the illustration.
- Fill the remaining spaces of the Rondel with Tiles from the A stack in clockwise direction.
- The space behind the last Playing Piece stays empty as shown in the illustration.
- The setup of the Rondel should look like this: Playing Pieces 1,2, (3, 4) - (Die) - Tiles S - Tiles A (..). - Empty Space.
For 2 and 3 players only: Place 1 Coin from the pool on the leftmost space (marked with a 1) of each Market row.
6 Placing Additional Material
Place the David Hume Tile near the Clanboard.
Advanced Game Setup
Playing with Chronicles changes the setup. These changes can be found in the specific Chronicle Rules. Please refer to them during the setup.
Choose the Chronicles you want to use.
Add the Chronicles content to the game accor- ding to the Chronicle rules.
Before Your First Game
Please sort the materials of the Chronicles from the punch board sheets into the Chronicle Tuck Boxes. You can easily find the materials belonging to each Chronicle by looking for the Chronicle Icon on the punch board sheets and the components and sorting the material into the Tuck Box with the corresponding symbol.
This way, sorting the material after playing the game is easily done.
Game Play
The game is played over 4 rounds. The first round ends when the last Tile of the A stack is placed on the Rondel, the second round ends with the last B Tile is placed on the Rondel and the third round ends when the last C is placed on the Rondel.
A scoring phase takes place immediately when the last Tile of a stack (A-C) is placed. The 4th round ends when all players have moved on, or over, the "The End Tile". A final scoring phase takes place.
Turn Order
Please note that, contrary to many other games, there is no fixed player order!
The player whose Playing Piece is at the rear of the Rondel (next to the empty space) takes his turn; he may advance his Playing Piece as far on the Rondel as he likes. A player may take several turns in succession if he stays in last position.
This also means that players may have taken an uneven number of turns when the game ends.
The Die
The Die acts as a dummy player that takes out Tiles in a random fashion and shortens play time. This section only applies if the Die is used.
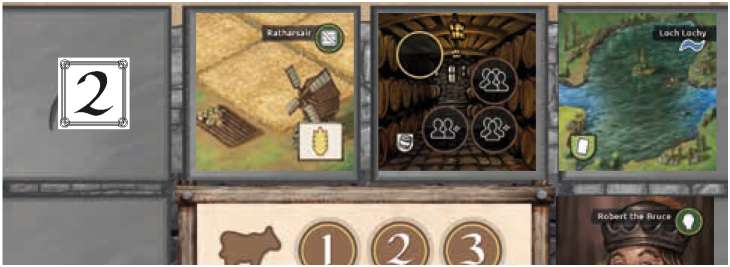
If the Die is in the last position, it is rolled and moved forward the number of Tiles shown on the Die (not the number of spaces - it ignores Playing Pieces).
If the Die lands on a Tile with a Chronicle Icon, the Die advances to the next Tile that has no such Icon. Where the Die lands, that Tile is moved to the Discard Pile, and the Die occupies that now-empty space. The Die does not remove the "The End Tile".
After the Die has moved, and has most likely removed a Tile, the next Player on the Rondel is determined.
Example: The Die advances 2 Tiles, because a 2 is rolled. The second Tile has a Chronicle Icon on it. The Die ignores this Tile and advances to the next tile. Loch Lochy is placed on the Discard Pile.
Player Turn
A player's turn proceeds like this:
- Advance your Playing Piece to any space on the Rondel with a Tile on it.
- Take that Tile, paying costs if required, and place your Playing Piece in its position.
- Place the Tile according to the placement rules.
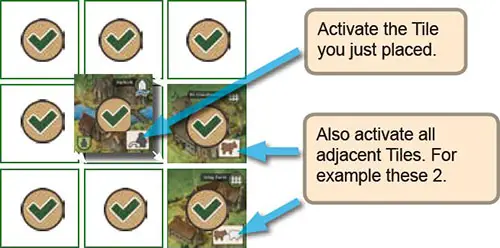
- Activate the placed Tile and all (up to 8) neighboring Tiles.
- Add 1 or more Tiles from the current Tile stack to the Rondel to fill up the board, until only 1 empty space is left, right behind the last Playing Piece.
If you place the last Tile from a stack, scoring ensues before the next player acts.
The D-Stack is handled differently and scoring ensues when all players moved on or over the "The End Tile".
Note: If all players moved their Playing Pieces over a Tile without taking it, the Tile is placed in the Discard Pile. This means that more than 1 Tile can be added from the Tile stack at the end of a player's turn.
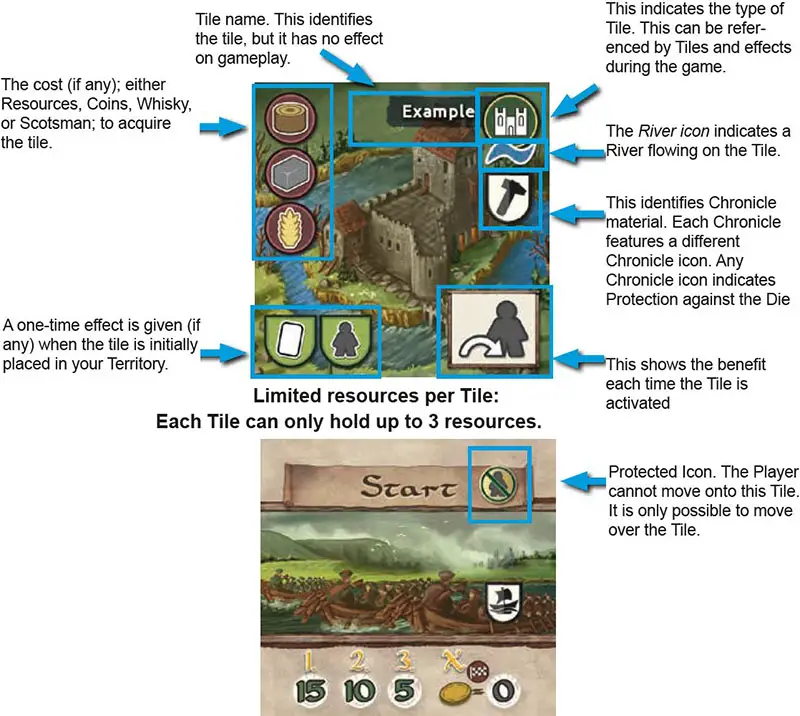
Anatomy of the Tiles
Each Tile has one or more symbols on it.
The Market
At any time during his turn, a player may buy or sell resources at the Market.
The Market is located in the middle of the Rondel. It shows a row of numbered fields (1, 2, 3) for each of the 5 resources.
Buying
If players want to buy a resource, they places Coins on the leftmost empty field for that resource - either 1, 2 or 3 Coins as indicated. If there are no empty fields, he can't buy that resource.
Players may buy as many resources as they want, if they use them immediately to pay any cost (e.g. paying for Tiles, or using resources using a Trade  Tile, exchanging Barley for Whisky etc)..
It is not possible to buy resources to keep as a supply.
Selling
If players want to sell resources, they put them back into the pool and take the rightmost stack of Coins on that resource's row. Players may sell resources as long as there are Coins for the resource on the Market. If the Market row is empty, the resource cannot be sold. Players can sell any number of resources during their turn.
Selling can take place at any time during a player's turn, including before activation, e.g. to make room for newly produced resources.
Example:
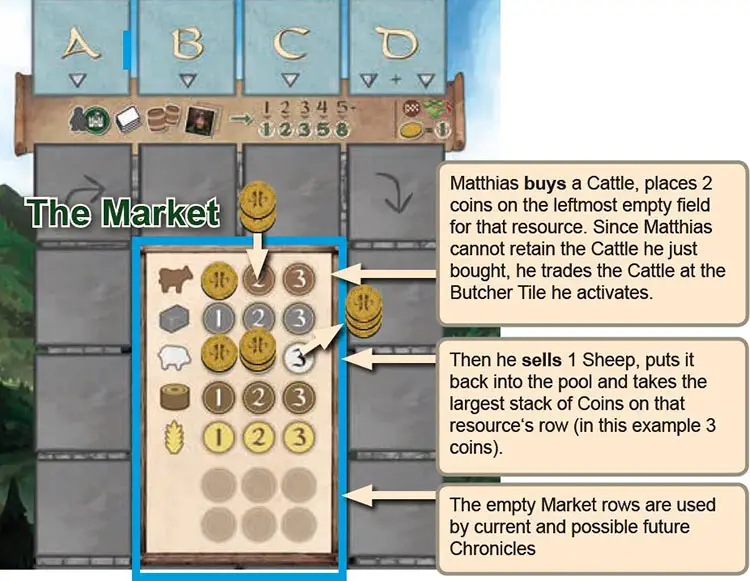
Note: Whisky Casks and Scotsmen may not be bought or sold!
They are not resources.
Introductory Game Setup
When learning or teaching the game, you may want to place 1 of each resource onto any empty market field. If players buy a resource, they take it from the Market Field and replace it with the corresponding number of Coins.
If players sell to the market, they take the Coins from the Market Field and place the sold resource in their place. That way it is easy to see which resources are available - at the cost of a bit more handling.
Acquiring Tiles from the Rondel
Move your Playing Piece onto a Tile of your choice.
If there is a cost to buy the Tile, it must be paid before taking it. You can do this by spending the corresponding resources (from any Tile you have resources on) or Coins from your pool. Alternatively, the Market may be used to buy needed resources. If you need to pay a Scotsman, it needs to be taken from a Tile within your Home Territory.
If you cannot pay the cost, you are not allowed to choose that Tile.
In the rare case that a player cannot legally take any of the available Tiles, he can discard a Tile by moving onto it. The player then takes 1 Coin from the pool OR receives 1 Movement Point.

If you take a Person, see Persons, Clan Markers and the Clan Board below.
If you take any other Tile, see Placement Rules below.
Placement Rules
All placement rules must be fulfilled to place a Tile.
-
Each Tile must be placed so that at least 1 of its sides touches the edge of an already placed Tile. It is not enough when there is just a corner touching the Tile.
-
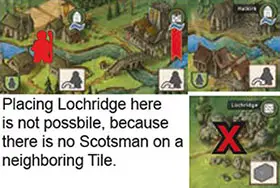
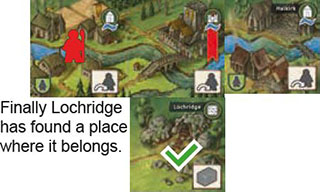
A Tile must be placed neighboring orthogonal or diagonal to one of your Scotsmen.
Important: If there is no Scotsman next to where you want to place the new Tile, you cannot place the Tile there.
-
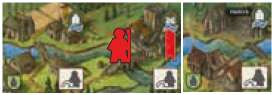
A River runs through your Home Territory Tile.
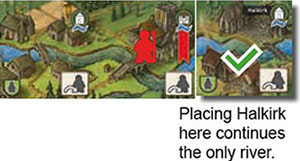
- All Tiles with a river must be placed so the river is extended (on either side).
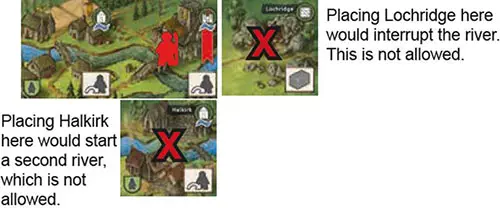
- No Tile without a river can be placed left or right of a Tile with a river.
- There can only be 1 river in each player's territory.
Note: Your Home Territory consists of your Home Territory Tile and all connected tiles.
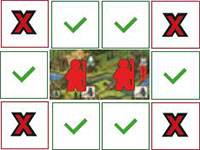
Placement Rules Examples:
Overbuild Tiles

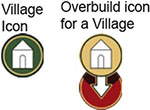
Some Tiles are designated for overbuilding other Tiles of the same type (indicated by the matching golden type icon).
Overbuild Tiles show an overbuild icon  in addition to its type icon. Overbuild Tiles can only be placed on another Tile, never on their own.
To overbuild a Tile:
- The type of the Overbuild Tile needs to match the type of the Tile it overbuilds.
- The river must match as well (not adding the river nor removing the river).
- The Overbuild Tile is placed on top of the Tile that was overbuilt.
- Only the topmost Tile is used for the remainder of the game.
One-time effects of a Tile that was overbuilt are retained (See One Time Effects on p. 12). For example, you do not have to return a Landmark Card to the supply if you overbuild your Landmark. Resources and Scotsmen on the overbuilt Tile are placed on the newly placed Tile.
Overbuild Tiles activate themselves and all adjacent Tiles - just like normal Tiles.
You can overbuild existing Overbuild Tiles.
Overbuild Example:
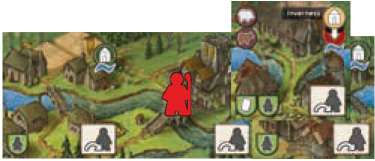
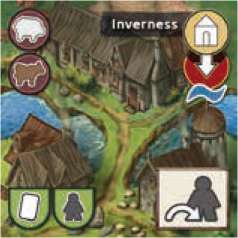
Inverness can be placed on top of Halkirk. They both share the village icon. The river is continued. And there is a Scotsman on a neighboring Tile.
One Time Effects
Once a Tile is legally placed, you receive the one-time effect in the lower left corner of the newly placed Tile.
Types of one-time effects:
-

Landmark Card: Take the corresponding Landmark Card, use its effect and place it in a separate area next to your territory.
Some Landmark Cards feature one-time effects
 , some feature ongoing-effects
  and some feature end-of-game effects
  .
. -

Scotsman: Place 1 of your Scotsmen from your supply on the newly placed Tile.
-

Joker Resource: Take 1 resource of your choice (Cattle, Sheep, Wood, Stone or Barley). Whisky Casks are not a resource and cannot be chosen.
-

Clan Marker: Take 1 of your Clan Markers and place it on the Clan Board, following the placement rules for Clan Markers outlined on p.15 Persons, Clan Markers and the Clan Board.
-

Whisky: Take a Whisky Cask from the pool and place it in a separate area next to your Clan Territory (where you keep your Person Tiles, Landmark Cards and the Whisky Casks). The Whisky supply is unlimited.
-

Coin: Take a Coin from the pool.
-

Victory Points (VP): Take the number of VP indicated.
Activating Tiles 
Once a Tile is legally placed, the Tile itself and all surrounding Tiles may be activated.
You may then activate this Tile and all adjacent Tiles, in any order you wish.
Adjacent Tiles are all Tiles orthogonally and diagonally neighboring the newly placed Tile.
All Tiles can receive their activation benefit only once per turn, unless a rule says otherwise. The icon in the bottom right indicates what a Tile does during an activation.
All activations are optional.
You can choose the order of the activations, but an activation has to be completed, before the next is started.
Types of Activations:
Gaining Resources
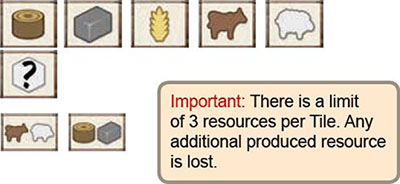
Take the shown resource from the pool and place it on the activated Tile.
Take any 1 resource from the pool (Wood, Stone, Barley, Cattle or Sheep) and place it on the activated Tile.
Take the 2 shown resources from the pool and place them on the activated Tile.
Exchanging Resources
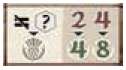
You may exchange resources for Victory Points, Whisky Casks or for placing Clan Markers. Exchanged resources are always returned to the pool. Exchange 2 or 4 different resources of your choice for 4 or 8 Victory Points.
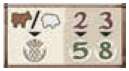
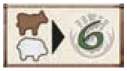
Exchange any combination of animals for the specified Victory Points. For example, return 1 Sheep and 2 Cattle to the pool to receive 8 Victory Points.
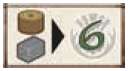
Exchange any combination of 3 resources for 7 Victory Points. For example, return 1 Sheep and 2 Stone to the pool to receive 7 Victory Points.
Exchange exactly the shown resources for the specified victory points.
Return any single resource to the pool and place 1 of your Clan Markers on the Clan Board, according to the rules listed in section Persons, Clan Markers and the Clan Board.
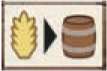
Exchange 1 Barley for 1 Whisky Cask.
Movement Points

You gain 1 Movement Point for each activated tile bearing the Movement Icon in its bottom right.
Each Movement Point enables 1 Scotsman to move from the tile he is on to a neighboring tile, orthogonally or diagonally, in your territory.
If you obtained multiple Movement Points you may use them to move multiple Scotsmen or to move some of them more than once.
You may use none, some or all of the Movement Points obtained.
Victory Points
When activated, immediately gain the number of Victory Points shown.
Overbuild Tiles
When Overbuild Tiles are placed, the Overbuild Tile and all adjacent Tiles are activated according to its activation effect. The Tile that was overbuilt is now below the Overbuild Tile and does not activate anymore and does not count for scoring purposes.
Persons, Clan Markers and the Clan Board
If a player takes a Person, the Tile is not added to the Clan Territory, but placed in a separate supply (next to the player's Whisky Casks and Landmark Cards).
Therefore taking a Person does not activate any tiles in your territory and they do not count towards the territory size in the end game scoring.
However, Persons feature a one-time effect. The player gains the favor of another Clan:
The player places 1 of his Clan Markers on 1 of the empty Clan Fields on the Clan Board. A player needs to pay the cost indicated on the roads connecting the chosen Clan Field with:
- either the green Start Field or
- any Clan Field with an already placed Clan Marker (regardless of the player color of the Clan Marker)
The player pays the Coin cost indicated on the roads to the pool. If a player cannot pay the road cost, he may not choose this Clan Field.
Then the player receives the bonus from the Clan. Each Clan Field can only be claimed once per game.
Scoring
The Scoring Rounds
There are 4 Scoring Rounds in the game. The first 3 Scoring Rounds take place when the last Tile of each Tile stack (A, B and C) is placed on the Rondel. The 4th Scoring Round is explained below (Ending the game).
Each of the Scorings Rounds work identically:
The game is suspended for a Scoring Round
In each Scoring Round, players compare their achievements in 4 areas to the player with the least in each category:
- Number of Scotsmen on the Home Castle Tile (not in any other castle)
- Number of Landmark Cards
- Number of Whisky Casks
- Number of Person Tiles
A player earns points for his lead over the player who has the LEAST of each item.

Example: Players compare the number of Landmark Cards. Matthias has 5 Landmark Cards, Andreas has 3 and Steffen has 1: Matthias has 4 more than the player with the least Landmark Cards (Steffen) and scores 5 Victory Points.
Andreas has 2 Landmark Cards more than Steffen and receives 2 Victory Points. Steffen has the fewest Landmarks and does not receive any Victory Points.
Note that players keep their Scotsmen, Landmark Cards, Whisky Casks and Person Tiles after the Scoring Round. They are not returned to the pool after the Scoring.
End of the Game
The game ends and the 4th Scoring Round takes place when the last player has moved his Playing Piece on or over the "The End Tile".
Generally, players will move over the "The End Tile", pick their last Tile to take from the Rondel and use it accordingly.
If a player prefers not to take another Tile from beyond the "The End Tile", he can finish the game for himself immediately by moving onto the "The End Tile". More than 1 player can move onto the "The End Tile".
If playing with the Die, the Die is removed from the game when it reaches the "The End Tile".
The final scoring works as follows:
-
a normal scoring takes place, as indicated above (Scoring).
-
then the size of each Player Territory is compared to the smallest Player Territory (with the least Tiles). Each player loses 3 Victory Points for each Tile he has placed more, compared to the player with the fewest Tiles! (Persons do not count towards the territory size).
Example: If Andreas has 15 Tiles, Matthias 13, and Steffen 16, then Andreas loses 6 points (2 Tiles more than Matthias, who has fewest, for -3 Victory Points each) and Steffen loses 9 points (3 Tiles more than Matthias, who has fewest, for -3 Victory Points each).
-
Each player receives 1 Victory Point for each Coin he has.
-
Some Landmark Cards award additional Victory Points at the end of the game
The player with the most Victory Points wins the game.
If there is a tie, the player with the highest number of resources held wins. If there is still a tie, players share the victory.
Continue Reading
