In Gem Rush, players take control of dwarves building a magical gem mine. The rooms in the mine are used to obtain gems, and then those gems are used to construct new rooms and score points.
There are two ways to play Gem Rush An Rush Mode, all players compete to be the first to a target number of points; in Crisis Mode, all players work together to score points within a time limit.
The rules are nearly the same for both modes, so rather than describing them separately, this rulebook gives a combined explanation of both modes, with special notes when a rule applies to only one mode.
Rules used only in Rush Mode are denoted by: 
Rules used only in Crisis Mode are denoted by: 
Components
- 80 Room Tiles
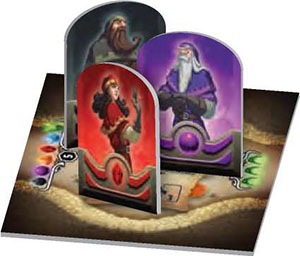
- 7 Dwarf Standees
- 75 Gem Cards
- 20 Skill Cards
- 57 Points
- First Player Marker
- Instructions
Room Tiles
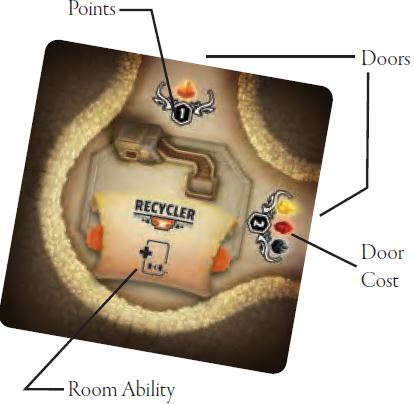
Room tiles come in three different types: Action. Movement, and Free. The icon under a rooms title and the colored brackets to the sides of the scroll identify what type of room it is. The rooms are as follows:

Setup
-
Game Mode
Choose whether you are going to play in Crisis Mode (cooperative) or Rush Mode (competitive).
For Crisis Mode, you can either choose a target score that you must collectively reach to win, or you can just play until time runs out and see how high a score you can get. Here are some recommended targets for various difficulty levels:
- Apprentice: 35 points
- Journeyman: 45 points
- Artisan: 55 points
- Expert: 65 points
- Master: 75 points
For Rush Mode, choose a target score. We recommend a target of 20 points for 4 players or less and 15 points for 5 players or more, but you can adjust the target depending on how long you want the game to last.
Once someone reaches the target, you will play out the remainder of the round so that all players get an equal number of turns.
-
Dwarves
Each player chooses a dwarf to play (your dwarfs color may change the details of certain Skill cards, but otherwise all dwarves play the same).
Choose a player to go first.
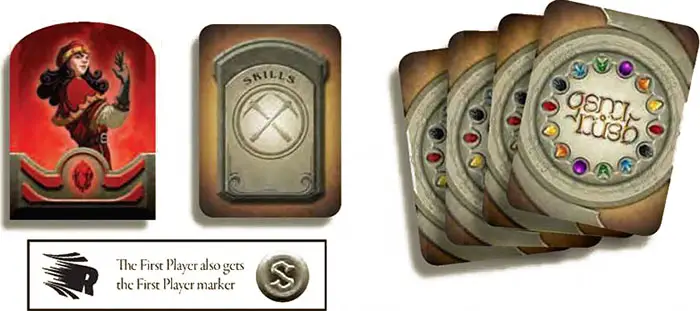
Give the first player marker. -
Skills
Shuffle the Skill cards and deal one to each player.
Players keep their skill face up in front of them, where all players can see it. Each player may use their skill as often as they like (within the limitations described on the card itself).
The remaining Skill cards will not be needed for gameplay.
-
Gems
Shuffle the Gem cards and deal 4 to each player to form their initial hand. The remaining cards form the Gem deck. Leave room beside the Gem deck for a discard pile.
Players are advised to keep their hand face up for their allies to see. Players keep their hands private.Each player receives:
-
Rooms
Shuffle the Room tiles, and place one face up in the center of the table to begin the mine. All players place their dwarves on this tile.
If this tile is a tunnel, then draw an additional Room tile and connect it to the tunnel. Keep connecting new tiles until one of them is not a tunnel. Players place their dwarves on the non-tunnel tile.
The remaining tiles form the Room deck.
-
Point Gems
Set the point gems to the side until they are needed.
Game Play
Players take turns in clockwise order until the game ends. On their turn, the current player must perform all of the following phases in order:
-
Check for game end.
-
Discard down to 4 cards.
-
Move up to 3 steps.
-
Perform 1 action.
-
Burn 3 cards.
O. Check For Game End
If at least one player has reached the target number of points, and the current player has the First Player marker, then the game ends and the player with the most points wins.
(Notice that all players will take an equal number of turns because the game can only end on the first player's turn).
1. Discard Down to 4 Cards
If the current player has more than 4 Gem cards in their hand, they must discard cards of their choice until they are down to 4.
(This must be done before moving or constructing rooms; you cannot make any use of the cards that you are discarding in this phase).
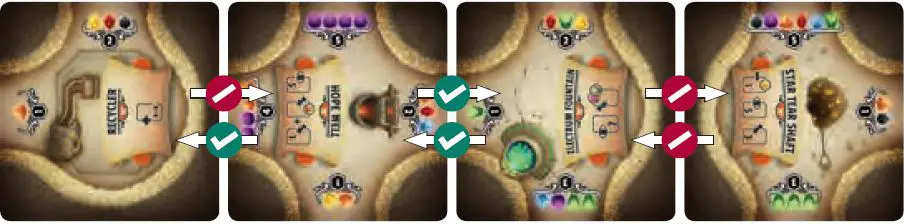
2. Move Up to 3 Steps
The current player can move their dwarf through the mine up to 3 steps (they may choose to move less, or not to move at all).
If two Room tiles are connected by doors, the player may move between them as 1 step.
If two Room tiles are connected by walls, the player may not move between them.
If one tile has a door but the adjacent tile has a wall, they form a one-way passage: the player may move from the tile with the door to the tile with the wall, but not the other way around.
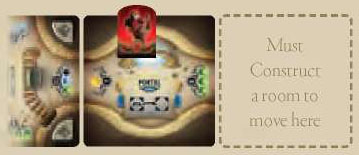
If the player s current tile has a door leading into empty space, the player can move into that space by constructing a new room.
In all cases, the player s current tile must show a door in the direction the player is moving. (A matching door on the destination tile is never required).
Empty Space Example:
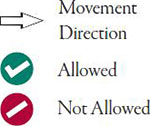
Movement Example
3. Perform 1 Action
The current player may either:
- Draw 1 card from the Gem deck or
- Use the ability from their current Room tile (which will usually involve drawing Gem cards).
Note: The player cannot continue moving or constructing rooms after performing their action.
Any time you need to draw more cards than there are in the Gem deck, draw as many as you can, then shuffle the discard pile and continue drawing. If there are still not enough cards, just draw as many as possible.
4. Burn 3 Cards
The players must collectively burn a total of 3 cards, selecting from any players' hand and/or the top of the Gem deck, reshuffling if necessary.
(Usually, you should burn from the deck unless there are not enough cards). Burnt cards are returned to the box and cannot be used for the rest of the game.
Important: "Discarding" cards is not the same as "burning" them. "Discarded" cards are reshuffled when the deck runs out, but "burnt" cards are never used again. Players burn cards only during this phase.
When the last Gem card is burnt, the game is over. Since there are 75 Gem cards and players must burn 3 per turn, the game will last a total of 25 turns (unless players choose to end after reaching their point target).
For instance, in a game with 5 players, each player will get 5 turns.
Constructing Rooms
If a player moves into a space with no Room tile, they must construct a new room. This costs 1 movement step (just like any other move) and the player ends up in the newly-constructed room.
To construct a new room, the player must discard Gem cards from their hand containing all of the gems shown on the door they moved through. (If the player cannot match all of the gems shown on the door, they cannot make that move).
Most Gem cards show 2 gems; both of the gems may be counted. If only one of the gems is needed, then the other is wasted.
After paying all required gems, the player receives the points marked on the door (under the cost they just paid), then draws a new tile from the Room deck and puts it into play in the space they entered.
Constructing Rooms Example:
This door shows Obsidian, Permafrost, and Electrum. The player discards one card with Obsidian & Electrum, and one card with Permafrost & Soulstone (the Soulstone is wasted).
After paying, the player receives the 2 points marked on the door (shown in the black hex below the cost), draws a new tile from the Room deck, and puts it into play in the space they entered.
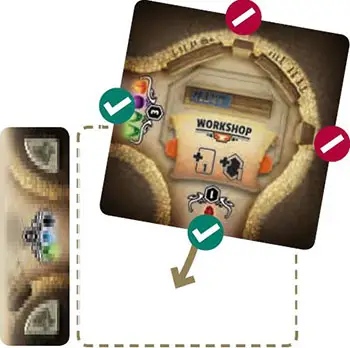
The player must place the new " room so that one of its doors faces the room that was just exited. In this case, either edge with a green check mark can face the room being moved from.
They may choose how to rotate the new Room tile, but must place it so that one door leads back the way they came in. (It is not necessary to match any other adjacent doors; only the one used for the construction). Therefore, the number of legal rotations will always equal the number of doors on the new tile.
Important: You only construct a room when moving into an empty space. If there already is a room tile in your destination space, you do not pay gems or score points; that is simply a regular movement.
The player then places their dwarf in the newly constructed room and continues their turn. They may continue moving if they have not made their maximum number of moves for the turn (they can even construct more rooms in the same turn, if they meet the requirements).
Note: Some doors cost nothing. Some doors are worth 0 points.
Standard Gems ( )
)
There are seven types of standard gems, which are simply used to pay any cost that includes them.
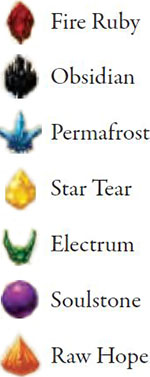
Special Gems ( )
)
There are four types of special gems, which have their own unique rules.
Diamond Dust 
Diamond Dust is a "wild" gem that may be used in lieu of any of the standard gems. (It is only wild when you are spending it; when drawing it, it only counts as a Diamond Dust).
Echoglass 
Echoglass may be counted as a copy of any standard gem spent at the same time. It cannot copy special gems (it cannot even copy the gem that a Diamond Dust is simulating).
Orichalcum 
Orichalcum does not help pay for a room's construction, but each Orichalcum used when constructing a room gives the player one additional point. However, Orichalcum may only be utilized if the other gem on the same card is useful in the construction.
Warpstone 
Warpstone does not help pay for a room's construction but allows the player to build in any location, and without spending movement.
Warpstone can move the player any distance, and does not require a valid path to the destination; the player simply appears in the new room they are constructing, without expending any movement (not even the 1 move normally used for the construction itself ).
However, the new room must still be connected to an existing door, and follows the construction rules as if the player had moved through that door. The player ends up in the newly constructed room.
Alternatively, any card with a Warpstone may be discarded during the movement step to move to any existing room (without constructing anything) for zero movement cost.
Room Effects
Each room has an ability that can be used during a player's action phase (usually to gain Gem cards).
There are many possible effects a room could have, but most of them fall into a few general categories:

Draw
Take cards from the Gem deck and put them in your hand (without Revealing them).

Reveal
Take cards from the Gem deck and put them face up, where everyone can see them.

Dig
Reveal cards from the deck one at a time until you find cards meeting the specified conditions. Discard the other Revealed cards.

Keep
Add to your hand any Revealed cards meeting the specified conditions; any Revealed cards that you do not end up keeping should be discarded at the end of the action.

Discard
Put cards from your hand into the discard pile.

Name a Gem
Choose any one of the eleven gem types in the game, including special gems. (The rest of the effect will work differently depending on what gem you Named).
Any time you need to Draw, Reveal, or Dig more cards than there are in the Gem deck, draw as many as you can, then shuffle the discard pile and continue drawing. If there are still not enough cards, just draw as many as possible.
Symbols that show an "X"
When a symbol shows an "X" instead of a number, the player chooses a number that can fully execute the room's ability the player cannot choose to
discard a larger number of cards than they have in hand). Multiple "X"s are all of the same value in the same room ("Discard X, Reveal X" would be "Discard 2, Reveal 2", if "2" is chosen).

Room Effects Symbols
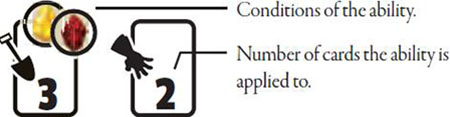
Room effect symbols are always executed from left to right. In this pairing of symbols the player would Draw and Reveal Gem cards from the Gem deck until they have Revealed 3 cards that have a Star Tear, a Fire Ruby, or both (discarding any Revealed cards that do not meet the Dig condition).
Then choose 2 of those 3 cards to Keep and put into their hand. The remaining card would be discarded.

In this set of three symbols, the player would Name a gem, Reveal 3 Gem cards from the top of the Gem deck, and Keep any that had a gem on them that matched the Named gem (discarding those that did not match the Named gem).
Action-phase Rooms

If a room has an orange anvil symbol under its title, then you may use that room's effect during your action phase as your action for the turn.
Movement-phase Rooms

If a room has a blue arrow symbol under its title, then you may use that room's effect during your Movement Phase for the cost of one movement step.
(You can also use it as your action, if you want).
Example: While on the Warped Mirror Room tile, you can spend one movement step to swap locations ivith any other player. Afterwards, you may continue your movementfrom your new location.

If a room's tide has a gray headlamp symbol under it then it is a Free action.
You may use that room's effect during your Movement Phase for no cost as many times as you want.
Example: While on the Mystic Elevator Room tile, you can choose to move the entire room (and everyone in it, including yourself) to a new location. This does not cost anything, and you may continue moving afterwards.
Mine Carts
Mine Carts are an unusual room. The first Mine Cart to be constructed does not do anything; however, once there are at least two Mine Carts, players can move from any Mine Cart to any other Mine Cart for no cost (during their Movement Phase).
Tunnels
Tunnels are a special room that you can never stop in. When you enter a tunnel, you must immediately follow the path from your entrance until it leads out in another direction.
This does not cost any additional movement; that is, you pay only 1 movement to enter the tunnel and cross it to the other side (as if the two connected rooms were adjacent).
Note that tunnel tiles have four doors, but they do not all connect to each other; they only connect in pairs. You must exit through the door that is connected to where you entered.
If several tunnel tiles are connected in a row, continue moving along the connected path until you emerge into a non-tunnel space (this still costs 1 movement total).
Tunnels and Construction
If you draw a tunnel tile when constructing a new room, place that tile in the space you are constructing, then immediately continue through the tunnel out the other side.
If this puts you in an empty space again, then construct another room in the new space; this does not cost any additional gems and is not worth any additional points.
(If the new room is also a tunnel, repeat). If following the tunnel leads you into a room that has already been constructed, then you simply stop in that room. (You still pay the cost and score the points of the original construction, even though the only new tile was a tunnel).
However, if you enter a tunnel that already exists and emerge into an empty space, then construct a new room using the cost and points of the door that led into the tunnel (not the tunnel itself; the doors on a tunnel have no cost or value).
In other words, you can build from that doorway exactly as if the tunnel were not there, except that the new Room tile is placed at the far end of the tunnel.
Construction:
Skill Card Variants
Skill cards provide each player a unique advantage that allows them to partially break the rules. There are several ways to use Skill cards.
-
Normal
Each player is dealt a random skill at the start of the game. Skills are kept face up, and each player may use their skill as often as they like (subject to the limitations written on the card itself).
-
Choice of Skills
At the start of the game, deal two Skill cards to each player (or perhaps more, if you have enough cards).
Each player chooses one of the skills dealt to them, and discards the other(s).
-
Shared Skill
Choose a single Skill card for all players to use.
-
Chaos Magic
At the end of each turn, the current player may draw a new Skill card and then shuffle their old one back into the deck. If the current player used their skill during the turn, then they must do this (otherwise it is optional).
-
Magic Circle
Deal a Skill card to each player, but then each player places their received card between themselves and the player to their left. Each player may use both the Skill card on their left and the one on their right.
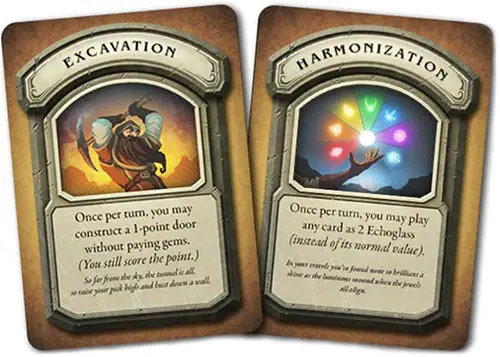
When using two skills at once, gems from one skill cannot be used to satisfy the conditions of another. For instance, when you use Harmonization to turn a card into 2 Echoglass, you cannot then use Transmutation to turn those 2 Echoglass into one Diamond Dust.
When Evocation grants an extra gem of your player color, that does not allow you to apply Permeation to a card that doesn't normally have your color (although you could apply both skills to the same card if it naturally had your color).
Note: This will lead to higher scores in Crisis Mode; you may wish to increase your point target by about 5-10 points to compensate.
-
No Skills
Skills are not required; if you prefer, you can leave them in the box and play without them.
Note: This will lead to lower scores in Crisis Mode; you may wish to reduce your point target by about 5-10 points to compensate.
Continue Reading
