Components
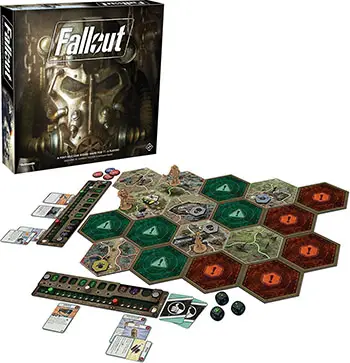
- 21 Map Tiles
- 4 Scenario Sheets
- 5 Plastic Figures
- 5 Character Cards
- 5 Character S.P.E.C.I.A.L. Tokens
- 4 Player Boards with 8 Connectors
- 12 Pegs
- 75 Encounter Cards
- 3 V.A.T.S. Dice
- 27 Enemy Tokens
- 35 S.P.E.C.I.A.L. Tokens
- 100 Quest Cards
- 14 Perk Cards
- 2 Power Tokens
- 54 Caps Tokens
- 12 Trait Tokens
- 34 Loot Cards
- 25 Asset Cards
- 11 Unique Asset Cards
- 23 Agenda Cards
- 10 Faction Tokens
- 8 Quest Markers
Setup
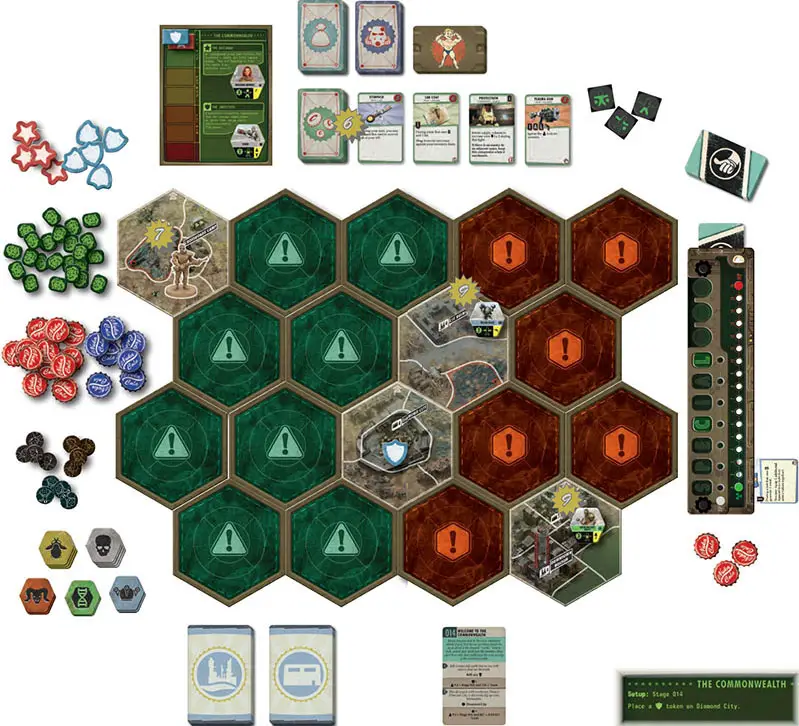
1 Choose Scenario: As a group, choose which scenario you would like to play. For your first game, we recommend playing the scenario "The Commonwealth". Take the corresponding scenario sheet and place it above the play area.
2 Build the Map: Separately shuffle the  and
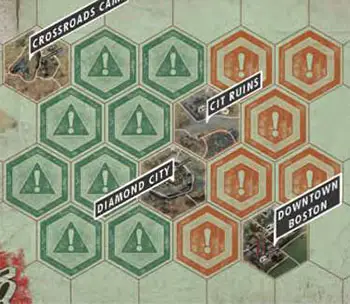
and  map tiles, and then construct the map following the image on the back of the chosen scenario sheet, placing the appropriate faceup map tiles in the indicated locations and a random
  or
or  map tile facedown in each indicated location.
3 Sort Tokens: Create piles of the S.P.E.C.I.A.L., Caps, trait, and enemy tokens, making sure the S.P.E.C.I.A.L. and enemy tokens are facedown and randomized; the enemy tokens should be further separated into individual stacks by type.
4 Create Encounter Decks: Separate the starting encounter cards-cards that have a star in the upper-left corner-into two different decks based on their card backs, shuffle them, and place them facedown in the play area.
Take the remaining encounter cards and the quest cards and put them in numerical order. This is the card library (not shown).
5 Create Other Decks: Remove all cards from the agenda deck that show a number in the bottom- left corner that is greater than the current number of players. Then, separately shuffle the agenda ( ), loot (
 ), and asset (
 ) decks and place them facedown in the play area. Lastly, make sure the perk cards, unique asset cards, and V.A.T.S. dice are within easy reach of all players.
6 Create Shop: Deal four asset cards faceup in a line next to the asset deck to form the shop.
7 Choose and Place Survivors: Randomly determine a first player and move the agenda deck to his or her right side.
Starting with that player and proceeding clockwise, each player chooses a survivor and takes the corresponding figure, character card, and S.P.E.C.I.A.L. token marked with that character's silhouette on the back.
Then, the player places the figure in an unoccupied space-one of the individual sections of tile divided by the white lines-in the "Crossroads Camp" tile.
8 Prepare Player Boards: Each player takes a player board and places a green peg in the "0" hole, a red peg in the "16" hole, and a gray peg in the hole to the left of the XP track.
Each player also places his or her starting S.P.E.C.I.A.L. token in the slot on the player board with the matching letter, then draws one additional S.P.E.C.I.A.L. token at random and places it in its slot.
If that player already has that letter, he or she randomly draws a different S.P.E.C.I.A.L. token instead. Then, each player draws one agenda card, keeping it secret from the other players. Finally, each player takes three Caps.
9 Resolve Starting Effects: Resolve any effects on the back of the scenario sheet. Then, for each space on the map with an icon matching an icon on an enemy token, take one random enemy token matching that icon and place it faceup in that space (enemies will be described later).
Finally, place the  and
and  power tokens on the topmost space of the power track on the scenario sheet.
Game Play
Players take turns in clockwise order, starting with the first player. After all players have taken a turn, enemies on the map activate and attack, and then a new round begins with the first player taking another turn.
Players continue resolving rounds in this way until a player achieves enough influence to claim victory or one of the factions in the scenario reaches the end of the power track.
When it's your turn, it's your time to shine! This is when you get to explore the wasteland, fight dangerous enemies, and complete quests.
During your turn, you may perform up to two actions. You can perform the same action multiple times. After you complete your actions, your turn ends, and the next player takes his or her turn. You can perform the following actions:
- Explore: Reveal an adjacent facedown map tile.
- Move: Move your figure around the map.
- Quest: Complete one of the available quests.
- Encounter: Draw and resolve an encounter card according to your position on the map.
- Fight: Fight and attempt to kill an enemy in your space.
- Camp: Recover some HP, unexhausted your companions, and exchange stuff with other survivors.
All actions are described in detail in the following sections.
You, the Survivor
When the word "you" is used, it refers to both the player who is resolving his or her turn and the survivor that he or she controls. The survivor and the player are inseparable. This player is also referred to as the "active player" by some cards and rules.
Explore Action
No one is exactly sure what is waiting out there in the wasteland, but you're going to find out! There's a lot of unexplored territories out there represented by facedown map tiles, and you can use the explore action to find out what mysteries they hold.
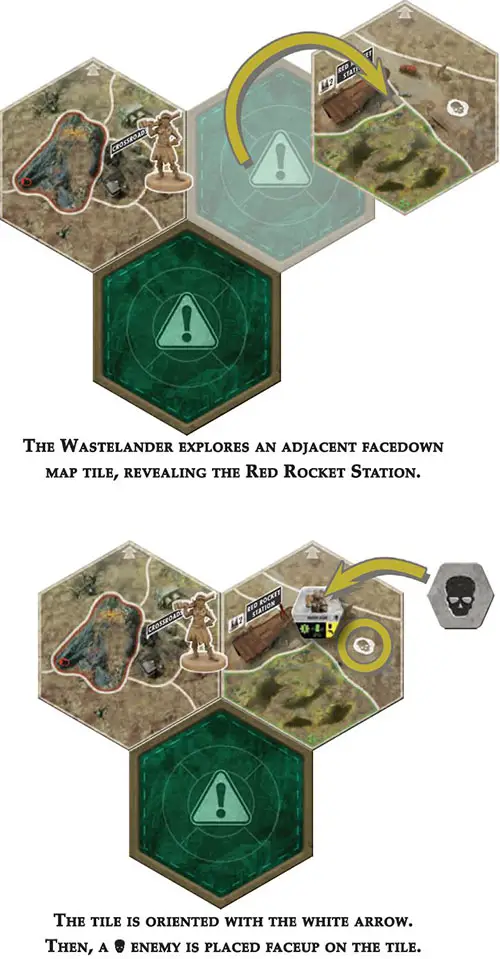
Each map tile is divided into spaces, which are defined by white borders. If you are in a space with a border touching a facedown map tile, you can perform the explore action to flip the map tile faceup.
Then, orient the tile so that the arrow on the top of the tile is pointing the same direction as the arrow on the starting map tile.
After revealing a new map tile, if there are any enemy icons on the map tile, draw a random enemy token of the and place it faceup in that space.
Move Action
You use the move action to (you guessed it) move around the map! But be careful; the wasteland is hazardous, and there is rough terrain and plenty of radiation awaiting you.
When you perform a move action you gain two movement points. You can spend each point to move your figure into an adjacent space. You may interrupt your move action to perform your second action, and after you are finished performing this second action, you may finish performing your move action.
Additionally, if you perform two move actions during your turn, the points of movement from both actions can be combined and spent together.
Move Action Example
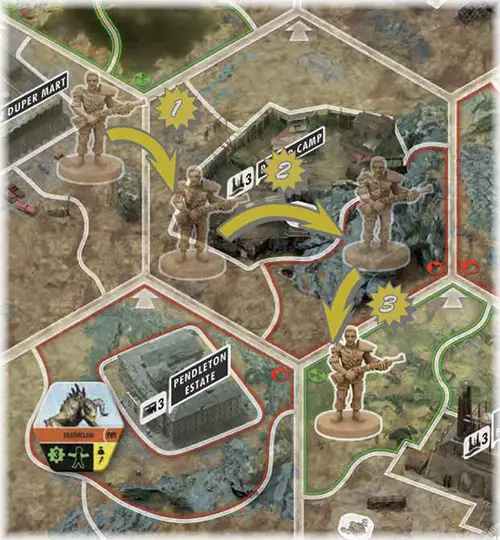
1 The Vault Dweller performs two move actions, gaining four movement points. He spends the first point to move into the adjacent space.
2 He spends his second and third movement points to move into a space that has difficult terrain.
3 He spends his fourth and final movement point to move into a space that has irradiated terrain; so he suffers 1 rad.
Terrain
Some spaces have terrain that affects a survivor who moves into that space. The terrain is indicated by the color of the space's border:
-
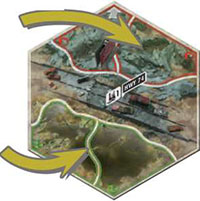
Difficult (red): You must spend two points of movement to move into this space.
-
Irradiated (green): You suffer one rad (
 ) when you move into this space (rads are described later).
Quest Action
To gain influence in the wasteland, you are going to have to help other people, whether it be some random wastelanders or one of the powerful factions determined by the scenario. All of the ways you can help people are represented by quests.
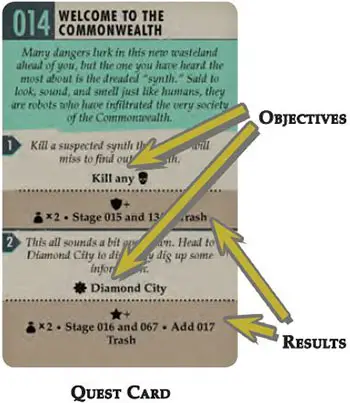
All quests available for you to complete are staged faceup in the play area. One quest is staged this way during setup, and then others are added as you play the game.
Each quest has multiple objectives, each with different results. Each objective has its own unique requirements. Some might provide a name of a space or type of space on the map that your figure must be in, others might list specific actions you must perform.
Some objectives are marked with a  icon, indicating that you must perform a quest action to complete that objective. After you have fulfilled the requirements of such an objective, if there are no enemies in your space, you can perform a quest action to complete that quest.
If an objective does not have a  icon, you complete the quest automatically when you fulfill the objective's requirements; no action is necessary!
When a quest is completed, you resolve all effects listed in the results bar presented below the objective you fulfilled (see "Card Results" sidebar to the right).
Quest Markers
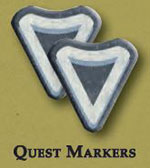
If a quest instructs you to place a quest marker, choose a pair of quest marker tokens with a matching color.
Place one on the map as indicated by the quest and the other on the quest card itself. When that card is trashed, discard both quest markers.
Card Results
When a quest is completed, it can have several effects on the game. These effects are listed in a shorthand shown in a results bar under a given objective on the card.
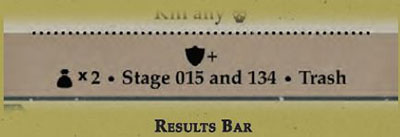
Resolve these effects left to right, as follows:
Add #: Retrieve the card indicated by the # from the card library. Then, take a number of cards equal to the number of players from the top of the deck matching the retrieved card's back. Finally, shuffle all the cards together and place them on top of the matching deck.
Stage #: Search the card library for the card indicated by # and place it faceup in the play area with the other quests.
# XP: Gain the amount of XP indicated by # (described later).
# Caps: Gain the number of Caps indicated by #.
Become X: Take the trait token matching X.
 : Draw a card from the deck that has a back matching the icon shown. If the icon is followed by a number, such as
  , draw that number of cards.
Gain the X unique asset: Search through the unique asset deck for the card specified by X and take it. If that asset has already been taken, draw one unique asset at random.
Shop #: Buy or sell a number of items from the shop determined by # (described later).
 : The faction corresponding to the icon shown gains an amount of power equal to the number of + symbols after the icon (described later).
Trash: Return this card to the game box. If the quest is not trashed, it is left in the play area and can be completed again.
Encounter Action
There's a whole lot of nothing out there since the war, but key locations still have pre-war artifacts and gatherings of survivors that have formed towns in the intervening centuries. You can have encounters to hunt around in the wasteland, trade with people at settlements, or investigate vaults.
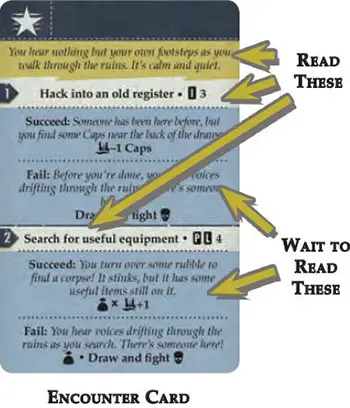
If you are in a space marked with an encounter icon (shown below), you can perform an encounter action to resolve an encounter card from the deck matching that encounter icon. You can encounter each location only once per turn, and you cannot perform this action if you are in the same space as an enemy.
Encounter Icons
There are two encounter icons at the start of the game:

Wasteland Encounter: Cards in the wasteland deck allow you to scavenge the location for useful loot or search for things in the wasteland.

Settlement Encounter: Cards in the settlement deck allow you to buy and sell things from the shop track and search for things in settlements.
There are also two vault-encounter icons:  and
and  . However, the vault-encounter cards are not added to the game until you complete specific quests. Until the vault-encounter cards are added to the game, you cannot have an encounter at a vault location.
Encounter Level
Each encounter icon on the map has a corresponding number that indicates its level. When the result bar shows an encounter icon ( ) in place of a number, treat that as being equal to the level of the encounter icon you are at.
For example, if you are resolving an encounter at the level 2 Red Rocket station and the encounter reads "@game47.jpg" you would draw two loot cards.
Resolving Encounters
To resolve an encounter, the player to your right draws one encounter card and reads the italicized text at the top of the card aloud. Then, he or she reads the bold text at the start of each numbered option, including any tests or requirements.
Then, you choose which option you would like to resolve, and the player reading the card prompts you to perform any listed requirements for that choice; these may include performing tests, fighting enemies, or paying Caps.
If you succeed at all requirements, the other player reads all text following the "Succeed" header under that option. If you fail to meet all requirements, the other player reads all text following the "Fail" header under that option.
Finally, you resolve all effects listed in the results bar for the appropriate outcome. After completing an encounter, place that card on the bottom of its deck.
Performing Tests
Many encounters and quests require you to complete a test. Each test shows one or more S.P.E.C.I.A.L. tokens followed by a difficulty number; for example:  4 .
4 .
To perform the test, you roll the three V.A.T.S. dice and count the number of hit ( ) icons shown on the dice results. If the number equals or exceeds the difficulty of the test, you succeed!
If you have any S.P.E.C.I.A.L. tokens that match those used by the test, you can reroll any number of dice before the final results of the test are resolved. You can perform one such reroll for each S.P.E.C.I.A.L. token that matches one used by the test.
Shop: Buying and Selling
When performing an encounter at a settlement, you will often get the chance to sell items, buy items, or recruit companions from the shop.
When this happens, draw one card from the top of the asset ( ) deck and add it to the left side of the shop. The encounter specifies a number; this is the maximum number of items that you can buy and sell.
For example, if the encounter reads "shop twice", you could buy two assets, or buy one asset and sell one asset, or sell two assets.
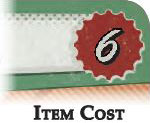
To buy an asset, spend a number of Caps equal to the cost in the upper-right corner of the asset card. Some cards, such as companions, show a token or trait in the corner in place of a cost. You can take such cards only if you have the indicated token or trait.
To sell an item, discard it from your inventory to the appropriate discard pile and gain Caps equal to one less than the item's cost.
Caps
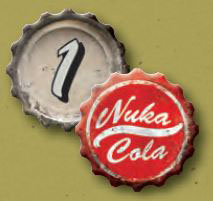
Caps are the widely accepted currency out there and can be gained by scavenging and selling stuff from wasteland locations.
Each player tracks his or her personal supply of Caps using Caps tokens.
When you gain Caps, take that many Caps tokens from the supply, and when you spend Caps, return that many to the supply.
There are Caps tokens worth both "1" and "5". Feel free to make change as needed!
After you are finished buying and selling, discard or draw new asset cards until there are four cards in the shop. If you have to discard cards, discard them from the right side of the track. If you have to add new cards, draw them from the asset deck and add them faceup to the left side of the track.
Inventory and Equipment
When you acquire an item or companion, place it in your play area; it is now in your inventory. You can have up to three assets in your inventory at the same time. If you would ever acquire cards in your inventory beyond three, you must choose and discard cards until you have only three.
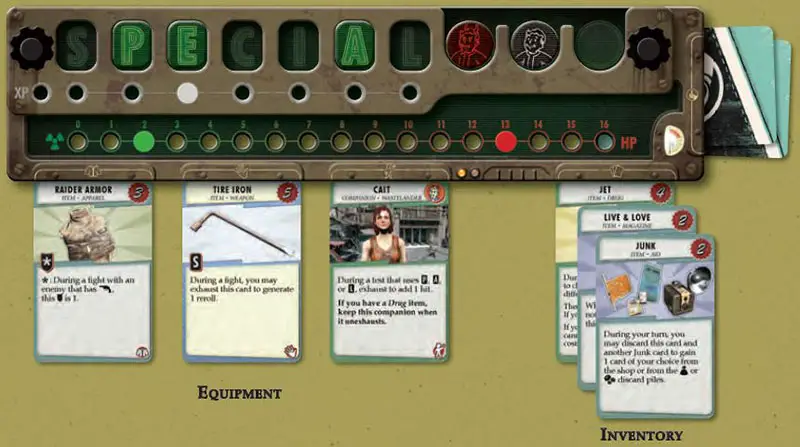
Additionally, you can have up to three cards equipped at time-one apparel, one weapon, and one companion, indicated by the slots on your player board. Equipped cards do not count toward your inventory.
You can change out what cards you have equipped when you acquire a new card, at the start of your turn, or when you perform a camp action.
Fight Action
We're not going to sugarcoat it: it's dangerous out there. There are mutated creatures, raiders, and worse things waiting for a bright-eyed survivor to come along. You are going to need to be prepared to fight off these enemies.
You can perform a fight action to choose one enemy in your space to fight.
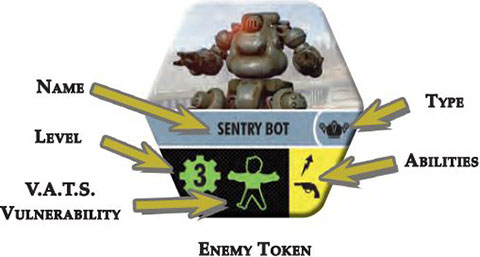
When you fight an enemy, you are trying to score a number of hits on it equal to or exceeding its level while avoiding getting hit back. You can hit the enemy's head, arms, legs, or body, but only hits against an area in which the enemy is vulnerable count!
To fight an enemy, you roll all three V.A.T.S. dice. Some weapons, which are described later, allow you to reroll your V.A.T.S. dice. If there are any  icons showing on the V.A.T.S. dice after the roll is final, the enemy hits you! For each
  icon, you suffer damage equal to the enemy's level.
HP and Rads
When you suffer damage, move the red peg on your player board a number of holes down the track equal to the amount of damage suffered.
Similarly, when you suffer rads ( ), move the green peg up the track a number of holes equal to the rads suffered. If the red peg is ever in a lower hole than the green peg or would be in the same hole as the green peg, you are killed!
When you are killed, place your figure in any space on the "Crossroads Camp" map tile, discard all cards in your inventory, keeping any equipped cards, and recover all HP by moving the red peg back to the highest number on the track.
When you are killed, you do not recover rads. After you recover your HP, if you are still killed because your rads are in the highest hole, you lose the game and are eliminated.

Next, you inflict hits! Each filled-in area on the dice indicates the part of the enemy you can potentially hit. For each die showing an area that matches one or more of the enemy's vulnerabilities, you inflict one hit. Each die can hit only one area. If the number of hits equals or exceeds the enemy's level, you kill it!
When you kill an enemy, you gain XP (described later) equal to its level and discard the enemy from the map; it is returned to the supply. Then, you take a random enemy of the same type from the supply and place it facedown on the closest matching icon on the map that does not already have an enemy of that type on it. While an enemy is facedown, it is inactive.
During a fight, if you do not kill the enemy, it remains in its space. Your hits do not carry over from fight to fight. The next survivor to fight that enemy will have to start over.
Inactive Enemies
Inactive enemies are facedown on the map. You cannot fight or use an ability to target an inactive enemy, and they do not stop you from performing actions in their space.
When a specified type of enemy activates at the end of the round (described later), all inactive enemies of that type are flipped faceup and become active.
Weapons and Apparel
The weapons and apparel you have equipped can help you during a fight.
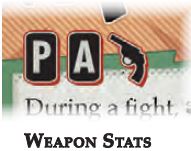
Each weapon has one or more S.P.E.C.I.A.L. tokens shown on its card. For each of these S.P.E.C.I.A.L. tokens that matches a S.P.E.C.I.A.L. token you have, you can reroll any number of dice before the final results of the fight are resolved.
You can perform one such reroll for each S.P.E.C.I.A.L. token that matches one on your equipped weapon.
Additionally, weapons can have the ranged ( ) icon, which allows you to fight enemies that are in spaces adjacent to you. When you fight an enemy that is in an adjacent space that does not also have a
  icon, you automatically inflict one additional hit against that enemy when resolving the fight.
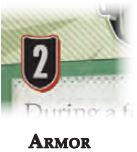
The apparel you have equipped can provide you with armor, which is shown as a value in the armor ( ) icon. When resolving a fight, you cancel a number of
  icons on the dice equal to the value of armor you have equipped.
Enemy Abilities
Enemies can have abilities that alter a fight, shown as icons on their token:

Aggressive: When this enemy moves into your space, or you move into its space, you immediately fight it; this fight is not an action.

Armor: This enemy requires one additional hit to kill.

Loot: When you kill this enemy, draw one loot card.

Radiation: When this enemy hits you for any amount of damage, suffer rads equal to the enemy's level.

Ranged: When this enemy activates (described later), it can fight you from an adjacent space. If it does this, and you do not have a  weapon, add one
  to the dice results.
Retreat: If you fail to kill this enemy during a fight, the enemy becomes inactive and is flipped facedown.
Exhaust and Unexhaust
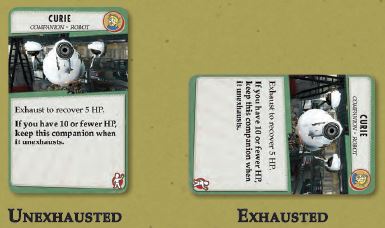
Some cards must be exhausted to use their abilities. To do this, turn the card 90 degrees on its side. An exhausted card cannot be exhausted again. When instructed to unexhaust a card, turn it 90 degrees to be upright again.
When a companion unexhausts, check the condition listed on the bottom of its card. If you do not meet this condition, that companion is discarded.
Camp Action
Does all of this have you exhausted? When the wasteland is becoming too much for you, find a safe place to hunker down, recover a bit, and trade with your fellow survivors.
When you perform a camp action, you recover three HP and unexhaust all of your exhausted cards. Then, you gain the Well Rested trait by taking the Well Rested trait token and placing it on your player board (traits are described later). Finally, you may trade with any other survivors within one space of you.
You cannot perform this action if you are in the same space as an enemy.
Trading with Survivors
Survivors can trade assets, loot, agendas, and Caps. When you perform a camp action, you may choose another survivor within one space of you and exchange any number of assets, loot, agendas, and Caps.
You must both agree to the exchange. You can also trade promises of future deeds, though whether or not you decide to keep those promises is up to you.
End of the Round
There are many dangers in the wasteland, including terrifying enemies and powerful factions working toward their own goals. So far, the survivors have been having all the fun, but at the end of the round, these forces get their chance to act.
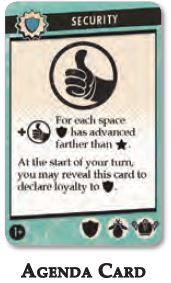
After all players have taken their turns, enemies activate. You reveal the top card of the agenda deck and resolve the enemy icons shown along the bottom of the card, and then discard it.
All text on agenda cards is ignored during enemy activation-this text is used only if a player has drawn it and is described later.
Enemy Activation
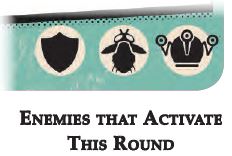
From left to right, for each enemy icon shown on the bottom of the drawn agenda card, that type of enemy activates. When an enemy type activates, you move each enemy of that type one space toward the nearest survivor.
If, before moving, that enemy is either in the same space as a survivor or adjacent to a survivor and has the icon, the enemy fights that survivor instead. After all enemies of a type have activated, you flip all inactive enemies of that type faceup.
When an enemy fights a survivor, that survivor and the enemy resolve a fight as if that survivor had performed a fight action. If there is ever a tie for the closest survivor, the enemy moves toward or attacks the survivor with the lowest HP value.
If two survivors are tied for lowest HP value, the tied player that acts earlier in turn order is chosen.
Drawing the Last Agenda Card
When the last agenda card is drawn, you shuffle the agenda discard to create the new agenda deck. Then, you pass the deck to the player to the right of the first player; that player is now the first player. Whose turn it is and whose turn is next does not change.
Finally, you advance both faction tokens one space down the track on the scenario sheet to represent their power growing over time.
Play continues with the next player in turn order. The round will end, and the next agenda card will be drawn, before the new first player's next turn.
End of the Game
Completing quests throughout the game can grant you agenda cards. These cards track your accomplishments in the wasteland. Each agenda card is kept secret from the other survivors.
An agenda card automatically grants you a single influence ( ) and can grant you additional influence if you meet the condition outlined on the card. Your goal is to reach a certain amount of influence before the other players. Y
ou can have a maximum of four agenda cards in your hand; if you draw a fifth, choose one and shuffle it back into the agenda deck.
The amount of influence you need to win depends on the number of players in the game:
- 1 Player: 11 influence
- 2 Players: 10 influence
- 3 Players: 9 influence
- 4 Players: 8 influence
As soon as the total value of your agenda cards is this amount of influence or more, the game ends and you win! Reveal your agenda cards to the other players.
At this time, any other survivors who also reached or exceeded the required amount of influence can reveal their cards and claim a joint victory alongside you.
Solo Play
When playing Fallout solo, follow all the standard rules for the game with the following exceptions:
When a quest requires you to be in the same space as another survivor, you must be in a  space instead. If it requires the other survivor to make a test, they are assumed to have a result of "3".
When resolving encounter cards, read them yourself. Read only the text that would normally be read aloud, and then make your decision before reading the text for your chosen outcome.
When the agenda deck is depleted, advance only the power token for the faction that currently has less power. If the factions are tied for power, they both advance as normal.
Continue Reading


