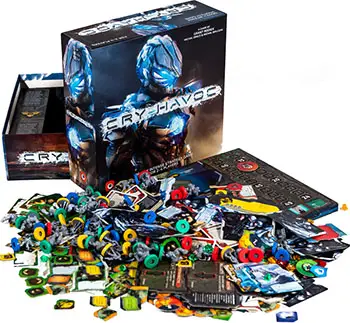
Components
- 1 game board
- 1 battle board
- 4 faction boards
- 52 miniatures
- 170+ cardboard tokens
- 30+ plastic crystals
- 1 rulebook
Object of the Game
The game is won by the player with the most Victory Points at the end of the game.
The primary way to score Victory Points is by controlling Regions with Crystals during Rounds in which Scoring is enabled.
Victory Points are also scored for controlling territories, capturing Prisoners, killing enemy Units and using certain Tactics or Skills.
Setup
-
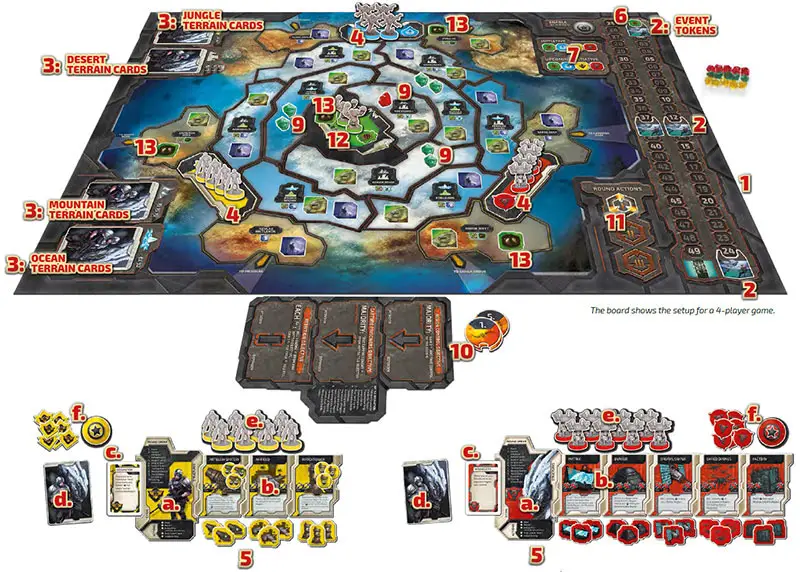
Place the Game board in the middle of the table.
Note: For a 2-player game the side marked for 2-players should be used in the setup.
-
Shuffle the Event tokens and place one face down on each of the four Event Spots on the Score track. Return any unused Event tokens to the box without looking at them.
-
Separate the Terrain Tactics cards by Terrain type into four piles, then shuffle each pile individually. Place each pile face down on the indicated space on the board.
-
Each player chooses one Faction to play. Take the Headquarters token from every non-Trog player and place them randomly in the starting Regions labeled "HQ". Place 4 Unit miniatures and 1 Control token matching the corresponding HQ token in the same space as the HQ token.
Note: The Trogs are only controlled by a player in games with four players.
-
Each player takes all of their Faction components.
-
Players place their Faction board in front of them face up.
-
Players place their Structure tiles face up, next to their Faction boards. Place all Structure tokens next to their associated Structure tiles.
-
Every player starts with 1-3 of their Skill cards and places the cards face up in front of them. Any unused Skill cards are returned to the box.
- First Time Players: Players ONLY use their Skill labeled Default.
- Experienced Players: Players use the Skill labeled Default and one Skill at random.
- Veteran Players: Players use the Skill labeled Default and two Skills at random.
-
Players shuffle their Tactics cards and place the cards as a face down deck in front of them.
-
Players place all remaining Unit miniatures in front of them to form their Reserve.
-
Players place their Scoring Enabled markers and Control tokens in front of them.
Note: Place any components from unused Factions back in the box.
-
-
Each player places their Score token on the 0 space of the Score track.
-
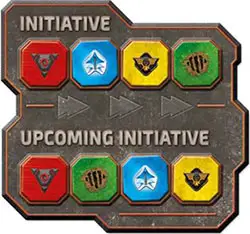
Take one Initiative token from every player, then place one per space randomly on the Initiative Track to determine the initial player order.
Place the second set of Initiative tokens for each player on the Upcoming Initiative Track in the same order as the Initiative Track.
-
Place Trog War Party and Exploration tokens face down in the Regions with the matching icons on the board. Set any additional tokens near the board to form a supply.
-
Place Crystals in each Region as shown by the symbols in the Regions of the board. Place the rest of the Crystals near the board to form a supply.
-
Place the Battle tokens and the Battle board near the Game board.
-
Place the Action Marker in the "I" position on the Round Actions on the board.
You are ready to begin!
4-player Game
In a 4-player game, one player takes the Trog Units and uses the Trog components (Faction board, Structures, Skills, etc)..
12. Place the Trog Headquarters on the space marked "Trog HQ" with two Units.
13. Place 4 Tunnels tokens on the board, one per each Region with the matching icons on the board, and one on Trog HQ.
Game Play
Cry Havoc is played in 5 or fewer Rounds, with each Round being divided into 6 Phases which are completed in order. The phases are listed and explained below.
- Events
- Draw Cards
- Actions
- Battle Resolution
- Prisoners
- Scoring (if Enabled)
1. Events
The events phase consists of 3 steps:
- Resolve Event(s)
- Update Initiative: This is skipped in the first Round.
- Refresh Exhausted Skills: This is skipped in the first Round.
A. Resolve Event(s)
Reveal the next stack of unrevealed Event token(s) and immediately resolve them, one at a time, from top to bottom.
Note that on the first turn of the game this stack will just consist of the Event on the first Event Spot on the Score track.
However, if a player's Score token passes any unresolved Event tokens on the track, the passed Event tokens are immediately stacked on top of the next unresolved Event token on the track.
In this way it is possible on later turns that there will be more than one Event token on the same spot.
B. Update Initiative
Change the order of the tokens on the Initiative Track so that the order matches that of the Upcoming Initiative Track. The Upcoming Initiative Track can be changed during the Action phase when certain cards are played.
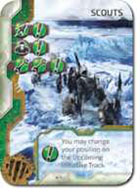
All players have a Tactics card that allows them to change their Initiative to any place (1st, 2nd, 3rd, 4th) when the card is played.
When this happens, players place their Upcoming Initiative token on the position of the Upcoming Initiative Track that indicates their new desired position.
Players with their Initiative tokens placed left to the moved Initiative token do not change position. Other players' Initiative tokens are pushed right to make space for the changed token.
Example: The current initiative order is: 1st Machines, 2nd Pilgrims, 3rd Humans, 4th Trogs
The Trog player plays the Scouts card that lets them change their Initiative. They place their Upcoming Initiative token in the 2nd Initiative place. The Machines do not move, but the Pilgrims and Humans are moved right.
The Upcoming Initiative resembles the following: 1st Machines, 2nd Trogs, 3rd Pilgrims, 4th Humans.
C. Refresh Exhausted Skills
Turn all of your exhausted Skills 90 degrees clockwise to indicate they are ready for use.
 ready |
 exhausted |
2. Draw Cards
Every player draws four cards from their personal Tactics deck. Then, any players with more than seven cards in their hand must place cards in their discard pile until they have seven in their hand.
Note: If you need to draw cards and your deck is empty, shuffle your discard pile to form a new deck.
Card Anatomy
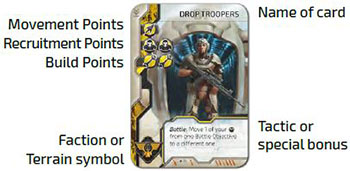
Discard any number of cards from your hand and gain Movement points equal to the number of Movement icons on the discarded cards.
Each Movement point allows you to Move one of your Units from any Region to an adjacent Region. You can Move more than one Unit, and each Unit can be Moved multiple times.
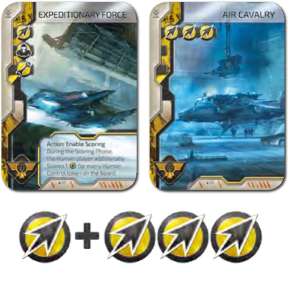
Example: The Human player discards two cards showing a total of four Movement Points. They may Move one Unit four times, four Units one time, or any combination of this.
Important: Players can never Move Units into an enemy's Headquarters Region or any Battle Region.
3. Actions
This is the primary phase of every Round. Place the Action marker in the first position of the Action track. Beginning with the first player on the Initiative track, players take a single Action.
Play then proceeds in the order of the Initiative Track. After every player has taken one Action, move the Action marker to the next space and repeat this until every player has taken a total of three Actions.
The actions available to every player:
- Move
- Recruit
- Build Structure(s) And/or Activate Structure(s)
- Draw Two Tactics Cards, Keep One
- Enable Scoring
Important:
When discarding cards for the Movement, Recruit, or Build Actions, ignore any Tactic Text on them! Some cards provide additional bonuses (Example: Draw 1 Card) when discarding them for Movement, Recruit, or Build Actions. Look for the
.
Draw 1 card from your deck for each symbol
Draw 1 card from your deck regardless of the number of symbols.
Gain 1 VP.
A. Move Action
If your Unit enters a Region with an opponent's Units, a Trog War Party token or a Trog Nest token, the Unit must stop moving and cannot Move again this turn.
However, additional Units may be moved into this Region during the current Move Action! The Movement Action ends when all Movement points are expended, or a player chooses to spend no further Movement points.
At the end of the move action, follow these steps in order:
-

Reveal and resolve any Exploration tokens in Regions with your Units. Exploration tokens provide bonuses to the player who reveals them.
-
For each Region you Moved into with a Trog War Party/Nest token, reveal and resolve that token. If no Trog Units were placed in the Region as a direct result of the effect of the token (when there is no Trog Unit in the Reserve), you must immediately lose one Unit in that Region.
-
If your Units are present in a Region with no Units belonging to other players, immediately gain Control of the Region by placing one of your Control tokens in the Region.
-
Any Regions with enemy Units present receive Battle tokens. Place the lowest numbered Battle tokens that are not already on the board.
These are now considered Battle Regions. If placing multiple Battle tokens, you can choose the order.
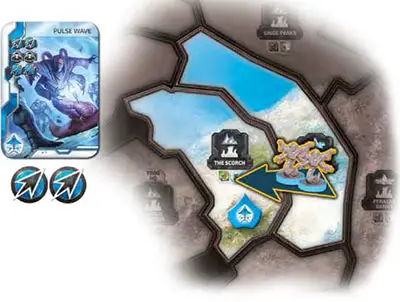
Move Example: The Pilgrims discard a card showing two Movement Points. They spend two points to Move two Units into the Scorch Pegion.
Because there are neither enemy Units nor Trog War Party/Nest tokens, the Pilgrims place their Control token in the Pegion.
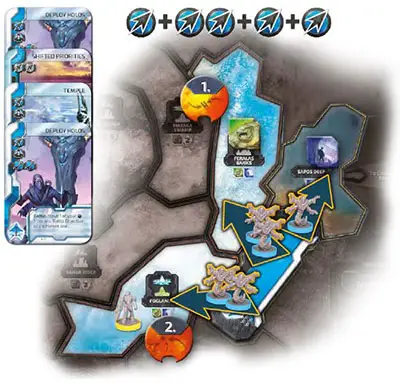
Move Example: The Pilgrims discard four cards showing five Movement Points. They spend two points to Move two of their Units into the Foglands /Pegion with one Human Unit.
They spend two points to Move 2 into the Feralas Banks Pegion with a Trog War Party token. They spend the last point to Move one Unit to Sapos Deep Pegion with an Exploration token in it.
The Exploration token is resolved. Then, the Trog War Party token is resolved. Then, a Battle token is placed in the Pegion. Then, a Battle token is placed in the second Pegion.
Note: Regions in the outer ring otthe planet that are opposite each other are considered adjacent tor any reason. These Regions are marked with an arrowto remind you.
Important Battle Region Rules
- A Region with a Battle token is known as a Battle Region.
- No further Units from any player may enter any Region with a Battle token.
- Place one of the Attacker's Units on top of the Battle token to remember who the Attacker is.
- Structures cannot be Built in a Battle Region.
- Structures cannot be activated in a Battle Region unless explicitly noted.
- The defending player may use a Movement Action on their turn to leave a Battle Region. However, they may only Move Units out of the Region in excess of twice the number of Units belonging to the Attacker.
Example: The Pilgrim player Moves 3 Units into a Region with 8 Human Units. A Battle token is placed in the Region. No other Units may be Moved into this Region. On the Humans' turn, they may Move up to 2 Units out of the Region (as 3 Pilgrim Units 'block' 6 Human Units).
B. Recruit Action
Discard any number of cards from your hand and gain Recruitment points equal to the number of Recruitment icons on the discarded cards. Spend each Recruitment point to add one Unit from your Reserve to your Headquarters Region.
If your Reserve is empty, you cannot add further Units using Recruitment.
Example: The Pilgrim player discards 3 cards with a total of 5 Recruitment points. They may add up to 5 Units to their Headquarters Region.
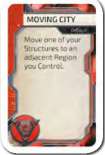
C. Build and/or Activate Structure(s) Action
Discard any number of cards from your hand and gain Building points equal to the number of Building icons on the discarded cards.
Then, spend each Building point to place Structures in Regions you controlled at the beginning of this Action and/or Activate Structures that are already Built, including ones Built this turn!
Each Structure tile depicts the number of Building points required to Build and Activate it. You can Build and activate any number of Structures with a single Action as long as you have sufficient Building points to pay for it.
A Building can only be Activated once per Action, but can be Activated multiple times in a single Round if you take the Build Action again.
Building example: The Pilgrim player discards 2 cards with a total of 5 Building points.
They Build the Harvester and the Power Orb Structures and place their tokens in chosen controlled Regions, spending 4 Building points to do that (2 points per Structure). The last Building point may be spent to Activate one of the Structures.
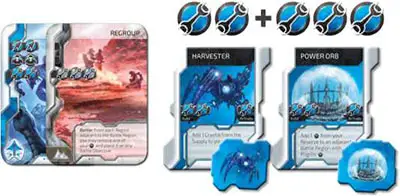
Structure Rules
- Structures cannot be Built in a Region with a Battle token.
- Structures cannot be Built in a Headquarters Region.
- Multiple Structures of the same type cannot be Built in a single Region.
- Structures in a Battle Region cannot be Activated, unless explicitly stated by a card.
- If a player loses Control of a Region with their Structure, the Structure remains, but the owning player cannot Activate it (unless a card indicates otherwise), until they regain Control of the Region.
D. Draw two Tactics Cards, keep one
Draw the top two cards from your deck or from any Terrain Tactic deck. Choose one of them to reshuffle, and add the other to your hand.
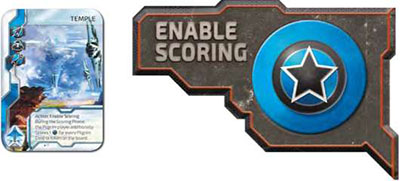
E. Enable Scoring Action
Each player has a single card in their deck that, when played, allows them to take the Enable Scoring Action. When the Enable Scoring Action is taken, the card cannot be used for the Movement, Recruit, or Build Actions.
When you Enable Scoring, place your Enable Scoring token on the Scoring Enabled space on the board as a reminder of who Enabled Scoring.
Scoring can only be enabled once per Round! At the end of the Round, the player who Enabled Scoring will score 1VP for every Region they Control. Then, all players will score 1VP for each Crystal in every Region they Control.
Using Skills:

During your turn, you can use any number of your Skills that have not yet been exhausted. Using a Skill does not count as an Action and each Skill can only be used once per Round, unless explicitly stated by the Skill.
Once a Skill is used, turn it 90 degrees counterclockwise to indicate it has been used. Exhausted Skills are refreshed at the beginning of each Round.
Skills can only be used during the Actions phase unless otherwise indicated by the Skill. Skills must be used before or after an Action, but never during.
4. Battle Resolution
A Battle takes place for each Region with a Battle token. Resolve Battles from the lowest numbered Battle token to the highest.
If for any reason during the Action phase, all Units from one player in a Region with a Battle token are eliminated prior to Battle Resolution, a Battle does not take place. Immediately remove the Battle token and place a Control token for the player with Units remaining.
Battle Resolution follows these steps in order:
- Add one crystal to the battle region
- Place the battling units on battle objectives
- Play tactics cards
- Resolve the battle objectives
- Place the surviving units back in the region. (When winning the Region Control)
- Retreat with units (when losing the region control)
- Remove the battle token
A. Add one crystal to the Battle region
Increase the value of the Crystals in the Battle Region by one.
B. Place the battling units on battle objectives
There are three Battle Objective on the Battle board over which players compete in every Battle.
Firstly, the attacking player places all of their Units from the Region in any or all of the Battle Objective spaces in any distribution.
Secondly, the defending player places all of their Units from the Region in any or all of the Battle Objective spaces in any distribution.
The Pilgrim player is the Attacker and places their Units first. They place 3 Units in the Region Control Objective and 1 Unit on the Capture Prisoners Objective. The defending Human player then places 3 Units on the Attrition Objective.
C. Play tactics cards
Players involved in the Battle alternate playing Tactics cards.
Firstly, the Attacker may play and resolve a single Tactics card from their hand, then discard it. Secondly, the Defender may play and resolve a single Tactics card from their hand, then discard it.
Players repeat this step until neither player wishes to play, or cannot play, additional Tactics cards. Once a player declines to play Tactics cards, they can no longer play Tactics cards in the current Battle. There is no limit to the number of Tactics cards that can be played.
Important: The faction Tactics cards in a player's deck can be played in any Battle. However, Terrain Tactics can only be played if the Terrain of the Battle Region matches that of the Terrain Tactics card.
The outer Regions do not have a Terrain Type, which means Terrain Tactics cannot be played in Battles there. For example Mountain Tactics card can only be played in a Battle in a Region with a Mountain.
Note: When battling the Trogs in games with 2 or 3 players, the first player to the left of the player fighting against the Trogs controls the Trogs in the Battle.
This includes placing Trog Units on Battle Objectives and playing Tactics cards from their hand. Trogs never score Victory Points and cannot win the game.
D. Resolve the battle objectives
Resolve the Battle Objectives from top to bottom:
-
Region Control:
The player with the most Units in this Objective gains Control of the Region and immediately scores 2 Victory Points.
The Region Control remains with that player even if all of their Units are eliminated during the subsequent Objectives. If there are equal numbers of Units from both players in the Region, the Defender wins.
Note: If neither player places Units in the Region Control Objective, the defending player wins the Objective
-
Capture Prisoners:
The player with the most Units present in this Objective immediately takes one enemy Unit involved in the Battle (from any Objective, even from Attrition) and places it in front of them.
This captured Unit cannot be Recruited by its owner as it is not a part of their Reserve.
In case of a tie, neither player captures a Prisoner.
Example: In this Battle, neither player gets a Prisoner, because there is a tie in the Objective.
-
Attrition:
Each player kills one enemy Unit in the Region (from the Region Control, Capture Prisoners, or Attrition Objectives) for each of their own Units placed on this Objective.
Players resolve Attrition simultaneously as it does not affect the resolution of the Battle. Each player Scores 1 Victory Point per enemy Unit killed. Killed Units go back to their owner's Reserve.
Note: In some cases, a third player may use a Skill or Structure to affect a Battle in which they are not the Attacker or Defender. If a player who is not the Attacker or Defender participates in the Attrition Objective, their Units or tokens are always resolved last.
E. Place the surviving units back to the region
(When winning the region control objective)
The surviving Units of the player who won the Region Control Objective are returned from the Objectives to the Region.
F. Retreat with Units
(when Losing The Region Control Objective)
The surviving Units of the player who lost the Region Control Objective must move to an adjacent non- Battle Region under the retreating player's Control. If there are no such Regions, the Units are returned to their owner's Reserve.

Trog exception: In a 2-3 player game, if the Trogs win the Region Control Objective do not place a Control token, but place a Trog Nest token face down instead.
Also, if Trog Units must retreat, remove the Units from the board and place a Trog Nest token face down in any adjacent uncontrolled Region. Trog Nest tokens add more Trog Units to the Region when revealed
G. Remove the battle token
The Battle is resolved now, so the Battle token is not needed anymore.
Repeat these steps until every Battle is resolved.
5. Prisoners
First, players Score 1VP for every Prisoner they have. Then, in Initiative order, each player may lose 2 Victory Points per Prisoner they want to return to their Reserve that is currently being held by another player.
Each player may do this as many times as they wish until all of their Prisoners are reclaimed. You cannot return a Prisoner if you do not have enough VP to pay for their return.
Example: The Pilgrim player wishes to return 7 Pilgrim Prisoner held by the Humans and 7 of the 2 Pilgrim Prisoners held by the Machines. They lose 4 Victory Points and add the two Prisoners to their Reserve. One Prisoner remains with the Machines.
If a player chooses not to regain a Prisoner on the same Round that it is captured, they may choose to do so in this phase of a future Round, paying the normal 2 Victory Points.
6. Scoring
(If Enabled): If Scoring was Enabled, the player who Enabled Scoring scores 1VP for every Region they Control. Then, every player scores 1 VP for every Crystal located in all of the Regions under their Control.
This is the end of the Round. If the game is not over, begin a new Round.
Example: The Pilgrim player Enabled Scoring in a game with the Machines. The Pilgrims control 4 Regions, so they score dVP. Then, both players Score their Crystals.
The Pilgrims have 8 Crystals total in their Regions, so they score 8VP. The Machines have 5 Crystals total in their three Regions, so they score 5VP.
During Scoring, if a player's Score token passes an unresolved Event token on the track, the passed Event token is immediately stacked on top of the next Event token on the track.

If a Player has more than 49 VP, use their Faction 50+ Score token to track their score.
End of the Game
The game ends at the end of the Round in which the Enable Final Scoring event was resolved.

If, during the game, no player's Score token passes an unresolved Event, then the game will last 5 Rounds. However, if an unresolved Event token is passed during Scoring, the game will end sooner.
Scoring is always Enabled in the final Round and cannot be Enabled by players. Mark this using the Final Scoring marker. Players will score VP for Crystals, but nobody will score VP for Region Control.
The player with the most Victory Points is the winner! In the case of a tie, the player with the most Prisoners wins. If still tied, the player who went later in Initiative order wins.
Playing the Trogs
Trogs are only controlled by a player in four player games. Use the following rules when incorporating the Trogs.
During Setup: The fourth player controls the Trogs. Place the Trog Headquarters and 2 Units in the World Caverns Region. Do not place a Trog War Party token in the Region. Determine initial Initiative randomly as usual.
Movement:
If a Trog Unit enters a Region with a Trog War Party/ Nest token, immediately reveal the token and place all Crystals and Trog Units as usual.
These Units are available to the Trog player for use, even during the current Movement Action if there are remaining Movement Points.
Trogs may Move between Regions with Tunnels (both pre-built on the map and Build with the Tunnels Structure) as if they were adjacent.
Battles:
If the Region Control Objective is lost, the Trog player retreats Units like other players. If this is not possible, they are returned to the Reserve instead of placing a Trog Nest token.
Scoring:
During the Scoring phase, Trogs only score half the total points for Crystals located in Regions under their Control, Rounded up.
Trogs score Victory Points the same as other players for Battle Objectives, captured Prisoners, and so forth.
Continue Reading
