The ancient Galactic Realm, ruled from the Core Worlds of the galaxy, is waning.
The barbaric kingdoms that lie beyond the galactic frontier are now amassing their strengths, choosing this pivotal moment to strike at the heart of the fading republic. They seek to establish new empires built upon the ashes of decaying civilizations.
But these outer systems are not yet strong enough to engage the forces of the Core Worlds directly. The young kingdoms must first gnaw at the edges of the crumbling frontier, developing new types of units and shrewder tactics.
They must build up their energy resources to launch magnificent fleets and overwhelming ground forces. Then, when the time is right, they must strike at the galactic core itself, claiming the most exalted planets for themselves. The barbarian kingdom that achieves these goals will carve out the greatest empire in the galaxy.
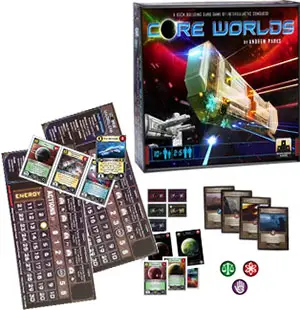
Components
- 1 Round Marker
- 1 Destiny Marker
- 5 Player Boards
- 5 Action Markers
- 5 Energy Markers
- 12 Energy Tokens
- 3 Energy Surge Tokens
- 210 Cards:
Object of the Game
Each player controls a barbarian Star Empire represented by a variety of cards. Throughout the game, players will invade Worlds and draft new Units and Tactics into their Empires.
Each card lists its Empire Points in the upper right corner. The player whose Empire contains the most Empire Points at the end of the game is the winner.
Number of Players

Core Worlds is a deck-building card game for 2 - 5 players. It is strongly recommended that only experienced Core Worlds players play the 5-player game.
Setup
-
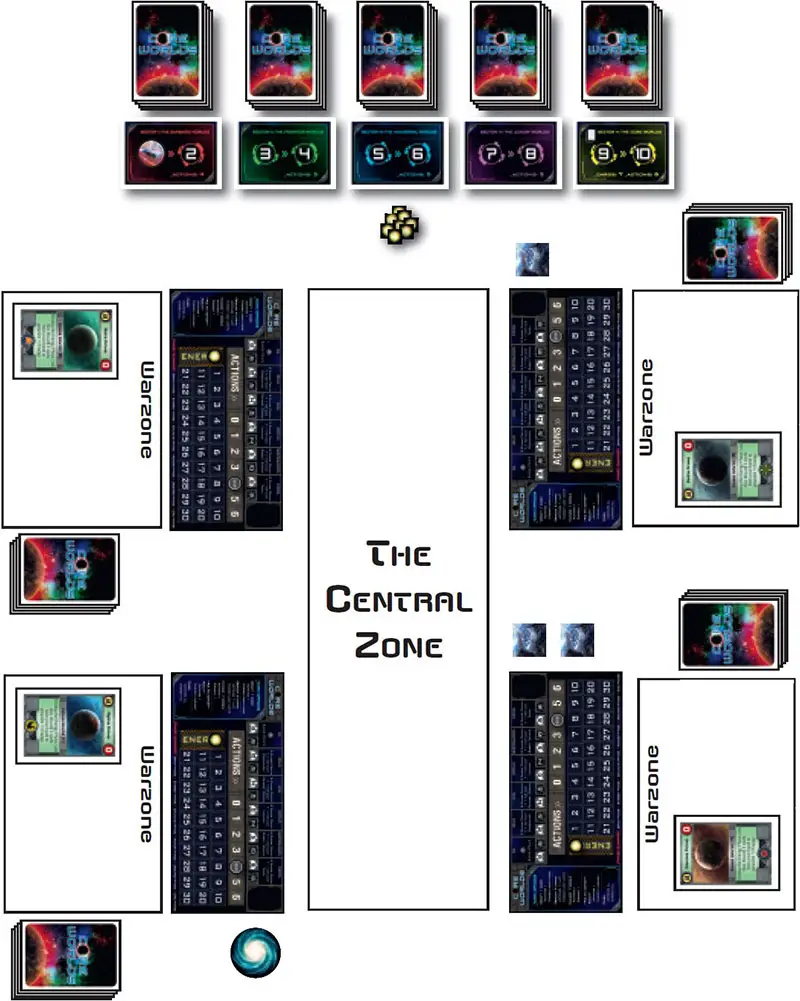
Choose an area off to the side of the main playing area. Lay out the five Sector Cards in numerical order in a horizontal row as shown in the diagram on page 9. Leave a large space in the center of the table for the Central Zone where new Units, Tactics, Prestige cards, and Worlds can be placed during the Galactic Phase.
-
Place the Round Marker on top of the "1" space on the leftmost Sector Card.
-
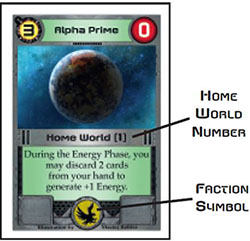
Shuffle the five Worlds designated as "Home Worlds" in their card type (see right), and deal one randomly to each player.
-
Each player places his Home World face up on the table in front of himself. This is the first card in the player's Warzone (see diagram on page 9).
-
Give the Destiny Marker to the player with the lowest Home World Number (see right). The Home World Number has no further effect on the game.
-
Give each player 1 Player Board, 1 Action Marker, and 1 Energy Marker. Each player should place his Player Board on the table in front of himself, above the area designated for his Warzone.
He should then place his Action Marker on the "4" space in the Action section of his Player Board, and place his Energy Marker on top of the word "Energy" in the Energy section of his Player Board (since the players start with 0 Energy).
Return all unused Player Boards, Action Markers, and Energy Markers to the box; they will not be used during this game.
-
Separate the remaining cards into 11 face up stacks. The cards in each stack must contain the same Faction Symbol or Sector Number in the lower center portion of the card.
-
Give each player the stack of cards that share the same Faction Symbol as his Home World. The 16 cards in this stack form the player's Starting Deck.
Each player should shuffle his Starting Deck and place it face down on the table in front of himself, to the right of his Warzone. Note: Do not shuffle the Home Worlds into the Starting Decks; leave them face up as part of the player's Warzone.
Return any unused Home Worlds, as well as their matching Starting Decks, to the box; they will not be used during this game.
-
If this is your first game of Core Worlds, place the stack of cards with the Sector Number of "0" back in the box. Variant Rules for using these "pregame draft cards" are included on page 16.
-
Shuffle each Galactic Deck separately; these cards are marked in the lower center with Sector Numbers I, II, III, IV, or V. Place each deck face down above its corresponding Sector Card (see diagram on opposite page).
-
Place the Energy Tokens in a pile beside the Central Zone.
-
When playing with 3 or 4 players, certain players will receive the Destiny Marker more frequently than others. The large Energy Surge Tokens are used to compensate the other players.
The player who starts the game with the Destiny Marker is considered Player 1, with Player 2 to his left and so on clockwise around the table. In a 3-player game, give one Energy Surge Token to Player 2 and one Energy Surge Token to Player 3.
In a 4-player game, give one Energy Surge Token to Player 3 and two Energy Surge Tokens to Player 4. When playing with 2 or 5 players, return the Energy Surge Tokens to the box; they will not be needed.
Game Play
A game of Core Worlds takes place over the course of 10 Rounds. Each Round, the players participate together during six phases:
- Draw Phase - Each player draws cards from the top of his draw deck until he has 6 cards in his hand.
- Energy Phase - Each player's Worlds generate Energy.
- Galactic Phase - The Central Zone is filled with new cards from the current Galactic Deck.
- Action Phase - Each player takes turns performing Actions until all Action Points are spent.
- Discard Phase - Each player discards his hand onto his discard pile (one card may be retained).
- End Phase - The Round Marker is moved forward and the Destiny Marker is passed to the left.
At the end of the tenth Round, the player with the most Empire Points wins the game!
Set Up Diagram for 4 Players:
What follows is an in-depth look at each of the game's Phases.
1. Draw Phase
During the Draw Phase, each player draws cards from the top of his draw deck until he has 6 cards in his hand. If a player chose to retain one card during the previous Round's Discard Phase, then the player only draws 5 cards.
Each player may pick up and view his hand, but should keep the contents of his hand hidden from the other players. The number of cards in each player's hand is public information and cannot be hidden.
If a player ever needs to draw a card when his draw deck is empty, he immediately shuffles his discard pile and places it face down beside his Warzone to form a new draw deck.
Each player draws one additional card during the last two Rounds of the game, as indicated on the corresponding Sector Card (Sector V: The Core Worlds).
2. Energy Phase
Each player counts the total amount of Energy generated by all of his Worlds. The amount of Energy generated by each World is the number shown in the Energy Symbol in the card's upper left corner.
Each player slides his Energy Marker one space forward on his Player Board for each point of Energy generated by his Worlds. Note that all unused Energy from the previous Round should have been removed during the Discard Phase; players cannot accumulate Energy from one Round to the next.

After each player's Worlds have generated Energy, each player, starting with the player holding the Destiny Marker and continuing clockwise around the table, must now declare whether he is boosting his Energy with one or more Energy Surges and/or through Energy Exploration (see below).
A player may also use any other special abilities that he may have acquired that take place during the Energy Phase. After a player has decided whether or not to perform these optional activities during the Energy Phase, he cannot change his mind once his opponents have made their decisions.
Energy Surges: Each player with an Energy Surge Tactic card in his hand may now generate addi- tional Energy if he chooses. As detailed on the card, a player playing an Energy Surge generates +2 Energy if at least one opposing player's Worlds generate more Energy than his own.
Otherwise, the Energy Surge generates +1 Energy. A player is permitted to play multiple Energy Surges during the same Round if he chooses. Note: Unlike Energy Surge cards, Energy Surge Tokens are used during the Action Phase, not during the Energy Phase (see page 14 for more information).
Energy Exploration: Each Home World's card text provides an additional way to generate extra Energy, which can be especially useful early in the game. During the Energy Phase, each player may choose to discard any 2 cards from his hand to generate a total of +1 Energy.
A note on card text: Card text always states explicitly when and how it can be used. Unless the card states otherwise, its text can only be used once during each situation for which it qualifies.
For example, a player can only use the card text on his Home World once during each Energy Phase to generate a total of +1 Energy. If any card text should ever contradict the rules of the game, the card text takes precedence.
3. Galactic Phase
During the Galactic Phase, perform the following three steps in order. At the start of the first Round, there will be no cards in the Central Zone so the first two steps can be skipped.
-
Remove Cards with Energy: Remove all cards from the Central Zone that have an Energy Token on them. Return the Energy Tokens to their pile beside the Central Zone, and place the cards face down on top of their respective Galactic Decks.
-
Place Energy Tokens: Place one Energy Token on each remaining card in the Central Zone. If a player later drafts a Unit or Tactic with an Energy Token on it, or successfully Invades a World with an Energy Token on it, that player slides his Energy Marker one space forward on his Player Board and then returns the Energy Token to its pile beside the Central Zone.
-
Add New Cards: Draw cards from the top of the current Galactic Deck (the deck in the same Sector as the Round Marker) and place each drawn card face up in the Central Zone within view of all the players.
Keep drawing cards until the total number of cards in the Central Zone matches the number on the following chart:

After the number of cards in the Central Zone matches the number on the chart above, check to see if the number of Worlds in the Central Zone is at least equal to the number of players in the game.
If not, keep drawing and placing cards from the current Galactic Deck until the number of Worlds is equal to the number of players. Then, check to see if the total number of non-World cards (Units, Tactics, Prestige) is at least equal to the number of players in the game.
If not, keep drawing and placing cards until the number of non-Worlds is equal to the number of players.
For example, during a 4 player game, after adding new cards, there are 3 Worlds and 7 non-Worlds in the Central Zone. More cards must be drawn from the current Galactic Deck until there are at least 4 Worlds (i.e. the number of players).
If the numbers had been reversed (7 Worlds and 3 non-Worlds), more cards would be drawn until there were 4 non-Worlds in the Central Zone.
4. Action Phase
During the Action Phase, each player, starting with the player holding the Destiny Marker and continuing clockwise around the table, performs one turn at a time.
During a player's turn, he may perform one of the turn options listed below (and summarized on each player's Player Board). These turn options require a player to spend one or more of his Action Points by sliding his Action Marker one or more spaces to the left on his Player Board.
Players continue to cycle around the table taking turns until all of their Action Points have been spent. Each player is therefore likely to take several turns during the same Action Phase.
What follows is a list of options that a player can perform during one of his turns. A player can only perform one of these options during each of his turns. A player may, however, repeat the same option during multiple turns.
-
Draft 1 Unit / Tactic / Prestige
A player may draft one Unit (yellow), Tactic (blue), or Prestige card (red) from the Central Zone and add it to his Empire.
To do so, he must first spend 1 Action Point and then pay an amount of Energy equal to the card's Draft Cost (the number in the gold circle on the card's central horizontal bar).
Once drafted, a Unit or Tactic is placed face up in the player's discard pile; drafted Units and Tactics are never placed immediately in the player's hand, deck, or Warzone.
A player is always permitted to view the cards in his own discard pile, but is not permitted to search the cards in his opponents' discard piles.
Unlike Units and Tactics, drafted Prestige cards (red) are immediately placed face up in the player's Warzone. Prestige cards are never added to a player's hand, deck, or discard pile.
A player cannot draft more than one card during his turn to act, although he may continue to draft cards during subsequent turns if his opponents have left any in the Central Zone. Remember that Worlds are never drafted; they must be invaded instead.
-
Deploy X Units
A player may deploy any number of Units (yellow) from his hand to his Warzone during the same turn. For each Unit he deploys, he must spend 1 Action Point. If he does not have enough Action Points, he must stop deploying Units.
The player must also spend enough Energy to pay the Deploy Cost for each Unit (the number in the upper left corner of the card). After spending 1 Action Point for each Unit and paying the Deploy Cost for each Unit, he places the Units face up in his Warzone.
For example, a player wishing to deploy 3 Galactic Grunts to his Warzone would need to spend 3 Action Points (1 for each Unit), and then spend a total of 3 Energy (since each Galactic Grunt has a Deploy Cost of 1).
Even though a player can deploy multiple Units during each of his turns, each Unit is considered to be deployed sequentially. Thus, the order that the player deploys his Units may be important.
For example, the Dreadnought Cruiser, which normally costs 7 Energy to deploy, has a -1 Deploy Cost for every Starfighter in the player's Warzone.
If the player is planning to deploy 2 Starfighters during the same turn that he is deploying the Dreadnought Cruiser, he should choose to play the 2 Starfighters first so that the Cruiser will have a reduced cost.
Each Unit in the game has a specific Card Type (Hero, Infantry, Robot, Vehicle, Starfighter, Star Cruiser, or Capital Ship). Players should be mindful of this when using the abilities on their cards.
In the example above, the player had previously deployed a Battle Cruiser to his Warzone. Because the Battle Cruiser's card type is "Star Cruiser" and not "Starfighter", it does not reduce the cost of the Dreadnought Cruiser.
-
Invade 1 World
A player may launch one Invasion during his turn. The player must first spend 1 Action Point and then pay 1 Energy. He then targets one World in the Central Zone and announces the planet's Fleet Strength and Ground Strength.
He must then discard enough Units from his Warzone whose combined Fleet Strengths equal or exceed the planet's Fleet Strength and whose combined Ground Strengths equal or exceed the planet's Ground Strength.
The Units used to invade the planet must be discarded from the Warzone face up into the player's discard pile. Units in the player's hand have no effect on an Invasion.
If the player has discarded enough Units to equal or exceed the planet's Fleet Strength and Ground Strength, then he conquers that World by placing it immediately in his Warzone beside his other Worlds. A player never places a World in his hand, deck, or discard pile.
A player is allowed to announce an Invasion even if the cards in his Warzone do not immediately have sufficient strength to overcome the planet's defenses.
However, the player may then activate any card text on the Units in his Warzone and play any Tactic cards from his hand that specifically say they can be used "during an Invasion". (Remember that the card text on Units in a player's hand has no effect on gameplay; a Unit must be in the player's Warzone for its text to be applicable).
If for some reason the player still does not have sufficient strength to conquer the World, he does not have to discard any Units, but he must end his turn immediately; his spent Action Point and Energy are not refunded.

Playing a Tactic card from one's hand during an Invasion does not require a player to spend an Action Point. Tactic cards only require a player to spend an Action Point if they are played "as an Action".
Most card text on Units includes some type of cost, such as discarding cards from one's hand or paying Energy. Similarly, most Tactic cards have an Energy cost listed in their upper left corner. A player can only use these abilities if he can afford to pay for them.
Remember that, unless specified on the card, each ability can only be used once per situation, even if the player can afford to pay for the abilities multiple times.
For example, the Hercules Bomber is a Starfighter with a Fleet Strength of 1. It possesses card text that allows you to pay 1 Energy to add +2 Ground Strength to the Bomber.
However, you can only use this ability once per Invasion (on each of your Bombers) because it does not say it can be used multiple times. Conversely, the Heavy Repeating Assault Unit says that you can pay "up to 2 Energy" to add +2 Ground Strength to the Unit for each Energy spent.
In this case, the player can choose to use the ability once or twice because the card specifies that you can pay up to 2 Energy.
Colonizing Worlds: After a player conquers a World, he may choose to stack one "Galactic Grunts" card or "Snub Fighter" card that was used in that Invasion beneath the conquered World instead of discarding it.
That removes the Grunt or Snub from the player's deck for the rest of the game (thus increasing the chance that the player will draw newly drafted cards in the future).
Note: A card used to colonize a World is still considered part of the player's Empire, but it is not considered part of the player's Warzone.
-
Use One "as An Action" Ability
Some Units and Tactics have card text that can be used "as an Action". This card text takes up the player's turn and forces him to spend 1 Action Point. The player must also pay any Energy Costs specified on the Unit or Tactic.
-
Pass
A player may always choose to pass on his turn, and must do so if he has run out of Action Points. A player will also be forced to pass if he runs out of Energy unless he can use an "As an Action" ability that does not have an Energy cost.
A player who chooses to pass must spend all of his remaining Action Points. Once a player passes, he cannot act again during the same Round.
Energy Surge tokens: Players with Energy Surge Tokens can use each of them once per game to generate extra Energy. A player with an Energy Surge Token can use it at any time during one of his turns to generate +2 Energy.
This does not cost an Action Point or take up the player's turn. After an Energy Surge Token is used in this manner, it is permanently removed from the game.
6. Discard Phase
After every player has passed during the Action Phase, the Discard Phase begins.
Each player must discard the remaining cards in his hand face up onto his discard pile, although the player may choose to retain one (and only one) card in his hand for the next Round.
If he retains one card, he will only draw 5 cards during the next Round's Draw Phase. After discarding their hands, the players must also deplete their remaining Energy by placing their Energy Markers on top of the word "Energy" in the Energy section of their Player Boards.
Note: The players do not discard the cards in their Warzones during the Discard Phase. A player may keep Units in his Warzone for as many Rounds as he likes before using them to conquer a World.
7. End Phase
During the End Phase, the Round Marker advances to the next circle on the Sector Cards. If this circle is in the next Sector, the players should check to see if the number of Action Points they can spend each Round has now increased.
Also, when the Round Marker is in a new Sector, the players will draw cards from the next Galactic Deck to add to the Central Zone during the following Round's Galactic Phase.
After the Round Marker has been moved, each player should set his Action Marker to the appropri-ate number of Action Points (as indicated on the current Sector Card). The player with the Destiny Marker then passes it to the player on his left, and the next Round begins.
The Core Worlds
When the Round Marker moves onto the fifth Sector Card (Round 9), each player is given the option to immediately shuffle his discard pile into his draw deck. This gives the players a reasonable chance to draw the Units and Tactics that they recently drafted from Sector 4.
The Card Deck Icon (see right) on the fifth Sector Card serves as a reminder that the players have this option as they enter the final Sector. The fifth Sector Card also indicates that players should draw up to 7 cards instead of 6 during the final two Rounds of the game.
There are no new Units or Tactics available in the final Galactic Deck. There are only the 6 Core Worlds and the 6 Prestige cards.
Because the number of Empire Points provided by many of the Core Worlds varies based upon the types of cards the players have drafted into their Empires, the players should pay attention throughout the game to the Core Worlds reference area on their Player Boards. This section details each Core World's Empire Point value, as well as its Fleet and Ground Strengths.
On the tenth and final Round of the game, all remaining cards from the final Galactic Deck must enter the Central Zone, even if this means that the number of cards in the center exceeds the normal amount there (as indicated on page 11). This gives every player the opportunity to vie for the Core World of their choice.
End of the Game
At the end of the 10th Round, the players tally their total Empire Points to determine the winner.
Bonus Empire Points
Players should first record all Empire Point bonuses that are granted for having certain cards in their Warzones at the end of the game (for example, the "World Ship" and "Queen Alais"), or for having certain types of cards in their Empires at the end of the game (for example, the bonuses listed on the Core Worlds).
These cards feature a "+" next to their Empire Point values, and specify their bonus as part of their card text. Any Infantry and Starfighters used to colonize conquered Worlds are still considered part of the players' Empires for these purposes, as are any cards in the players' hands, decks, discard piles, and Warzones.
When calculating these bonuses at the end of the game, players should use the Energy Markers on their Player Boards to keep a running tally of their Empire Point bonuses. This number should only signify the bonus points themselves, not the base Empire Points printed on the cards.
For example, the Core World "Zeus" has a base value of 2 Empire Points, and also provides 1 bonus point for every Starfighter in the player's Empire at the end of the game.
If a player has 6 Starfighters in his Empire, he should record these 6 Empire Points separately by sliding his Energy Marker forward 6 spaces on his Player Board. He will later count Zeus's base value of 2 Empire Points when he tallies up his entire deck (see below).
Printed Empire Points
Each player should now gather all the cards in his Empire, including the cards in his hand, deck, discard pile, and Warzone, and place them in one stack. The player should then total the printed Empire Points on all of the cards in this stack.
Victory
Each player adds the Empire Points printed on his cards to the number of bonus Empire Points he recorded on his Player Board. The player with the highest total Empire Points wins the game!
In case of a tie, the tied Empire whose Worlds generate the most Energy wins. If still tied, the tied Empire with the most Worlds wins. If still tied, those players share control of the galaxy!
Continue Reading


