
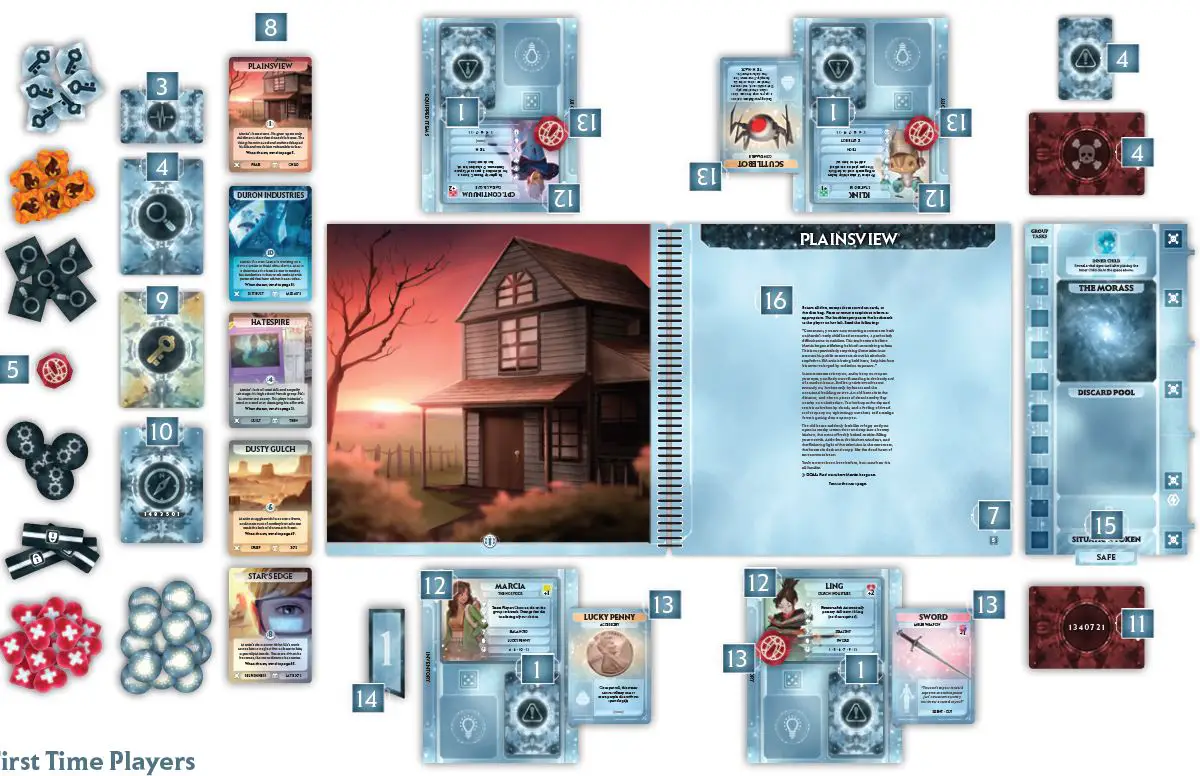
Components

- 1 Rulebook
- 1 Adventure Book
- 1 Sideboard
- 1 Dice Bag
- 38 Dice
- 60 Item Cards
- 11 Totem Cards
- 6 Environment Cards
- 22 Avatar Cards
- 32 Hostile Cards
- 13 I.D. Entity Cards
- 55 Clue Cards
- 11 Comazone Cards
- 10 Vital Signs Cards
- 24 Status Cards
- 4 Rules Reference Cards
- 4 Player Sheets
- 22 Avatar Standees
- 1 Inner Child Standee
- 1 Adult Martin Standee
- 4 Magnacycle Standees
- 30 Hostile Standees
- 13 I.D. Entity Standees
- 1 Situation Token
- 4 Door Tokens
- 4 Suspicious Tokens
- 4 Objective Tokens
- 1 Bookmark Token
- 30 Clarity Tokens
- 6 Insight Tokens
- 5 Fire Tokens
- 5 Search Tokens
- 20 Life Force Tokens
- 1 Campaign Sticker Sheet
- 20 Standee Stands
Object of the Game
Comanauts is a cooperative adventure game for 2-4 players. In it, players take on the role of comanauts, explorers who enter the irradiated dreamscape of Dr. Martin Strobal's subconscious, in an attempt to rouse him from his coma and save the world.
In each Comanauts game session, players will try to find and defeat the Prime Inner Demon (I.D). Entity that is currently troubling Dr. Strobal. To find the Prime I.D., players enter comazones, stable, dreamlike locations within Dr. Strobal's mind, and try to find the unconscious doctor's inner child.
Successful interactions with the inner child will provide clues to the Prime I.D.'s secret location. Pay close attention to these clues! The comanauts will leap from comazone to comazone until they can find the Prime I.D., but if they waste too much time in the wrong comazones, Dr. Strobal's subconscious will turn against them and begin to wear them down!
Comanauts can be played as individual sessions or as a campaign game, meaning each game session tells only one part of a multipart narrative. Each game session focuses on just one of the I.D.s that is currently troubling Dr. Strobal.
By playing multiple game sessions and defeating more I.D.s, players unlock more of the story, and can eventually win the campaign.
Setup
To set up a game of Comanauts, follow these steps:
-
Give each player a player sheet and the default status card listed on that player sheet. Place that status card face down in the spot provided on the player sheet.
-
Put all of the dice in the dice bag.
-
Form the vital signs deck by doing the following:
Shuffle the Flatline card with 2 Stable vital signs cards and set them face down next to the play area.
Shuffle the rest of the vital signs cards and place them face down on top of those 3 cards.
-
Form separate piles of the item, hostile, I.D. Entity, avatar, totem and status cards in an easy to reach area. Note: These cards do not need to be shuffled.
-
Separate the different types of tokens into piles and place them in an easy to reach area.
-
Look through the I.D. Entity cards and remove 2 copies of the Fear I.D. Entity. Note: If playing as a campaign, also remove any I.D. Entities with stickers on them. Then shuffle the I.D. Entities and reveal 5. Return the rest of the I.D. Entities to the box.
-
Collect the comazone cards for each of the revealed I.D. Entities. Randomly choose one to be the starting comazone. Turn to the page in the Adventure Book listed on that card.
-
Place all of the collected comazone cards in a face up row alongside the Adventure Book. This row of cards is called: The Nexus. Return the rest of the comazone cards to the box.
-
Collect the totem cards that correspond to each comazone in the Nexus and form a totem deck. Return the rest of the totem cards to the box.
-
Set aside the I.D. Entity associated with the starting comazone. Shuffle the rest of the previously revealed I.D. Entities and draw 1. DO NOT LOOK AT IT!
This will be the Prime I.D. Entity for this adventure. Locate the 7 digit clue identification code on the back of that I.D. Entity card, collect and shuffle the 5 clue cards that match that code, and place them face down on top of the Prime I.D. Entity.
-
Place all remaining I.D. Entities, including the "starting" one, in a separate facedown I.D. stack.
-
Deal 2 random avatar cards face down onto the avatar slot of each player sheet. DO NOT LOOK AT THEM!
Each player looks through the remaining avatar cards, chooses a starting avatar, places that avatar on top of the face down ones on her player sheet and places 3
 tokens on it. (Add additional tokens if your starting avatar has a bonus). After all players have chosen a starting avatar, return the remaining avatar cards to the box.
 -
Each player collects her starting avatar standee and any starting items listed on her starting avatar card and equips them. If the starting comazone is listed as a suspicious comazone on her starting avatar card, place a suspicious token on the avatar card.
-
Choose a player to be the first bookkeeper. Give that player the bookmark token. The bookkeeper takes the first turn and play proceeds clockwise around the table.
-
Place the sideboard next to the Adventure Book and slot the situation token into its slot "safe" side up.
-
Read the introduction section of the starting comazone in the Adventure Book.
Page Setup
Each page of the Adventure Book will give players some instructions on how to set it up. Below are some general instructions on how to read a game map and how to generate an encounter.
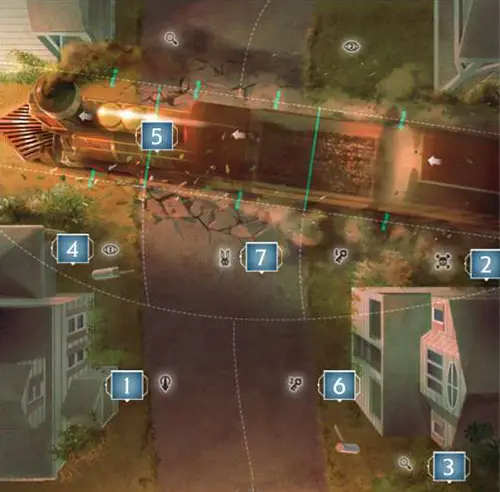
- Avatar Start Space: Avatar standees come into play anywhere on this space.
- Enemy Start Space: When encountering hostiles or I.D. entities, their standees come into play anywhere on this space.
- Search Spot: See the Search Spot section below for details.
- Point of Interest: See the Point of Interest section below for details.
- Colored Lines: To move across a solid colored line, a player must use a die matching the color of the line to move her avatar.
- Insight Spot: See the Insight Spot section below for details.
- Rabbit Hole: When the translucent blue inner child die is drawn from the dice bag, the inner child standee is placed on this symbol. When a player's avatar moves onto a space with the inner child, go to the page's
 entry.
 - Objective: See the Objective section below for details.
Search Spot 
Spaces containing a  symbol will have 1 or more tokens placed in them as instructed by the page's setup section.
When a player's avatar is in a space with a token, she may search with that avatar to gain any 1 specific item listed on the matching entry. Upon successfully searching, discard 1 token from the space.
Point of Interest  , Insight Spot
  and Objective
The Adventure Book will instruct players when to put a  token on an insight spot or a
  token on an objective.
  symbols are points of interest that can be explored, tokens offer opportunities to interact with the world, and tokens represent objectives to achieve.
On a player's turn, when her avatar is on an space or a space with a or token, pause that player's turn and read the page's matching , or entry. Then, unless directed otherwise, resume play.
Most symbols can only be explored once. symbols that include a  symbol can be explored multiple times.
Leaving a Page
If the Adventure Book directs you to leave a page or turn to a new page, unless stated otherwise, finish the current player's turn before leaving, including Check Threat.
When leaving a page, remove any remaining tokens and enemy standees on that page from play and move all avatar standees (including those in the Morass) to their cards.
Generating an Encounter
When players encounter enemies, collect the hostile and/or I.D. Entity cards indicated and their matching standees. Place the collected standees on the  space. Shuffle the collected cards and deal them face up to the enemy slots along the sideboard.
If there are multiple spaces, divide the enemies up among those spaces as evenly as possible. If there are already cards in the slots, add the new cards to any empty slots. Flip the situation token to "hostile".
Encountering an I.D. Entity
When the Adventure Book directs players to encounter an I.D. Entity it will sometimes provide a 7-digit I.D. identification code. Look for the correct I.D. Entity card to put into play by matching this code to one of the cards in the I.D. Stack.
If no match is found, the players will encounter the Prime I.D. Entity! Take the Prime I.D. Entity (under the clue cards) and put it into play.
Encountering the Prime I.D. Entity
When adding the Prime I.D. Entity to play, place a number of tokens on its card equal to the number of players. When the Prime I.D. would be defeated, instead remove 1 token from its card. When it has no on its card, it is then defeated and removed from play.
Note: Do not place tokens on an I.D. that isn't the Prime I.D.
If the players defeat the Prime I.D. Entity, they win the game.
Player Turn
On a player's turn, she does the following steps in order
- Draw Dice
- Gain Clarity
- Place Threat
- Place Inner Child
- Perform Actions
- Discard Dice
- Check Threat
1. Draw Dice
Draw 5 dice out of the dice bag and place them in front of you. If there are fewer than 5 dice in the bag, draw the remaining dice from the bag, move all of the dice in the discard pool back to the bag, and then complete your draw.
2. Gain Clarity
 Roll your white (clarity) dice to gain
  . Each die may be rolled separately, or multiple may be rolled together as 1 roll (to achieve a higher roll result).
After each roll, if the roll result was equal to or higher than your current number of tokens, gain 1 token and then discard that die (or dice), by moving it to the discard pool. There is no limit to the number of tokens a player can have.
3. Place Threat

Place all of your black dice with white pips (common threat dice) on the threat track, starting at the top.
If your avatar has a suspicious token on its card, also place any black dice with red pips (suspicious threat dice) on the threat track in the same way. If your avatar does not have a suspicious token on its card, return the suspicious threat dice to the bag.
If the situation is "hostile" and there are more threat dice on the threat track than enemies in play, return a previously defeated hostile from that page to the map on any symbol, and add its card to any empty slot. A hostile that was removed from play without being defeated will not return during this step.
Note: The term "threat die" refers to any black die, either common or suspicious.
4. Place Inner Child

There is 1 transparent blue die in the bag. If this die was drawn, roll it and place it on the inner child slot on the sideboard and then reveal a vital signs card. If the current map page has a symbol on it, place the inner child standee on that space.
5. Perform Actions
All of the remaining colored (attribute) dice in front of you may be utilized to perform actions. To perform an action, you must spend a die of the appropriate color.
To spend a die: Roll that die, resolve its effect, then discard it. Just as with clarity dice, each die may be rolled separately, or multiple of the same color (or purple) may be rolled together as 1 roll.
On your turn, you may perform as many actions as you like, as many times as you like, so long as you still have the appropriate dice available to spend. The actions that can be performed with each die type are as follows.
Any Color Attribute Dice
- Focus
- Move across dotted lines or move across solid lines matching the color of the die being rolled.
- Reserve (a die)
- Encourage (a player)
- Equip/Trade
- Perform a skill test of the matching color
- Contribute to a group task of the matching color
-

Red Attribute Dice
Melee attack, strength-based tasks.
-

Green Attribute Dice
Ranged attack, agility-based tasks.
-

Yellow Attribute Dice
Search, smarts-based tasks.
-

Blue Attribute Dice
Resistance-based tasks.
-

Purple Attribute Dice
A purple die can be spent or discarded in place of any other attribute die, but it is always purple.
Focus
Spend 2 attribute dice of any color to take an attribute die of your choice from the discard pool.
Move
Spend any color attribute die to move your avatar across a dotted line to any adjacent space OR to move within its current space. Place your avatar anywhere within the destination space.
An avatar can only be moved across a solid colored line if you use that color of die or a purple die to move.
When moving out of a space containing an enemy, dotted white lines count as solid green lines.
Although an avatar can be placed anywhere within a space, it cannot be moved again within that space unless you spend another die.
Note: Solid white lines cannot be crossed.
Reserve
Instead of spending a die, you may reserve it. A reserved die is stored on your player sheet. There is no need to roll a die you are reserving. A reserved die can be used to defend against damage or can be used on one of your future turns. You cannot reserve a die if there is already one on your player sheet.
Encourage
To encourage a player, do one of the following:
Store 1 of your dice on that player's sheet, just as you would with your own sheet when reserving a die. If that player already has a die stored, discard the previously stored die.
Discard any colored attribute die and give that player 1 of your
.
Equip/trade
Spend any colored attribute die to move any number of items between your inventory and your equipment slots. You can also give items to and receive items from any one player whose avatar is in the same space as yours. An item's combat bonus and effect are only active when it is equipped.
Skill Test
Sometimes there is a skill test available to perform. Skill tests have a color and a target difficulty number.
To perform a skill test you must spend any number of the appropriate color of dice (or purple). If your roll result meets or exceeds that target number, resolve the success effect of that skill test.
Otherwise, resolve the fail effect. You automatically fail a skill test if you are required to make one but do not have the appropriate dice. Unless otherwise directed, a skill test can only be performed once.
There are 3 places that players can look to see if there are skill tests available:
Adventure Book Special Rules: Sometimes the Adventure Book will instruct players to make a skill test.
Status Cards: Many status cards have a skill test that must be passed to remove them.
Environment Cards: Some environment cards require players to make a skill test to interact with the environment.
Group Task
Sometimes there is a group task available to perform. Group tasks are similar to skill tests, except multiple players can contribute on their turns by rolling the appropriate colored dice and placing them on the group task track.
When the total value of dice on the group task track equals or exceeds the task's target difficulty number, resolve the task's success effect. Unlike skill tests, group tasks cannot fail.
Players can contribute to group tasks regardless of where their avatar is on the map, unless directed otherwise by the Adventure Book. Note: Die bonuses are never applied to dice placed on the group task track.
Melee Attack
To perform a melee attack, choose a target enemy in the same space as the attacking avatar. Roll any number of red dice. If the roll result meets or exceeds the target enemy's defense value, that enemy is defeated.
When an enemy is defeated, remove it from play by removing its standee from the map and discarding its card. Set both to the side of the page as hostiles (though not I.D.s) may return during the Place Threat step.
The player that defeated it can loot it by looking through the item deck and gaining the item listed on the loot section of the enemy's card. When gaining an item, you can immediately equip it for free, place it in your inventory, or give it to another player whose avatar is on the same space (and must equip it or place it in her inventory).
If, at any time, there are no more cards on the threat track, turn the situation token to "safe".
Ranged Attack
A ranged attack works just like a melee attack except a ranged attack uses green dice, and the attack may also target enemies that are on adjacent spaces.
An avatar equipped with a ranged weapon can target an enemy even farther away up to a number of spaces equal to the range listed on the weapon's card. The target must be within clear sight of the attacker to be considered in range.
Clear Sight
When determining if an attacker has clear sight to a target, draw an imaginary line from any portion of the attacker's base to any portion of the defender's base using their current placement. If that line would cross any solid white lines, there is no clear sight and the ranged attack cannot be made.
Attacking the Prime I.D. Entity
When the Prime I.D. Entity would be defeated by an attack, instead remove 1 from its card. When it has no on its card, it is then defeated and removed from play.
Search
A player whose avatar is on a space with 1 or more tokens can perform a search action by rolling 1 or more yellow dice. On a result of 4 or higher the search is successful. Discard 1 token, look through the item deck and take any 1 item listed in the entry of the current page of the Adventure Book.
When gaining an item, you can immediately equip it for free, place it in your inventory, or give it to another player whose avatar is on the same space (and must equip it or place it in her inventory).
 Item Cards |
Equipment Slots

Each player has 5 equipment slots: Head, Body, Hand, Hand/Accessory and Accessory. A player can only equip items if she has slots available.
Any item that cannot be equipped must be carried in that player's inventory or discarded. A player can carry two unequipped items in her inventory.

Example: Ransom is carrying a revolver (1 hand) in one hand slot, and a radio (accessory) in the hand/ accessory slot. Later, he finds a rifle (2 hands). If he wants to equip the rifle, he must move both the revolver and the radio to his inventory.
Note: Since the radio is an accessory, he could move it to his accessory slot if it's available, and it would still be considered equipped.
Bonuses and Using Purple Dice
Various cards and effects can give bonuses to a player's die rolls. If a bonus specifies a color, it applies to each die of that color that is rolled, e.g. avatar die bonuses. If a bonus specifies melee attack  , ranged attack
  or defense
  , it applies only to those types of rolls,
e.g. weapon combat bonuses. If there is an effect that changes or multiplies a die's result, apply that before any die bonuses.
Bonuses are never applied to dice placed on the group task track.
Purple dice may be used in place of any other attribute die. However, purple dice do not benefit from any bonuses except for those granted specifically to purple dice.

6. Discard Dice
Discard all of your remaining dice.
7. Check Threat
If the situation (token) is "hostile"... and the number of dice on the threat track equals or exceeds the number of enemies in play, the enemies take a turn. If the situation is "safe"... and there are 4 or more dice on the threat track, resolve the list below in order.
- Resolve the
 effect on the current page of the Adventure Book.
 - If the effect results in enemies coming into play, flip the situation token to "hostile" and immediately take an enemy turn.
- Discard all dice from the threat track.
- Refresh the dice bag. (Return all of the dice in the discard pool to the dice bag).
After the Check Threat step and a possible enemy turn, continue with the next player's turn (the player to the left of the current player).
Enemy Turn
To resolve an enemy turn, do the following steps in order:
- Enemy Activation
- Discard Threat and Refresh Dice
1. Enemy Activation
Starting with the enemy in the top enemy slot of the sideboard and continuing downward, activate each enemy 1 at a time until all enemies in play have been activated once. To activate an enemy do the following in order:
Roll
Take a die off the threat track and roll it. Match the number result to an action on the enemy's card. That action will determine the enemy's speed, range and strength for the activation as well as any special rules that apply during the action.
Move 
Move the enemy by following these steps:
-
If the enemy is sharing a space with an avatar, do not move it.
-
Otherwise, move the enemy toward the nearest avatar (the avatar that would require the least amount of movement to reach) until it enters that avatar's space, or until it has moved a number of spaces equal to its speed, whichever comes first.
(If multiple avatars are equally close, the current bookkeeper decides which of those avatars the enemy will move toward). Enemies can freely move across solid colored lines (but not solid white lines).
Target 
Determine which avatar the enemy will target for an attack by following these steps:
-
If there are no avatars within the enemy's range and clear sight, it will not attack.
-
Otherwise it will target the closest avatar (measured by number of spaces away) within range. (If multiple avatars are equally close, the current bookkeeper decides which of those avatars the enemy will target).
Note: Some attacks will specify a target within range. A target is in range if it is within that attack's listed range and clear sight.
Attack 
The enemy now attacks its target. To resolve that attack, follow these steps.
-
If the target avatar's player has no die stored or chooses not to defend, remove 1 from the target avatar.
-
If the target avatar's player has a die stored, that player may choose to defend against the attack by rolling the stored die.
If the roll is less than the strength of the attack, discard the die and remove 1 V from the target avatar.
If the roll is equal to or higher than the strength of the attack, then the attack has been blocked. Return that die to the player's sheet.
-
If the avatar lost its last
, it ceases to exist in this comazone.
After activating an enemy, discard the threat die used to determine its action and activate the next enemy.
Note: Attacks from other sources, e.g. the Adventure Book, are resolved in the same way, except a threat die is not discarded.
2. Discard Threat and Refresh Dice
Once all enemies have been activated once, discard any threat dice remaining on the threat track, return all dice in the discard pool to the dice bag and continue to the next player's turn.
The Morass
When an avatar loses all of its , it ceases to exist within that comazone. Do the following in order:
-
Reveal a vital signs card.
-
Remove that avatar from play (i.e. the map).
-
Discard its avatar card, all unused dice, any starting items listed on that card and any active status effects or suspicious tokens on that avatar. Keep your
. -
Reveal the next avatar card on that player's mat, and add its standee to the Morass section of the sideboard.
-
Add 3
tokens to the new avatar's card. (Add additional tokens if the avatar has a bonus). -
Retrieve any starting items listed on that avatar's card from the item deck, if possible, and equip those items. (If equipping an item to a slot that is already filled, the previously equipped item must be moved to inventory. Discard item cards in excess of the two card inventory limit).
If any player's third avatar is sent to the Morass or if all avatars are in the Morass at the same time, the players lose.
At the beginning of a player's turn, if her avatar is in the Morass, it returns to play. Place the avatar on any space on the map that has an avatar already on it. If the current comazone is listed as a suspicious comazone on the avatar card, place a suspicious token on the avatar card.
Avatar Cards |
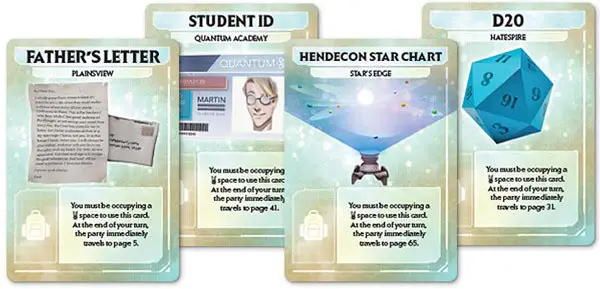
The Nexus
Sometimes the Adventure Book will send players to the Nexus. The Nexus is the row of comazone cards that was set out next to the Adventure Book during setup.
When players are sent to the Nexus, each player places her avatar on its card then reviews the comazones in the Nexus. Choose one comazone to visit next and turn to the page in the Adventure Book indicated on that comazone card. Place or remove suspicious tokens as appropriate, based on the avatar cards' suspicious comazones.
 Comazone cards |
When choosing a comazone, remember that your goal is to locate the Prime I.D. by playing through to the end of its home comazone.
There are 3 ways to narrow down your search for the correct comazone/Prime I.D. Entity:
- Hints from the story text of the clue cards you've revealed
- The correct comazone is never the comazone you started in
- Any I.D. Entity you've already encountered during this play is not the Prime I.D. Entity.
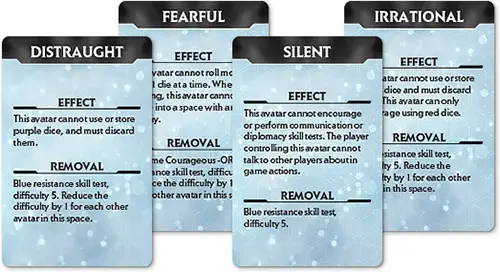
Status / Suspicious
Avatars can be affected by a variety of conditions such as fearful, silent or distraught. When an avatar "becomes" something it means to place the corresponding status card near that avatar's card, e.g. when an avatar becomes trapped, place a trapped status card near that avatar's card.
The status card's effect immediately applies to the affected avatar. An avatar cannot have two of the same status card at the same time.
To remove a status card, follow the instructions on the card under "removal". If using a skill test to remove a status card, the skill test can be performed by the affected avatar or any other avatar in its space. There is no penalty for failing this test and it may be attempted multiple times.
Each player sheet also has a default status card. Turn this card face up when instructed to activate it. When removing the default status card, turn it face down but keep it on your player sheet.
Suspicious avatars, i.e. avatars that don't seem to belong in a comazone, are marked by a suspicious token. Suspicious tokens cannot be removed by effects that remove status cards. Do not place a second suspicious token on an avatar card.
Vital Signs
Reveal a card from the vital signs deck each time:
- An avatar is sent to the Morass
- A player draws the inner child die
- The Adventure Book directs you to
Stable vital signs cards have no effect. Critical vital signs cards may have an effect if there is a  entry on the current Adventure Book page. If a second (or more) Critical vital signs card is revealed on any page, it has no effect. If the Flatline card is revealed, Martin has slipped beyond saving and the players lose the game.
 Adventure Book |
Clarity
Each avatar has a clarity ability listed on its card. To use this ability, a player must spend the number of tokens listed on the card (usually 3). The ability's text will describe the timing and effects on the game. If timing is not specified, the ability must be used during that avatar's Perform Actions step.
Re-rolling
can also be used to re-roll a die result. When a player rolls an attribute die she can spend 1 token to re-roll that die. A die can be re-rolled as many times as the player is willing to spend her tokens.
Insight
Players gather tokens by exploring the comazones and interacting with the environments. Each time the Adventure Book instructs you to gain a token, place it in the insight token slot on the sideboard. Each time the players have collectively earned 3 tokens, discard them and reveal a clue card.
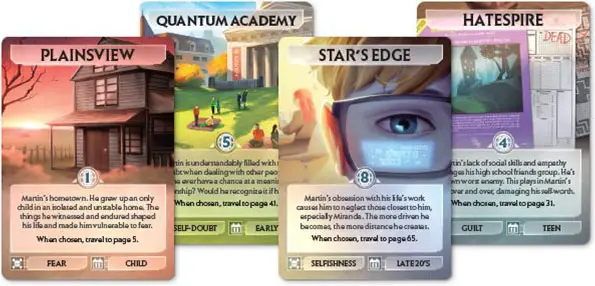
Clue Cards
When the players reveal a clue card, either from collecting the required tokens, or when the Adventure Book instructs them to, the current player draws the top clue card and reads it out loud to the other players.
Each clue hints at the emotions and memories associated with the Prime I.D. Entity that is holding Martin within his mind and preventing him from waking from his coma.
The players should use this moment to discuss the clues and other evidence that can guide them to the correct comazone to defeat the Prime I.D. Entity and bring Martin closer to recovery.
Totems
When players gain a clue card, they will also be given a choice of totem cards. Players can use totems to travel between comazones and should pick the totem they feel will grant them access to the comazone where Martin is being held.
Like any other item card, totems must be equipped in order to be used.
Ambiguous Effects
Sometimes players will be instructed to do something for which there are multiple valid choices, such as deciding which avatar an enemy will move toward. In all cases where there are multiple valid choices, the current bookkeeper chooses.
End of the Game
If the Flatline vital signs card is revealed, if any player's third avatar is sent to the Morass or if all avatars are in the Morass at the same time, the players lose.
The players win if they discover and defeat the Prime I.D. Entity.
Continue Reading

